Page 789 of 2771
![NISSAN TIIDA 2008 Service Repair Manual BRC-24
< SERVICE INFORMATION >[ABS]
TROUBLE DIAGNOSIS FOR SELF-DIAGNOSTIC ITEMS
TROUBLE DIAGNOSIS FOR SELF-DIAGNOSTIC ITEMS
Wheel Sensor SystemINFOID:0000000001703839
INSPECTION PROCEDURE
1.CONNECTOR](/manual-img/5/57399/w960_57399-788.png "NISSAN TIIDA 2008 Service Repair Manual BRC-24
< SERVICE INFORMATION >[ABS]
TROUBLE DIAGNOSIS FOR SELF-DIAGNOSTIC ITEMS
TROUBLE DIAGNOSIS FOR SELF-DIAGNOSTIC ITEMS
Wheel Sensor SystemINFOID:0000000001703839
INSPECTION PROCEDURE
1.CONNECTOR")
BRC-24
< SERVICE INFORMATION >[ABS]
TROUBLE DIAGNOSIS FOR SELF-DIAGNOSTIC ITEMS
TROUBLE DIAGNOSIS FOR SELF-DIAGNOSTIC ITEMS
Wheel Sensor SystemINFOID:0000000001703839
INSPECTION PROCEDURE
1.CONNECTOR INSPECTION
Disconnect the ABS actuator and electric unit (control unit) connector E33 and wheel sensor of malfunctioning
code.
Check the terminals for deformation, disconnection, looseness or damage.
OK or NG
OK >> GO TO 2.
NG >> Repair or replace as necessary.
2.CHECK WHEEL SENSOR OUTPUT SIGNAL
1. Connect ABS active wheel sensor tester (J-45741) to wheel sensor using appropriate adapter.
2. Turn on the ABS active wheel sensor tester power switch.
NOTE:
The green POWER indicator should illuminate. If the POWER indicator does not illuminate, replace the
battery in the ABS active wheel sensor tester before proceeding.
3. Spin the wheel of the vehicle by hand and observe the red SENSOR indicator on the ABS active wheel
sensor tester. The red SENSOR indicator should flash on and off to indicate an output signal.
NOTE:
If the red SENSOR indicator illuminates but does not flash, reverse the polarity of the tester leads and
retest.
Does the ABS active wheel sensor tester detect a signal?
YES >> GO TO 3.
NO >> Replace the wheel sensor. Refer to BRC-32, "
Removal and Installation".
3.CHECK TIRES
Check for inflation pressure, wear and size of each tire. Refer to WT-25
.
Are tire pressure and size correct and is tire wear within specifications?
YES >> GO TO 4.
NO >> Adjust tire pressure or replace tire(s).
4.CHECK WHEEL BEARINGS
Check wheel bearing axial end play. Refer to FAX-5, "
On-Vehicle Inspection and Service" or RAX-4, "On-Vehi-
cle Inspection and Service".
OK or NG
OK >> GO TO 5.
NG >> Repair or replace as necessary. Refer to FA X - 5 , "
Removal and Installation" or RAX-4, "Removal
and Installation".
5.CHECK WIRING HARNESS FOR SHORT CIRCUIT
1. Disconnect ABS actuator and electric unit (control unit) connec-
tor and wheel sensor connector of malfunction code No.
2. Check continuity between wheel sensor harness connector ter-
minals and ground.
OK or NG
OK >> GO TO 6.
NG >> Repair the circuit.
6.CHECK WIRING HARNESS FOR OPEN CIRCUITContinuity should not exist.
WFIA0498E
Page 794 of 2771
![NISSAN TIIDA 2008 Service Repair Manual TROUBLE DIAGNOSES FOR SYMPTOMS
BRC-29
< SERVICE INFORMATION >[ABS]
C
D
E
G
H
I
J
K
L
MA
B
BRC
N
O
P
TROUBLE DIAGNOSES FOR SYMPTOMS
ABS Works FrequentlyINFOID:0000000001703845
1.CHECK WARNING LAMP ACTI](/manual-img/5/57399/w960_57399-793.png "NISSAN TIIDA 2008 Service Repair Manual TROUBLE DIAGNOSES FOR SYMPTOMS
BRC-29
< SERVICE INFORMATION >[ABS]
C
D
E
G
H
I
J
K
L
MA
B
BRC
N
O
P
TROUBLE DIAGNOSES FOR SYMPTOMS
ABS Works FrequentlyINFOID:0000000001703845
1.CHECK WARNING LAMP ACTI")
TROUBLE DIAGNOSES FOR SYMPTOMS
BRC-29
< SERVICE INFORMATION >[ABS]
C
D
E
G
H
I
J
K
L
MA
B
BRC
N
O
P
TROUBLE DIAGNOSES FOR SYMPTOMS
ABS Works FrequentlyINFOID:0000000001703845
1.CHECK WARNING LAMP ACTIVATION
Make sure warning lamp remains off while driving.
OK or NG
OK >> GO TO 2.
NG >> Carry out self-diagnosis. Refer to BRC-18, "
CONSULT-III Function (ABS)".
2.CHECK WHEEL SENSORS
Check the following.
• Wheel sensor mounting for looseness
• Wheel sensors for physical damage
• Wheel sensor connectors for terminal damage or loose connections
• Sensor rotor and mount for physical damage
OK or NG
OK >> GO TO 3.
NG >> Repair or replace as necessary.
3.CHECK WHEEL BEARINGS
Check wheel bearing axial end play. Refer to FA X - 5 , "
On-Vehicle Inspection and Service" or RAX-4, "On-Vehi-
cle Inspection and Service".
OK or NG
OK >> GO TO 4.
NG >> Repair as necessary.
4.CHECK BRAKE FLUID PRESSURE
Check brake fluid pressure distribution.
Refer to BRC-16, "
Basic Inspection".
Is brake fluid pressure distribution normal?
YES >> Inspection End.
NO >> Perform Basic Inspection. Refer to BRC-16, "
Basic Inspection".
Unexpected Pedal ActionINFOID:0000000001703846
1.CHECK WARNING LAMP ACTIVATION
Make sure warning lamp remains off while driving.
OK or NG
OK >> GO TO 2.
NG >> Carry out self-diagnosis. Refer to BRC-18, "
CONSULT-III Function (ABS)".
2.CHECK BRAKE PEDAL STROKE
Check brake pedal stroke.
Is brake pedal stroke excessive?
YES >> Perform Basic Inspection. Refer to BRC-16, "Basic
Inspection".
NO >> GO TO 3.
3.CHECK CONNECTOR AND BRAKING PERFORMANCE
1. Disable ABS by disconnecting ABS actuator and electric unit (control unit) connector.
SBR540A
Page 1854 of 2771
PRECAUTIONS
GI-3
< SERVICE INFORMATION >
C
D
E
F
G
H
I
J
K
L
MB
GI
N
O
P
General PrecautionINFOID:0000000001702424
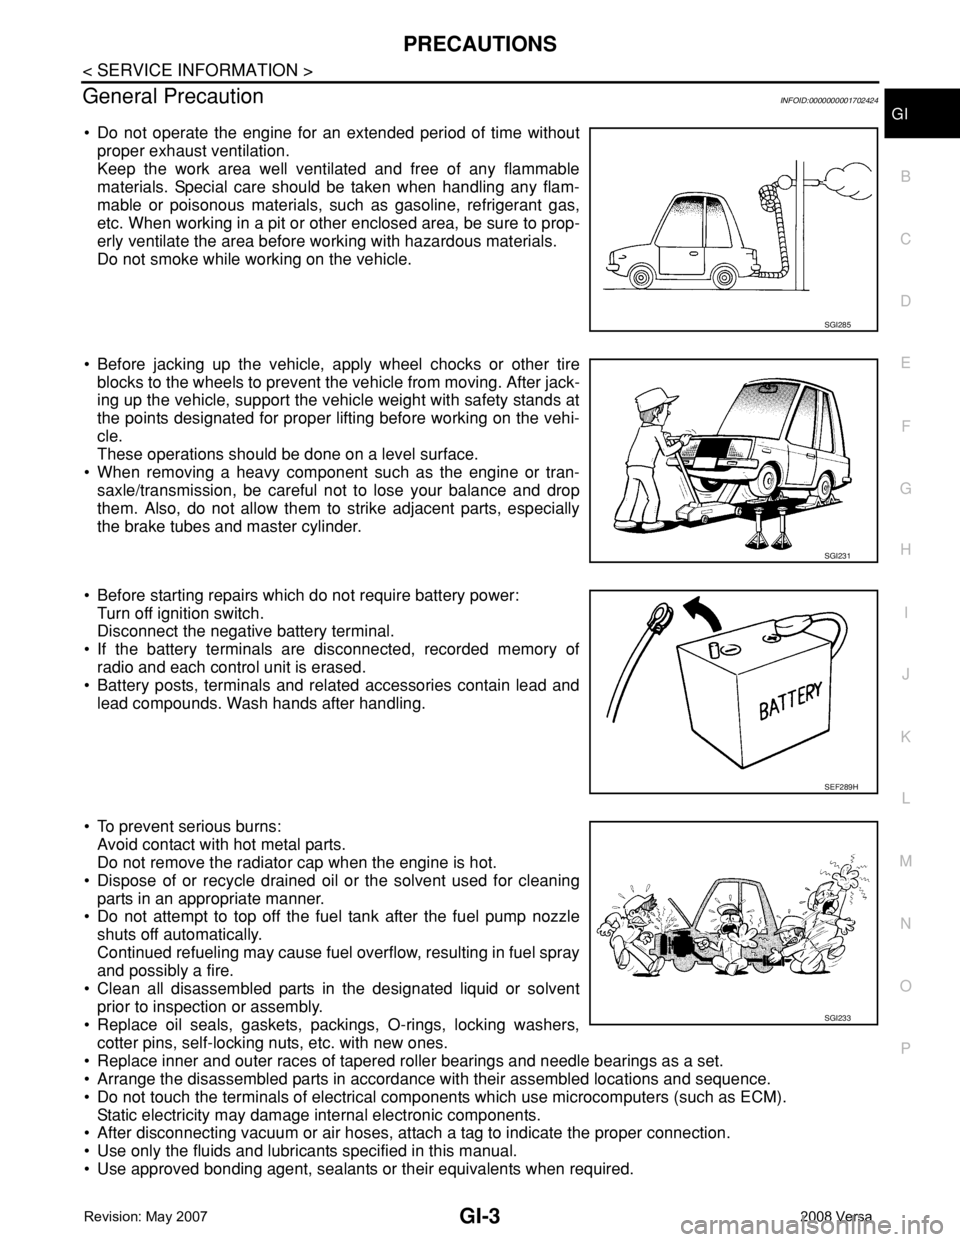
• Do not operate the engine for an extended period of time without
proper exhaust ventilation.
Keep the work area well ventilated and free of any flammable
materials. Special care should be taken when handling any flam-
mable or poisonous materials, such as gasoline, refrigerant gas,
etc. When working in a pit or other enclosed area, be sure to prop-
erly ventilate the area before working with hazardous materials.
Do not smoke while working on the vehicle.
• Before jacking up the vehicle, apply wheel chocks or other tire
blocks to the wheels to prevent the vehicle from moving. After jack-
ing up the vehicle, support the vehicle weight with safety stands at
the points designated for proper lifting before working on the vehi-
cle.
These operations should be done on a level surface.
• When removing a heavy component such as the engine or tran-
saxle/transmission, be careful not to lose your balance and drop
them. Also, do not allow them to strike adjacent parts, especially
the brake tubes and master cylinder.
• Before starting repairs which do not require battery power:
Turn off ignition switch.
Disconnect the negative battery terminal.
• If the battery terminals are disconnected, recorded memory of
radio and each control unit is erased.
• Battery posts, terminals and related accessories contain lead and
lead compounds. Wash hands after handling.
• To prevent serious burns:
Avoid contact with hot metal parts.
Do not remove the radiator cap when the engine is hot.
• Dispose of or recycle drained oil or the solvent used for cleaning
parts in an appropriate manner.
• Do not attempt to top off the fuel tank after the fuel pump nozzle
shuts off automatically.
Continued refueling may cause fuel overflow, resulting in fuel spray
and possibly a fire.
• Clean all disassembled parts in the designated liquid or solvent
prior to inspection or assembly.
• Replace oil seals, gaskets, packings, O-rings, locking washers,
cotter pins, self-locking nuts, etc. with new ones.
• Replace inner and outer races of tapered roller bearings and needle bearings as a set.
• Arrange the disassembled parts in accordance with their assembled locations and sequence.
• Do not touch the terminals of electrical components which use microcomputers (such as ECM).
Static electricity may damage internal electronic components.
• After disconnecting vacuum or air hoses, attach a tag to indicate the proper connection.
• Use only the fluids and lubricants specified in this manual.
• Use approved bonding agent, sealants or their equivalents when required.
SGI285
SGI231
SEF289H
SGI233
Page 2285 of 2771
CHASSIS AND BODY MAINTENANCE
MA-25
< SERVICE INFORMATION >
C
D
E
F
G
H
I
J
K
MA
B
MA
N
O
P
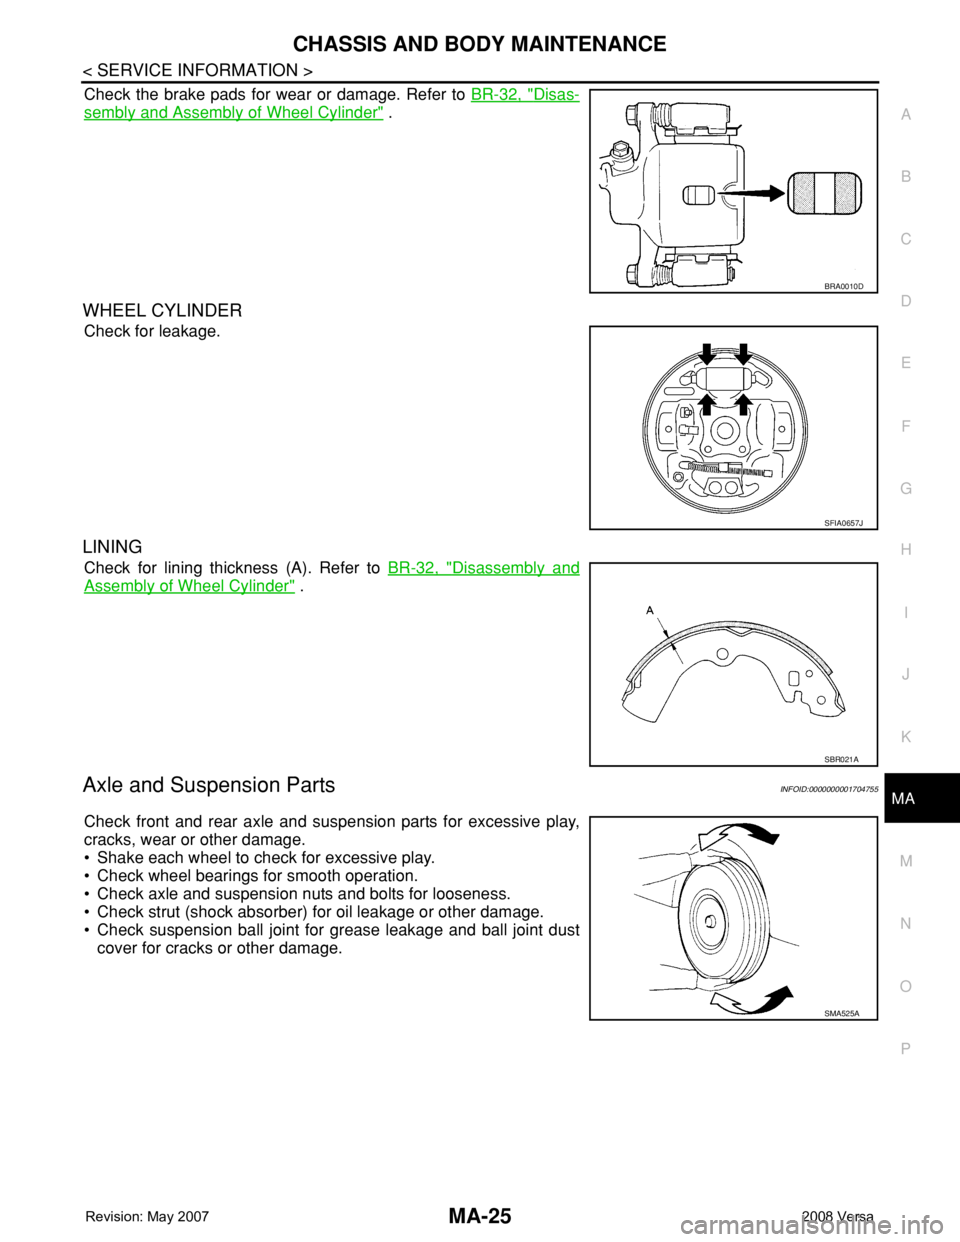
Check the brake pads for wear or damage. Refer to BR-32, "Disas-
sembly and Assembly of Wheel Cylinder" .
WHEEL CYLINDER
Check for leakage.
LINING
Check for lining thickness (A). Refer to BR-32, "Disassembly and
Assembly of Wheel Cylinder" .
Axle and Suspension PartsINFOID:0000000001704755
Check front and rear axle and suspension parts for excessive play,
cracks, wear or other damage.
• Shake each wheel to check for excessive play.
• Check wheel bearings for smooth operation.
• Check axle and suspension nuts and bolts for looseness.
• Check strut (shock absorber) for oil leakage or other damage.
• Check suspension ball joint for grease leakage and ball joint dust
cover for cracks or other damage.
BRA0010D
SFIA0657J
SBR021A
SMA525A