Page 2545 of 2771
TROUBLE DIAGNOSIS
RF-15
< FUNCTION DIAGNOSIS >
C
D
E
F
G
H
J
K
L
MA
B
RF
N
O
P
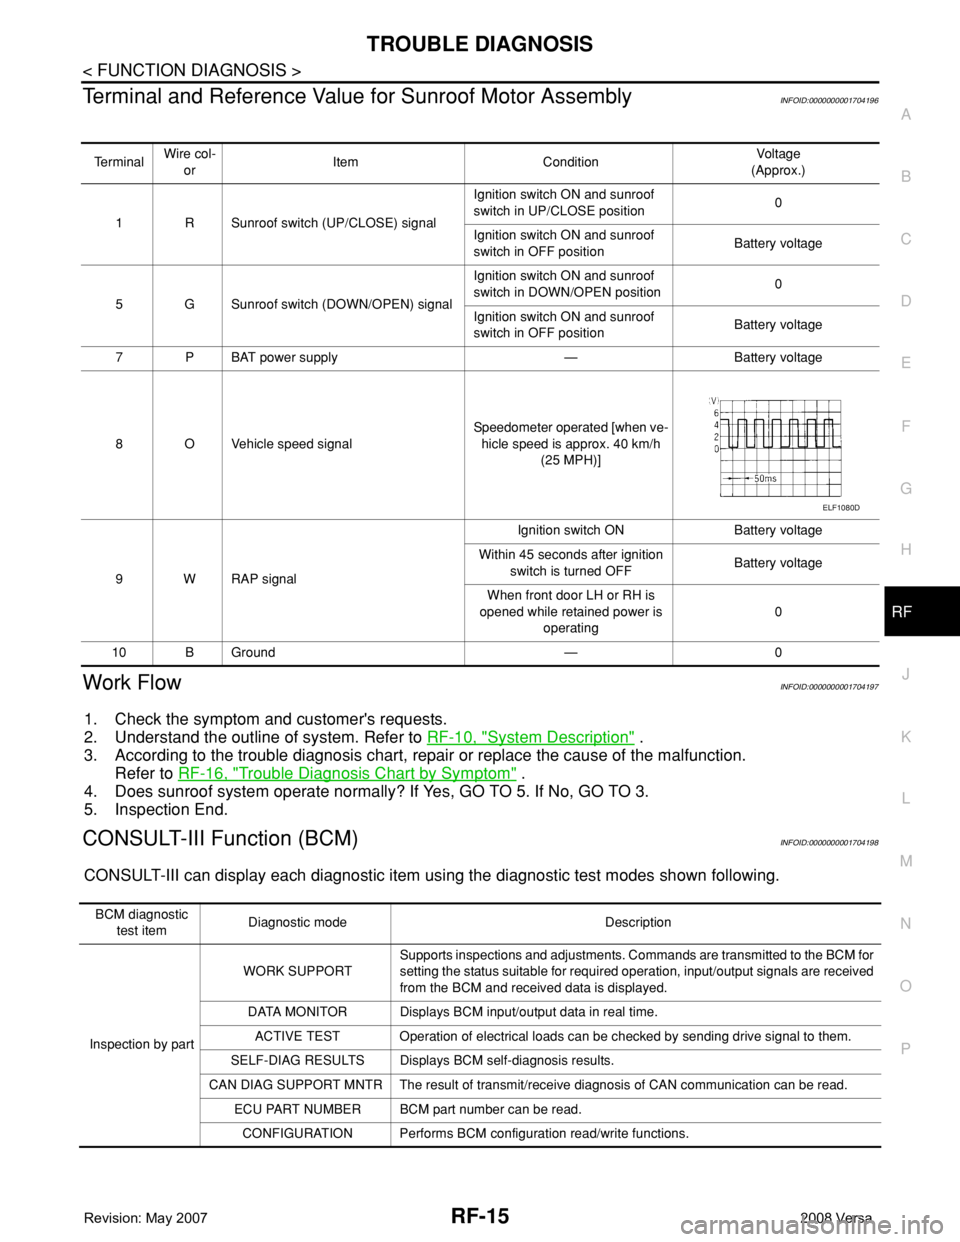
Terminal and Reference Value for Sunroof Motor AssemblyINFOID:0000000001704196
Work FlowINFOID:0000000001704197
1. Check the symptom and customer's requests.
2. Understand the outline of system. Refer to RF-10, "
System Description" .
3. According to the trouble diagnosis chart, repair or replace the cause of the malfunction.
Refer to RF-16, "
Trouble Diagnosis Chart by Symptom" .
4. Does sunroof system operate normally? If Yes, GO TO 5. If No, GO TO 3.
5. Inspection End.
CONSULT-III Function (BCM)INFOID:0000000001704198
CONSULT-III can display each diagnostic item using the diagnostic test modes shown following.
Te r m i n a lWire col-
orItem ConditionVoltag e
(Approx.)
1 R Sunroof switch (UP/CLOSE) signalIgnition switch ON and sunroof
switch in UP/CLOSE position0
Ignition switch ON and sunroof
switch in OFF positionBattery voltage
5 G Sunroof switch (DOWN/OPEN) signalIgnition switch ON and sunroof
switch in DOWN/OPEN position0
Ignition switch ON and sunroof
switch in OFF positionBattery voltage
7PBAT power supply — Battery voltage
8 O Vehicle speed signalSpeedometer operated [when ve-
hicle speed is approx. 40 km/h
(25 MPH)]
9 W RAP signalIgnition switch ON Battery voltage
Within 45 seconds after ignition
switch is turned OFFBattery voltage
When front door LH or RH is
opened while retained power is
operating0
10 B Ground — 0
ELF1080D
BCM diagnostic
test itemDiagnostic mode Description
Inspection by partWORK SUPPORTSupports inspections and adjustments. Commands are transmitted to the BCM for
setting the status suitable for required operation, input/output signals are received
from the BCM and received data is displayed.
DATA MONITOR Displays BCM input/output data in real time.
ACTIVE TEST Operation of electrical loads can be checked by sending drive signal to them.
SELF-DIAG RESULTS Displays BCM self-diagnosis results.
CAN DIAG SUPPORT MNTR The result of transmit/receive diagnosis of CAN communication can be read.
ECU PART NUMBER BCM part number can be read.
CONFIGURATION Performs BCM configuration read/write functions.
Page 2546 of 2771
RF-16
< FUNCTION DIAGNOSIS >
TROUBLE DIAGNOSIS
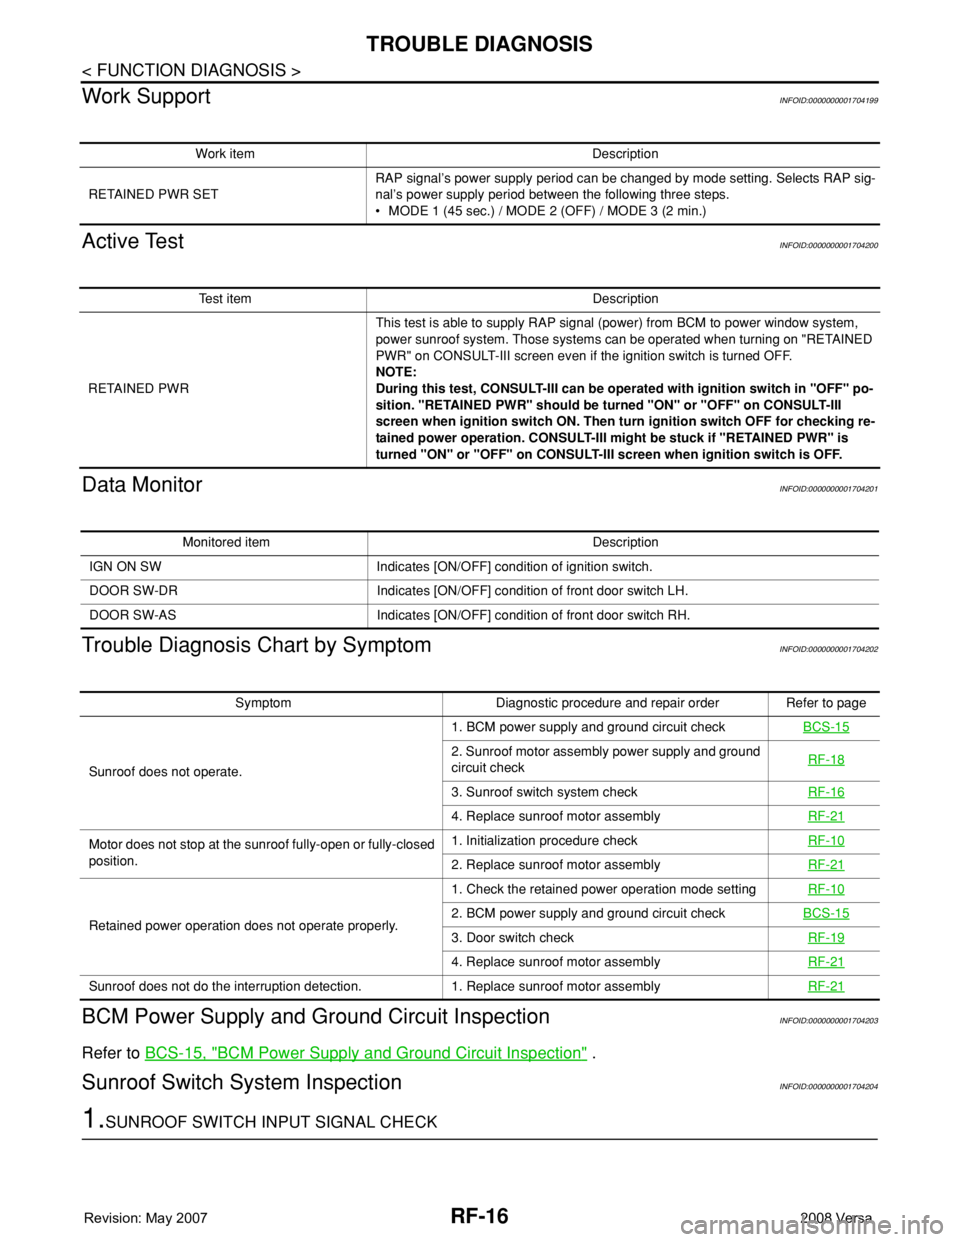
Work Support
INFOID:0000000001704199
Active TestINFOID:0000000001704200
Data MonitorINFOID:0000000001704201
Trouble Diagnosis Chart by SymptomINFOID:0000000001704202
BCM Power Supply and Ground Circuit InspectionINFOID:0000000001704203
Refer to BCS-15, "BCM Power Supply and Ground Circuit Inspection" .
Sunroof Switch System InspectionINFOID:0000000001704204
1.SUNROOF SWITCH INPUT SIGNAL CHECK
Work item Description
RETAINED PWR SETRAP signal’s power supply period can be changed by mode setting. Selects RAP sig-
nal’s power supply period between the following three steps.
• MODE 1 (45 sec.) / MODE 2 (OFF) / MODE 3 (2 min.)
Test item Description
RETAINED PWRThis test is able to supply RAP signal (power) from BCM to power window system,
power sunroof system. Those systems can be operated when turning on "RETAINED
PWR" on CONSULT-III screen even if the ignition switch is turned OFF.
NOTE:
During this test, CONSULT-III can be operated with ignition switch in "OFF" po-
sition. "RETAINED PWR" should be turned "ON" or "OFF" on CONSULT-III
screen when ignition switch ON. Then turn ignition switch OFF for checking re-
tained power operation. CONSULT-III might be stuck if "RETAINED PWR" is
turned "ON" or "OFF" on CONSULT-III screen when ignition switch is OFF.
Monitored item Description
IGN ON SW Indicates [ON/OFF] condition of ignition switch.
DOOR SW-DR Indicates [ON/OFF] condition of front door switch LH.
DOOR SW-AS Indicates [ON/OFF] condition of front door switch RH.
Symptom Diagnostic procedure and repair order Refer to page
Sunroof does not operate.1. BCM power supply and ground circuit checkBCS-15
2. Sunroof motor assembly power supply and ground
circuit checkRF-18
3. Sunroof switch system checkRF-16
4. Replace sunroof motor assemblyRF-21
Motor does not stop at the sunroof fully-open or fully-closed
position.1. Initialization procedure checkRF-10
2. Replace sunroof motor assemblyRF-21
Retained power operation does not operate properly.1. Check the retained power operation mode settingRF-102. BCM power supply and ground circuit checkBCS-15
3. Door switch checkRF-19
4. Replace sunroof motor assemblyRF-21
Sunroof does not do the interruption detection. 1. Replace sunroof motor assemblyRF-21
Page 2549 of 2771
TROUBLE DIAGNOSIS
RF-19
< FUNCTION DIAGNOSIS >
C
D
E
F
G
H
J
K
L
MA
B
RF
N
O
P
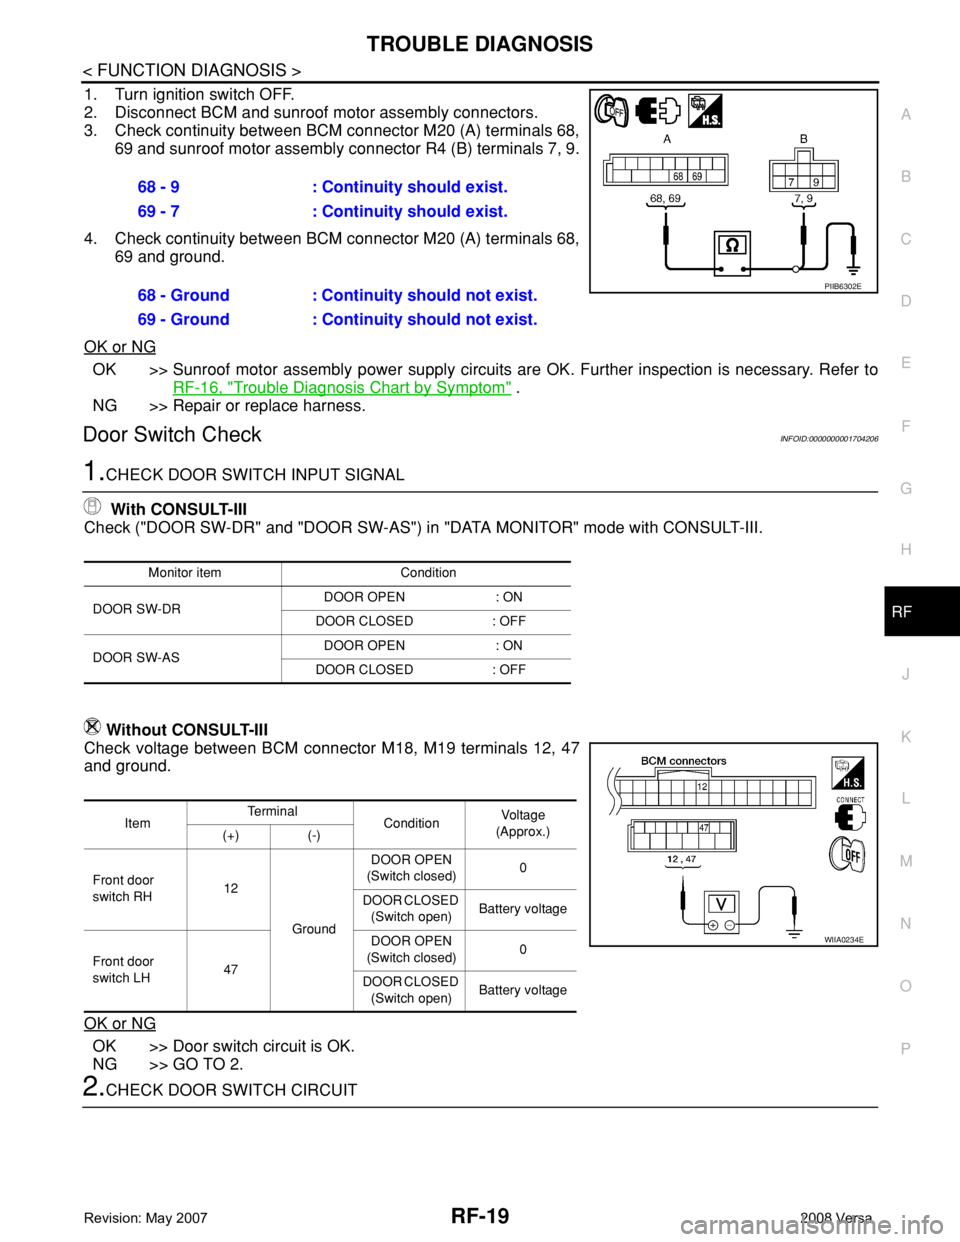
1. Turn ignition switch OFF.
2. Disconnect BCM and sunroof motor assembly connectors.
3. Check continuity between BCM connector M20 (A) terminals 68,
69 and sunroof motor assembly connector R4 (B) terminals 7, 9.
4. Check continuity between BCM connector M20 (A) terminals 68,
69 and ground.
OK or NG
OK >> Sunroof motor assembly power supply circuits are OK. Further inspection is necessary. Refer to
RF-16, "
Trouble Diagnosis Chart by Symptom" .
NG >> Repair or replace harness.
Door Switch CheckINFOID:0000000001704206
1.CHECK DOOR SWITCH INPUT SIGNAL
With CONSULT-III
Check ("DOOR SW-DR" and "DOOR SW-AS") in "DATA MONITOR" mode with CONSULT-III.
Without CONSULT-III
Check voltage between BCM connector M18, M19 terminals 12, 47
and ground.
OK or NG
OK >> Door switch circuit is OK.
NG >> GO TO 2.
2.CHECK DOOR SWITCH CIRCUIT68 - 9 : Continuity should exist.
69 - 7 : Continuity should exist.
68 - Ground : Continuity should not exist.
69 - Ground : Continuity should not exist.
PIIB6302E
Monitor item Condition
DOOR SW-DRDOOR OPEN : ON
DOOR CLOSED : OFF
DOOR SW-ASDOOR OPEN : ON
DOOR CLOSED : OFF
ItemTe r m i n a l
ConditionVoltag e
(Approx.)
(+) (-)
Front door
switch RH12
GroundDOOR OPEN
(Switch closed)0
DOOR CLOSED
(Switch open)Battery voltage
Front door
switch LH47DOOR OPEN
(Switch closed)0
DOOR CLOSED
(Switch open)Battery voltage
WIIA0234E
Page 2550 of 2771
RF-20
< FUNCTION DIAGNOSIS >
TROUBLE DIAGNOSIS
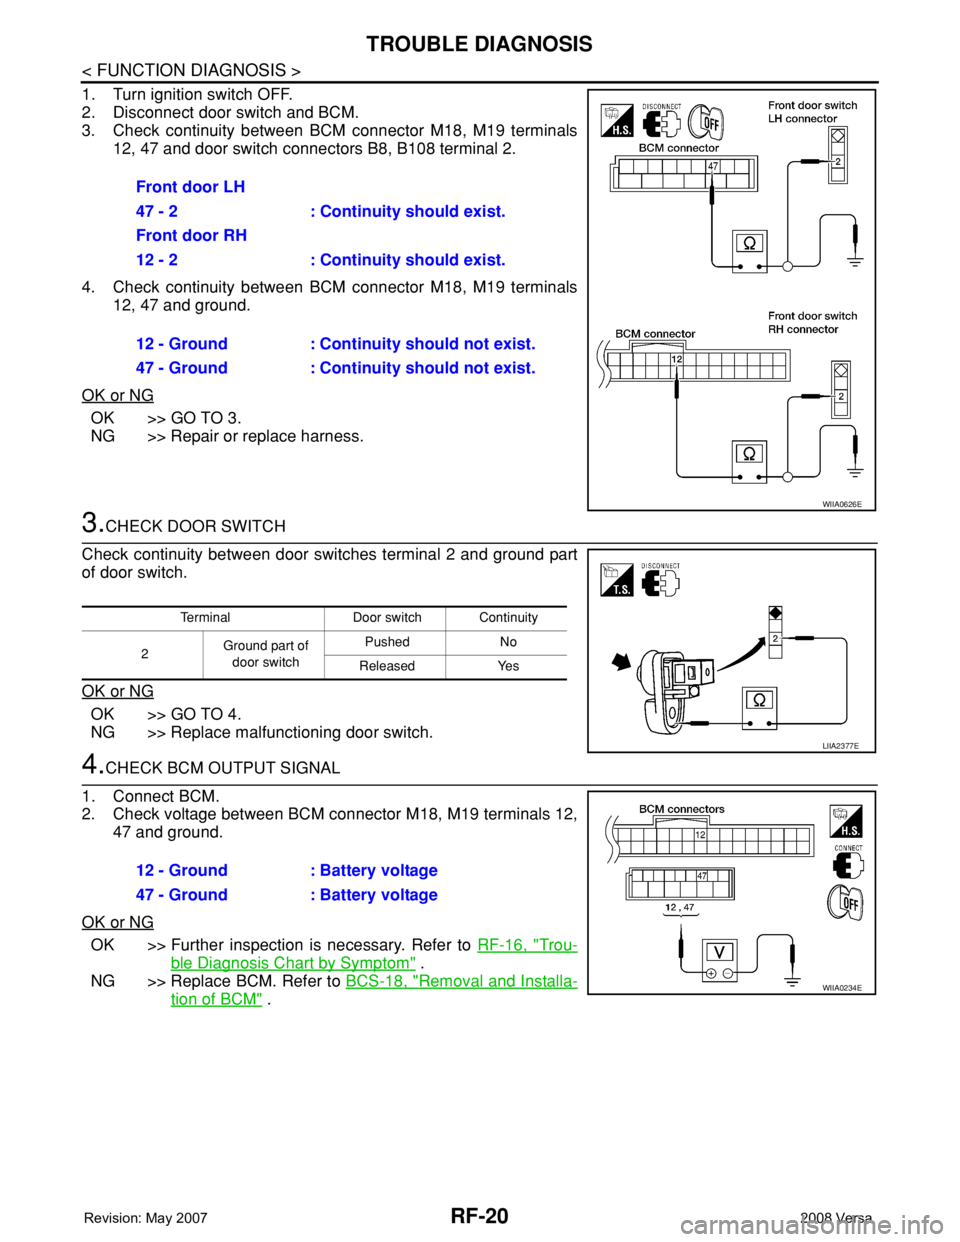
1. Turn ignition switch OFF.
2. Disconnect door switch and BCM.
3. Check continuity between BCM connector M18, M19 terminals
12, 47 and door switch connectors B8, B108 terminal 2.
4. Check continuity between BCM connector M18, M19 terminals
12, 47 and ground.
OK or NG
OK >> GO TO 3.
NG >> Repair or replace harness.
3.CHECK DOOR SWITCH
Check continuity between door switches terminal 2 and ground part
of door switch.
OK or NG
OK >> GO TO 4.
NG >> Replace malfunctioning door switch.
4.CHECK BCM OUTPUT SIGNAL
1. Connect BCM.
2. Check voltage between BCM connector M18, M19 terminals 12,
47 and ground.
OK or NG
OK >> Further inspection is necessary. Refer to RF-16, "Trou-
ble Diagnosis Chart by Symptom" .
NG >> Replace BCM. Refer to BCS-18, "
Removal and Installa-
tion of BCM" . Front door LH
47 - 2 : Continuity should exist.
Front door RH
12 - 2 : Continuity should exist.
12 - Ground : Continuity should not exist.
47 - Ground : Continuity should not exist.
WIIA0626E
Terminal Door switch Continuity
2Ground part of
door switchPushed No
Released Yes
LIIA2377E
12 - Ground : Battery voltage
47 - Ground : Battery voltage
WIIA0234E
Page 2671 of 2771
SPIRAL CABLE
SRS-37
< ON-VEHICLE REPAIR >
C
D
E
F
G
I
J
K
L
MA
B
SRS
N
O
P
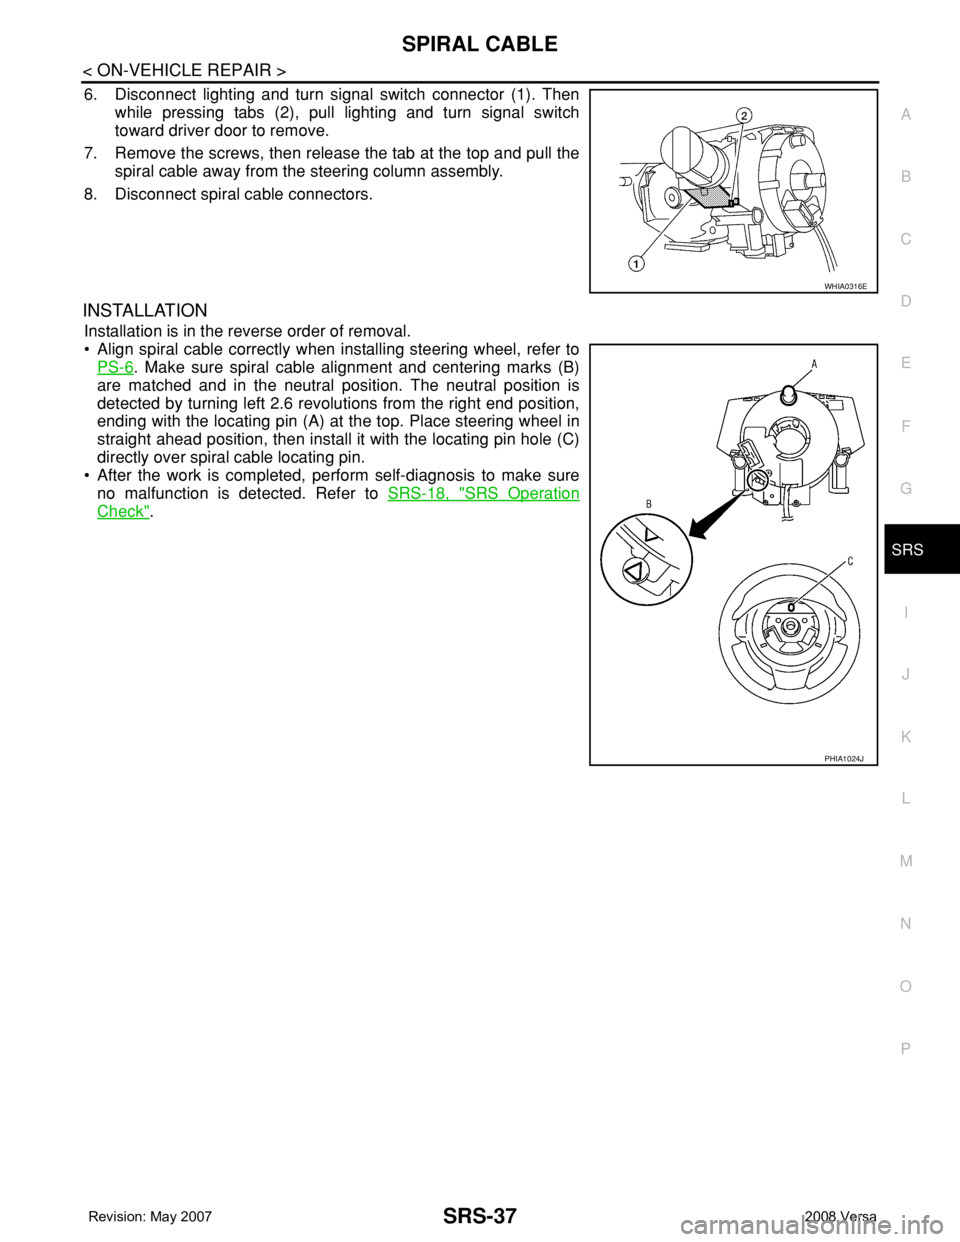
6. Disconnect lighting and turn signal switch connector (1). Then
while pressing tabs (2), pull lighting and turn signal switch
toward driver door to remove.
7. Remove the screws, then release the tab at the top and pull the
spiral cable away from the steering column assembly.
8. Disconnect spiral cable connectors.
INSTALLATION
Installation is in the reverse order of removal.
• Align spiral cable correctly when installing steering wheel, refer to
PS-6
. Make sure spiral cable alignment and centering marks (B)
are matched and in the neutral position. The neutral position is
detected by turning left 2.6 revolutions from the right end position,
ending with the locating pin (A) at the top. Place steering wheel in
straight ahead position, then install it with the locating pin hole (C)
directly over spiral cable locating pin.
• After the work is completed, perform self-diagnosis to make sure
no malfunction is detected. Refer to SRS-18, "
SRS Operation
Check".
WHIA0316E
PHIA1024J
Page 2755 of 2771
WW-22
< SERVICE INFORMATION >
FRONT WIPER AND WASHER SYSTEM
Removal and Installation of Front Wiper and Washer Switch
INFOID:0000000001704561
REMOVAL
1. Remove the steering column cover. Refer to IP-10 .
2. Disconnect the wiper and washer switch connector.
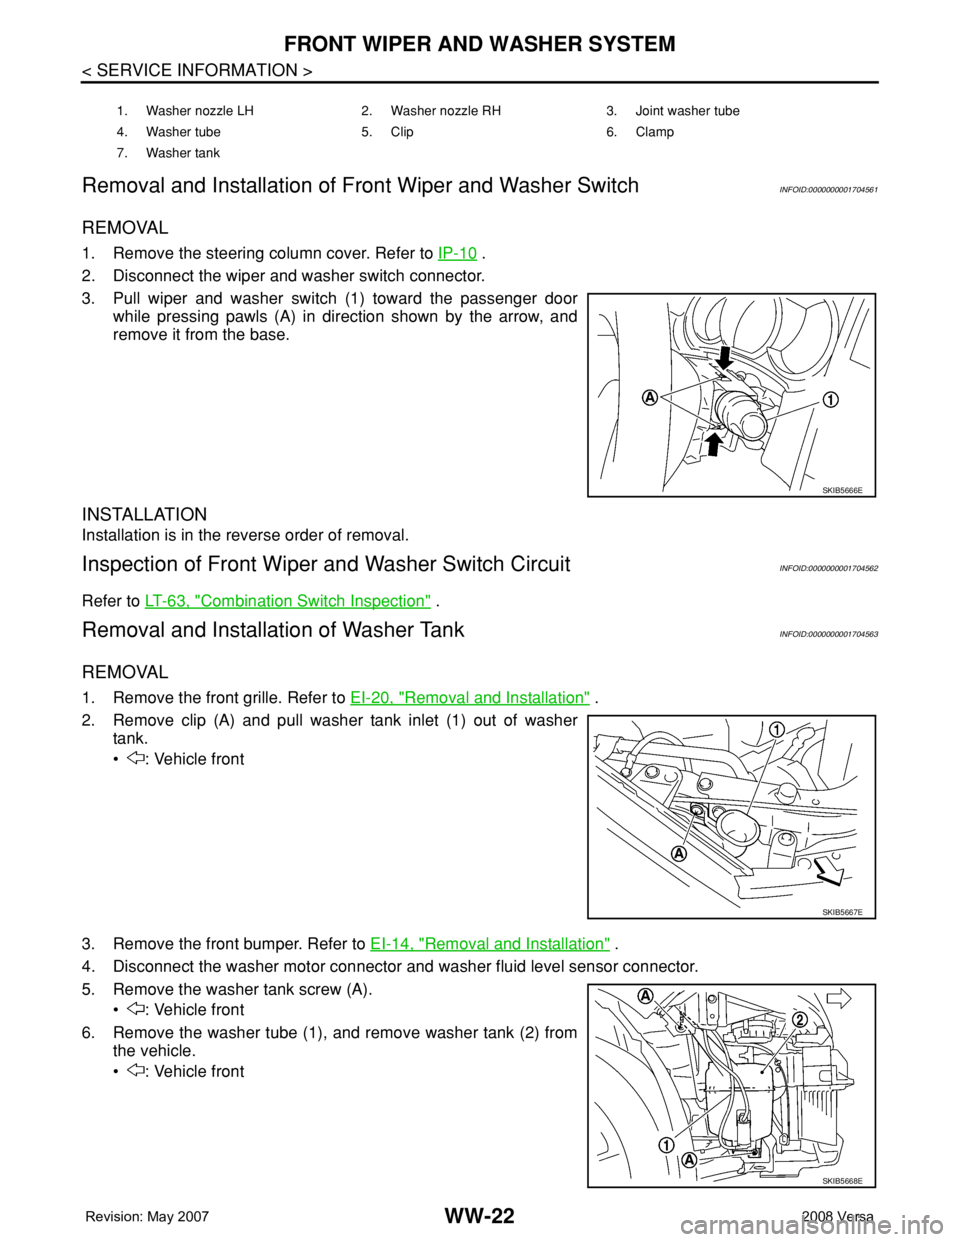
3. Pull wiper and washer switch (1) toward the passenger door
while pressing pawls (A) in direction shown by the arrow, and
remove it from the base.
INSTALLATION
Installation is in the reverse order of removal.
Inspection of Front Wiper and Washer Switch CircuitINFOID:0000000001704562
Refer to LT-63, "Combination Switch Inspection" .
Removal and Installation of Washer TankINFOID:0000000001704563
REMOVAL
1. Remove the front grille. Refer to EI-20, "Removal and Installation" .
2. Remove clip (A) and pull washer tank inlet (1) out of washer
tank.
• : Vehicle front
3. Remove the front bumper. Refer to EI-14, "
Removal and Installation" .
4. Disconnect the washer motor connector and washer fluid level sensor connector.
5. Remove the washer tank screw (A).
• : Vehicle front
6. Remove the washer tube (1), and remove washer tank (2) from
the vehicle.
• : Vehicle front
1. Washer nozzle LH 2. Washer nozzle RH 3. Joint washer tube
4. Washer tube 5. Clip 6. Clamp
7. Washer tank
SKIB5666E
SKIB5667E
SKIB5668E