2008 NISSAN QUEST warning
[x] Cancel search: warningPage 152 of 376
WARNING
cGasoline is extremely flammable and
highly explosive under certain condi-
tions. You could be burned or seriously
injured if it is misused or mishandled.
Always stop the engine and do not
smoke or allow open flames or sparks
near the vehicle when refueling.
cDo not attempt to top off the fuel tank
after the fuel pump nozzle shuts off
automatically. Continued refueling may
cause fuel overflow, resulting in fuel
spray and possibly a fire.
cUse only an original equipment type
fuel-filler cap as a replacement. It has a
built-in safety valve needed for proper
operation of the fuel system and emis-
sion control system. An incorrect cap
can result in a serious malfunction and
possible injury. It could also cause the
malfunction indicator light to come on.
cNever pour fuel into the throttle body to
attempt to start your vehicle.cDo not fill a portable fuel container in
the vehicle or trailer. Static electricity
can cause an explosion of flammable
liquid, vapor or gas in any vehicle or
trailer. To reduce the risk of serious
injury or death when filling portable fuel
containers:
– Always place the container on the
ground when filling.
– Do not use electronic devices when
filling.
– Keep the pump nozzle in contact
with the container while you are fill-
ing it.
– Use only approved portable fuel con-
tainers for flammable liquid.
CAUTION
cIf fuel is spilled on the vehicle body,
flush it away with water to avoid paint
damage.
cTighten until the fuel-filler cap clicks.
Failure to tighten the fuel-filler cap
properly may cause the
Mal-
function Indicator Light (MIL) to illumi-
nate. If the
light illuminates be-
cause the fuel-filler cap is loose or
missing, tighten or install the cap and
continue to drive the vehicle.
The
light should turn off after a
few driving trips. If the
light
does not turn off after a few driving
trips, have the vehicle inspected by a
NISSAN dealer.
cFor additional information, see the
“Malfunction Indicator Light (MIL)” in
the “Instruments and Controls” section
earlier in this manual.
3-20Pre-driving checks and adjustments
ZREVIEW COPYÐ2008 Quest(van)
Owners ManualÐUSA_English(nna)
06/29/07Ðdebbie
X
Page 153 of 376
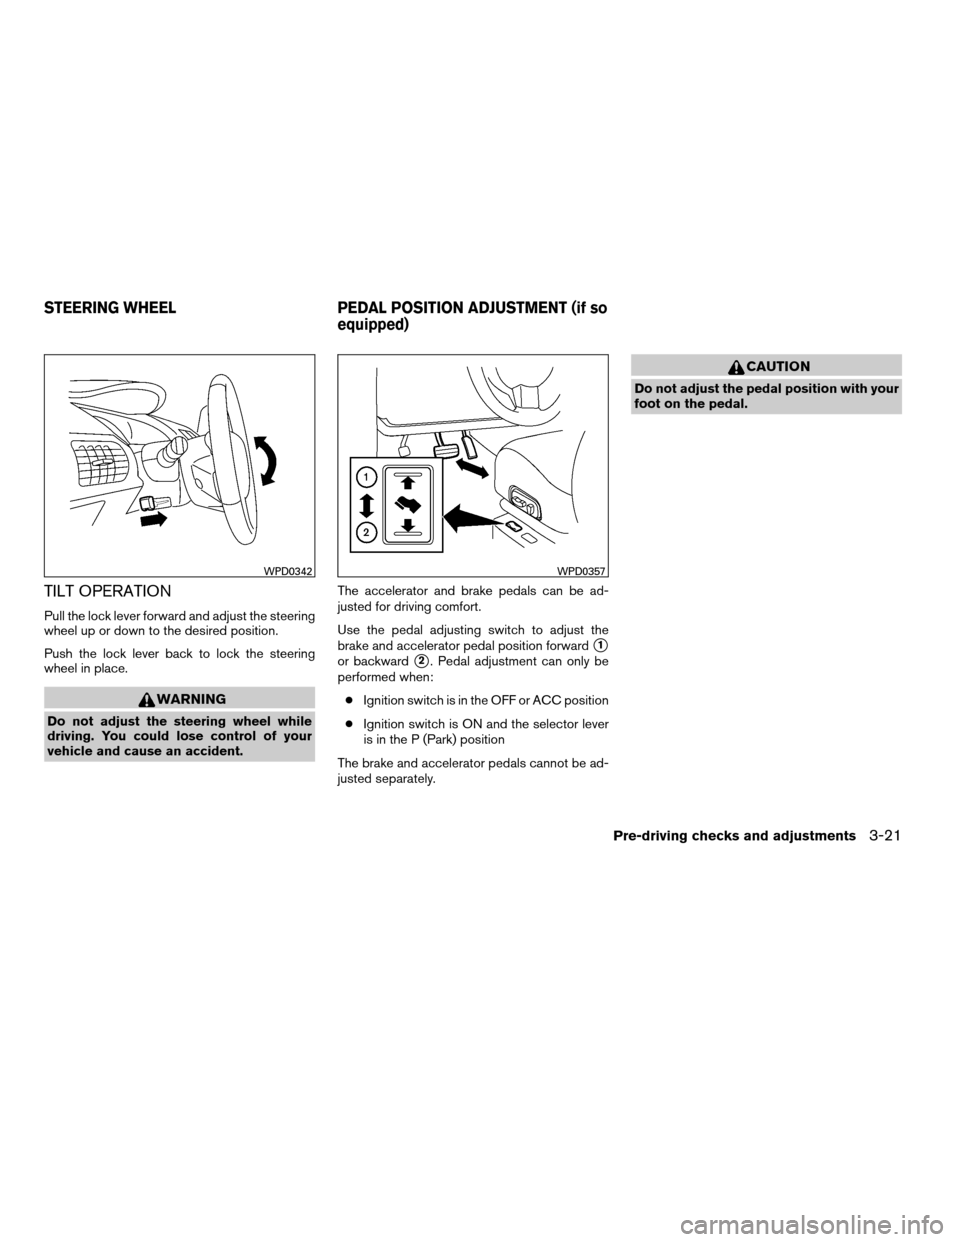
TILT OPERATION
Pull the lock lever forward and adjust the steering
wheel up or down to the desired position.
Push the lock lever back to lock the steering
wheel in place.
WARNING
Do not adjust the steering wheel while
driving. You could lose control of your
vehicle and cause an accident.The accelerator and brake pedals can be ad-
justed for driving comfort.
Use the pedal adjusting switch to adjust the
brake and accelerator pedal position forward
s1
or backwards2. Pedal adjustment can only be
performed when:
cIgnition switch is in the OFF or ACC position
cIgnition switch is ON and the selector lever
is in the P (Park) position
The brake and accelerator pedals cannot be ad-
justed separately.
CAUTION
Do not adjust the pedal position with your
foot on the pedal.
WPD0342WPD0357
STEERING WHEEL PEDAL POSITION ADJUSTMENT (if so
equipped)
Pre-driving checks and adjustments3-21
ZREVIEW COPYÐ2008 Quest(van)
Owners ManualÐUSA_English(nna)
06/29/07Ðdebbie
X
Page 155 of 376
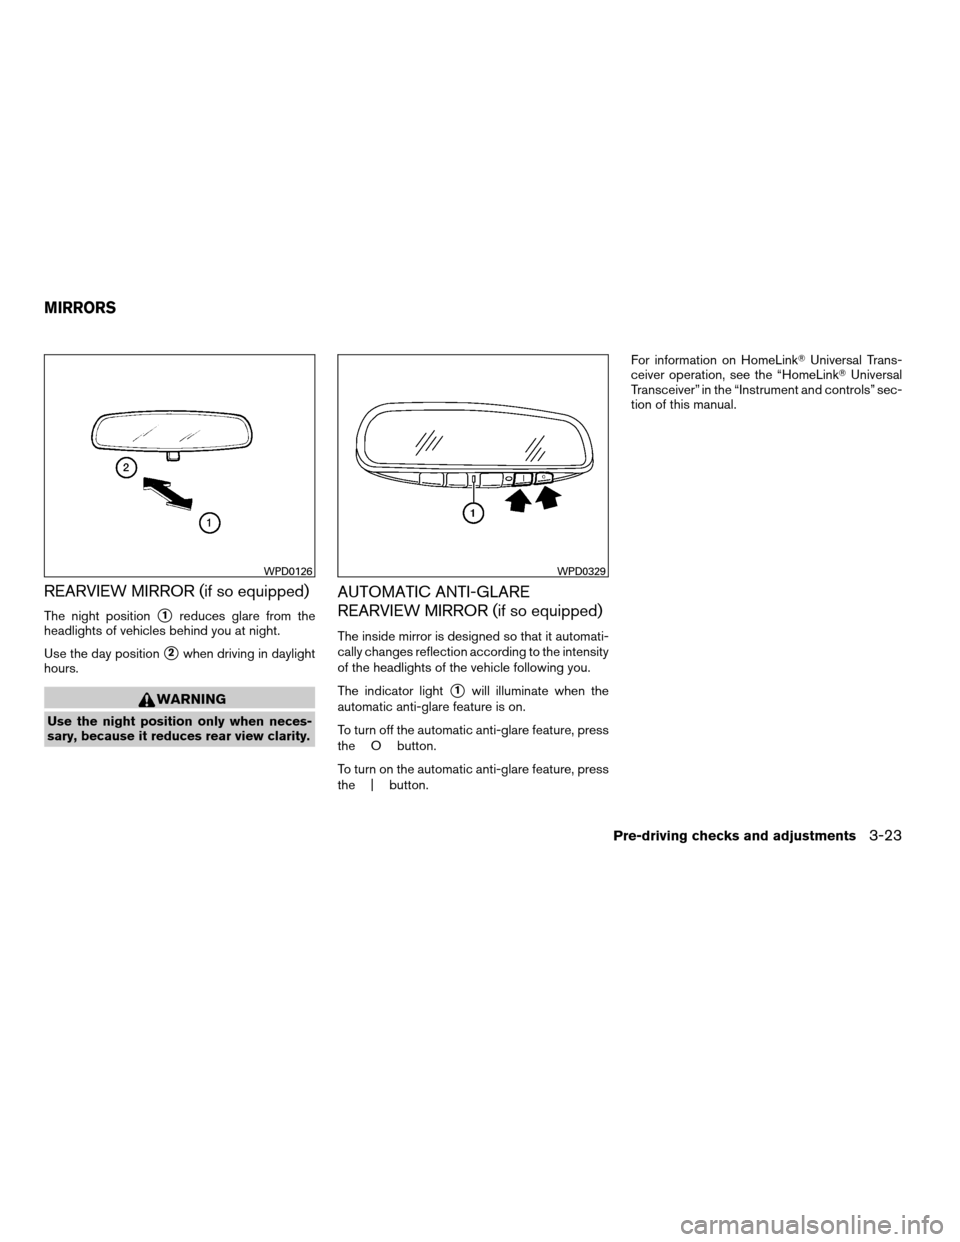
REARVIEW MIRROR (if so equipped)
The night positions1reduces glare from the
headlights of vehicles behind you at night.
Use the day position
s2when driving in daylight
hours.
WARNING
Use the night position only when neces-
sary, because it reduces rear view clarity.
AUTOMATIC ANTI-GLARE
REARVIEW MIRROR (if so equipped)
The inside mirror is designed so that it automati-
cally changes reflection according to the intensity
of the headlights of the vehicle following you.
The indicator light
s1will illuminate when the
automatic anti-glare feature is on.
To turn off the automatic anti-glare feature, press
the O button.
To turn on the automatic anti-glare feature, press
the | button.For information on HomeLinkTUniversal Trans-
ceiver operation, see the “HomeLinkTUniversal
Transceiver” in the “Instrument and controls” sec-
tion of this manual.
WPD0126WPD0329
MIRRORS
Pre-driving checks and adjustments3-23
ZREVIEW COPYÐ2008 Quest(van)
Owners ManualÐUSA_English(nna)
06/29/07Ðdebbie
X
Page 156 of 376
OUTSIDE MIRRORS
WARNING
Objects viewed in the outside mirror on
the passenger side are closer than they
appear. Be careful when moving to the
right. Using only this mirror could cause
an accident. Use the inside mirror or
glance over your shoulder to properly
judge distances to other objects.
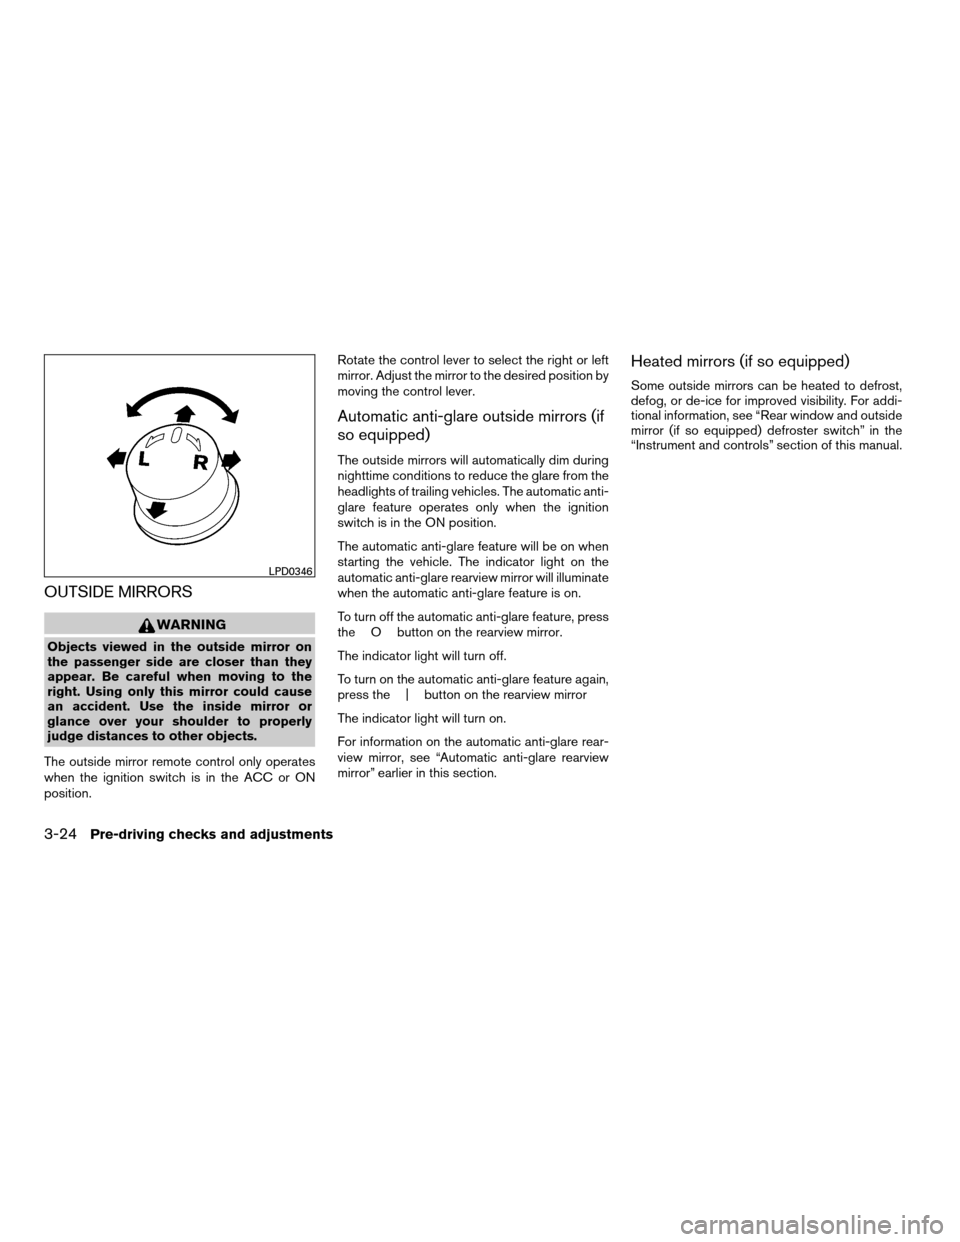
The outside mirror remote control only operates
when the ignition switch is in the ACC or ON
position.Rotate the control lever to select the right or left
mirror. Adjust the mirror to the desired position by
moving the control lever.
Automatic anti-glare outside mirrors (if
so equipped)
The outside mirrors will automatically dim during
nighttime conditions to reduce the glare from the
headlights of trailing vehicles. The automatic anti-
glare feature operates only when the ignition
switch is in the ON position.
The automatic anti-glare feature will be on when
starting the vehicle. The indicator light on the
automatic anti-glare rearview mirror will illuminate
when the automatic anti-glare feature is on.
To turn off the automatic anti-glare feature, press
the O button on the rearview mirror.
The indicator light will turn off.
To turn on the automatic anti-glare feature again,
press the | button on the rearview mirror
The indicator light will turn on.
For information on the automatic anti-glare rear-
view mirror, see “Automatic anti-glare rearview
mirror” earlier in this section.
Heated mirrors (if so equipped)
Some outside mirrors can be heated to defrost,
defog, or de-ice for improved visibility. For addi-
tional information, see “Rear window and outside
mirror (if so equipped) defroster switch” in the
“Instrument and controls” section of this manual.
LPD0346
3-24Pre-driving checks and adjustments
ZREVIEW COPYÐ2008 Quest(van)
Owners ManualÐUSA_English(nna)
06/29/07Ðdebbie
X
Page 162 of 376

4 Display screen, heater, air conditioner,
audio and phone systems
Control panel buttons — with monochrome screen....4-2
How to use the TRIP button.....................4-3
How to use the SETTING button.................4-5
button...................................4-6
Door warning..................................4-6
Control panel buttons — color screen without
Navigation System (if so equipped)..................4-7
How to use the joystick and ENTER button........4-7
How to use the BACK button....................4-7
How to use the TRIP button.....................4-8
How to use the SETTING button................4-11
button..................................4-16
Control panel buttons — color screen with
Navigation System (if so equipped).................4-17
How to use the joystick and ENTER button.......4-17
How to use the BACK button...................4-18
Setting up the start-up screen..................4-18
How to use the TRIP button....................4-18
How to use the SETTING button................4-22
button..................................4-28
Rearview monitor (if so equipped)..................4-28
How to read the displayed lines.................4-28
Adjusting the screen...........................4-29Operating tips.................................4-29
Ventilators.......................................4-30
Heater and air conditioner (manual).................4-31
Controls......................................4-31
Heater operation..............................4-32
Air conditioner operation.......................4-33
Air flow charts.................................4-34
Heater and air conditioner (automatic)
(if so equipped)..................................4-40
Automatic operation...........................4-40
Manual operation..............................4-41
Operating tips.................................4-41
Rear seat air conditioner..........................4-42
Controls......................................4-43
Servicing air conditioner...........................4-43
Audio system....................................4-43
Radio........................................4-43
FM radio reception............................4-44
AM radio reception............................4-44
Satellite radio reception (if so equipped).........4-44
Audio operation precautions....................4-45
FM/AM/SAT radio with compact disc (CD)
player........................................4-50
ZREVIEW COPYÐ2008 Quest(van)
Owners ManualÐUSA_English(nna)
06/29/07Ðdebbie
X
Page 164 of 376
WARNING
cDo not disassemble or modify this sys-
tem. If you do, it may result in accidents,
fire, or electrical shock.
cDo not use this system if you notice any
abnormality, such as a frozen screen or
lack of sound. Continued use of the
system may result in accident, fire or
electric shock.
cIn case you notice any foreign object in
the system hardware, spill liquid on it,
or notice smoke or smell coming from
it, stop using the system immediately
and contact your nearest NISSAN
dealer. Ignoring such conditions may
lead to accidents, fire or electrical
shock.
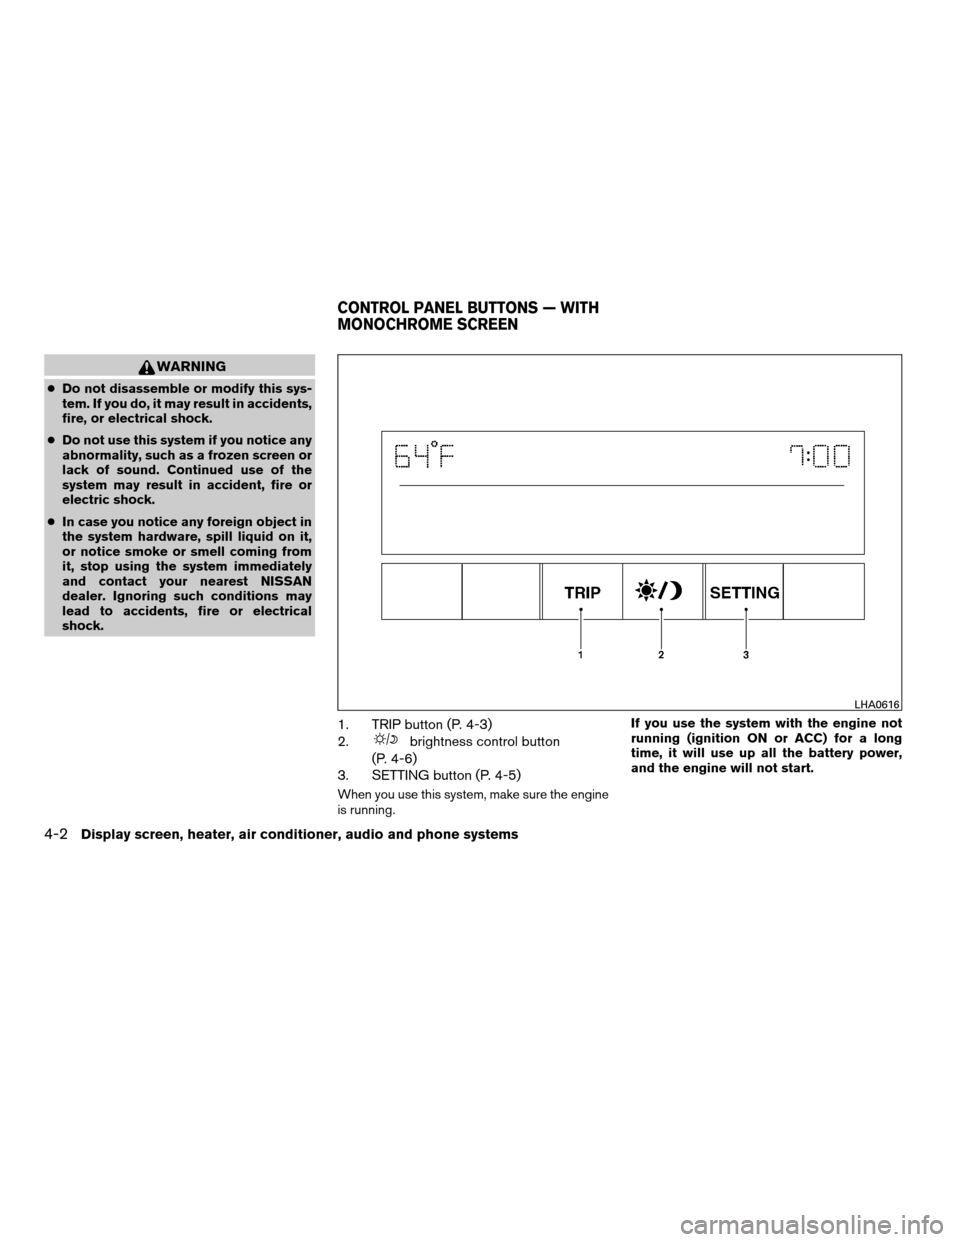
1. TRIP button (P. 4-3)
2.
brightness control button
(P. 4-6)
3. SETTING button (P. 4-5)
When you use this system, make sure the engine
is running.If you use the system with the engine not
running (ignition ON or ACC) for a long
time, it will use up all the battery power,
and the engine will not start.
LHA0616
CONTROL PANEL BUTTONS — WITH
MONOCHROME SCREEN
4-2Display screen, heater, air conditioner, audio and phone systems
ZREVIEW COPYÐ2008 Quest(van)
Owners ManualÐUSA_English(nna)
06/29/07Ðcathy
X
Page 167 of 376
In case of low tire pressure, a message “LOW
PRESSURE” or “CHECK ALL TIRES” is dis-
played on the screen:
LOW PRESSURE — CHECK ALL TIRES.
WARNING
cWhen a spare tire is mounted or a wheel
is replaced, tire pressure will not be
indicated, the Tire Pressure Monitoring
System (TPMS) will not function and
the low tire pressure warning light will
flash for approximately 1 minute. The
light will remain on after 1 minute. Con-
tact your NISSAN dealer as soon as
possible for tire replacement and/or
system resetting.
cReplacing tires with those not originally
specified by NISSAN could affect the
proper operation of the TPMS.
HOW TO USE THE SETTING
BUTTON
Pressing the SETTING button will change the
settings menu as follows:
Backlight!Day Mode Brightness!Night
Mode Brightness!Clock Adjust HOURS!Clock Adjust MINUTES!Units!Lang!MP3
Disp Type (if so equipped)!Audio or OFF!
Backlight
Backlight
To turn off the screen, select “OFF” of the Back-
light mode by pressing the TUNE button.
The message “Press SETTINGS to resume” will
display for approximately 5 seconds then the
screen will turn off.
To turn on the screen, press the SETTING button
and select “ON” by pressing the TUNE button.
When any button besides SETTING is pressed
with the screen off, the screen turns on for further
operation. The screen will turn off automatically
after the operation is finished.
Day mode brightness
The brightness of the screen during the day can
be changed by pressing the TUNE button.
For additional information, see “
button”
later in this section.
Night mode brightness
The brightness of the screen during the night can
be changed by pressing the TUNE button.
For additional information, see “
button”
later in this section.
Clock operation
The digital clock displays time when the ignition
key is in ACC or ON.
If the power supply is disconnected, the
clock will not indicate the correct time.
Readjust the time.
Clock adjust hours
Press the SETTING button until Clock Adjust
HOURS is shown in the display. Press the TUNE
button up or down to adjust the hour.
Clock adjust minutes
Press the SETTING button again Clock Adjust
Minutes is shown in the display. Press the TUNE
button up or down to adjust the minutes.
To exit the clock adjustment, press the SETTING
button repeatedly. The screen will return to the
audio display if the audio is on. If the audio is not
on, the screen will return to a blank display.
Units
To change the units press the TUNE button to
select “ENGLISH” or “METRIC”.
Unit: US — MI, °F, MPG
Metric — km, °C, L/100 km
Display screen, heater, air conditioner, audio and phone systems4-5
ZREVIEW COPYÐ2008 Quest(van)
Owners ManualÐUSA_English(nna)
06/29/07Ðdebbie
X
Page 168 of 376

Language
The language can be changed to “ENGLISH” or
“FRANÇAIS” by pressing the TUNE button.
MP3 display type (if so equipped)
To change how MP3 discs are displayed, press
the TUNE button to select “DISC NUMBER” or
“FOLDER NUMBER”.
Disc number mode will display the file number in
the disc.
Folder number mode will display the file number
in the current folder.
For additional information, see “Audio System”
later in this section.
BUTTON
To change the display brightness, press
thebutton. Pressing the button with the
headlights off will prompt the “BRIGHTNESS
NIGHT (MANUAL)” or “BRIGHTNESS AUTO-
MATIC”. If “BRIGHTNESS NIGHT (MANUAL)” is
selected, the brightness of the screen will not be
affected by the headlight operation. The bright-
ness of the screen will be dependent on the
settings in the Night Mode Brightness, described
earlier in this section.Pressing the button with the headlights on will
prompt the “BRIGHTNESS DAY (MANUAL)” or
“BRIGHTNESS AUTOMATIC”. If “BRIGHT-
NESS DAY (MANUAL)” is selected the bright-
ness of the screen will not be affected by the
headlight operation. The brightness of the screen
will be dependent on the settings in the Day
Mode Brightness, described earlier in this sec-
tion.
DOOR WARNING
The DOOR OPEN screen will be automatically
displayed as shown when both of the following
conditions are met:
cThe vehicle is driven with a door(s) open for
longer than 2.5 seconds.
cThe vehicle speed is greater than 3 MPH (5
km/h) .
Beeping will occur during the door warning; to
disable the beeping press any button. If a change
in any door condition occurs during the time the
beep is cancelled, a warning will return.
LHA0643
4-6Display screen, heater, air conditioner, audio and phone systems
ZREVIEW COPYÐ2008 Quest(van)
Owners ManualÐUSA_English(nna)
06/29/07Ðdebbie
X