2008 NISSAN QASHQAI speed limit
[x] Cancel search: speed limitPage 168 of 297

Downloaded from www.Manualslib.com manuals search engine The turbocharger system uses engine oil for lubrica-
tion and cooling of its rotating components. The tur-
bocharger turbine turns at extremely high speeds
and it can reach an extremely high temperature. It is
essential to maintain a flow of clean oil through the
turbocharger system. A sudden interruption to the
oil supply may cause a malfunction in the turbo-
charger.
To ensure prolonged life and performance of the
turbocharger, it is essential to comply with the fol-
lowing maintenance procedure:
CAUTION
Change the engine oil of the turbo-charged
diesel engine as prescribed. See the sepa-
rately provided Warranty Information & Main-
tenance Booklet for additional information.
Use only the recommended engine oil. See
“Capacities and recommended
fuel/lubricants” in the “9. Technical
information” section.
If the engine has been operating at high rpm
for an extended period of time, let it idle for a
few minutes prior to shutdown.
Do not accelerate the engine to high rpm im-
mediately after starting it.
WARNING
Be careful not to burn yourself with exhaust
gases.
Do not park the vehicle over flammable mate-
rials such as dry grass, waste paper or rags,
as they may burn easily.
If the vehicle continues to be driven at a low
speed with the DPF warning light illuminated,
the fail-safe will limit engine revolutions and/
or torque. In this case, the engine oil must be
replaced and the process of burning accumu-
lated particulate matter must be carried out
by a NISSAN dealer or qualified workshop.
Service regeneration is a maintenance item
and is not covered by the NISSAN warranty.
Use engine oil for DPF equipped models. For
details, see “Capacities and recommended
fuel/lubricants” in the “9. Technical
information” section.
CAUTION
The DPF becomes extremely hot after burning
particulate matter.
NISSAN GREEN PROGRAM
Some diesel engine models are fitted with a Diesel
Particulate Filter (DPF), which is a device that re-
moves carbon (soot) from the exhaust gas. To oper-
ate effectively, the DPF system must routinely con-
duct a cleaning operation, called regeneration, that burns-off the accumulated carbon. This regenera-
tion process is normally automatic and not visible to
the driver.
REGENERATION RESTRICTIONS
Driving conditions such as frequent short journeys
or stop/start driving can result in excessive build up
of carbon in the filter. When this happens the DPF
warning light
will illuminate (and a message
will appear in the vehicle information display, see
“Vehicle information display” later in this section) to
inform you that the vehicle must be driven in a par-
ticular manner to begin regeneration.
When the DPF warning light is illuminated, provided
that legal and safety conditions allow, the vehicle
should be driven at a speed of over 60 km/h (37.5
MPH) until the DPF warning light turns off. This pro-
cess can take up to 30 minutes to complete.
IF REGENERATION FAILS
Failure to react to the DPF warning lightmay
lead to saturation of the DPF system. If this hap-
pens, the Malfunction Indicator (MI)
will also
illuminate to indicate that a Service Regeneration by
a NISSAN dealer or qualified workshop is required.
The engine speed may also be limited to 3,000 rpm
to protect the DPF system.
NOTE
Contact a NISSAN dealer or qualified workshop
to perform a forced regeneration.
TURBOCHARGER SYSTEM
(Diesel engine models) DIESEL PARTICULATE FILTER
(DPF) (where fitted)
Starting and driving5-5
Page 175 of 297
Downloaded from www.Manualslib.com manuals search engine mately 1/3 to the floor) and hold it then crank
the engine. Release the ignition switch and
the accelerator pedal when the engine starts.
CAUTION
Do not operate the starter for more than 15
seconds at a time. If the engine does not start,
turn the ignition switch to the “OFF” position
and wait 10 seconds (Petrol engine models)
or 20 seconds (Diesel engine models) before
cranking again, otherwise the starter could be
damaged.
If it becomes necessary to start the engine
with a booster battery and jumper leads, the
instructions and cautions contained in the
“Jump-starting” in the “6. In case of
emergency” section should be carefully fol-
lowed.
7. Warm-up
Allow the engine to idle for at least 30 seconds
after starting. Drive at moderate speed for a short
distance first, especially in cold weather.
WARNING
Do not leave the vehicle unattended while the
engine is warming up.
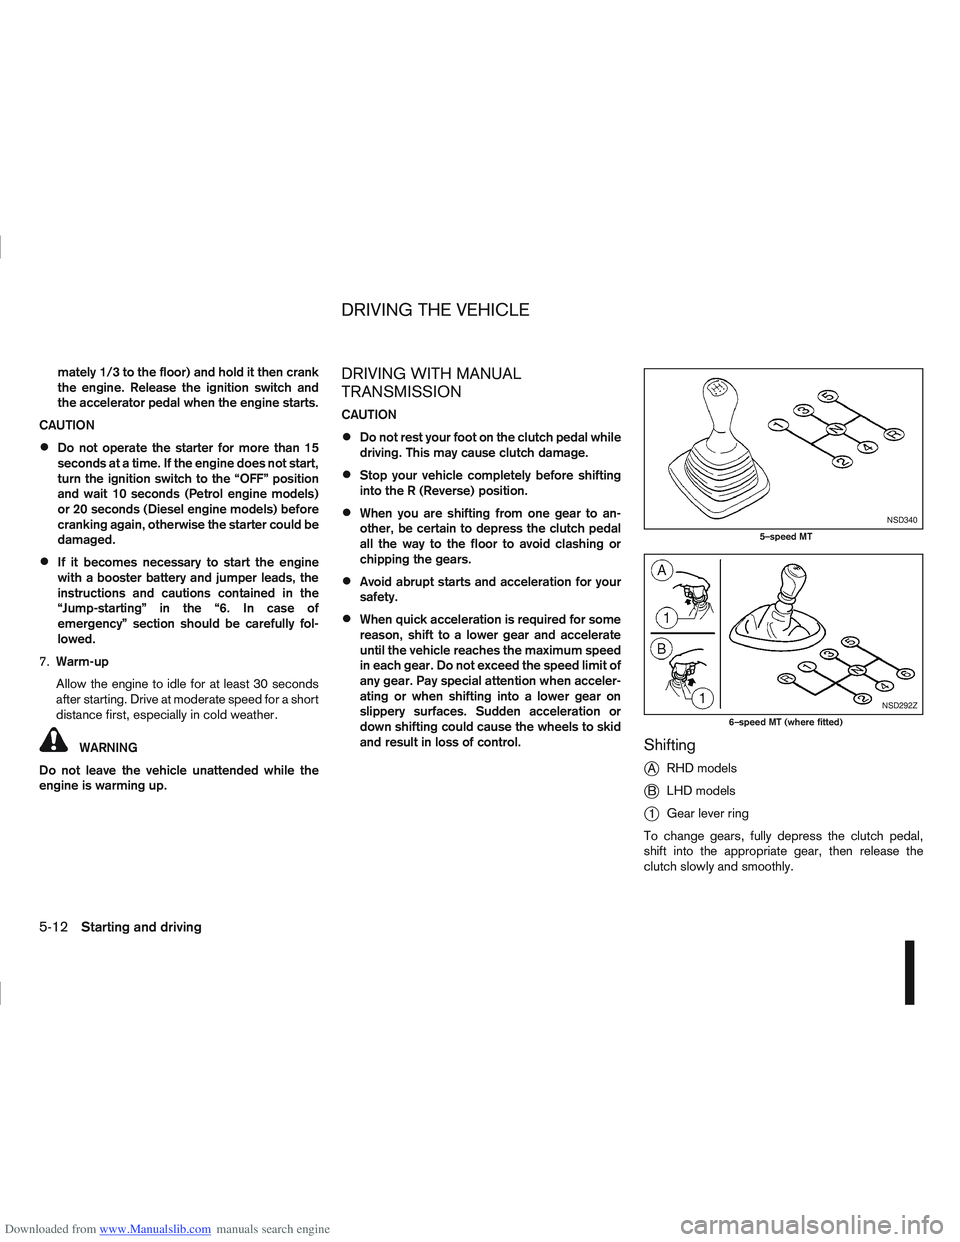
DRIVING WITH MANUAL
TRANSMISSION
CAUTION
Do not rest your foot on the clutch pedal while
driving. This may cause clutch damage.
Stop your vehicle completely before shifting
into the R (Reverse) position.
When you are shifting from one gear to an-
other, be certain to depress the clutch pedal
all the way to the floor to avoid clashing or
chipping the gears.
Avoid abrupt starts and acceleration for your
safety.
When quick acceleration is required for some
reason, shift to a lower gear and accelerate
until the vehicle reaches the maximum speed
in each gear. Do not exceed the speed limit of
any gear. Pay special attention when acceler-
ating or when shifting into a lower gear on
slippery surfaces. Sudden acceleration or
down shifting could cause the wheels to skid
and result in loss of control.
Shifting
j
A RHD models
jB LHD models
j1Gear lever ring
To change gears, fully depress the clutch pedal,
shift into the appropriate gear, then release the
clutch slowly and smoothly.
NSD340
5–speed MT
NSD292Z
6–speed MT (where fitted)
DRIVING THE VEHICLE
5-12Starting and driving
Page 180 of 297
Downloaded from www.Manualslib.com manuals search engine Fail-safe
AT models:
When the fail-safe operation occurs, the AT CHECK
indicator light comes on for 2 seconds and the auto-
matic transmission will be locked in the third gear.
Have a NISSAN dealer or qualified workshop check
and repair the transmission.
CVT models:
When the fail-safe operation occurs, the vehicle
speed will be decreased automatically to reduce the
chance of transmission damage. Vehicle speed can
be controlled with the accelerator pedal, but the
engine power may be limited. Have a NISSAN dealer
or qualified workshop check and repair the trans-
mission.
AT or CVT models:
If the vehicle is driven under extreme conditions,
such as excessive wheel spinning and subse-
quent hard braking, the Fail-safe system may be
activated. This will occur even if all electrical cir-
cuits are functioning properly. In this case, turn
the ignition switch “OFF” and wait for 10 sec-
onds. Then turn the key back to the ON position.
The vehicle should return to its normal operating
condition. If it does not return to its normal oper-
ating condition have your NISSAN dealer or quali-
fied workshop check the transmission and have
the transmission repaired by a NISSAN dealer or
qualified workshop, if necessary.WARNING
When the fail safe operation occurs, the vehicle
speed may be lower than other traffic, which
could increase the chance of a collision. Be es-
pecially careful when driving. If necessary, drive
to the side of the road at a safe place and away
from traffic, to allow the transmission to return to
normal operation, or have the transmission re-
paired by a NISSAN dealer or qualified workshop,
if necessary.
DRIVING WITH CONTINUOUSLY
VARIABLE TRANSMISSION (CVT)
(Models without manual shift)
The Continuously Variable Transmission (CVT) in
your vehicle is electronically controlled to produce
maximum power and smooth operation.
The recommended operating procedures for this
transmission are shown on the following pages. Fol-
low these procedures for maximum vehicle perfor-
mance and driving enjoyment.
WARNING
Do not downshift abruptly on slippery roads. This
may cause a loss of control.
CAUTION
The cold engine idle speed is high, so use
caution when shifting the transmission into a
forward or reverse position before the engine
has warmed up.
Avoid revving up the engine while the vehicle
is stopped. This could cause unexpected ve-
hicle movement.
Never shift to either the P (Park) or R (Re-
verse) position while the vehicle is moving.
This could cause serious damage to the trans-
mission.
Start the engine in either the P (Park) or N
(Neutral) position. The engine will not start in
any other position. If it does, have your ve-
hicle checked by a NISSAN dealer or qualified
workshop.
Shift into the P (Park) position and apply the
handbrake when at a standstill for longer than
a short waiting period.
Keep the engine at idling speed while shifting
from the N (Neutral) position to any driving
position.
When stopping the vehicle on an uphill grade,
do not hold the vehicle by depressing the ac-
celerator pedal. The footbrake pedal should
be depressed in this situation.
Starting vehicle
1. After starting the engine, fully depress the foot- brake pedal before moving the selector lever out
of the P (Park) position.
2. Keep the footbrake pedal depressed and move the selector lever to a driving position.
3. Release the handbrake, the footbrake pedal, and then gradually start the vehicle in motion.
Starting and driving5-17
Page 183 of 297
Downloaded from www.Manualslib.com manuals search engine Shift lock release
j
1LHD models
j2RHD models
jA Shift lock release button
If the battery charge is low or discharged, the selec-
tor lever may not move from the P (Park) position
even with the brake pedal depressed and the selec-
tor lever button pushed.
To move the selector lever, perform the following
procedure:
1. Models with Intelligent Key system:
Place the ignition switch in the “OFF” or LOCK
position.
Models without Intelligent Key system:
Place the ignition switch in the LOCK position,
and remove the key if it is inserted.
2. Apply the handbrake.
3. Push down the shift lock release button
jA.Use
a suitable tool.
4. Push and hold the selector lever button and move the selector lever to the N (Neutral) position while
holding down the shift lock release button.
Place the ignition switch in the ON position to un-
lock the steering wheel. The vehicle may be moved
to the desired location. For models with Intelligent Key system: If the battery
is discharged completely, the steering wheel cannot
be unlocked. Do not move the vehicle with the steer-
ing wheel locked.
If the selector lever cannot be moved out of the P
(Park) position, have a NISSAN dealer or qualified
workshop check the CVT system as soon as pos-
sible.
WARNING
If the selector lever cannot be moved from the P
(Park) position while the engine is running and
the brake pedal is depressed, the stop lights may
not work. Malfunctioning stop lights could cause
an accident injuring yourself and others.
High fluid temperature protection mode
This transmission has a high fluid temperature pro-
tection mode. If the fluid temperature becomes too
high (for example, when climbing steep grades in
high temperature with heavy loads, such as when
towing a trailer), engine power and, under some
conditions, vehicle speed will be decreased auto-
matically to reduce the chance of transmission dam-
age. Vehicle speed can be controlled with the ac-
celerator pedal, but engine and vehicle speed may
be limited.
Fail-safe
When the fail-safe operation occurs, the CVT will
not be shifted to the selected driving position.
If the vehicle is driven under extreme conditions,
such as excessive wheel spinning and subse- quent hard braking, the fail-safe system may be
activated. This will occur even if all electrical cir-
cuits are functioning properly. In this case, place
the ignition switch in the “OFF” position and wait
for 10 seconds. Then turn the ignition switch back
to the ON position. The vehicle should return to
its normal operating condition. If it does not re-
turn to its normal operating condition, have a
NISSAN dealer or qualified workshop check the
transmission and repair it if necessary.
WARNING
When the fail-safe operation occurs, vehicle
speed may be gradually reduced. The reduced
speed may be lower than other traffic, which
could increase the chance of a collision. Be es-
pecially careful when driving. If necessary, pull to
the side of the road at a safe place and allow the
transmission to return to normal operation, or
have it repaired if necessary.
5-20Starting and driving
Page 192 of 297
Downloaded from www.Manualslib.com manuals search engine The cruise control system allows driving at constant
speeds without keeping your foot on the accelerator
pedal.
WARNING
The cruise control system ONLY maintains a
constant vehicle speed, it does not replace
the driver.
Always observe the posted speed limits and
do not set the speed above them.
Do not use the cruise control system when
driving under the following conditions. Doing
so could cause a loss of vehicle control and
result in an accident.
– When it is not possible to keep the vehicleat a constant speed
– When driving in heavy traffic
– When driving in traffic that varies speed
– When driving in windy areas
– When driving on winding or hilly roads
– When driving on slippery (rain, snow, ice, etc.) roads
CAUTION
On manual transmission models, do not shift into
N (Neutral) without depressing the clutch pedal
when the cruise control is set. Should this occur,
depress the clutch pedal and turn the cruise con-
trol main switch off immediately. Failure to do so
may cause engine damage. When the cruise control system is on the speed lim-
iter cannot be operated.
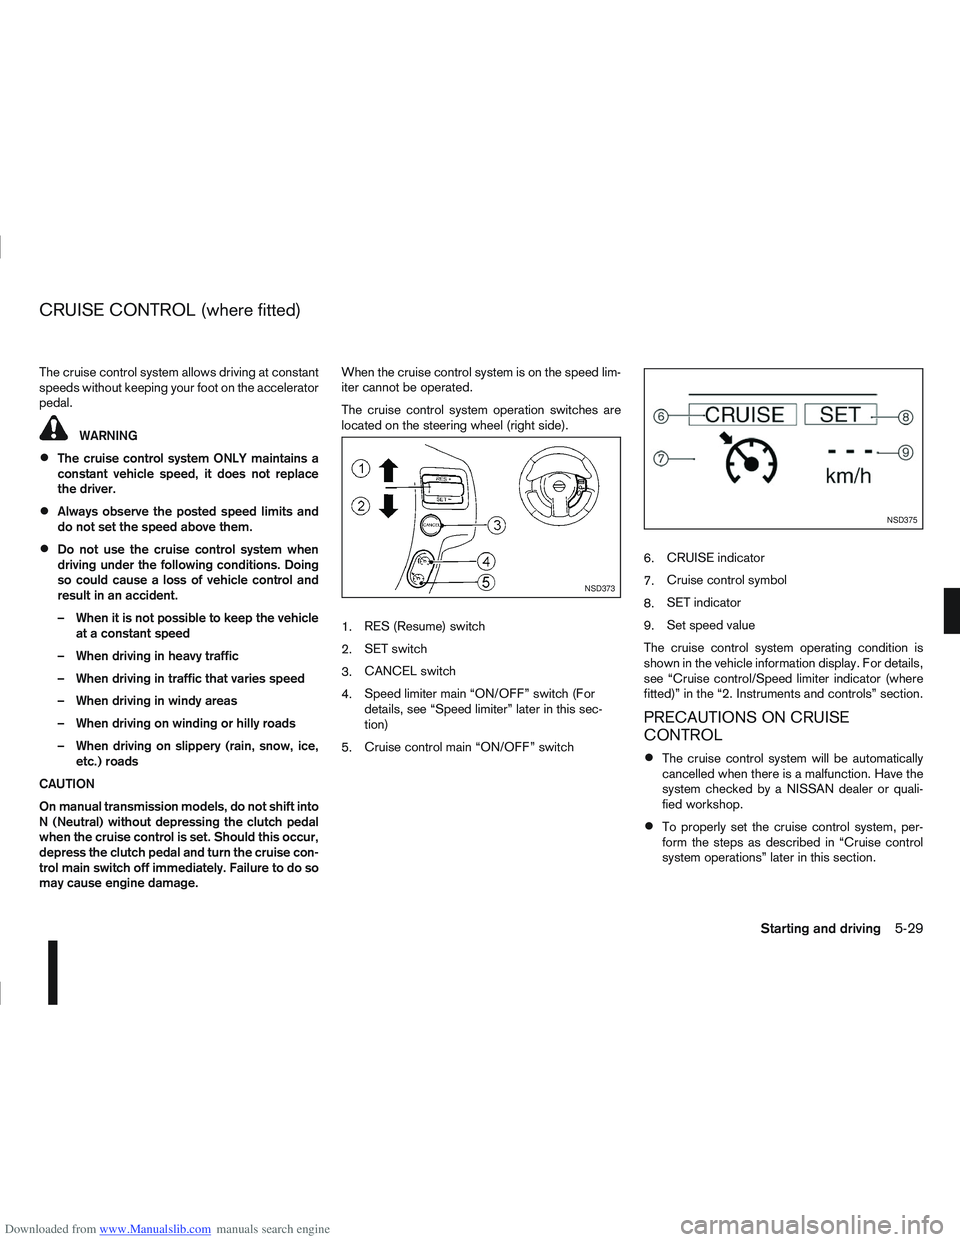
The cruise control system operation switches are
located on the steering wheel (right side).
1.
RES (Resume) switch
2. SET switch
3. CANCEL switch
4. Speed limiter main “ON/OFF” switch (For
details, see “Speed limiter” later in this sec-
tion)
5. Cruise control main “ON/OFF” switch 6.
CRUISE indicator
7. Cruise control symbol
8. SET indicator
9. Set speed value
The cruise control system operating condition is
shown in the vehicle information display. For details,
see “Cruise control/Speed limiter indicator (where
fitted)” in the “2. Instruments and controls” section.
PRECAUTIONS ON CRUISE
CONTROL
The cruise control system will be automatically
cancelled when there is a malfunction. Have the
system checked by a NISSAN dealer or quali-
fied workshop.
To properly set the cruise control system, per-
form the steps as described in “Cruise control
system operations” later in this section.
NSD373
NSD375
CRUISE CONTROL (where fitted)
Starting and driving5-29
Page 193 of 297
Downloaded from www.Manualslib.com manuals search engine CRUISE CONTROL SYSTEM
OPERATIONS
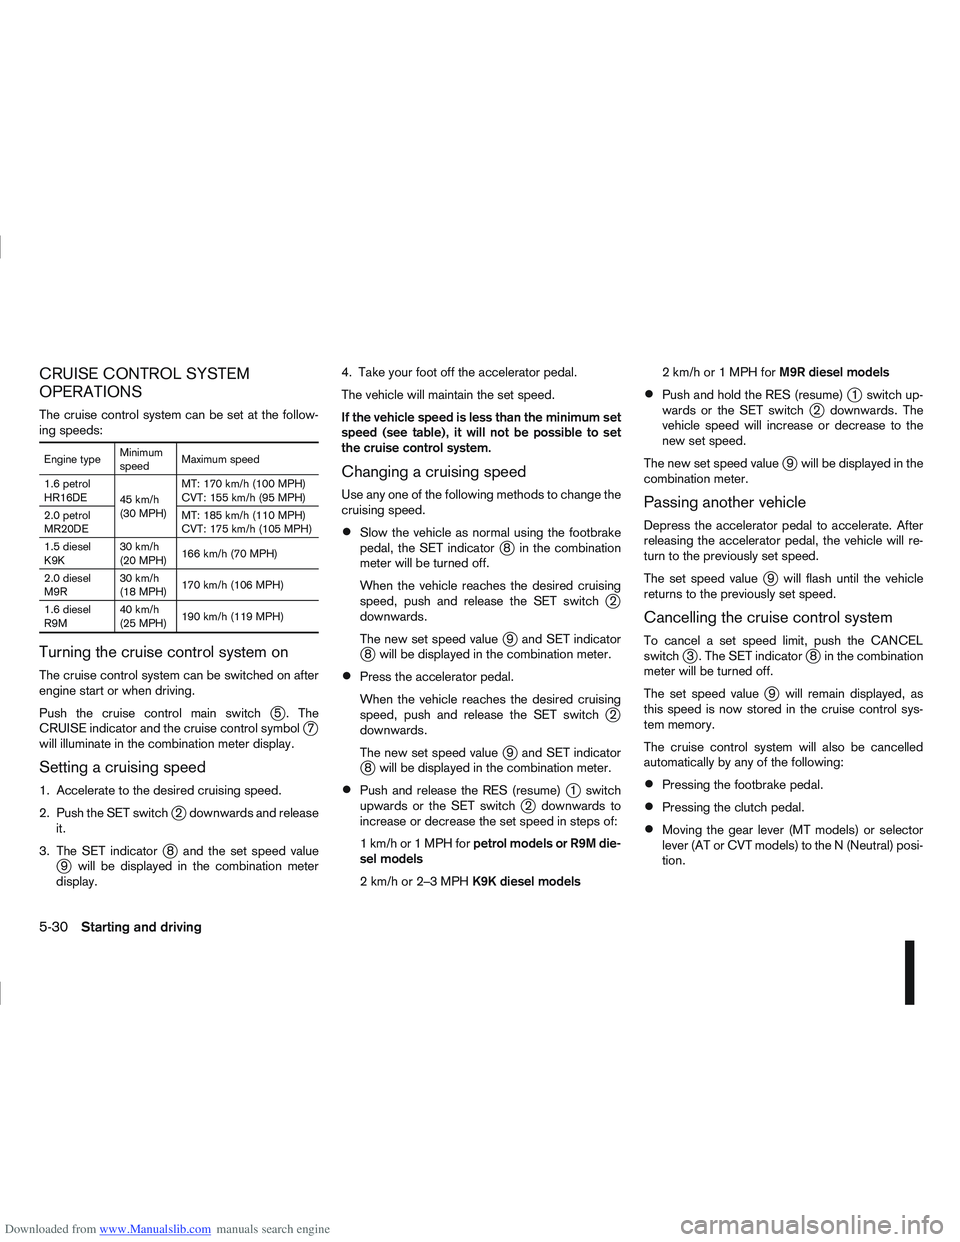
The cruise control system can be set at the follow-
ing speeds:
Engine typeMinimum
speedMaximum speed
1.6 petrol
HR16DE 45 km/h
(30 MPH)MT: 170 km/h (100 MPH)
CVT: 155 km/h (95 MPH)
2.0 petrol
MR20DE MT: 185 km/h (110 MPH)
CVT: 175 km/h (105 MPH)
1.5 diesel
K9K 30 km/h
(20 MPH)
166 km/h (70 MPH)
2.0 diesel
M9R 30 km/h
(18 MPH)
170 km/h (106 MPH)
1.6 diesel
R9M 40 km/h
(25 MPH)
190 km/h (119 MPH)
Turning the cruise control system on
The cruise control system can be switched on after
engine start or when driving.
Push the cruise control main switch
j5 . The
CRUISE indicator and the cruise control symbolj7
will illuminate in the combination meter display.
Setting a cruising speed
1. Accelerate to the desired cruising speed.
2. Push the SET switch
j2 downwards and release
it.
3. The SET indicator
j8 and the set speed valuej9 will be displayed in the combination meter
display. 4. Take your foot off the accelerator pedal.
The vehicle will maintain the set speed.
If the vehicle speed is less than the minimum set
speed (see table), it will not be possible to set
the cruise control system.
Changing a cruising speed
Use any one of the following methods to change the
cruising speed.
Slow the vehicle as normal using the footbrake
pedal, the SET indicatorj8 in the combination
meter will be turned off.
When the vehicle reaches the desired cruising
speed, push and release the SET switch
j2
downwards.
The new set speed value
j9 and SET indicatorj8 will be displayed in the combination meter.
Press the accelerator pedal.
When the vehicle reaches the desired cruising
speed, push and release the SET switch
j2
downwards.
The new set speed value
j9 and SET indicatorj8 will be displayed in the combination meter.
Push and release the RES (resume)j1 switch
upwards or the SET switchj2 downwards to
increase or decrease the set speed in steps of:
1km/hor1MPHforpetrol models or R9M die-
sel models
2km/hor2–3MPHK9K diesel models 2km/hor1MPHforM9R diesel models
Push and hold the RES (resume)j1 switch up-
wards or the SET switchj2 downwards. The
vehicle speed will increase or decrease to the
new set speed.
The new set speed value
j9 will be displayed in the
combination meter.
Passing another vehicle
Depress the accelerator pedal to accelerate. After
releasing the accelerator pedal, the vehicle will re-
turn to the previously set speed.
The set speed value
j9 will flash until the vehicle
returns to the previously set speed.
Cancelling the cruise control system
To cancel a set speed limit, push the CANCEL
switchj3 . The SET indicatorj8 in the combination
meter will be turned off.
The set speed value
j9 will remain displayed, as
this speed is now stored in the cruise control sys-
tem memory.
The cruise control system will also be cancelled
automatically by any of the following:
Pressing the footbrake pedal.
Pressing the clutch pedal.
Moving the gear lever (MT models) or selector
lever (AT or CVT models) to the N (Neutral) posi-
tion.
5-30Starting and driving
Page 194 of 297
Downloaded from www.Manualslib.com manuals search engine If the vehicle slows down more than approxi-
mately 12 km/h (8 MPH) below the set speed.
Resuming a previous cruising speed
If the cruising speed has been cancelled, the set
speed valuej9 will remain displayed in the combi-
nation meter and the speed will be stored in the
cruise control system memory. This cruising speed
can be reactivated by pressing the RES (Resume)
switch
j1 upwards.
If the vehicle speed is less than the minimum set
speed (see table), it will not be possible to re-
sume to the cruising speed.
Turn the cruise control system off
The cruise control system will be turned off when
one of the following operations is performed:
Push the cruise control main “ON/OFF” switchj5 . The cruise control symbolj7 , the CRUISE
indicatorj6 , the SET indicatorj8 , and the set
speed valuej9 will turn off in the combination
meter display
Push the speed limiter main “ON/OFF” switchj5 . The cruise control system information in the
combination meter will be replaced with the
speed limiter information. For details see “Speed
limiter” later in this section.
When the vehicle is stopped and the ignition is
turned to the off position.
Turning off the cruise control system will erase
the cruise control system memory. The speed limiter allows you to set the desired ve-
hicle speed limit. While the speed limiter is acti-
vated, you can perform normal braking and accel-
eration, but the vehicle will not exceed the set speed.
When the vehicle reaches the set speed limit or if
the set speed limit is lower than the actual vehicle
speed, the accelerator pedal will not work until the
vehicle speed drops below the set speed limit.
WARNING
The speed limiter will not automatically brake
the vehicle to the set speed limit.
Always observe posted speed limits. Do not
set the speed above them.
Always confirm the setting status of the speed
limiter in the combination meter display.
When the speed limiter is set, avoid hard ac-
celeration to reach the set limit to ensure that
the system can limit the speed of the vehicle
correctly.
When additional floor mats are used, be sure
that they are correctly secured and that they
cannot interfere with the accelerator pedal.
Mats not adapted to the vehicle may prevent
proper operation of the speed limiter.
When the speed limiter is on the cruise control sys-
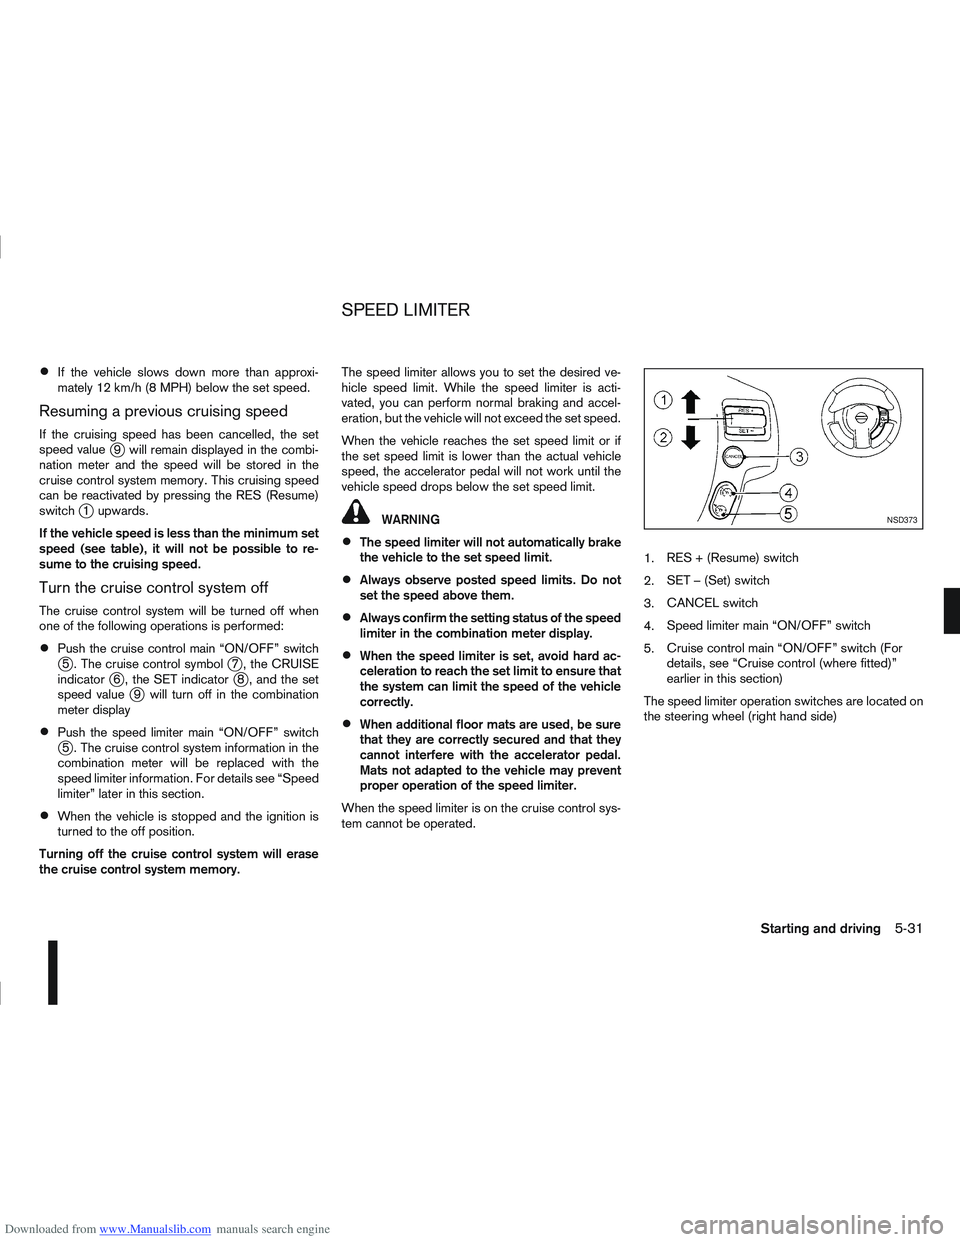
tem cannot be operated. 1.
RES + (Resume) switch
2. SET – (Set) switch
3. CANCEL switch
4. Speed limiter main “ON/OFF” switch
5. Cruise control main “ON/OFF” switch (For
details, see “Cruise control (where fitted)”
earlier in this section)
The speed limiter operation switches are located on
the steering wheel (right hand side)
NSD373
SPEED LIMITER
Starting and driving5-31
Page 195 of 297
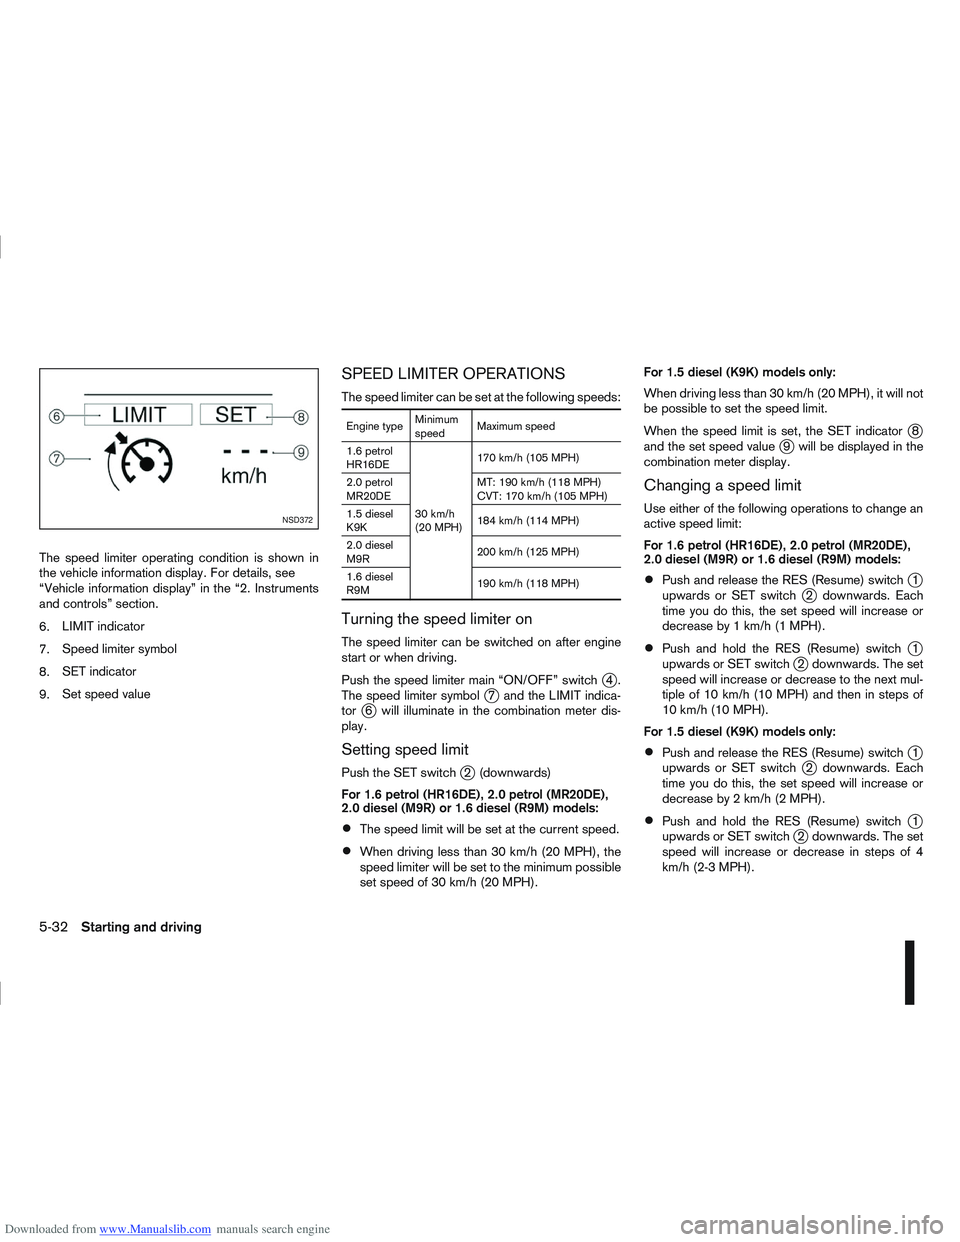
Downloaded from www.Manualslib.com manuals search engine The speed limiter operating condition is shown in
the vehicle information display. For details, see
“Vehicle information display” in the “2. Instruments
and controls” section.
6.LIMIT indicator
7. Speed limiter symbol
8. SET indicator
9. Set speed value
SPEED LIMITER OPERATIONS
The speed limiter can be set at the following speeds:
Engine type Minimum
speedMaximum speed
1.6 petrol
HR16DE
30 km/h
(20 MPH)170 km/h (105 MPH)
2.0 petrol
MR20DE MT: 190 km/h (118 MPH)
CVT: 170 km/h (105 MPH)
1.5 diesel
K9K 184 km/h (114 MPH)
2.0 diesel
M9R 200 km/h (125 MPH)
1.6 diesel
R9M 190 km/h (118 MPH)
Turning the speed limiter on
The speed limiter can be switched on after engine
start or when driving.
Push the speed limiter main “ON/OFF” switch
j4.
The speed limiter symbolj7 and the LIMIT indica-
torj6 will illuminate in the combination meter dis-
play.
Setting speed limit
Push the SET switchj2 (downwards)
For 1.6 petrol (HR16DE), 2.0 petrol (MR20DE),
2.0 diesel (M9R) or 1.6 diesel (R9M) models:
The speed limit will be set at the current speed.
When driving less than 30 km/h (20 MPH), the
speed limiter will be set to the minimum possible
set speed of 30 km/h (20 MPH). For 1.5 diesel (K9K) models only:
When driving less than 30 km/h (20 MPH), it will not
be possible to set the speed limit.
When the speed limit is set, the SET indicator
j8
and the set speed valuej9 will be displayed in the
combination meter display.
Changing a speed limit
Use either of the following operations to change an
active speed limit:
For 1.6 petrol (HR16DE), 2.0 petrol (MR20DE),
2.0 diesel (M9R) or 1.6 diesel (R9M) models:
Push and release the RES (Resume) switchj1
upwards or SET switchj2 downwards. Each
time you do this, the set speed will increase or
decrease by 1 km/h (1 MPH).
Push and hold the RES (Resume) switchj1
upwards or SET switchj2 downwards. The set
speed will increase or decrease to the next mul-
tiple of 10 km/h (10 MPH) and then in steps of
10 km/h (10 MPH).
For 1.5 diesel (K9K) models only:
Push and release the RES (Resume) switchj1
upwards or SET switchj2 downwards. Each
time you do this, the set speed will increase or
decrease by 2 km/h (2 MPH).
Push and hold the RES (Resume) switchj1
upwards or SET switchj2 downwards. The set
speed will increase or decrease in steps of 4
km/h (2-3 MPH).
NSD372
5-32Starting and driving