2008 NISSAN PATHFINDER lock
[x] Cancel search: lockPage 3 of 36
TAB LE O F C O NTE NTS
Remote Keyless Entry System . . . . . . . . . . . . . . . . . . 2
Intelligent Key System. . . . . . . . . . . . . . . . . . . . . . . 2
Windshield Wiper/Washer Switch . . . . . . . . . . . . . . . . 3
Headlight and Turn Signal Control . . . . . . . . . . . . . . . . 3
Steering Wheel Switches for Audio Control . . . . . . . . . . . 4
Cruise Control . . . . . . . . . . . . . . . . . . . . . . . . . . . 5
Automatic Climate Control . . . . . . . . . . . . . . . . . . . . 5
Rear Climate Control Dials . . . . . . . . . . . . . . . . . . . . 6
FM/AM/XM® Radio with CD Changer . . . . . . . . . . . . . . 7
Music Box Hard-Disk Drive Audio System . . . . . . . . . . . . 8
CompactFlash™ (CF) Player Operation . . . . . . . . . . . . . 9
Control Panel Display with Navigation System . . . . . . . . . . 9
Rearview Monitor (Navigation System Only) . . . . . . . . . . . 10
Clock/Set Adjustment . . . . . . . . . . . . . . . . . . . . . . . 10
Trip Computer . . . . . . . . . . . . . . . . . . . . . . . . . . . 11
Instrument Brightness Control/Trip Change Button . . . . . . . 11
Automatic Driver Positioner . . . . . . . . . . . . . . . . . . . . 11
Pedal Position Adjustment . . . . . . . . . . . . . . . . . . . . 12
Manual Shift Mode . . . . . . . . . . . . . . . . . . . . . . . . 12
Four-Wheel Drive (4WD) Shift Switch . . . . . . . . . . . . . . 13
Hill Descent Control Switch . . . . . . . . . . . . . . . . . . . 13
Front-Passenger Air Bag Status Light . . . . . . . . . . . . . . 14
Tire Pressure Monitoring System (TPMS) . . . . . . . . . . . . 14
Seat Belt Warning Light and Chime . . . . . . . . . . . . . . . 14
Child Safety Rear Door Lock . . . . . . . . . . . . . . . . . . . 14
Vehicle Dynamic Control (VDC) System Off Switch . . . . . . . 15
Heated Steering Wheel Switch . . . . . . . . . . . . . . . . . . 15
Sunroof Controls . . . . . . . . . . . . . . . . . . . . . . . . . 15
Liftgate . . . . . . . . . . . . . . . . . . . . . . . . . . . . . . . 16
Front Seat Adjustments . . . . . . . . . . . . . . . . . . . . . . 16
Folding the 2nd Row Bench Seat . . . . . . . . . . . . . . . . 16
Tip Up for Easy Entry or Exit From the 3rd Row . . . . . . . . . 17
Folding the 3rd Row Seats . . . . . . . . . . . . . . . . . . . . 17
Homelink® Universal Transceiver . . . . . . . . . . . . . . . . . 17
Bluetooth® Hands-Free Phone System . . . . . . . . . . . . . . 18
N ISSAN
Mobile Entertainment System . . . . . . . . . . . . . 21
Remote Audio System Controls . . . . . . . . . . . . . . . . . 22
NISSAN Voice Recognition System . . . . . . . . . . . . . . . 24
Navigation System . . . . . . . . . . . . . . . . . . . . . . . . . 26
Page 4 of 36
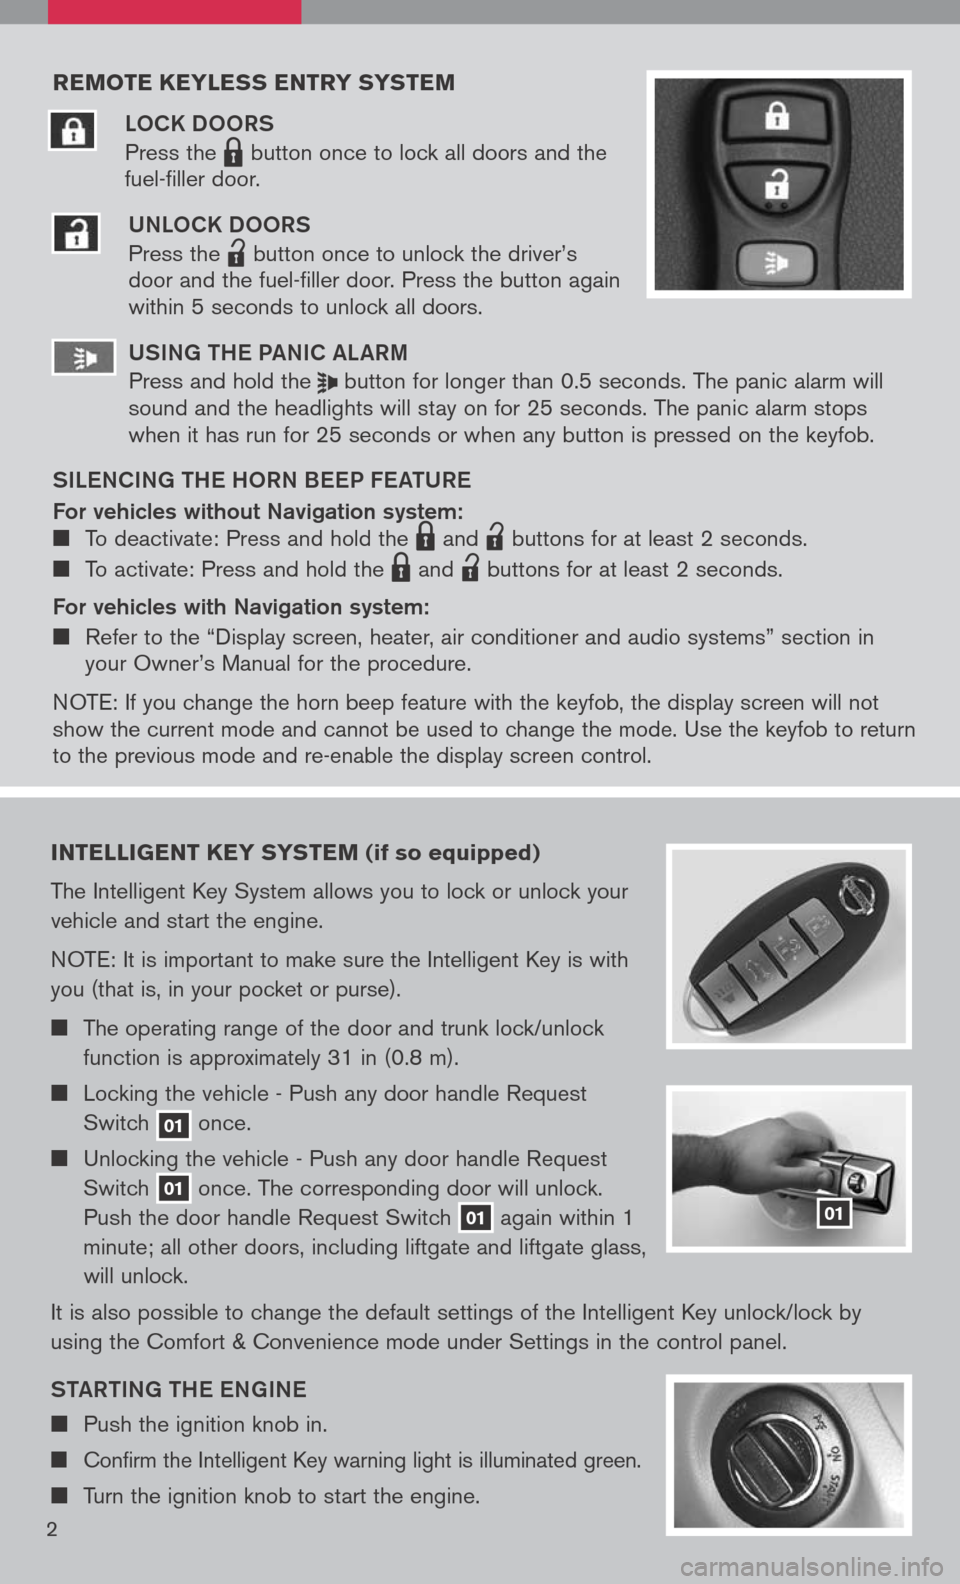
reMote keyless entry systeM
LOCK DOORS
Press the LPD0150 button once to lock all doors and the
fuel-filler door.
UNLOCK DOORS
Press the
lpd0151
button once to unlock the driver’s door and the fuel-filler door. Press the button again within 5 seconds to unlock all doors.
U SiN g the Pa NiC aL aR m
Press and hold the button for longer than 0.5 seconds. The panic alarm will sound and the headlights will stay on for 25 seconds. The panic alarm stops when it has run for 25 seconds or when any button is pressed on the keyfob.
S iL e NC iN g the h ORN B eeP F eat URe
For vehicles without Navigation system: To deactivate: Press and hold the LPD0150 and
lpd0151
buttons for at least 2 seconds.
To activate: Press and hold the LPD0150 and
lpd0151
buttons for at least 2 seconds.
For vehicles with Navigation system:
Refer to the “Display screen, heater, air conditioner and audio systems” section in your Owner’s Manual for the procedure.
N OTE: If you change the horn beep feature with the keyfob, the display screen will not show the current mode and cannot be used to change the mode. Use the keyfob to return to the previous mode and re-enable the display screen control.
intelligent key syste M (if so equipped)
The Intelligent Key System allows you to lock or unlock your
vehicle and start the engine.
NOTE: It is important to make sure the Intelligent Key is with
you (that is, in your pocket or purse).
The operating range of the door and trunk lock/unlock
function is approximately 31 in (0.8 m).
Locking the vehicle - Push any door handle Request
Switch 01 once.
Unlocking the vehicle - Push any door handle Request
Switch 01 once. The corresponding door will unlock.
Push the door handle Request Switch 01 again within 1
minute; all other doors, including liftgate and liftgate glass,
will unlock.
It is also possible to change the default settings of the Intelligent Key unlock/lock by
using the Comfort & Convenience mode under Settings in the control panel.
Sta Rti Ng the eN gi Ne
Push the ignition knob in.
Confirm the Intelligent Key warning light is illuminated green.
Turn the ignition knob to start the engine.
01
2
Page 5 of 36
tURN iN g the eN gi Ne OFF
Shift the transmission into P (Park).
Turn the ignition knob to the LOCK position.
An audible warning chime will sound when exiting the vehicle if the ignition knob is
not completely turned to the OFF position.
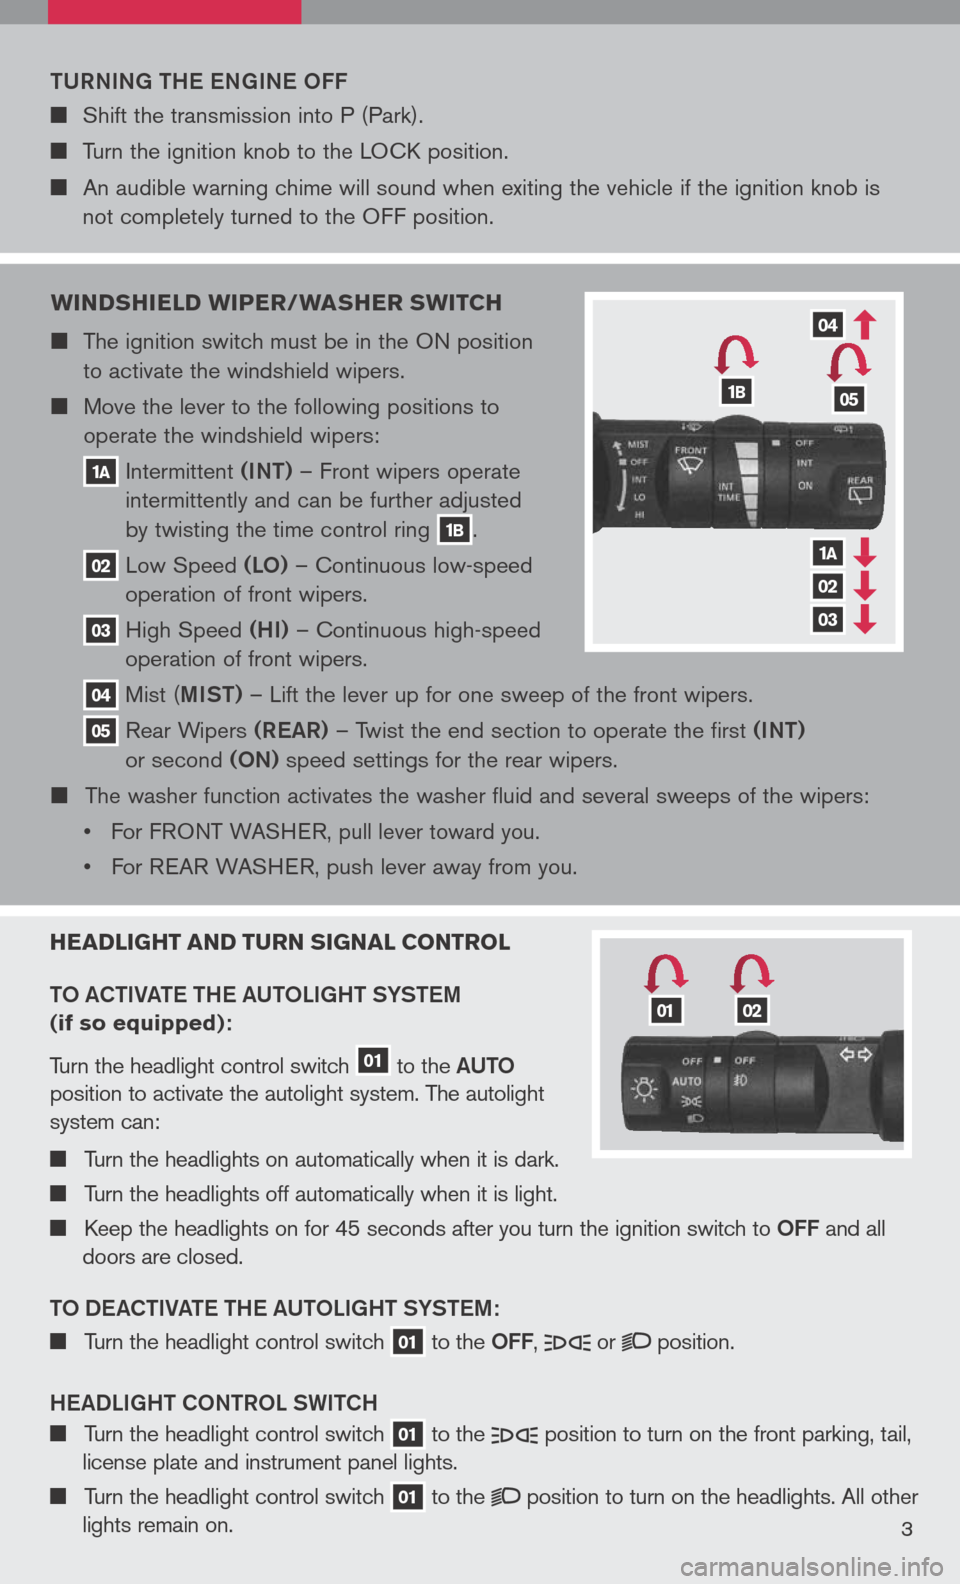
W indshield W iper/Washer sW itch
The ignition switch must be in the ON position
to activate the windshield wipers.
Move the lever to the following positions to
operate the windshield wipers:
1a Intermittent (iNt) – Front wipers operate
intermittently and can be further adjusted
by twisting the time control ring 1b.
02 Low Speed (LO) – Continuous low-speed
operation of front wipers.
03 High Speed (hi) – Continuous high-speed
operation of front wipers.
04 Mist ( miSt) – Lift the lever up for one sweep of the front wipers.
05 Rear Wipers (ReaR) – Twist the end section to operate the first (iNt)
or second (ON) speed settings for the rear wipers.
The washer function activates the washer fluid and several sweeps of the wipers:
• For F
RONT WASHER, pull lever toward you.
• For REAR WASHER, push lever away from you.
headlight and turn signal control
t O aC ti Vate the a U tOL ight SYStem
(if so equipped):
Turn the headlight control switch 01 to the aU tO
position to activate the autolight system. The autolight
system can:
Turn the headlights on automatically when it is dark.
Turn the headlights off automatically when it is light.
Keep the headlights on for 45 seconds after you turn the ignition switch to OFF and all
doors are closed.
t O D eaCti Vate the a U tOL ight SYStem:
Turn the headlight control switch 01 to the OFF, or position.
hea DLight CON tROL SW itCh
Turn the headlight control switch 01 to the position to turn on the front parking, tail,
license plate and instrument panel lights.
Turn the headlight control switch 01 to the position to turn on the headlights. All other
lights remain on.3
1b05
04
03
02
1a
0102
Page 12 of 36
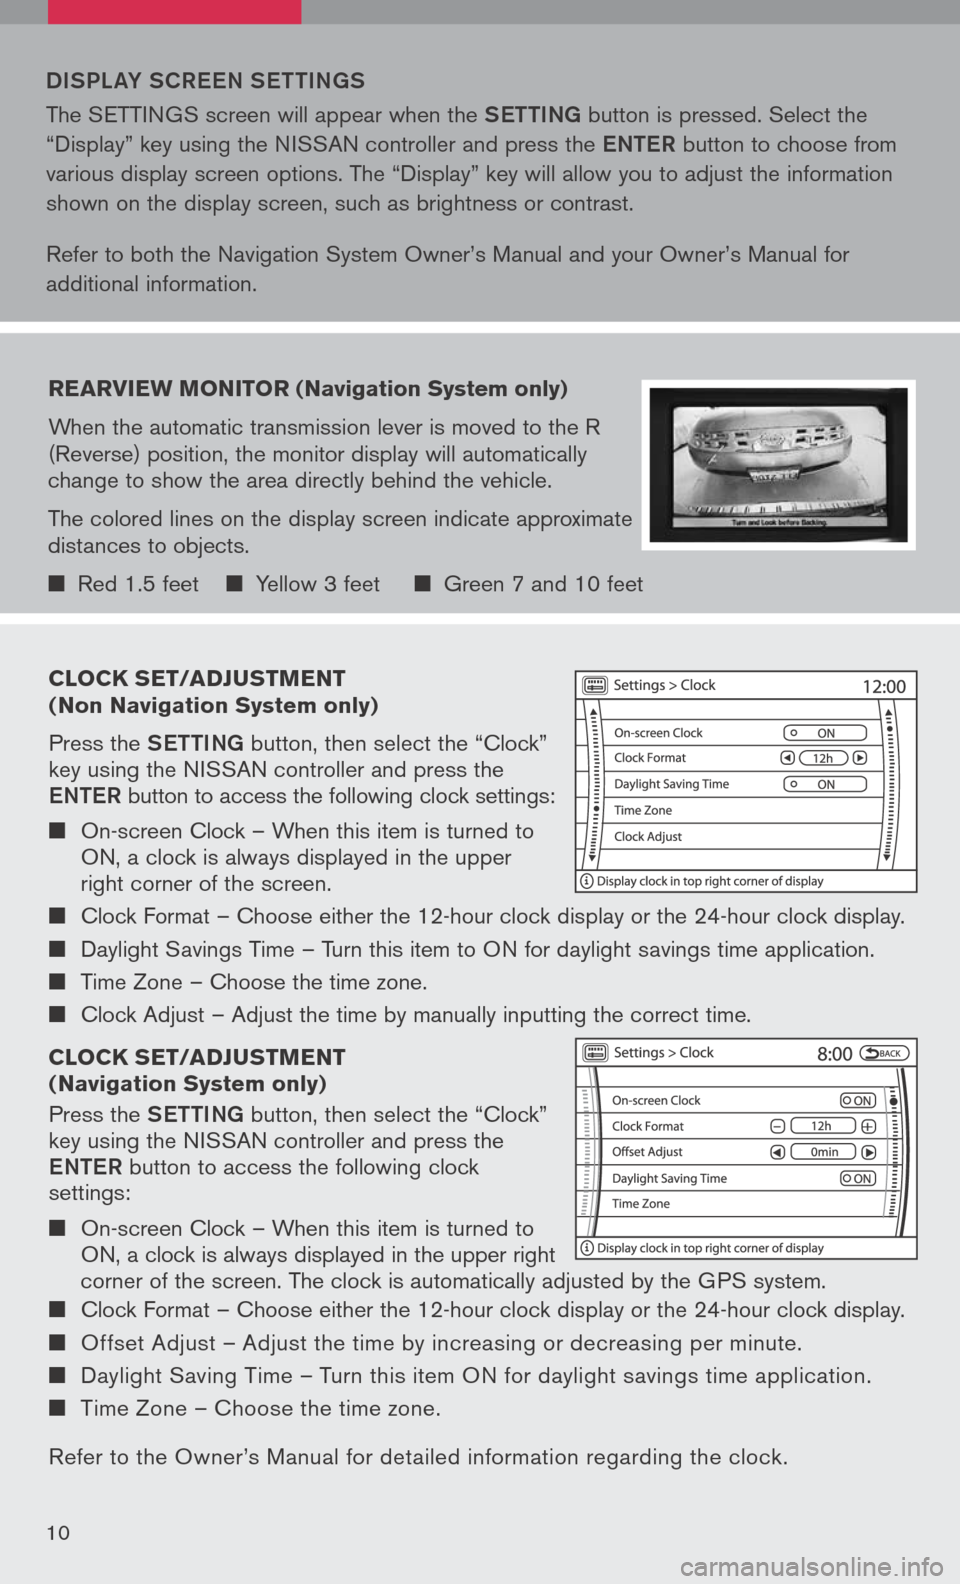
clock set/ad Just Ment
( n on navigation system only)
Press the Setti Ng button, then select the “Clock” key using the NISSAN controller and press the
eN te R button to access the following clock settings:
On-screen Clock – When this item is turned to ON, a clock is always displayed in the upper right corner of the screen.
Clock Format – Choose either the 12-hour clock display or the 24-hour clock display.
Daylight Savings Time – Turn this item to ON for daylight savings time application.
Time Zone – Choose the time zone.
Clock Adjust – Adjust the time by manually inputting the correct time.
clock set/ad Just Ment
( n avigation system only)
Press the Setti Ng button, then select the “Clock” key using the NISSAN controller and press the
eNte R button to access the following clock settings:
On-screen Clock – When this item is turned to ON, a clock is always displayed in the upper right
corner of the screen. The clock is automatically adjusted by the GPS system.
Clock Format – Choose either the 12-hour clock display or the 24-hour clock display.
Offset Adjust – Adjust the time by increasing or decreasing per minute.
Daylight Saving Time – Turn this item ON for daylight savings time application.
Time Zone – Choose the time zone.
Refer to the Owner’s Manual for detailed information regarding the clock.
DiSPL aY SCR eeN S etti Ng S
The SETTINGS screen will appear when the Setti Ng button is pressed. Select the
“Display” key using the NISSAN controller and press the eNte R button to choose from
various display screen options. The “Display” key will allow you to adjust the information
shown on the display screen, such as brightness or contrast.
Refer to both the Navigation System Owner’s Manual and your Owner’s Manual for
additional information.
rearvie W Monitor (n avigation system only)
When the automatic transmission lever is moved to the R (Reverse) position, the monitor display will automatically change to show the area directly behind the vehicle.
The colored lines on the display screen indicate approximate distances to objects.
Red 1.5 feet Yellow 3 feet Green 7 and 10 feet
10
Page 14 of 36
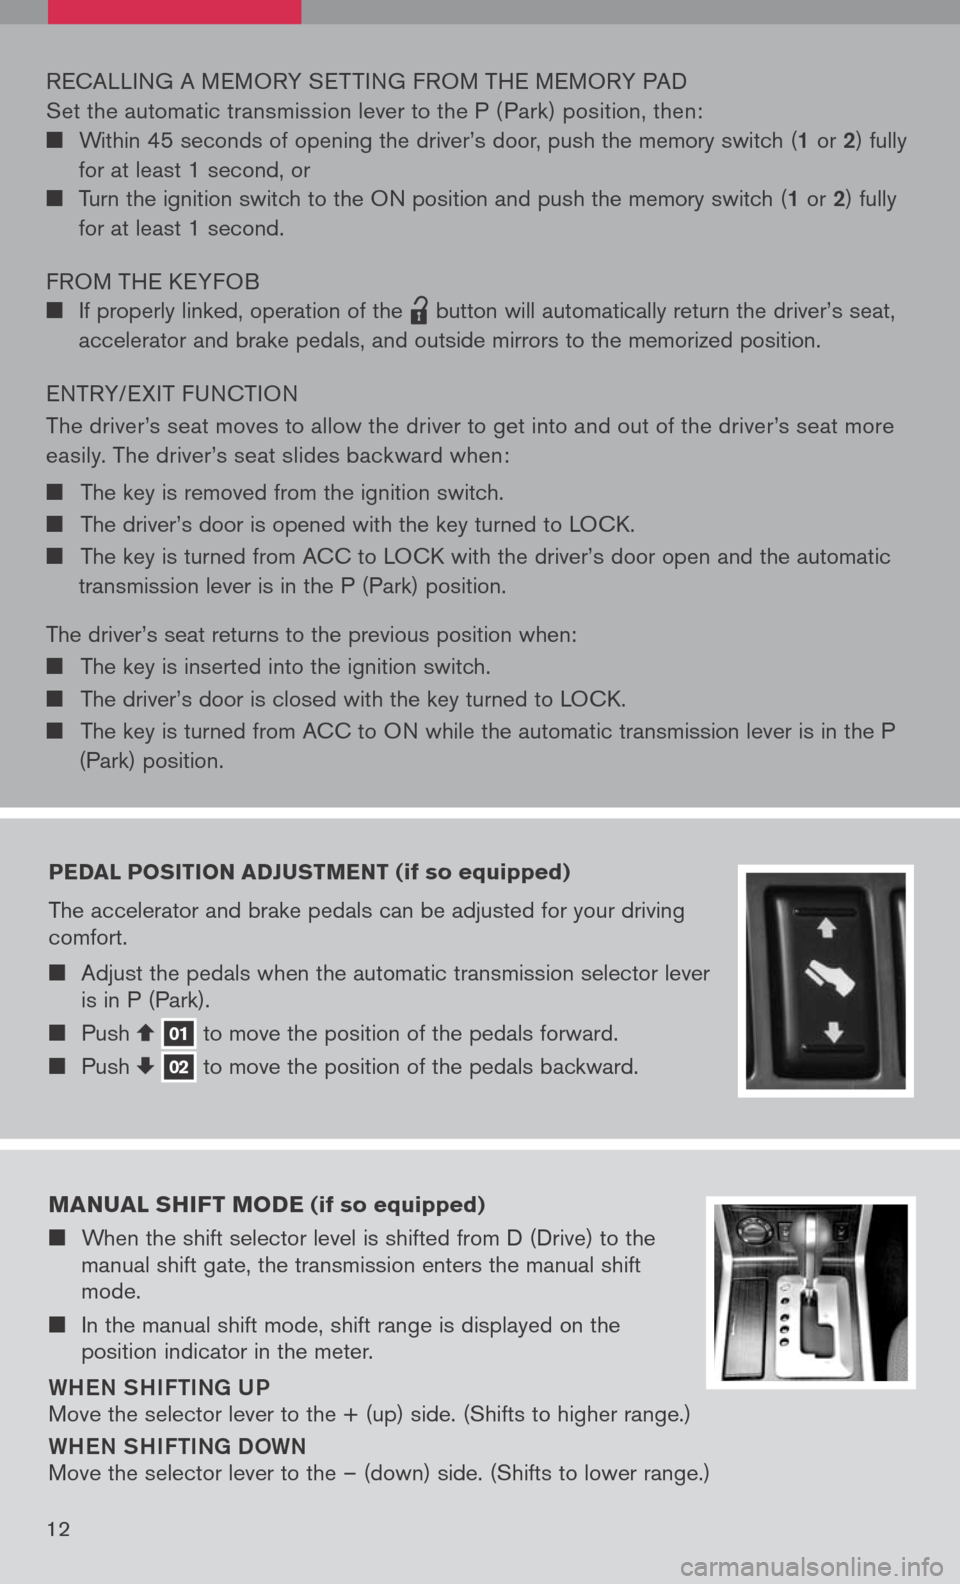
pedal position adJust Ment (if so equipped)
The accelerator and brake pedals can be adjusted for your driving comfort.
Adjust the pedals when the automatic transmission selector lever is in P (Park).
Push 01 to move the position of the pedals forward. Push 02 to move the position of the pedals backward.
RECALLING A MEMORY SET TING FROM THE MEMORY PAD
Set the automatic transmission lever to the P ( Park) position, then:
Within 45 seconds of opening the driver’s door, push the memory switch (1 or 2) fully
for at least 1 second, or
Turn the ignition switch to the ON position and push the memory switch (1 or 2) fully
for at least 1 second.
FROM THE KEYFOB
If properly linked, operation of the
lpd0151
button will automatically return the driver’s seat,
accelerator and brake pedals, and outside mirrors to the memorized position.
ENTRY/ EXIT FUNCTION
The driver’s seat moves to allow the driver to get into and out of the driver’s seat more
easily. The driver’s seat slides backward when:
The key is removed from the ignition switch.
The driver’s door is opened with the key turned to LOCK.
The key is turned from ACC to LOCK with the driver’s door open and the automatic
transmission lever is in the P (Park) position.
The driver’s seat returns to the previous position when:
The key is inserted into the ignition switch.
The driver’s door is closed with the key turned to LOCK.
The key is turned from ACC to ON while the automatic transmission lever is in the P
(Park) position.
M anual shiFt M ode (if so equipped)
When the shift selector level is shifted from D (Drive) to the manual shift gate, the transmission enters the manual shift mode.
In the manual shift mode, shift range is displayed on the position indicator in the meter.
Whe N Shi Fti Ng U P
Move the selector lever to the + (up) side. (Shifts to higher range.)
WheN Shi Fti Ng D OWN
Move the selector lever to the – (down) side. (Shifts to lower range.)
12
Page 16 of 36
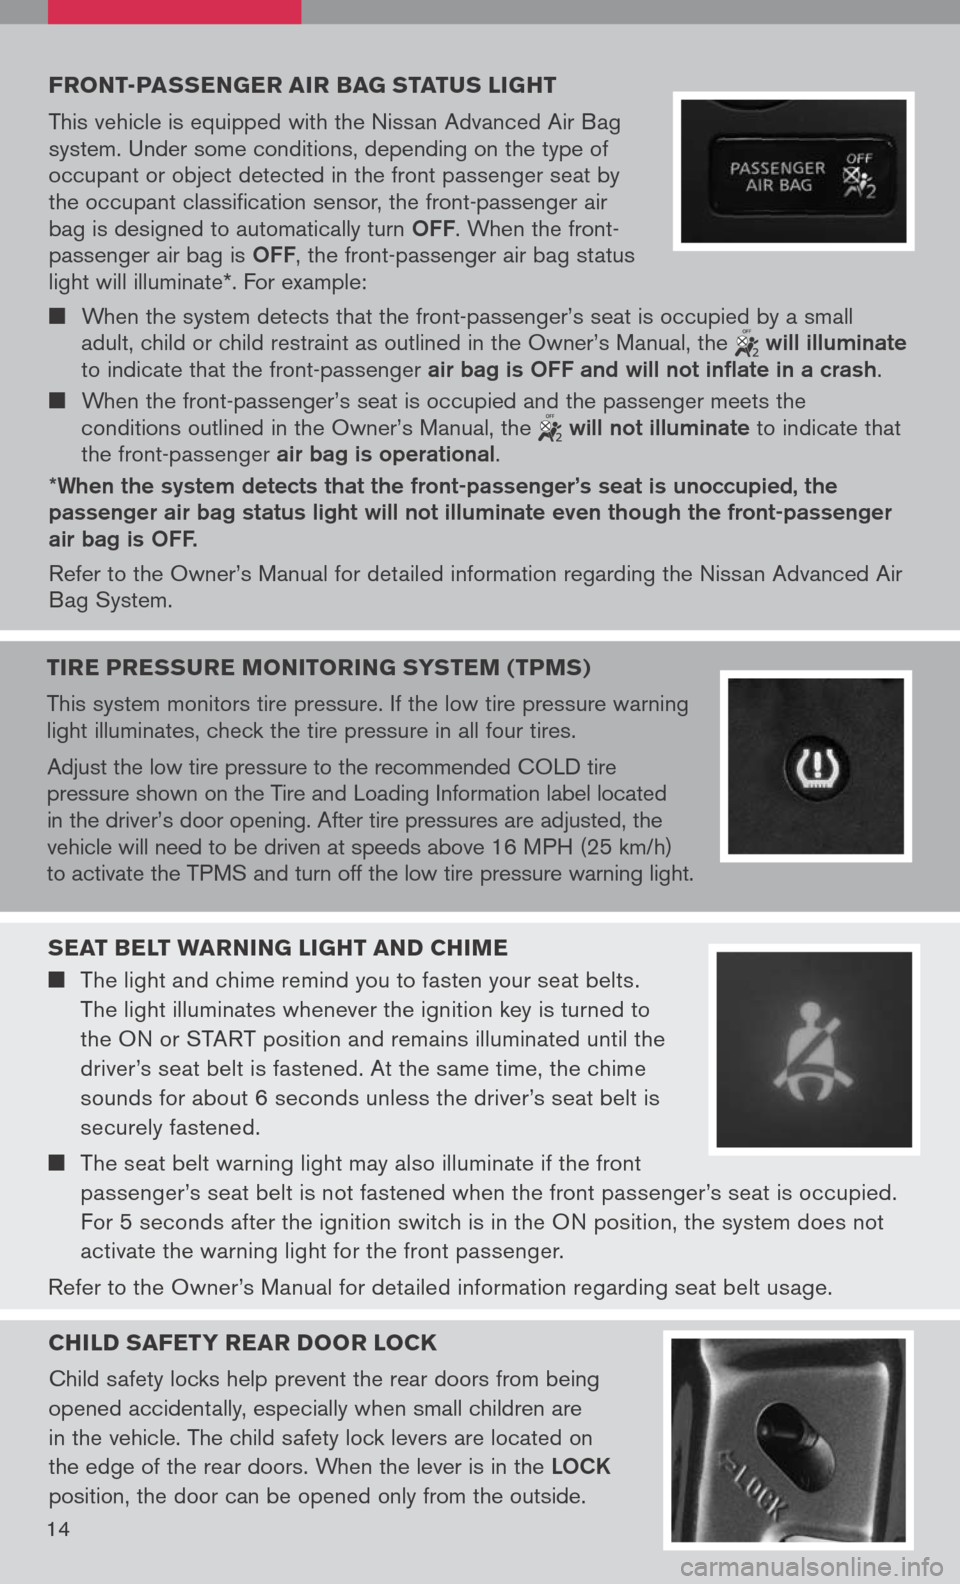
Front -passenger air bag status light
This vehicle is equipped with the Nissan Advanced Air Bag system. Under some conditions, depending on the type of occupant or object detected in the front passenger seat by the occupant classification sensor, the front-passenger air bag is designed to automatically turn OFF. When the front-passenger air bag is OFF, the front-passenger air bag status light will illuminate*. For example:
When the system detects that the front-passenger’s seat is occupied by a small adult, child or child restraint as outlined in the Owner’s Manual, the will illuminate to indicate that the front-passenger air bag is OFF and will not inflate in a crash.
When the front-passenger’s seat is occupied and the passenger meets the conditions outlined in the Owner’s Manual, the will not illuminate to indicate that the front-passenger air bag is operational.
*When the system detects that the front-passenger’s seat is unoccupied, the passenger air bag status light will not illuminate even though the front-passenger air bag is OFF.
Refer to the Owner’s Manual for detailed information regarding the Nissan Advanced Air Bag System.
seat belt W arning light and chiMe
The light and chime remind you to fasten your seat belts.
The light illuminates whenever the ignition key is turned to
the ON or START position and remains illuminated until the
driver’s seat belt is fastened. At the same time, the chime
sounds for about 6 seconds unless the driver’s seat belt is
securely fastened.
The seat belt warning light may also illuminate if the front
passenger’s seat belt is not fastened when the front passenger’s seat is occupied.
For 5 seconds after the ignition switch is in the ON position, the system does not
activate the warning light for the front passenger.
Refer to the Owner’s Manual for detailed information regarding seat belt usage.
child saFety rear door lock
Child safety locks help prevent the rear doors from being
opened accidentally, especially when small children are
in the vehicle. The child safety lock levers are located on
the edge of the rear doors. When the lever is in the LOCK
position, the door can be opened only from the outside.
14
tire pressure M onitoring systeM (tpMs)
This system monitors tire pressure. If the low tire pressure warning light illuminates, check the tire pressure in all four tires.
Adjust the low tire pressure to the recommended COLD tire pressure shown on the Tire and Loading Information label located in the driver’s door opening. After tire pressures are adjusted, the vehicle will need to be driven at speeds above 16 MPH (25 km/h) to activate the TPMS and turn off the low tire pressure warning light.
Page 18 of 36
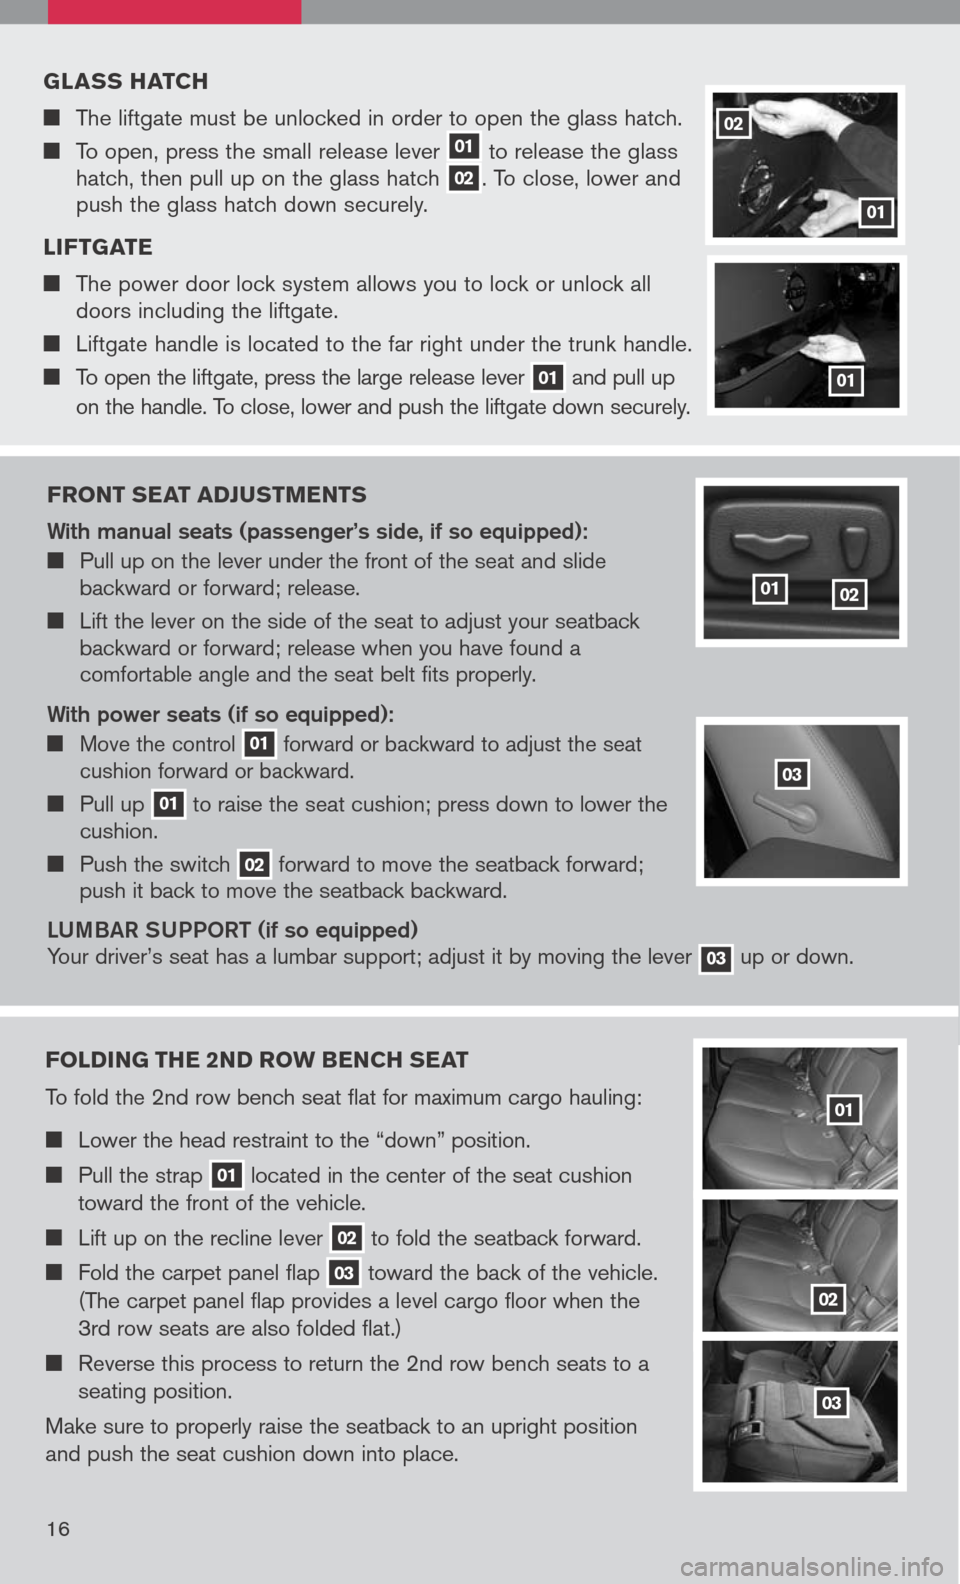
Front seat ad Just Ments
With manual seats (passenger’s side, if so equipped):
Pull up on the lever under the front of the seat and slide backward or forward; release.
Lift the lever on the side of the seat to adjust your seatback backward or forward; release when you have found a comfortable angle and the seat belt fits properly.
With power seats (if so equipped):
Move the control 01 forward or backward to adjust the seat cushion forward or backward.
Pull up 01 to raise the seat cushion; press down to lower the cushion.
Push the switch 02 forward to move the seatback forward; push it back to move the seatback backward.
LU mBaR SUPPOR t (if so equipped)
Your driver’s seat has a lumbar support; adjust it by moving the lever 03 up or down.
0102
g lass hatch
The liftgate must be unlocked in order to open the glass hatch.
To open, press the small release lever 01 to release the glass hatch, then pull up on the glass hatch 02. To close, lower and push the glass hatch down securely.
l iF tgate
The power door lock system allows you to lock or unlock all doors including the liftgate.
Liftgate handle is located to the far right under the trunk handle.
To open the liftgate, press the large release lever 01 and pull up
on the handle. To close, lower and push the liftgate down securely.
01
02
01
Folding the 2nd ro W bench seat
To fold the 2nd row bench seat flat for maximum cargo hauling:
Lower the head restraint to the “down” position.
Pull the strap 01 located in the center of the seat cushion
toward the front of the vehicle.
Lift up on the recline lever 02 to fold the seatback forward.
Fold the carpet panel flap 03 toward the back of the vehicle.
(The carpet panel flap provides a level cargo floor when the
3rd row seats are also folded flat.)
Reverse this process to return the 2nd row bench seats to a
seating position.
Make sure to properly raise the seatback to an upright position
and push the seat cushion down into place.
01
02
03
03
16