2008 NISSAN PATHFINDER brake light
[x] Cancel search: brake lightPage 7 of 36

cruise control
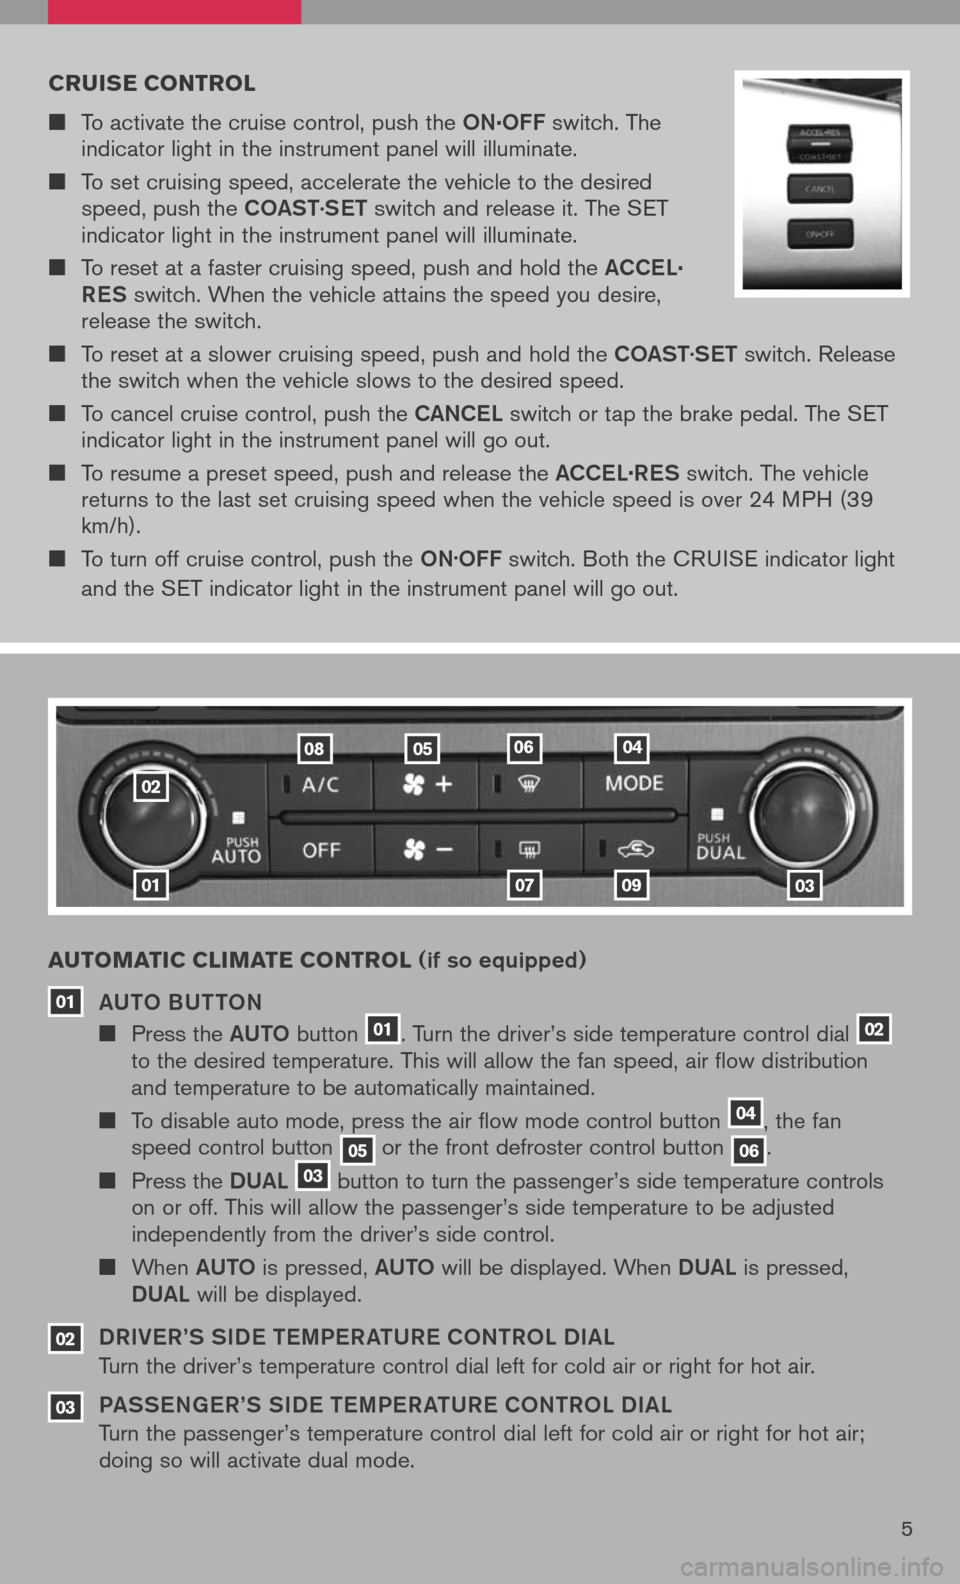
To activate the cruise control, push the ON.OFF switch. The indicator light in the instrument panel will illuminate.
To set cruising speed, accelerate the vehicle to the desired speed, push the COaSt.
S et switch and release it. The SET indicator light in the instrument panel will illuminate.
To reset at a faster cruising speed, push and hold the aCCe L.
R eS
switch. When the vehicle attains the speed you desire, release the switch.
To reset at a slower cruising speed, push and hold the COaSt.
S et switch. Release the switch when the vehicle slows to the desired speed.
To cancel cruise control, push the CaNCe L switch or tap the brake pedal. The SET indicator light in the instrument panel will go out.
To resume a preset speed, push and release the aCCe L.
R eS switch. The vehicle returns to the last set cruising speed when the vehicle speed is over 24 MPH (39 km/h).
To turn off cruise control, push the ON.OFF switch. Both the CRUISE indicator light
and the SET indicator light in the instrument panel will go out.
01
02
01
a uto Matic cli M ate control (if so equipped)
a U tO BU ttON
Press the aUt O button 01. Turn the driver’s side temperature control dial 02 to the desired temperature. This will allow the fan speed, air flow distribution and temperature to be automatically maintained.
To disable auto mode, press the air flow mode control button 04, the fan speed control button 05 or the front defroster control button 06.
Press the DUaL 03 button to turn the passenger’s side temperature controls on or off. This will allow the passenger’s side temperature to be adjusted independently from the driver’s side control.
When aUt O is pressed, aUt O will be displayed. When DUaL is pressed,
DU aL will be displayed.
DR iV e R’S S iD e tem Pe R at UR e CO NtROL D iaL
Turn the driver’s temperature control dial left for cold air or right for hot air.
Pa SS eN ge R’S S iD e tem Pe R at UR e CON tROL D iaL
Turn the passenger’s temperature control dial left for cold air or right for hot air; doing so will activate dual mode.
03
02
0709
08050406
5
03
Page 13 of 36

instruMent brightness control /trip change button
The instrument brightness control operates when the headlight control switch is in the or position.
Turn the control to adjust the brightness of the instrument panel lights.
Press the change button to select trip computer features. See above for more information on the trip computer.
trip coMputer (if so equipped)
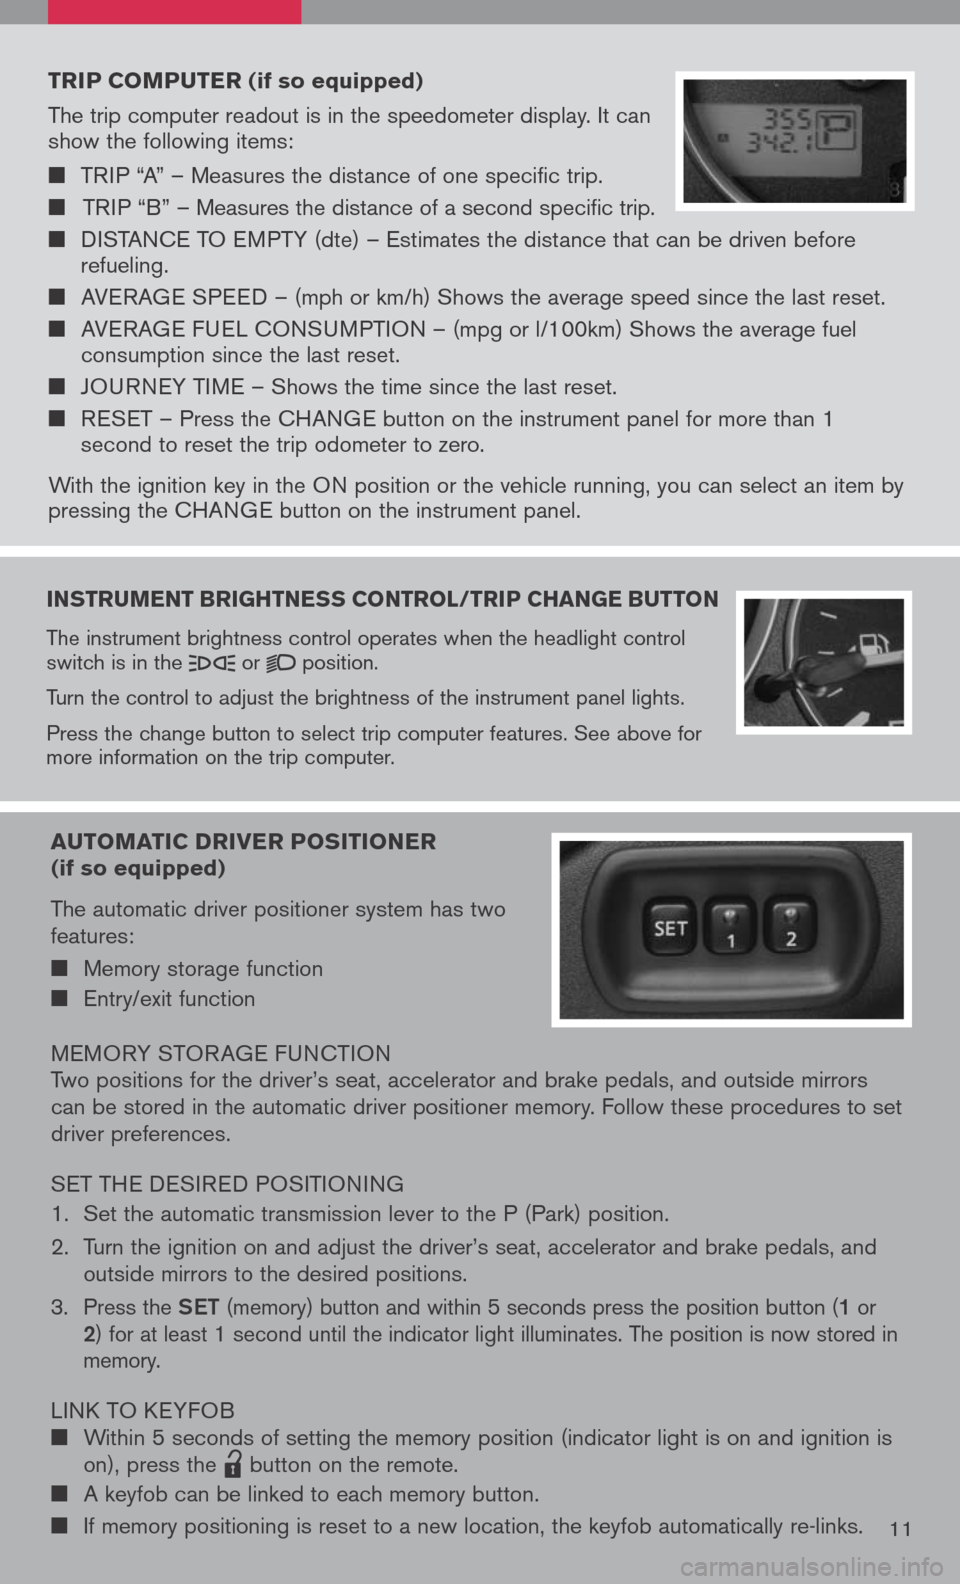
The trip computer readout is in the speedometer display. It can show the following items:
TRIP “A” – Measures the distance of one specific trip.
TRIP “B” – Measures the distance of a second specific trip.
DISTANCE TO EMPTY (dte) – Estimates the distance that can be driven before refueling.
AVERAGE SPEED – (mph or km/h) Shows the average speed since the last reset.
AVERAGE FUEL CONSUMPTION – (mpg or l/100km) Shows the average fuel consumption since the last reset.
JOURNEY TIME – Shows the time since the last reset.
RESET – Press the CHANGE button on the instrument panel for more than 1 second to reset the trip odometer to zero.
With the ignition key in the ON position or the vehicle running, you can select an item by pressing the CHANGE button on the instrument panel.
auto Matic driver positioner (if so equipped)
The automatic driver positioner system has two features:
Memory storage function
Entry/exit function
MEMORY STOR AGE FUNCTIONTwo positions for the driver’s seat, accelerator and brake pedals, and outside mirrors can be stored in the automatic driver positioner memory. Follow these procedures to set driver preferences.
SET THE DESIRED POSITIONING
1. Set the automatic transmission lever to the P (Park) position.
2. Turn the ignition on and adjust the driver’s seat, accelerator and brake pedals, and
outside mirrors to the desired positions.
3. Press the Set (memory) button and within 5 seconds press the position button (1 or 2) for at least 1 second until the indicator light illuminates. The position is now stored in memory.
LINK TO KEYFOB Within 5 seconds of setting the memory position (indicator light is on and ignition is on), press the
lpd0151
button on the remote.
A keyfob can be linked to each memory button.
If memory positioning is reset to a new location, the keyfob automatically re-links.11
Page 15 of 36

Four -Wheel drive (4W d) shi Ft sW itch
(if so equipped)
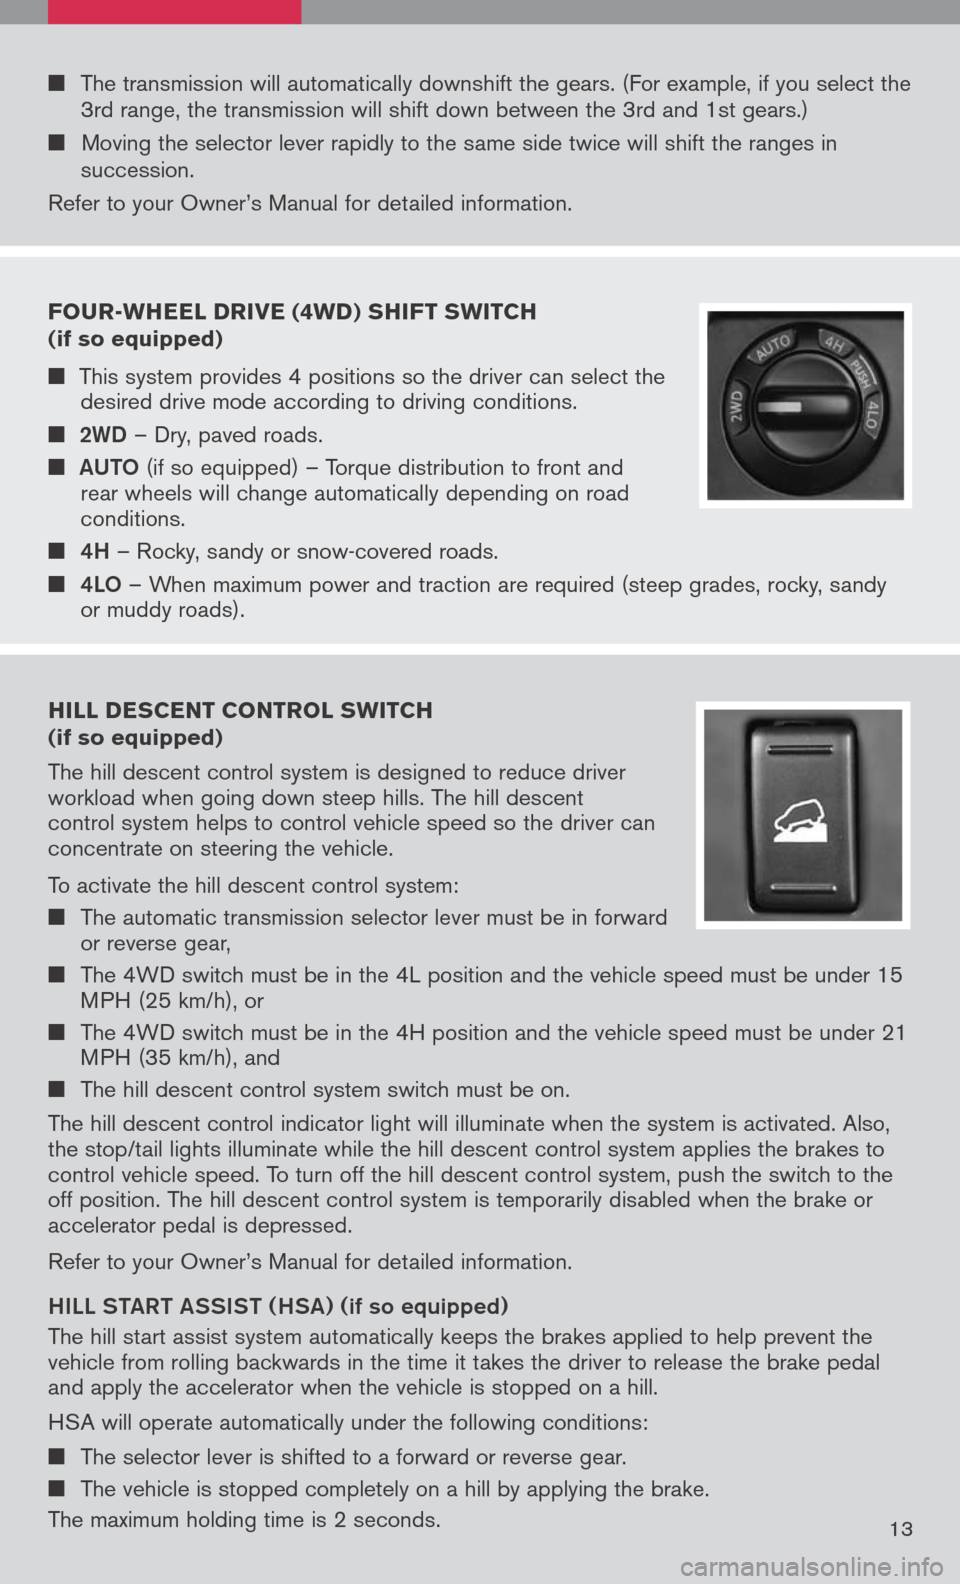
This system provides 4 positions so the driver can select the desired drive mode according to driving conditions.
2WD – Dry, paved roads.
aUt O
(if so equipped) – Torque distribution to front and rear wheels will change automatically depending on road conditions.
4h – Rocky, sandy or snow-covered roads.
4LO – When maximum power and traction are required (steep grades, rocky, sandy or muddy roads).
hill descent control s W itch (if so equipped)
The hill descent control system is designed to reduce driver workload when going down steep hills. The hill descent control system helps to control vehicle speed so the driver can concentrate on steering the vehicle.
To activate the hill descent control system:
The automatic transmission selector lever must be in forward or reverse gear,
The 4WD switch must be in the 4L position and the vehicle speed must be under 15 MPH (25 km/h), or
The 4WD switch must be in the 4H position and the vehicle speed must be under 21 MPH (35 km/h), and
The hill descent control system switch must be on.
The hill descent control indicator light will illuminate when the system is activated. Also, the stop/tail lights illuminate while the hill descent control system applies the brakes to control vehicle speed. To turn off the hill descent control system, push the switch to the off position. The hill descent control system is temporarily disabled when the brake or accelerator pedal is depressed.
Refer to your Owner’s Manual for detailed information.
hiLL Sta Rt aSS iS t ( hSa) (
if so equipped)
The hill start assist system automatically keeps the brakes applied to help prevent the vehicle from rolling backwards in the time it takes the driver to release the brake pedal and apply the accelerator when the vehicle is stopped on a hill.
HSA will operate automatically under the following conditions:
The selector lever is shifted to a forward or reverse gear.
The vehicle is stopped completely on a hill by applying the brake.
The maximum holding time is 2 seconds.13
The transmission will automatically downshift the gears. (For example, if you select the 3rd range, the transmission will shift down between the 3rd and 1st gears.)
Moving the selector lever rapidly to the same side twice will shift the ranges in succession.
Refer to your Owner’s Manual for detailed information.