Page 33 of 235

The front passenger air bag indicator light warns of
front passenger air bag status. If the front passen-
ger air bag has been deactivated, the light comes on
and stays on as long as the front passenger air bag
switch remains in the OFF position.
A.Models with Intelligent Key
B.Models without Intelligent Key
Deactivating the front passenger air bag
To fit a rear facing child restraint on the front pas-
senger seat, you must deactivate the front passen-
ger seat air bag system:1. With the ignition switch in the LOCK position
and the engine off, open the passenger’s side
door.
2. Insert the ignition key/emergency key (Intelligent
Key equipped models) in the front passenger air
bag switch on the side of the dashboard, press
then turn the key to the OFF position.
3. Turn the ignition switch to the ON position and
make sure the front passenger air bag indicator
light
remains illuminated.
The
indicator light remains continuously illumi-
nated to warn you of front passenger air bag status.
See “Child restraints” later in this section for child
seat appropriate fitting.
Activating the front passenger air bag
You should reactivate the front passenger air bag
system as soon as the child restraint is not in use on
the front passenger seat to ensure protection of the
front passenger seat occupant in the event of an
impact.
To reactivate the front passenger air bag system:
1. With the ignition switch in the LOCK position
and the engine off, open the passenger’s side
door.
2. Insert the ignition key/emergency key (Intelligent
Key equipped models) in the front passenger air
bag switch and turn the key to the ON position.
NPA746Z
Safety — seats, seat belts and supplemental restraint system1-15
Page 34 of 235

3. Turn the ignition switch to the ON position and
make sure the front passenger air bag indicator
light
illuminates for a few seconds and then
turns off.
WARNING
If any of the following conditions occur after the
ignition switch has been turned to the ON posi-
tion, the front passenger air bag system needs
servicing and your vehicle must be taken to the
nearest NISSAN dealer or qualified workshop.
•The front passenger air bag indicator light
comes on and remains illuminated after ap-
proximately 7 seconds while the front pas-
senger air bag switch is ON.
•The front passenger air bag indicator light
does not come on at all while the front pas-
senger air bag switch is ON.
Unless checked and repaired, the front passenger
air bag system may not function properly.
PRECAUTIONS ON CHILD
RESTRAINT USAGE
Infants and small children shouldalwaysbe placed
in an infant or child restraint while riding in the ve-
hicle.
WARNING
•Infants and small children should never be
carried on your lap. It is not possible for even
the strongest adult to resist the forces of an
accident. The child could be crushed between
the adult and parts of the vehicle. Also, do not
put the same seat belt around both your child
and yourself. In general, child restraints are
designed to be installed with the lap portion
of a three-point type seat belt.
•NISSAN recommends to install the child re-
straint on the rear seat when available. Ac-
cording to accident statistics, children are
safer when properly restrained in the rear seat
than in the front seat.
•An improperly installed child restraint could
lead to serious injury in an accident.
Child restraints specially designed for infants and
small children are offered by several manufacturers.
When selecting any child restraint, keep the follow-
ing points in mind:
•Choose a child restraint that complies with the
latest European safety standard, ECE Regula-
tion 44.03.
•Place your child in the child restraint and check
the various adjustments to be sure that the child
restraint is suitable for your child. Always follow
all of the recommended procedures.
•Check the child restraint in your vehicle to be
sure it is compatible with the vehicle’s seat belt
system.
•Refer to the tables further in this section for a list
of the recommended fitment positions and the
approved child restraint for your vehicle.
WARNING
•Since your vehicle is equipped with a front
passenger air bag, never install a rear facing
child restraint in the front seat without first
deactivating the front passenger air bag.
•Adjustable seatbacks should be positioned to
fit the child seat; however, it should be as
upright as possible.
•Follow all the child restraint manufacturer’s
instructions for installation and use. An ap-
SSS0099Z
CHILD RESTRAINTS
1-16Safety — seats, seat belts and supplemental restraint system
Page 35 of 235

propriate child restraint should be chosen and
purchased according to the child and the ve-
hicle as it may not be possible to properly
install some types of child restraints in your
vehicle.
•Improper use of a child restraint can increase
injuries for both the infant or child and other
occupants in the vehicle.
•When your child restraint is not in use, keep it
secured with a seat belt to prevent it from
being thrown forward in case of a sudden stop
or accident.
•Remember that a child restraint left in a closed
vehicle can become very hot. Check the seat-
ing surface and buckles before placing your
child in the child restraint.
•After attaching a child restraint, test the seat
before you place the child in it. Tilt it from side
to side. Try to tug it forward and check
whether the belt holds it in place. If the re-
straint is not secure, tighten the belt as nec-
essary, or put the restraint in another seat
and test it again.
•If the child restraint is not anchored properly,
the risk of a child being injured in a collision
or a sudden stop greatly increases.
•The front passenger seat and adjustable rear
bench seat should be positioned to fit the
child seat appropriately. See “Installation of a
child restraint system on the front passengerseat” later in this section and “Installation of a
child restraint system on rear seats” later in
this section.
•For a front facing child restraint, installed on a
three-point type lap/shoulder belt, make sure
the shoulder belt does not go in front of the
child’s face or neck. If it does, put the shoul-
der belt behind the child restraint.
•If the child restraint is equipped with a locking
clip, ensure that the clip is securely fastened
to the vehicle seat belt. If the locking clip is
not used, injuries could result from the child
restraint tipping over during normal vehicle
braking or cornering.
Safety — seats, seat belts and supplemental restraint system1-17
Page 36 of 235

Approved child restraint positions List of approved ISOFIX and specific
Universal child restraints
Age group Seating position
Rear outer pas-
sengerRear centre pas-
senger
Group0(<10
kg - 0 to 9
months)Fair G0/1 (1) (2) Romer Baby
Safe (1) (3)
Group 0+ (< 13
kg - 0 to 24
months)Fair G0/1 (1) (2) Romer Baby
Safe (1) (3)
Group1(9to18
kg - 9 to 48
months)Fair G0/1 (2) Romer Lord (3)
Romer Duo-Plus
(3)
Group 2 and 3
(15to36kg–4
to 12 years)Romer Kid (3) Romer Kid (3)
(1) Rearward facing only
(2) The child restraint requires an additional ISOFIX plat-
form to be fitted to your vehicle. Refer to a NISSAN
dealer or qualified workshop for proper platform refer-
ences.
(3) Universal mode ONLY
WARNING
•Since your vehicle is equipped with a front
passenger air bag system, do not fit a rear
facing child restraint on the front passenger
seat without first deactivating the front pas-
senger air bag as such a restraint system used
Age groupSeating position
Front passenger (with
deactivatedfront pas-
senger air bag ONLY)Rear outer passengerRear centre pas-
senger
Group 0 (< 10 kg - 0 to 9 months) U (1) U or I (1) L (1)
Group 0+ (< 13 kg - 0 to 24 months) U (1) U or I (1) L (1)
Group 1 (9 to 18 kg - 9 to 48 months) U U or I L
Group2and3(15to36kg–4to12years) U U L
U: Suitable for “Universal” category -forward and rearward facing child restraints- approved in this age group.
I: Suitable for “ISOFIX (with Top Tether)” category.
L: Suitable for particular child restraints given in the following table. These restraints may be of the specific vehicle,
restricted, “semi-Universal” or “Universal” categories.
X: Seat position not suitable for restraints in this age group.
(1) Rearward facing only.
NOTE
•For the forward facing child restraint position on the rear seat, slide the front passenger seat as
far forwards as possible and the rear bench seat to its rearmost position.
•For the rearward facing child restraint position on the rear seat, slide the front passenger seat
as far backwards as possible and slide the rear bench seat forwards until the edge of the child
restraint touches the front seat.
•For the rearward facing child restraint on the front passenger seat, slide the front passenger
seat forward so that the child restraint touches the vehicle dashboard.
1-18Safety — seats, seat belts and supplemental restraint system
Page 37 of 235

in this position could cause serious injury to
the infant in case of air bag deployment dur-
ing a collision.
•In vehicles equipped with a side air bag sys-
tem, do not let any infants or small children sit
in the front passenger’s seat as the air bag
may cause serious injury in case of deploy-
ment during a collision.
NOTE
Universal child restraints approved to ECE Regu-
lation No. 44.03 are clearly marked “Universal”.
INSTALLATION OF A CHILD
RESTRAINT SYSTEM ON THE FRONT
PASSENGER SEAT
WARNING
•Never install a rear facing child restraint sys-
tem in the front seat without first deactivating
the front passenger air bag. Inflating supple-
mental front-impact air bags inflate with greatforce. A child restraint system could be struck
by the supplemental front-impact air bags in
an accident and could seriously injure or kill
your child.
•NISSAN recommends that infants or small
children be seated in a child restraint system
in the rear seat. According to accident statis-
tics, children are safer when properly
restrained in the rear seat than in the front
seat.
Rear facing
If you install a child restraint system in the front seat,
follow these steps:
1. Deactivate the front passenger air bag. See
“Supplemental Restraint System (air bag
system)” earlier in this section for further details.
2. Move the seat to the rearmost position.
3. Adjust the head restraint to its highest position.
Remove it if it interferes with the child restraint
installation. In such situation, securely store the
head restraint in the luggage compartment so
that it does not become a dangerous projectile
during a sudden stop or in an accident.
4. Position the child restraint system in the front
passenger’s seat.
Always follow the child restraint system manu-
facturer’s instructions for installation and use.5. Route the seat belt tongue through the child re-
straint system and insert it into the buckle until
you hear and feel the latch engage.
To prevent slack in the lap belt, it will be neces-
sary to secure the shoulder belt in place with a
locking clip
jA . Use a locking clip attached to
the child restraint system, or one which is equiva-
lent in dimensions and strength.
Be sure to follow the child restraint system
manufacturer’s instructions for belt routing.
6. Slide the seat forward so that the seat belt fully
tightens the child restraint system and the child
restraint reaches the vehicle dashboard.
7. Test the child restraint system before you place
the child in it. Tilt it from side to side. Try to tug it
forward and check if it is held securely in place.
NPA679Z
Front passenger air bag left active
SSS0513Z
Safety — seats, seat belts and supplemental restraint system1-19
Page 38 of 235

INSTALLATION OF A CHILD
RESTRAINT SYSTEM ON REAR
SEATS
WARNING
•NISSAN recommends that infants or small
children be seated in a child restraint system.
According to accident statistics, children are
safer when properly restrained in the rear seat
than in the front seat.
•The direction of the child restraint system de-
pends on the type of the child restraint sys-
tem and the size of the child.
Front-facing
When you install a front-facing child restraint system
in a rear outer or centre seat, follow these steps:
1. Position the rear sliding bench seat to its rear-
most position and the front passenger seat as far
forward as possible.
2. Position the front-facing child restraint system on
the rear seat.
Always follow the child restraint system manu-
facturer’s instructions for installation and use.3. Route the seat belt tongue through the child re-
straint system and insert it into the buckle until
you hear and feel the latch engage.
To prevent slack in the lap belt, it will be neces-
sary to secure the shoulder belt in place with a
locking clipjA . Use a locking clip attached to
the child restraint system, or one which is equiva-
lent in dimensions and strength.
Be sure to follow the child restraint system
manufacturer’s instructions for belt routing.
4. Test the child restraint system before you place
the child in it. Tilt it from side to side. Try to tug it
forward and check if it is held securely in place.
5. Check to make sure that the child restraint sys-
tem is properly secured prior to each use.
SSS0374AZ
Rear outer seat
NPA736Z
Rear centre seat
SSS0513Z
1-20Safety — seats, seat belts and supplemental restraint system
Page 39 of 235

Rear-facing
When you install a rear-facing child restraint system
in a rear outer or centre seat, follow these steps:
1. Slide the front passenger seat as far backwards
as possible and slide the rear bench seat for-
wards.
2. Position the rear-facing child restraint system on
the rear seat.
Always follow the child restraint system manu-
facturer’s instructions for installation and use.3. Route the seat belt tongue through the child re-
straint system and insert it into the buckle until
you hear and feel the latch engage.
To prevent slack in the lap belt, it will be neces-
sary to secure the shoulder belt in place with a
locking clip
jA . Use a locking clip attached to
the child restraint system, or one which is equiva-
lent in dimensions and strength.
Be sure to follow the child restraint system
manufacturer’s instructions for belt routing.
4. Test the child restraint system before you place
the child in it. Tilt it from side to side. Try to tug it
forward and check if it is held securely in place.
Then adjust the rear bench seat so that the edge
of the child restraint touches the front seat.
5. Check to make sure that the child restraint sys-
tem is properly secured prior to each use.
SSS0375AZ
Rear outer seat
NPA737Z
Rear centre seat
SSS0513Z
Safety — seats, seat belts and supplemental restraint system1-21
Page 40 of 235

ISOFIX SYSTEM
WARNING
•Attach ISOFIX compatible child restraint sys-
tems only at the locations shown by the la-
bels. If a child restraint is not secured prop-
erly, your child could be seriously injured or
killed in an accident.
•The rear sliding bench seat is equipped with
2 ISOFIX compatible child restraint systems,
on both outer seats ONLY. Do not secure a
child restraint in the rear centre seating posi-
tion using the child restraint lower anchors.
The child restraint will not be secured prop-
erly.
•The ISOFIX system anchors are designed to
withstand only those loads imposed by cor-
rectly fitted child restraints. Under no circum-
stances are they to be used for adult seat
belts or harnesses.
Some child restraints include two rigid or webbing-
mounted attachments that can be connected to two
anchors located at certain seating positions in your
vehicle. This system is known as the ISOFIX or
ISOFIX compatible system. With this system, you
do not have to use a vehicle seat belt to secure the
child restraint. Your vehicle is equipped with special
anchor points that are used with ISOFIX system
compatible child restraints. Check your child re-
straint for a label stating that it is compatible with the
ISOFIX system. This information may also be in the
child restraint owner’s manual. If you have such a
NPA720
1-22Safety — seats, seat belts and supplemental restraint system
 1
1 2
2 3
3 4
4 5
5 6
6 7
7 8
8 9
9 10
10 11
11 12
12 13
13 14
14 15
15 16
16 17
17 18
18 19
19 20
20 21
21 22
22 23
23 24
24 25
25 26
26 27
27 28
28 29
29 30
30 31
31 32
32 33
33 34
34 35
35 36
36 37
37 38
38 39
39 40
40 41
41 42
42 43
43 44
44 45
45 46
46 47
47 48
48 49
49 50
50 51
51 52
52 53
53 54
54 55
55 56
56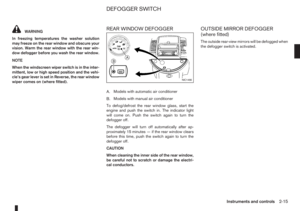 57
57 58
58 59
59 60
60 61
61 62
62 63
63 64
64 65
65 66
66 67
67 68
68 69
69 70
70 71
71 72
72 73
73 74
74 75
75 76
76 77
77 78
78 79
79 80
80 81
81 82
82 83
83 84
84 85
85 86
86 87
87 88
88 89
89 90
90 91
91 92
92 93
93 94
94 95
95 96
96 97
97 98
98 99
99 100
100 101
101 102
102 103
103 104
104 105
105 106
106 107
107 108
108 109
109 110
110 111
111 112
112 113
113 114
114 115
115 116
116 117
117 118
118 119
119 120
120 121
121 122
122 123
123 124
124 125
125 126
126 127
127 128
128 129
129 130
130 131
131 132
132 133
133 134
134 135
135 136
136 137
137 138
138 139
139 140
140 141
141 142
142 143
143 144
144 145
145 146
146 147
147 148
148 149
149 150
150 151
151 152
152 153
153 154
154 155
155 156
156 157
157 158
158 159
159 160
160 161
161 162
162 163
163 164
164 165
165 166
166 167
167 168
168 169
169 170
170 171
171 172
172 173
173 174
174 175
175 176
176 177
177 178
178 179
179 180
180 181
181 182
182 183
183 184
184 185
185 186
186 187
187 188
188 189
189 190
190 191
191 192
192 193
193 194
194 195
195 196
196 197
197 198
198 199
199 200
200 201
201 202
202 203
203 204
204 205
205 206
206 207
207 208
208 209
209 210
210 211
211 212
212 213
213 214
214 215
215 216
216 217
217 218
218 219
219 220
220 221
221 222
222 223
223 224
224 225
225 226
226 227
227 228
228 229
229 230
230 231
231 232
232 233
233 234
234