2008 NISSAN MURANO ignition
[x] Cancel search: ignitionPage 205 of 444
Black plate (201,1)
Model "Z51-D" EDITED: 2008/ 6/ 26
SAA2010
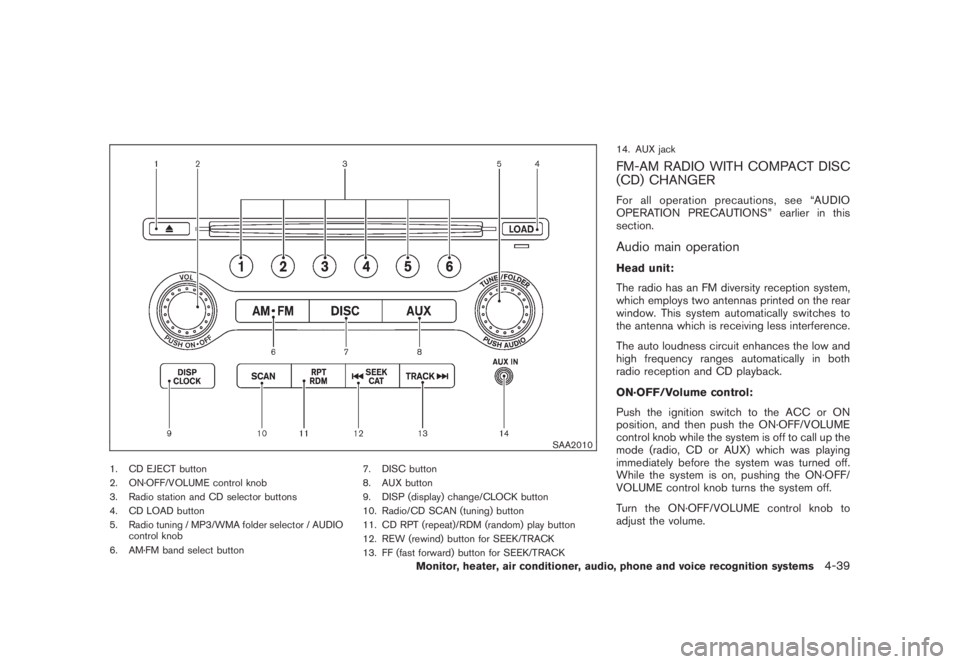
1. CD EJECT button
2. ON·OFF/VOLUME control knob
3. Radio station and CD selector buttons
4. CD LOAD button
5. Radio tuning / MP3/WMA folder selector / AUDIO
control knob
6. AM·FM band select button7. DISC button
8. AUX button
9. DISP (display) change/CLOCK button
10. Radio/CD SCAN (tuning) button
11. CD RPT (repeat)/RDM (random) play button
12. REW (rewind) button for SEEK/TRACK
13. FF (fast forward) button for SEEK/TRACK14. AUX jack
FM-AM RADIO WITH COMPACT DISC
(CD) CHANGERFor all operation precautions, see “AUDIO
OPERATION PRECAUTIONS” earlier in this
section.Audio main operationHead unit:
The radio has an FM diversity reception system,
which employs two antennas printed on the rear
window. This system automatically switches to
the antenna which is receiving less interference.
The auto loudness circuit enhances the low and
high frequency ranges automatically in both
radio reception and CD playback.
ON·OFF/Volume control:
Push the ignition switch to the ACC or ON
position, and then push the ON·OFF/VOLUME
control knob while the system is off to call up the
mode (radio, CD or AUX) which was playing
immediately before the system was turned off.
While the system is on, pushing the ON·OFF/
VOLUME control knob turns the system off.
Turn the ON·OFF/VOLUME control knob to
adjust the volume.
Monitor, heater, air conditioner, audio, phone and voice recognition systems
4-39
Page 206 of 444

Black plate (202,1)
Model "Z51-D" EDITED: 2008/ 6/ 26
Adjusting sound quality:
Push the Audio control knob to change the
selecting mode as follows.
Bass?Treble?Fade?Balance?Beep
Rotate the Audio control knob to adjust Bass,
Treble, Fade and Balance to the desired level.
Fade adjusts the sound level between the front
and rear speakers and Balance adjusts the
sound between the right and left speakers.
To turn the beep sound off or on, rotate the
Audio control knob until the desired mode is
displayed. This turns on or off the beep sound
when audio buttons are pushed.
Once you have adjusted the sound quality to the
desired level, push the Audio control knob
repeatedly until the radio or CD display re-
appears. Otherwise, the radio or CD display will
automatically reappear after about 5 seconds.
CLOCK adjust:
Push the CLOCK adjust button for more than
1.5 seconds to turn on the CLOCK display.
See “CLOCK” in the “2. Instruments and
controls” section for the detailed clock adjust-
ment operation.
FM-AM radio operation
radio (FM/AM) band select:
Pushing the radio band select button will
change the band as follows:
AM?FM1?FM2?AM
When the radio band select button is pushed
while the ignition switch is in the ACC or ON
position, the radio will come on at the station last
played.
The last station/channel played will also come
on when the ON·OFF/VOL control knob is
pushed to ON.
If another audio source is playing when the radio
band select button is turned to ON, the audio
source will automatically be turned off and the
last radio station played will come on.
When the stereo broadcast signal is weak, the
radio will automatically change from stereo to
monaural reception.
TUNE (Tuning):
Turn the TUNE/FOLDER knob for manual tuning.
SEEK tuning:
Push the SEEK·CAT or TRACK button
or
to tune from low to high or high to low
frequencies and to stop at the next broadcasting
station.SCAN tuning:
Push the SCAN tuning button to tune from low
to high frequencies and stops at each broad-
casting station for 5 seconds. Pushing the
button again during this 5 seconds period will
stop SCAN tuning and the radio will remain
tuned to that station.
If the SCAN tuning button is not pushed within 5
seconds, SCAN tuning moves to the next
station.
*1
to
*6
Station memory operations:
Twelve stations/channels can be set for the FM
band (6 for FM1, 6 for FM2) and 6 stations can
be set for the AM band.
1. Choose the radio band AM, FM1 or FM2
using the radio band select button.
2. Tune to the desired station using the SEEK,
SCAN or TUNE button.
3. Select the desired station/channel and keep
pushing any of the desired station preset
4-40
Monitor, heater, air conditioner, audio, phone and voice recognition systems
Page 207 of 444
Black plate (203,1)
Model "Z51-D" EDITED: 2008/ 6/ 26
buttons
*1
to
*6
until a beep sound is
heard. (The radio mutes when the select
button is pushed.)
4. The channel indicator will then come on and
the sound will resume. Memorizing is now
complete.
5. Other buttons can be set in the same
manner.
If the battery cable is disconnected, or if the fuse
blows, the radio memory will be erased. In that
case, reset the desired stations.
Compact Disc (CD) changer operationPush the ignition switch to the ACC or ON
position, push the LOAD button and insert the
compact disc into the slot with the label side
facing up. The compact disc will be guided
automatically into the slot and start playing.
After loading the disc, the number of tracks on
the disc and the play time will appear on the
display.
If the radio is already operating, it will auto-
matically turn off and the compact disc will play.
If the system has been turned off while the
compact disc was playing, pushing the ON·-
OFF/VOL control knob will start the compact
disc.
CD LOAD:
To insert a CD in the CD changer, push the
LOAD button for less than 1.5 seconds. Select
the loading position by pushing the CD insert
select button
*1
to*6, then insert the CD.
To insert 6 CDs to the CD changer in
succession, push the LOAD button for more
than 1.5 seconds.
The inserted slot numbers will illuminate on the
display.
PLAY:
When the DISC (CD play) button is pushed with
the system off and the compact disc loaded, the
system will turn on and the compact disc will
start to play.
When the DISC button is pushed with the
compact disc loaded and the radio playing, the
radio will automatically be turned off and the
compact disc will start to play.
When the DISC button is pushed while a CD is
loaded and a medium is played using the
auxiliary input jacks, you can toggle back and
forth between CD and medium.
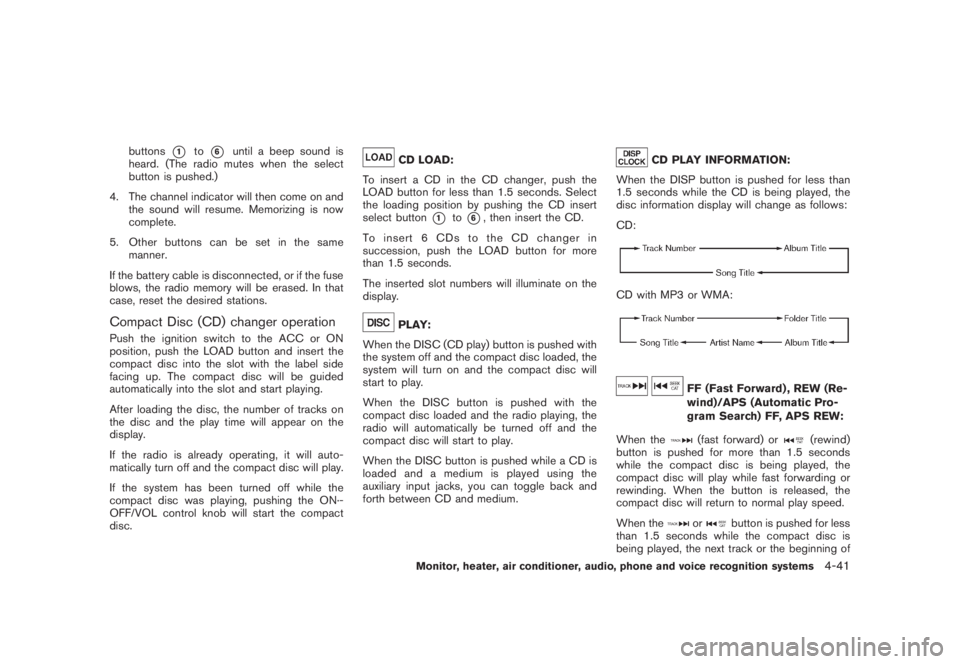
CD PLAY INFORMATION:
When the DISP button is pushed for less than
1.5 seconds while the CD is being played, the
disc information display will change as follows:
CD:
CD with MP3 or WMA:
FF (Fast Forward) , REW (Re-
wind)/APS (Automatic Pro-
gram Search) FF, APS REW:
When the(fast forward) or
(rewind)
button is pushed for more than 1.5 seconds
while the compact disc is being played, the
compact disc will play while fast forwarding or
rewinding. When the button is released, the
compact disc will return to normal play speed.
When the
or
button is pushed for less
than 1.5 seconds while the compact disc is
being played, the next track or the beginning of
Monitor, heater, air conditioner, audio, phone and voice recognition systems
4-41
Page 210 of 444
Black plate (206,1)
Model "Z51-D" EDITED: 2008/ 6/ 26
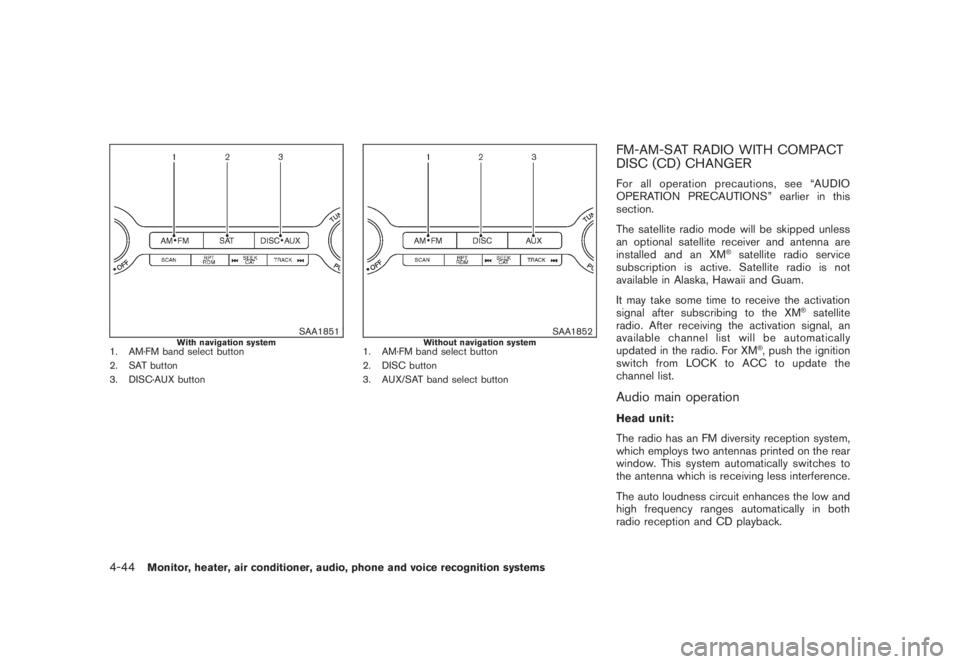
SAA1851
With navigation system
1. AM·FM band select button
2. SAT button
3. DISC·AUX button
SAA1852
Without navigation system
1. AM·FM band select button
2. DISC button
3. AUX/SAT band select button
FM-AM-SAT RADIO WITH COMPACT
DISC (CD) CHANGERFor all operation precautions, see “AUDIO
OPERATION PRECAUTIONS” earlier in this
section.
The satellite radio mode will be skipped unless
an optional satellite receiver and antenna are
installed and an XM
®satellite radio service
subscription is active. Satellite radio is not
available in Alaska, Hawaii and Guam.
It may take some time to receive the activation
signal after subscribing to the XM
®satellite
radio. After receiving the activation signal, an
available channel list will be automatically
updated in the radio. For XM
®, push the ignition
switch from LOCK to ACC to update the
channel list.
Audio main operationHead unit:
The radio has an FM diversity reception system,
which employs two antennas printed on the rear
window. This system automatically switches to
the antenna which is receiving less interference.
The auto loudness circuit enhances the low and
high frequency ranges automatically in both
radio reception and CD playback.
4-44
Monitor, heater, air conditioner, audio, phone and voice recognition systems
Page 211 of 444

Black plate (207,1)
Model "Z51-D" EDITED: 2008/ 6/ 26
ON·OFF/Volume control:
Push the ignition switch to the ACC or ON
position, and then push the ON·OFF/VOLUME
control knob while the system is off to call up the
mode (radio, CD or AUX) which was playing
immediately before the system was turned off.
While the system is on, pushing the ON·OFF/
VOLUME control knob turns the system off.
Turn the ON·OFF/VOLUME control knob to
adjust the volume.
Adjusting tone quality and speaker bal-
ance:
To adjust Bass, Treble, Balance and Fade, push
the Audio control knob. When the display shows
the setting you want to change (Bass, Treble,
Balance and Fade) , rotate the Audio control
knob to set the desired setting. For the other
setting methods, see “HOW TO USE SETTING
BUTTON” earlier in this section.
This vehicle has some sound effect functions as
follows (if so equipped):
.Speed Sensitive Volume
For more details, see “VEHICLE INFORMATION
AND SETTINGS” earlier in this section.
Switching the display (for models with
navigation system):
Pushing theDISC·AUXbutton will switch thedisplays as follows:
CD?CompactFlash*?DVD*?AUX?
iPod
®*?Music Box*?CD
*: if so equipped
FM-AM-SAT radio operation
radio (FM/AM) band select:
Pushing the radio band select button will
change the band as follows:
AM?FM1?FM2?AMor
radio (SAT) band select:
Pushing the radio band select button will
change the band as follows:
(With navigation system)
SAT1?SAT2?SAT1
(Without navigation system)
AUX?SAT1?SAT2?AUX
When the radio band select button is pushed
while the ignition switch is in the ACC or ON
position, the radio will come on at the station last
played.
The last station/channel played will also come
on when the ON·OFF/VOL control knob ispushed to ON.
The satellite radio mode requires an active XM
®
satellite radio service subscription. Satellite
radio is not available in Alaska, Hawaii and
Guam.
If another audio source is playing when the radio
band select button is turned to ON, the audio
source will automatically be turned off and the
last radio station played will come on.
When the stereo broadcast signal is weak, the
radio will automatically change from stereo to
monaural reception.
TUNE (Tuning):
.For AM and FM radio
Turn the TUNE/FOLDER knob for manual
tuning.
.For XM satellite radio
Turn the TUNE/FOLDER knob to seek
channels from all of the categories when
any CAT is not selected.
SEEK tuning/CATEGORY
(CAT):
.For AM and FM radio
Push the SEEK·CAT or TRACK button
or
to tune from low to high or high to
Monitor, heater, air conditioner, audio, phone and voice recognition systems
4-45
Page 212 of 444
Black plate (208,1)
Model "Z51-D" EDITED: 2008/ 6/ 26
low frequencies and to stop at the next
broadcasting station.
.For XM satellite radio
Push the SEEK·CAT or TRACK buttonor
to tune to the first channel of the
next or previous category.
During satellite radio reception, the following
notices will be displayed under certain condi-
tions.
.NO SIGNAL (No signal is received while the
SAT tuner is connected.)
.OFF AIR (Broadcasting signed off)
.ANTENNA ERROR (Antenna connection
error)
.LOADING (When the initial setting is
performed)
.UPDATING (When the satellite radio sub-
scription is not active)
.INVALID CH (Invalid channel is received.)
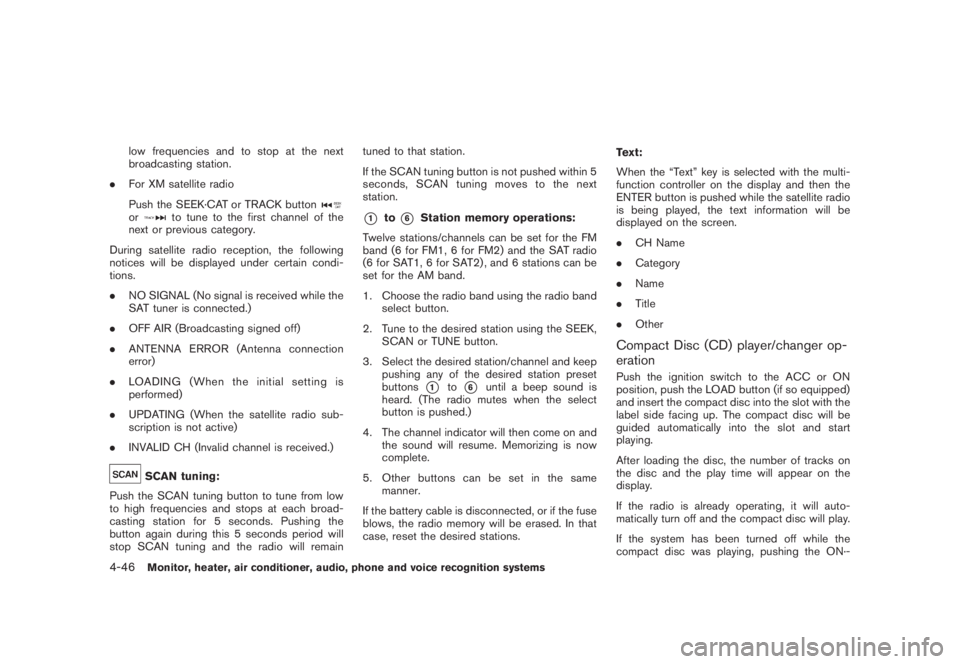
SCAN tuning:
Push the SCAN tuning button to tune from low
to high frequencies and stops at each broad-
casting station for 5 seconds. Pushing the
button again during this 5 seconds period will
stop SCAN tuning and the radio will remaintuned to that station.
If the SCAN tuning button is not pushed within 5
seconds, SCAN tuning moves to the next
station.
*1
to
*6
Station memory operations:
Twelve stations/channels can be set for the FM
band (6 for FM1, 6 for FM2) and the SAT radio
(6 for SAT1, 6 for SAT2) , and 6 stations can be
set for the AM band.
1. Choose the radio band using the radio band
select button.
2. Tune to the desired station using the SEEK,
SCAN or TUNE button.
3. Select the desired station/channel and keep
pushing any of the desired station preset
buttons*1
to
*6
until a beep sound is
heard. (The radio mutes when the select
button is pushed.)
4. The channel indicator will then come on and
the sound will resume. Memorizing is now
complete.
5. Other buttons can be set in the same
manner.
If the battery cable is disconnected, or if the fuse
blows, the radio memory will be erased. In that
case, reset the desired stations.Text:
When the “Text” key is selected with the multi-
function controller on the display and then the
ENTER button is pushed while the satellite radio
is being played, the text information will be
displayed on the screen.
.CH Name
.Category
.Name
.Title
.Other
Compact Disc (CD) player/changer op-
erationPush the ignition switch to the ACC or ON
position, push the LOAD button (if so equipped)
and insert the compact disc into the slot with the
label side facing up. The compact disc will be
guided automatically into the slot and start
playing.
After loading the disc, the number of tracks on
the disc and the play time will appear on the
display.
If the radio is already operating, it will auto-
matically turn off and the compact disc will play.
If the system has been turned off while the
compact disc was playing, pushing the ON·-
4-46
Monitor, heater, air conditioner, audio, phone and voice recognition systems
Page 215 of 444
Black plate (211,1)
Model "Z51-D" EDITED: 2008/ 6/ 26
SAA1567
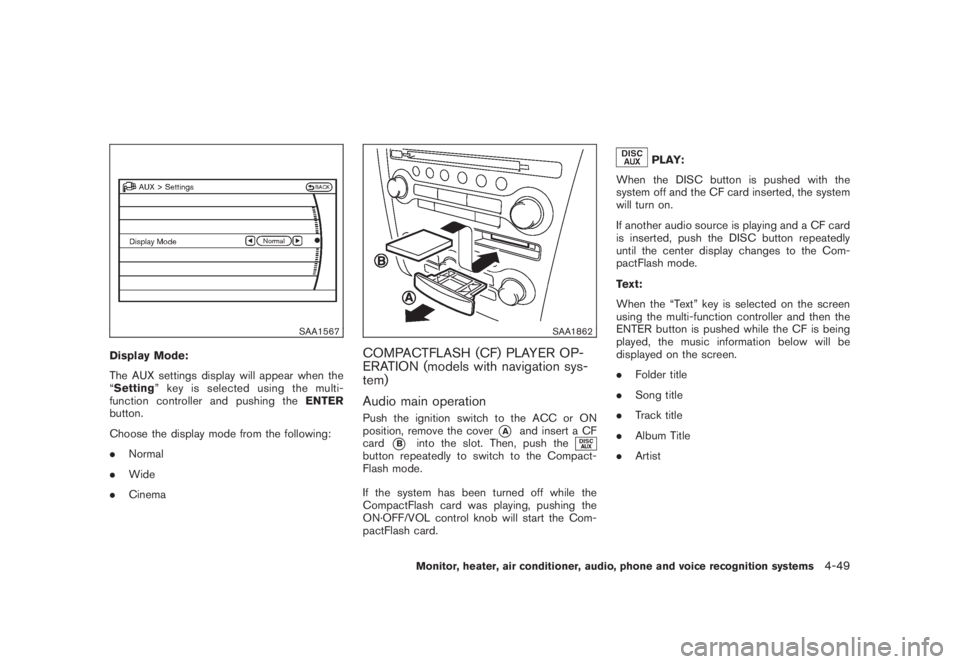
Display Mode:
The AUX settings display will appear when the
“Setting” key is selected using the multi-
function controller and pushing theENTER
button.
Choose the display mode from the following:
.Normal
.Wide
.Cinema
SAA1862
COMPACTFLASH (CF) PLAYER OP-
ERATION (models with navigation sys-
tem)
Audio main operationPush the ignition switch to the ACC or ON
position, remove the cover
*A
and insert a CF
card
*B
into the slot. Then, push the
button repeatedly to switch to the Compact-
Flash mode.
If the system has been turned off while the
CompactFlash card was playing, pushing the
ON·OFF/VOL control knob will start the Com-
pactFlash card.
PLAY:
When the DISC button is pushed with the
system off and the CF card inserted, the system
will turn on.
If another audio source is playing and a CF card
is inserted, push the DISC button repeatedly
until the center display changes to the Com-
pactFlash mode.
Text:
When the “Text” key is selected on the screen
using the multi-function controller and then the
ENTER button is pushed while the CF is being
played, the music information below will be
displayed on the screen.
.Folder title
.Song title
.Track title
.Album Title
.Artist
Monitor, heater, air conditioner, audio, phone and voice recognition systems
4-49
Page 217 of 444

Black plate (213,1)
Model "Z51-D" EDITED: 2008/ 6/ 26
iPod
®PLAYER OPERATION (if so
equipped)
Connecting iPod
®
Open the console lid and connect the cable
*1
as illustrated, and then connect the other end of
the cable to your iPod
®*2. Your vehicle is
equipped with the specialized cable for con-
necting the iPod
®to your vehicle audio unit. The
battery of your iPod
®is charged during the
connection to the vehicle.
The display on the iPod®shows a NISSAN
screen when the connection is completed.
While connecting the iPod®to the vehicle, the
iPod
®can only be operated by the vehicle audio
controls.
To disconnect the cable from the vehicle outlet,
fully depress the center connector button to
unlatch the connector and pull the connector
straight out of the outlet. To disconnect the
cable from the iPod
®, fully depress the side
connector buttons and pull the iPod
®connector
straight out of the iPod
®.
*iPod
®is a trademark of Apple Inc., registered in
the U.S. and other countries.
CompatibilityThe following models are available:
.Third generation iPod
®(Firmware version
2.3 or later) (Audiobook and Podcast are notavailable)
.Fourth generation iPod
®(Firmware version
3.1.1 or later)
.Fifth generation iPod
®(Firmware version
1.1.2 or later)
.iPod
®mini (Firmware version 1.41 or later)
.iPod®photo (Firmware version 1.2.1 or later)
.iPod®nano (Firmware version 1.2 or later)
Make sure that your iPod
®firmware is updated.
Audio main operationPush the ignition switch to the ACC or ON
position. Then, push the DISC/AUX button
repeatedly to switch to the iPod
®mode.
If the system has been turned off while the iPod
®
was playing, pushing the ON·OFF/VOL control
knob will start the iPod
®.
DISC/AUX button:
When the DISC/AUX button is pushed with the
system off and the iPod®connected, the system
will turn on. If another audio source is playing
and the iPod
®is connected, push the DISC
button repeatedly until the center display
changes to the iPod
®mode.Interface:
The interface for iPod
®operation shown on the
vehicle center display is similar to the iPod
®
interface. Use the multi-function controller and
the ENTER or BACK button to play the iPod
®
with your favorite settings.
The following items can be chosen from the
menu list screen. For further information about
each item, see the iPod
®Owner’s Manual.
.Playlists
.Artists
.Albums
.Songs
.Podcasts
.Genres
.Composers
.Audiobooks
The following touch-panel buttons shown on the
screen are also available:
.
: returns to the previous screen.
.: plays/pauses the music selected.
Monitor, heater, air conditioner, audio, phone and voice recognition systems
4-51