2008 NISSAN MURANO rear view mirror
[x] Cancel search: rear view mirrorPage 10 of 444
Black plate (7,1)
Model "Z51-D" EDITED: 2008/ 6/ 26
SSI0375
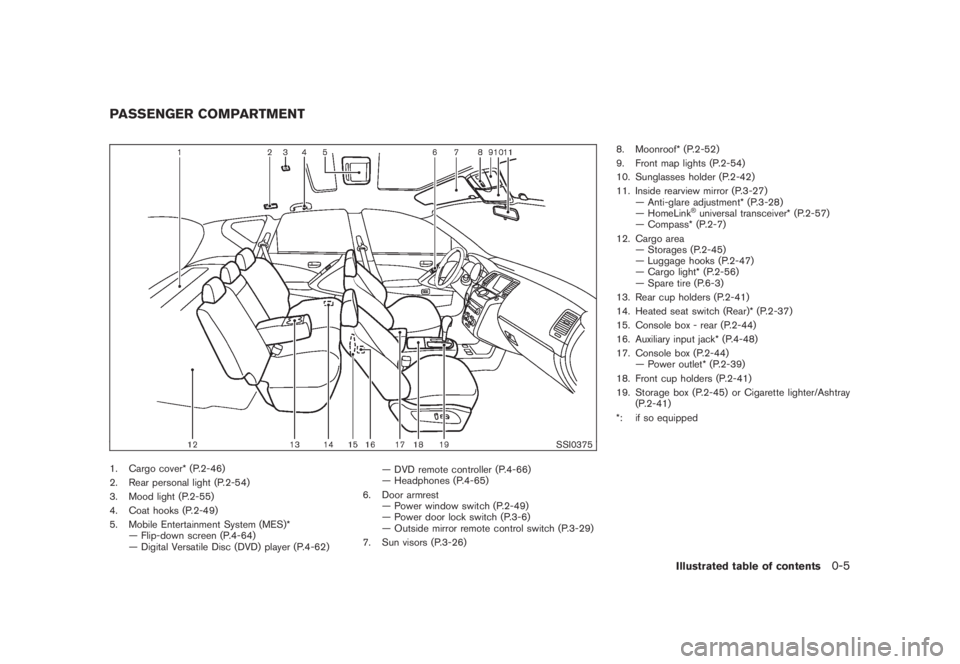
1. Cargo cover* (P.2-46)
2. Rear personal light (P.2-54)
3. Mood light (P.2-55)
4. Coat hooks (P.2-49)
5. Mobile Entertainment System (MES)*
— Flip-down screen (P.4-64)
— Digital Versatile Disc (DVD) player (P.4-62)— DVD remote controller (P.4-66)
— Headphones (P.4-65)
6. Door armrest
— Power window switch (P.2-49)
— Power door lock switch (P.3-6)
— Outside mirror remote control switch (P.3-29)
7. Sun visors (P.3-26)8. Moonroof* (P.2-52)
9. Front map lights (P.2-54)
10. Sunglasses holder (P.2-42)
11. Inside rearview mirror (P.3-27)
— Anti-glare adjustment* (P.3-28)
— HomeLink
®universal transceiver* (P.2-57)
— Compass* (P.2-7)
12. Cargo area
— Storages (P.2-45)
— Luggage hooks (P.2-47)
— Cargo light* (P.2-56)
— Spare tire (P.6-3)
13. Rear cup holders (P.2-41)
14. Heated seat switch (Rear)* (P.2-37)
15. Console box - rear (P.2-44)
16. Auxiliary input jack* (P.4-48)
17. Console box (P.2-44)
— Power outlet* (P.2-39)
18. Front cup holders (P.2-41)
19. Storage box (P.2-45) or Cigarette lighter/Ashtray
(P.2-41)
*: if so equipped
PASSENGER COMPARTMENT
Illustrated table of contents
0-5
Page 106 of 444
Black plate (102,1)
Model "Z51-D" EDITED: 2008/ 6/ 26
SIC3670
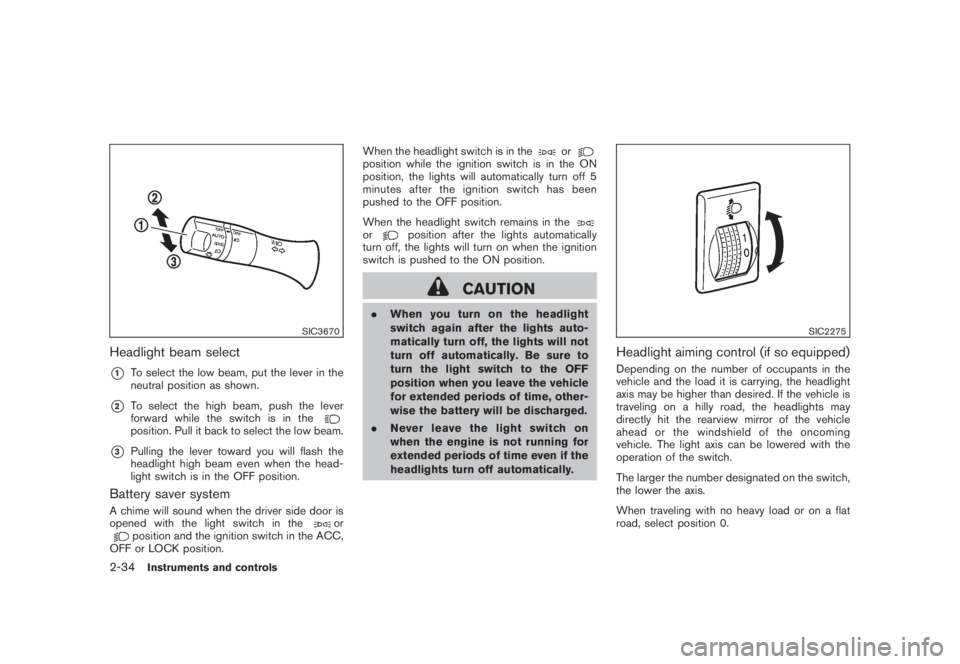
Headlight beam select*1
To select the low beam, put the lever in the
neutral position as shown.
*2
To select the high beam, push the lever
forward while the switch is in theposition. Pull it back to select the low beam.
*3
Pulling the lever toward you will flash the
headlight high beam even when the head-
light switch is in the OFF position.
Battery saver systemA chime will sound when the driver side door is
opened with the light switch in the
or
position and the ignition switch in the ACC,
OFF or LOCK position.When the headlight switch is in the
or
position while the ignition switch is in the ON
position, the lights will automatically turn off 5
minutesaftertheignitionswitchhasbeen
pushed to the OFF position.
When the headlight switch remains in theor
position after the lights automatically
turn off, the lights will turn on when the ignition
switch is pushed to the ON position.
CAUTION
.When you turn on the headlight
switch again after the lights auto-
matically turn off, the lights will not
turn off automatically. Be sure to
turn the light switch to the OFF
position when you leave the vehicle
for extended periods of time, other-
wise the battery will be discharged.
.Never leave the light switch on
when the engine is not running for
extended periods of time even if the
headlights turn off automatically.
SIC2275
Headlight aiming control (if so equipped)Depending on the number of occupants in the
vehicle and the load it is carrying, the headlight
axis may be higher than desired. If the vehicle is
traveling on a hilly road, the headlights may
directly hit the rearview mirror of the vehicle
ahead or the windshield of the oncoming
vehicle. The light axis can be lowered with the
operation of the switch.
The larger the number designated on the switch,
the lower the axis.
When traveling with no heavy load or on a flat
road, select position 0.
2-34
Instruments and controls
Page 107 of 444
Black plate (103,1)
Model "Z51-D" EDITED: 2008/ 6/ 26
WARNING
Xenon headlights are extremely bright
compared to conventional headlights. If
the xenon headlights hit the rearview
mirror of the vehicle ahead or the
windshield of oncoming vehicle, the
driver of these vehicles may have
difficulty driving because of the bright-
ness. Use the headlight aiming control
switch to lower the light axis. See
“XENON HEADLIGHTS” earlier in this
section for additional information.Daytime running light system (Canada
only)The daytime running lights automatically illumi-
nate when the engine is started with the parking
brake released. The daytime running lights
operate with the headlight switch in the OFF
position or in the
position. Turn the
headlight switch to the
position for full
illumination when driving at night.
If the parking brake is applied before the engine
is started, the daytime running lights do not
illuminate. The daytime running lights illuminate
once the parking brake is released. The daytime
running lights will remain on until the ignition
switch is pushed to the OFF position.
WARNING
When the daytime running light system
is active, tail lights on your vehicle are
not on. It is necessary at dusk to turn on
your headlights. Failure to do so could
cause an accident injuring yourself and
others.
SIC3585
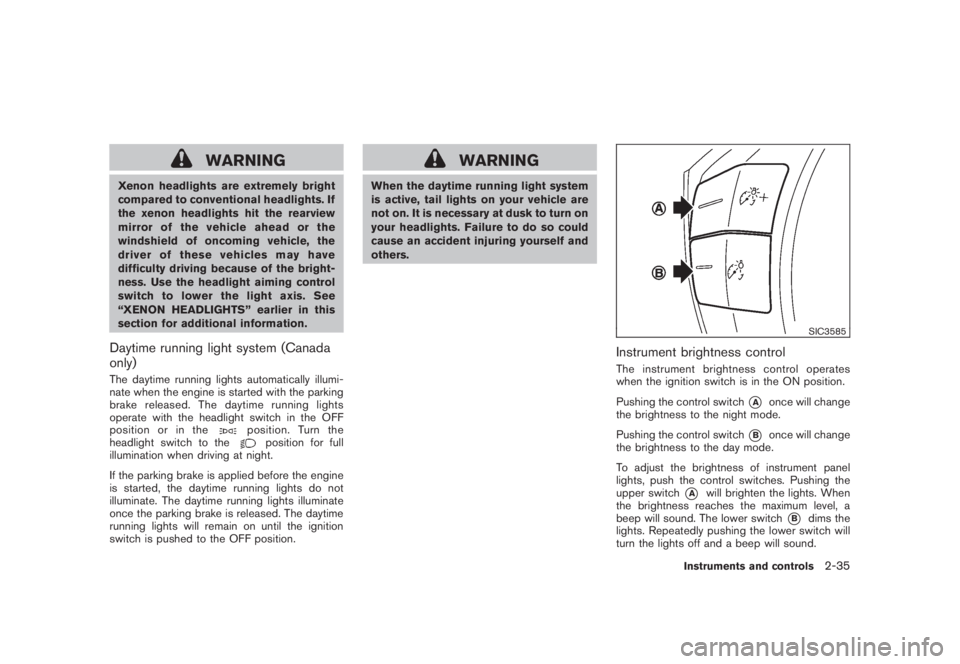
Instrument brightness controlThe instrument brightness control operates
when the ignition switch is in the ON position.
Pushing the control switch
*A
once will change
the brightness to the night mode.
Pushing the control switch
*B
once will change
the brightness to the day mode.
To adjust the brightness of instrument panel
lights, push the control switches. Pushing the
upper switch
*A
will brighten the lights. When
the brightness reaches the maximum level, a
beep will sound. The lower switch
*B
dims the
lights. Repeatedly pushing the lower switch will
turn the lights off and a beep will sound.
Instruments and controls
2-35
Page 159 of 444
Black plate (157,1)
Model "Z51-D" EDITED: 2008/ 6/ 26
CAUTION
.Do not store the main sun visor
before storing the extension sun
visor.
.Do not pull the extension sun visor
forcedly downward.
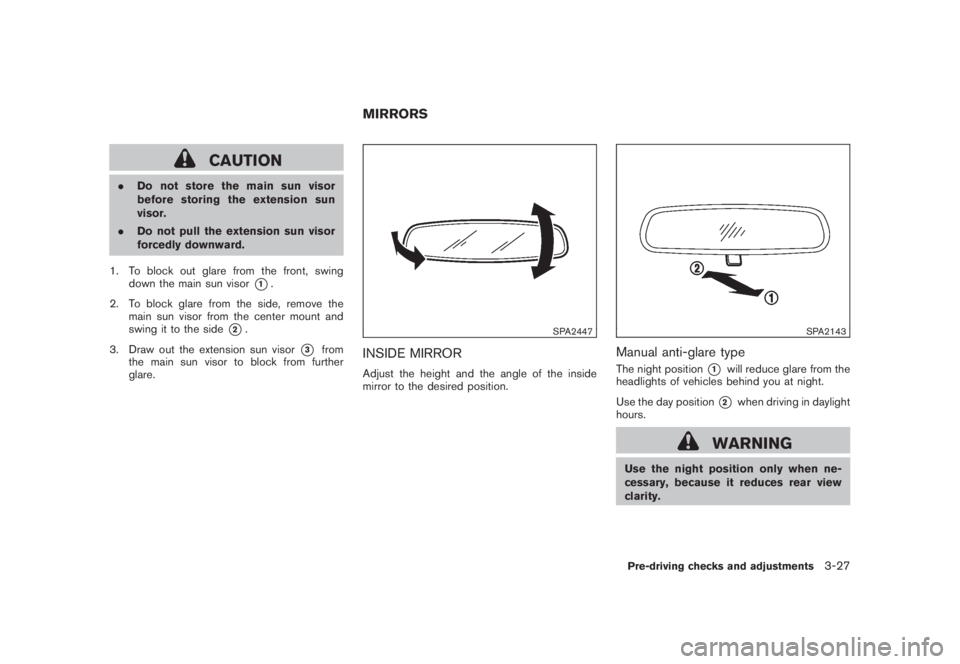
1. To block out glare from the front, swing
down the main sun visor
*1.
2. To block glare from the side, remove the
main sun visor from the center mount and
swing it to the side
*2.
3. Draw out the extension sun visor
*3
from
the main sun visor to block from further
glare.
SPA2447
INSIDE MIRRORAdjust the height and the angle of the inside
mirror to the desired position.
SPA2143
Manual anti-glare typeThe night position
*1
will reduce glare from the
headlights of vehicles behind you at night.
Use the day position*2
when driving in daylight
hours.
WARNING
Use the night position only when ne-
cessary, because it reduces rear view
clarity.
MIRRORS
Pre-driving checks and adjustments
3-27
Page 160 of 444
Black plate (158,1)
Model "Z51-D" EDITED: 2008/ 6/ 26
SPA2422A
Type A
SPA2450
Type B
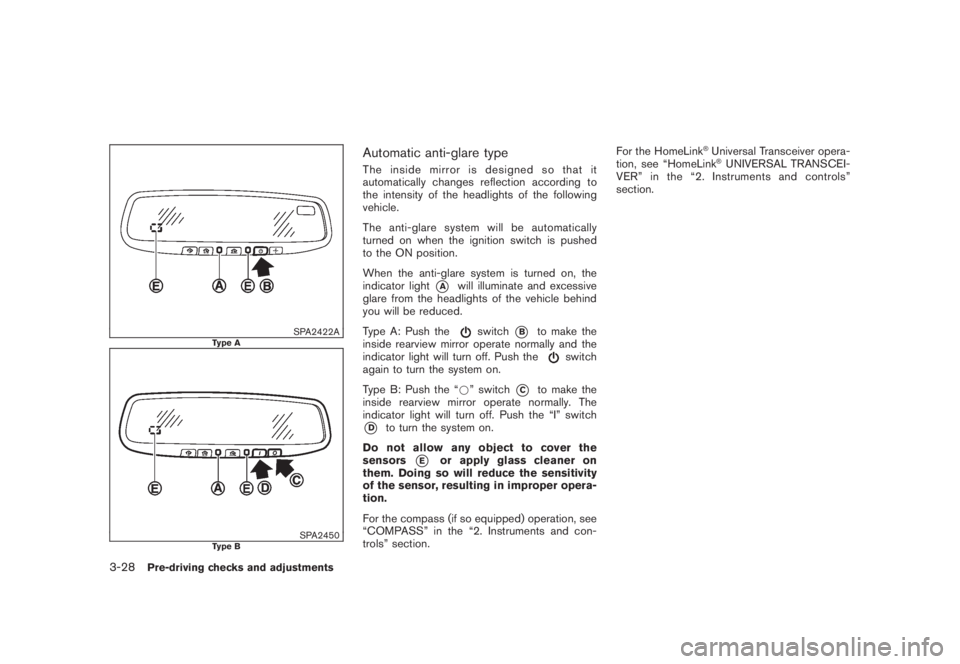
Automatic anti-glare typeThe inside mirror is designed so that it
automatically changes reflection according to
the intensity of the headlights of the following
vehicle.
The anti-glare system will be automatically
turned on when the ignition switch is pushed
to the ON position.
When the anti-glare system is turned on, the
indicator light
*A
will illuminate and excessive
glare from the headlights of the vehicle behind
you will be reduced.
Type A: Push the
switch
*B
to make the
inside rearview mirror operate normally and the
indicator light will turn off. Push the
switch
again to turn the system on.
Type B: Push the “*” switch
*C
to make the
inside rearview mirror operate normally. The
indicator light will turn off. Push the “I” switch
*D
to turn the system on.
Do not allow any object to cover the
sensors
*E
or apply glass cleaner on
them. Doing so will reduce the sensitivity
of the sensor, resulting in improper opera-
tion.
For the compass (if so equipped) operation, see
“COMPASS” in the “2. Instruments and con-
trols” section.For the HomeLink
®Universal Transceiver opera-
tion, see “HomeLink®UNIVERSAL TRANSCEI-
VER” in the “2. Instruments and controls”
section.
3-28
Pre-driving checks and adjustments
Page 161 of 444
Black plate (159,1)
Model "Z51-D" EDITED: 2008/ 6/ 26
SPA2319
OUTSIDE MIRRORS
WARNING
Objects viewed in the outside mirror on
the passenger side are closer than they
appear. Be careful when moving to the
right. Using only this mirror could cause
an accident. Use the inside mirror or
glance over your shoulder to properly
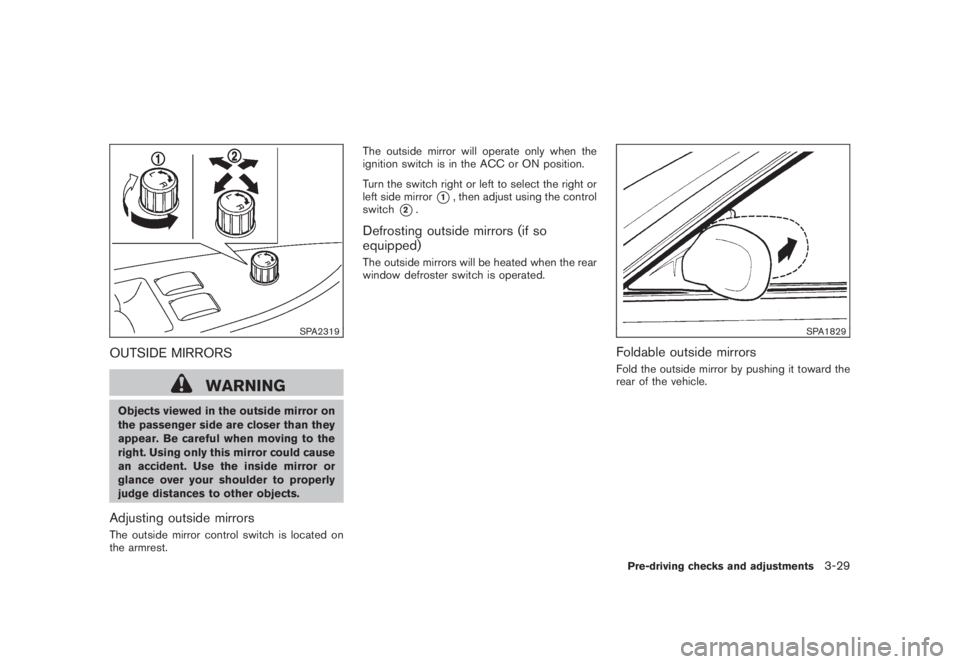
judge distances to other objects.Adjusting outside mirrorsThe outside mirror control switch is located on
the armrest.The outside mirror will operate only when the
ignition switch is in the ACC or ON position.
Turn the switch right or left to select the right or
left side mirror
*1, then adjust using the control
switch
*2.
Defrosting outside mirrors (if so
equipped)The outside mirrors will be heated when the rear
window defroster switch is operated.
SPA1829
Foldable outside mirrorsFold the outside mirror by pushing it toward the
rear of the vehicle.Pre-driving checks and adjustments
3-29
Page 185 of 444

Black plate (181,1)
Model "Z51-D" EDITED: 2008/ 6/ 26
SAA1092
Language/Units settings (models without
navigation system)The Language/Units settings display will appear
when pushing theSETTINGbutton, selecting
the “Language/Units”keywiththemulti-
function controller and pushing theENTER
button.
Select Language:
Choose the “Select Language” key and push
theENTERbutton. From the following display,
select “English”, “Franc¸ ais” or “Espan˜
ol” for your
favorite display appearance.Select Units:
Choose the “Select Units” key and push the
ENTERbutton. From the following display,
select “US” (Mile,8F, MPG) or “Metric” (km,
8C, L/100 km) for your favorite display appear-
ance.When the selector lever is shifted into the R
(Reverse) position, the monitor display shows
view to the rear of the vehicle.
The system is designed as an aid to the driver in
detecting large stationary objects to help avoid
damaging the vehicle. The system will not detect
small objects below the bumper and may not
detect objects close to the bumper or on the
ground.
WARNING
.The rear view camera is a conve-
nience but it is not a substitute for
proper backing up. Always turn and
check that it is safe to do so before
backing up. Always back up slowly.
.Objects viewed in the RearView
Monitor differ from actual distance
because a wide-angle lens is used.
Objects in the RearView Monitor
will appear visually opposite than
when viewed in the rear view and
outside mirrors.
.Make sure that the lift gate is
securely closed when backing up.
.Underneath the bumper and the
corner areas of the bumper cannot
be viewed on the RearView MonitorREARVIEW MONITOR (if so
equipped)
Monitor, heater, air conditioner, audio, phone and voice recognition systems
4-19
Page 187 of 444

Black plate (183,1)
Model "Z51-D" EDITED: 2008/ 6/ 26
.On a snow-covered or slippery road,
there may be a difference between
the predicted course line and the
actual course line.
.If the battery is disconnected or
becomes discharged, the predicted
course lines may be displayed in-
correctly. If this occurs, please per-
form the following procedures:
— Turn the steering wheel from
lock to lock while the engine is
running.
— Drive the vehicle on a straight
road for more than 5 minutes.
.When the steering wheel is turned
with the ignition switch in the ACC
position, the predicted course lines
may be displayed incorrectly.
.The displayed lines will appear
slightly off to the right because the
rear view camera is not installed in
the rear center of the vehicle.
.The distance guide line and the
vehicle width line should be used
as a reference only when the vehicle
is on a level paved surface. The
distance viewed on the monitor is
for reference only and may bedifferent than the actual distance
between the vehicle and displayed
objects.
.When backing-up the vehicle up a
hill objects viewed in the monitor
are further than they appear. When
backing-up the vehicle down a hill,
objects viewed in the monitor are
closer than they appear. Use the
inside mirror or glance over your
shoulder to properly judge dis-
tances to other objects.
The vehicle width and predicted course
lines are wider than the actual width and
course.
SAA1897
1. Visually check that the parking space is safe
before parking your vehicle.
2. The rear view of the vehicle is displayed on
the screen
*A
when the selector lever is
moved to the R (Reverse) position.
Monitor, heater, air conditioner, audio, phone and voice recognition systems
4-21