2008 NISSAN MAXIMA phone
[x] Cancel search: phonePage 101 of 328

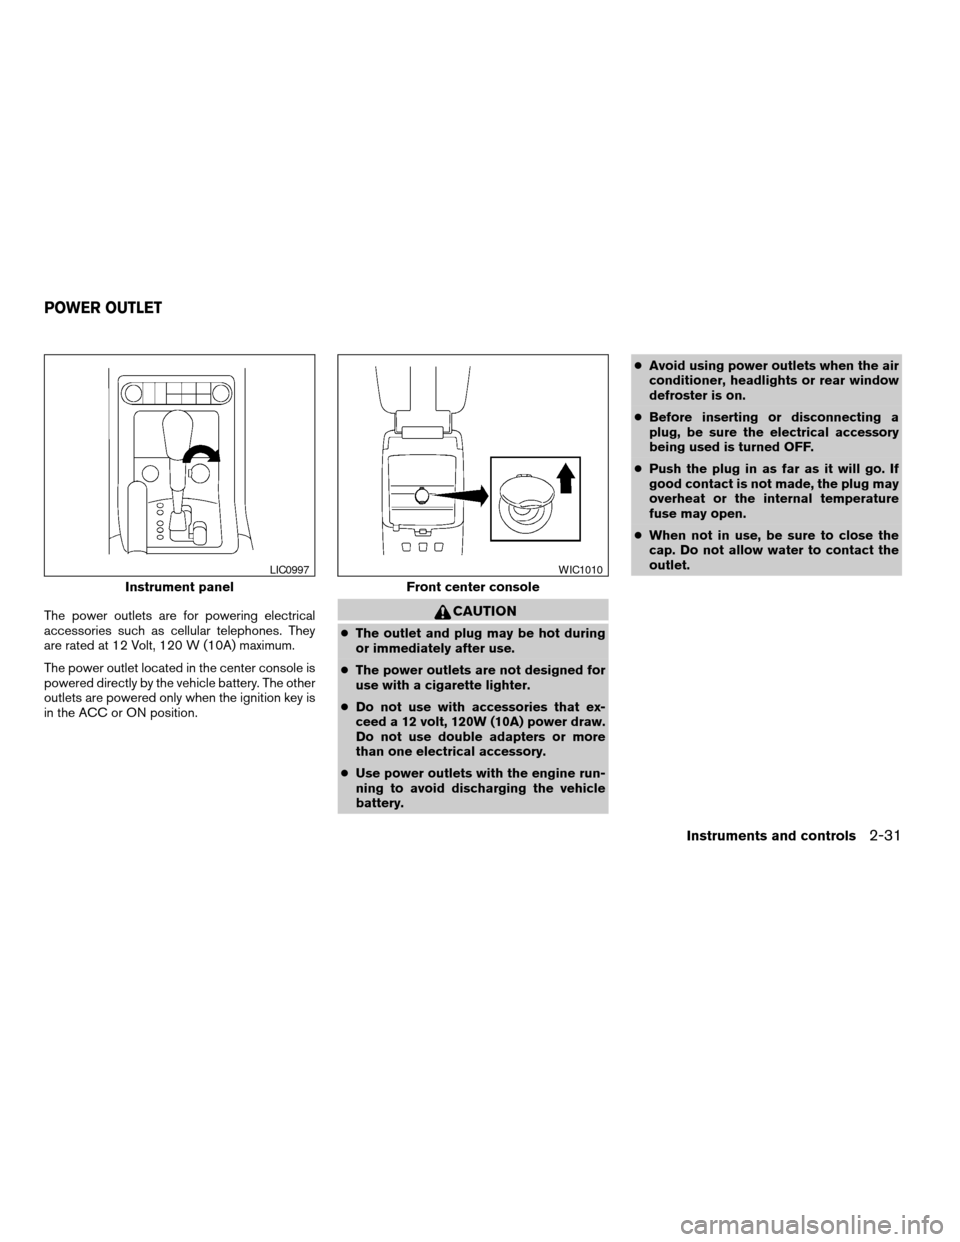
The power outlets are for powering electrical
accessories such as cellular telephones. They
are rated at 12 Volt, 120 W (10A) maximum.
The power outlet located in the center console is
powered directly by the vehicle battery. The other
outlets are powered only when the ignition key is
in the ACC or ON position.CAUTION
cThe outlet and plug may be hot during
or immediately after use.
cThe power outlets are not designed for
use with a cigarette lighter.
cDo not use with accessories that ex-
ceed a 12 volt, 120W (10A) power draw.
Do not use double adapters or more
than one electrical accessory.
cUse power outlets with the engine run-
ning to avoid discharging the vehicle
battery.cAvoid using power outlets when the air
conditioner, headlights or rear window
defroster is on.
cBefore inserting or disconnecting a
plug, be sure the electrical accessory
being used is turned OFF.
cPush the plug in as far as it will go. If
good contact is not made, the plug may
overheat or the internal temperature
fuse may open.
cWhen not in use, be sure to close the
cap. Do not allow water to contact the
outlet.
Instrument panel
LIC0997
Front center console
WIC1010
POWER OUTLET
Instruments and controls2-31
ZREVIEW COPYÐ2008 Maxima(max)
Owners ManualÐUSA_English(nna)
06/08/07Ðdebbie
X
Page 105 of 328

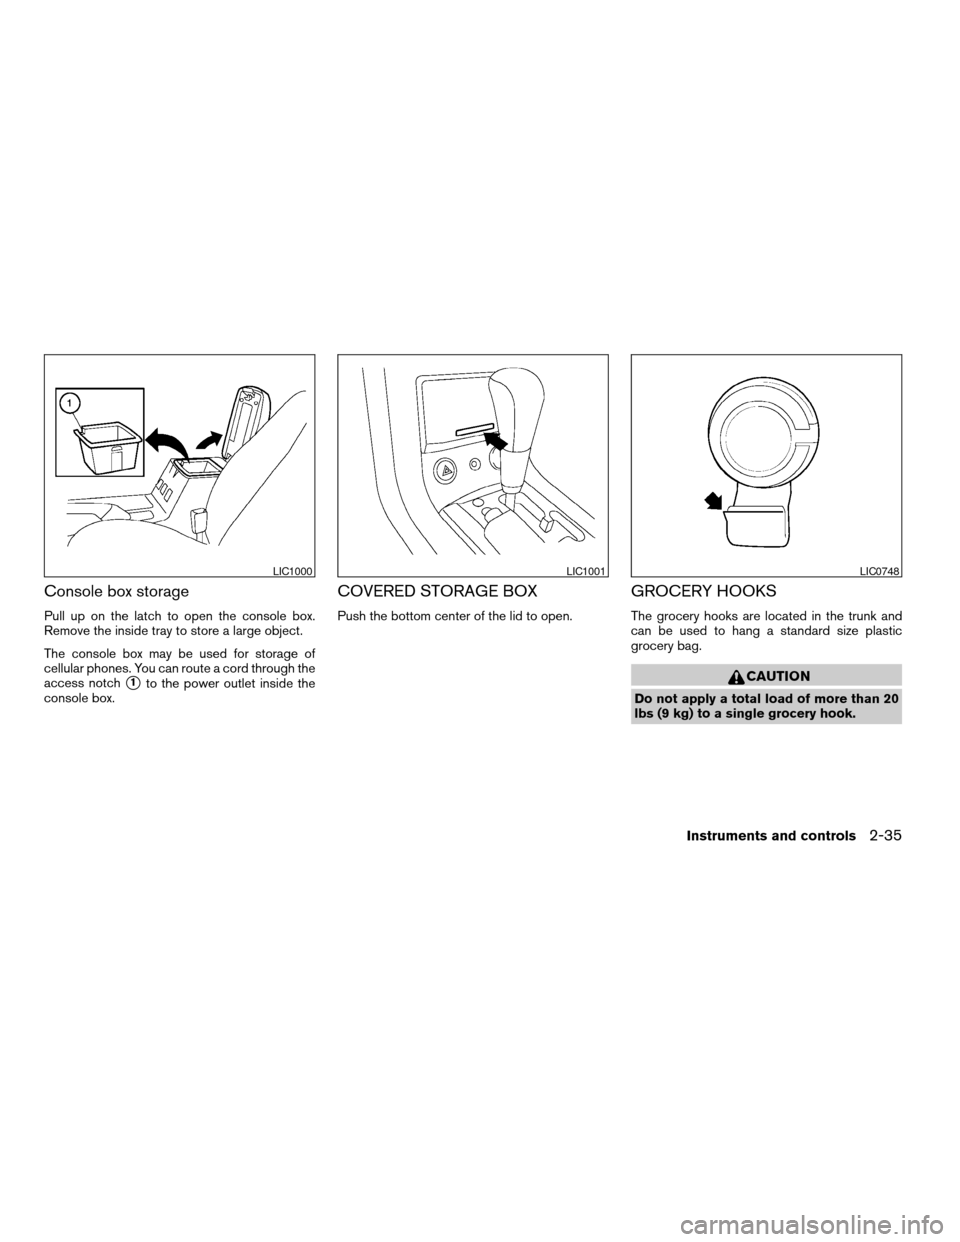
Console box storage
Pull up on the latch to open the console box.
Remove the inside tray to store a large object.
The console box may be used for storage of
cellular phones. You can route a cord through the
access notch
s1to the power outlet inside the
console box.
COVERED STORAGE BOX
Push the bottom center of the lid to open.
GROCERY HOOKS
The grocery hooks are located in the trunk and
can be used to hang a standard size plastic
grocery bag.
CAUTION
Do not apply a total load of more than 20
lbs (9 kg) to a single grocery hook.
LIC1000LIC1001LIC0748
Instruments and controls2-35
ZREVIEW COPYÐ2008 Maxima(max)
Owners ManualÐUSA_English(nna)
06/08/07Ðdebbie
X
Page 115 of 328

PROGRAMMING HOMELINKTFOR
CANADIAN CUSTOMERS
Prior to 1992, D.O.C. regulations required hand-
held transmitters to stop transmitting after 2 sec-
onds. To program your hand-held transmitter to
HomeLinkT, continue to press and hold the
HomeLinkTbutton (note steps2-4under “Pro-
gramming HomeLinkT”) while you press and re-
press (“cycle”) your hand-held transmitters every
2 seconds until the indicator light flashes rapidly
(indicating successful programming) .
NOTE:
When programming a garage door opener,
etc., it is advised to unplug the device dur-
ing the “cycling” process to prevent pos-
sible damage to the garage door opener
components.
OPERATING THE HOMELINKT
UNIVERSAL TRANSCEIVER
The HomeLinkTUniversal Transceiver (once pro-
grammed) may now be used to activate the ga-
rage door, etc. To operate, simply press the ap-
propriate programmed HomeLinkTUniversal
Transceiver button. The red indicator light will
illuminate while the signal is being transmitted.
PROGRAMMING TROUBLE-
DIAGNOSIS
If the HomeLinkTdoes not quickly learn the hand-
held transmitter information:
creplace the hand-held transmitter batteries
with new batteries.
cposition the hand-held transmitter with its
battery area facing away from the
HomeLinkTsurface.
cpress and hold both the HomeLinkTand
hand-held transmitter buttons without inter-
ruption.
cposition the hand-held transmitter1-3
inches (26 - 76 mm) away from the
HomeLinkTsurface. Hold the transmitter in
that position for up to 15 seconds. If
HomeLinkTis not programmed within that
time, try holding the transmitter in another
position – keeping the indicator light in view
at all times.
If you continue to have programming difficulties,
please contact the NISSAN Consumer Affairs
Department. The phone numbers are located in
the Foreword of this manual.
CLEARING THE PROGRAMMED
INFORMATION
Individual buttons cannot be cleared. However,
to clear all programming, press and hold the two
outside buttons and release when the indicator
light begins to flash (approximately 20 seconds) .
REPROGRAMMING A SINGLE
HOMELINKTBUTTON
To reprogram a HomeLinkTUniversal Transceiver
button, complete the following.
1. Press and hold the desired HomeLinkTbut-
ton.Do notrelease the button until step 4
has been completed.
2. When the indicator light begins to flash
slowly (after 20 seconds) , position the
hand-held transmitter1-3inches (26 - 76
mm) away from the HomeLinkTsurface.
3. Press and hold the hand-held transmitter
button.
4. The HomeLinkTindicator light will flash, first
slowly and then rapidly. When the indicator
light begins to flash rapidly, release both
buttons.
Instruments and controls2-45
ZREVIEW COPYÐ2008 Maxima(max)
Owners ManualÐUSA_English(nna)
06/08/07Ðdebbie
X
Page 123 of 328

cWhen operating near a location where
strong radio waves are transmitted, such as
a TV tower, power station and broadcasting
station.
cWhen in possession of wireless equipment,
such as a cellular telephone, transceiver,
and CB radio.
cWhen the Intelligent Key is in contact with or
covered by metallic materials.
cWhen any type of radio wave remote control
is used nearby.
cWhen the Intelligent Key is placed near an
electric appliance such as a personal com-
puter.
cWhen the vehicle is parked near a parking
meter.
In such cases, correct the operating conditions
before using the Intelligent Key function or use
the mechanical key.
Although the life of the battery varies depending
on the operating conditions, the battery’s life is
approximately 2 years. If the battery is dis-
charged, replace it with a new one.
When the Intelligent Key battery is low, the Intel-
ligent Key system warning light (
) will blink
green for about 30 seconds after the ignition
switch is turned to the ON position.Since the Intelligent Key is continuously receiving
radio waves, if the key is left near equipment
which transmits strong radio waves, such as sig-
nals from a TV and personal computer, the bat-
tery life may become shorter.
For information regarding replacement of a bat-
tery, see “Battery” in the “Maintenance and do-it-
yourself” section.
As many as 4 Intelligent Keys can be registered
and used with one vehicle. For information about
the purchase and use of additional Intelligent
Keys, contact a NISSAN dealer.
CAUTION
cDo not allow the Intelligent Key, which
contains electrical components, to
come into contact with water or salt
water. This could affect the system
function.
cDo not drop the Intelligent Key.
cDo not strike the Intelligent Key sharply
against another object.
cDo not change or modify the Intelligent
Key.
cWetting may damage the Intelligent
Key. If the Intelligent Key gets wet, im-
mediately wipe until it is completely dry.cDo not place the Intelligent Key for an
extended period in an area where tem-
peratures exceed 140°F (60°C) .
cDo not attach the Intelligent Key with a
key holder that contains a magnet.
cDo not place the Intelligent Key near
equipment that produces a magnetic
field, such as a TV, audio equipment and
personal computers.
If an Intelligent Key is lost or stolen, NISSAN
recommends erasing the ID code of that Intelli-
gent Key from the vehicle. This may prevent the
unauthorized use of the Intelligent Key to operate
the vehicle. For information regarding the erasing
procedure, contact a NISSAN dealer.
Pre-driving checks and adjustments3-7
ZREVIEW COPYÐ2008 Maxima(max)
Owners ManualÐUSA_English(nna)
06/08/07Ðdebbie
X
Page 146 of 328

Selecting the memorized position
Set the CVT selector lever to the P (Park) posi-
tion, then:
cWithin 45 seconds of opening the driver’s
door, push the memory switch (1 or 2) fully
for at least 1 second, or
cTurn the ignition switch to the ON position
and push the memory switch (1 or 2) fully for
at least 1 second.
The driver’s seat, steering column, and outside
mirrors will move to the memorized position with
the indicator light blinking, and then the light will
stay on for approximately 5 seconds.
ENTRY/EXIT FUNCTION
This system is designed so that the driver’s seat
and automatic operation steering column (if so
equipped) will automatically move when the CVT
selector lever is in the P (Park) position. This
allows the driver to get into and out of the driver’s
seat more easily.
The driver’s seat will slide backward and the
steering wheel will move up when the driver’s
door is opened and the ignition switch is in the
LOCK position.The driver’s seat and steering wheel will return to
previous position when the driver’s door is closed
and the ignition switch is pushed
The entry/exit function can be adjusted or can-
celed. See “Vehicle electronic systems” in the
“Display screen, heater, air conditioner, audio
and phone systems” section of this manual.
Restarting the entry/exit function
If the battery cable is disconnected or if the fuse
opens, the entry/exit function will be disabled.
Drive the vehicle over 25 MPH (40 km/h) to
restart the entry/exit function. You can also restart
the entry/exit function using the following proce-
dure.
1. Connect the battery cable or replace the
fuse.
2. Open and close the driver’s door more than
two times with the ignition key in the LOCK
position.
The entry/exit function should now work properly.
SYSTEM OPERATION
The automatic drive positioner system will not
work or will stop operating under the following
conditions:
cWhen the vehicle speed is above 4 MPH (7
km/h) .cWhen any of the memory switches are
pushed while the automatic drive positioner
is operating.
cWhen the adjusting switch for the driver’s
seat is turned on while the automatic drive
positioner is operating.
cWhen the memory switch (1 or 2) is not
pushed and held for at least 1 second.
cWhen the seat has been already moved to
the memorized position.
cWhen no seat position is stored in the
memory switch.
cWhen the CVT selector lever is moved from
P (Park) to any other position.
cWhen the driver’s door remains open more
than 45 seconds and the ignition switch is
not in the ON position.
The automatic drive positioner system can be
adjusted and canceled for vehicles with naviga-
tion system. See “Vehicle electronic systems” in
the “Display screen, heater, air conditioner, audio
and phone systems” section of this manual.
3-30Pre-driving checks and adjustments
ZREVIEW COPYÐ2008 Maxima(max)
Owners ManualÐUSA_English(nna)
06/08/07Ðdebbie
X
Page 147 of 328

4 Display screen, heater, air conditioner,
audio and phone systems
Control panel buttons — with monochrome screen....4-2
How to use the TRIP INFO button................4-3
Clock.........................................4-5
How to use the AUDIO button
(for control panel)..............................4-5
Door warning..................................4-5
Control panel buttons — with navigation system.......4-6
How to use the joystick and ENTER button........4-6
How to use the BACK button....................4-7
Setting up the start-up screen...................4-7
How to use the TRIP button.....................4-7
How to use the SETTING button................4-11
button..................................4-17
Ventilators.......................................4-18
Heater and air conditioner (automatic)..............4-19
Automatic operation...........................4-19
Manual operation..............................4-20
Operating tips.................................4-21
Servicing air conditioner...........................4-21
Audio system....................................4-22
Radio........................................4-22FM radio reception............................4-22
AM radio reception............................4-22
Satellite radio reception (if so equipped).........4-22
Audio operation precautions....................4-23
FM/AM/SAT radio with compact disc (CD)
player........................................4-28
FM/AM/SAT radio with compact disc (CD)
CD changer (if so equipped)....................4-33
FM/AM/SAT radio with compact disc (CD)
changer (if so equipped).......................4-38
CD care and cleaning..........................4-43
Steering wheel switch for audio control..........4-44
Antenna......................................4-45
Car phone or CB radio............................4-45
BluetoothTHands-Free Phone System
(if so equipped)..................................4-46
Using the system..............................4-47
Control buttons...............................4-49
Getting started................................4-49
List of voice commands........................4-51
Speaker adaptation (SA) mode..................4-56
Troubleshooting guide.........................4-58
ZREVIEW COPYÐ2008 Maxima(max)
Owners ManualÐUSA_English(nna)
06/08/07Ðdebbie
X
Page 148 of 328

WARNING
cDo not disassemble or modify this sys-
tem. If you do, it may result in accidents,
fire, or electrical shock.
cDo not use this system if you notice any
abnormality, such as a frozen screen or
lack of sound. Continued use of the
system may result in accident, fire or
electric shock.
cIn case you notice any foreign object in
the system hardware, spill liquid on it,
or notice smoke or smell coming from
it, stop using the system immediately
and contact your nearest NISSAN
dealer. Ignoring such conditions may
lead to accidents, fire or electrical
shock.
WHA1077
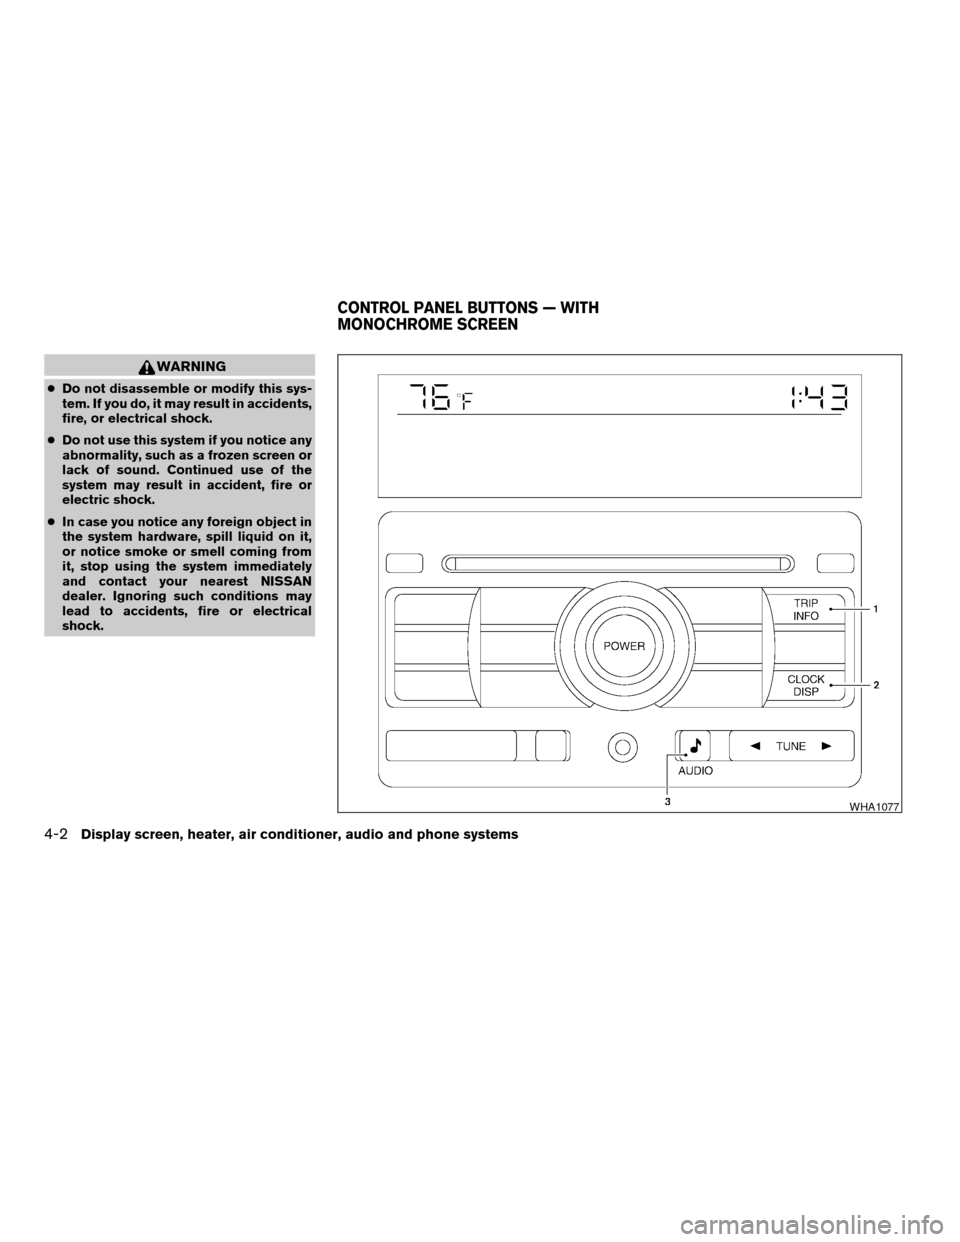
CONTROL PANEL BUTTONS — WITH
MONOCHROME SCREEN
4-2Display screen, heater, air conditioner, audio and phone systems
ZREVIEW COPYÐ2008 Maxima(max)
Owners ManualÐUSA_English(nna)
06/08/07Ðdebbie
X
Page 149 of 328

1. TRIP INFO button (P. 4-3)
2. CLOCK DISP button (P. 4-5)
3.
AUDIO button (P. 4-5)
When you use this system, make sure the engine
is running.
If you use the system with the engine not
running (ignition ON or ACC) for a long
time, it will use up all the battery power,
and the engine will not start.
Reference symbols:
TRIP INFO button — This is a button on the
control panel. By pressing this button you can
select the item or perform this action.
HOW TO USE THE TRIP INFO
BUTTON
When the TRIP INFO button is pressed, the
following modes will display on the screen.
Dist. to Empty!Average Speed!Fuel
Economy!Trip Time!Audio!Dist. to Empty
Distance to empty (MI or km)
The Distance To Empty (DTE) mode provides you
with an estimation of the distance that can be
driven before refueling. The DTE is constantly
calculated based on the amount of fuel in the fuel
tank and the actual fuel consumption. The display
is updated every 30 seconds. When the fuel level
is low, the DTE display will change to — .
NOTE:
cIf the amount of fuel added while the ignition
switch is OFF is small, the display just before
the ignition switch is turned OFF may con-
tinue to be displayed.cWhen driving uphill or rounding curves, the
fuel in the tank shifts, which may momentarily
change the display.
WHA0701
Display screen, heater, air conditioner, audio and phone systems4-3
ZREVIEW COPYÐ2008 Maxima(max)
Owners ManualÐUSA_English(nna)
06/08/07Ðdebbie
X