2008 NISSAN ARMADA seat adjustment
[x] Cancel search: seat adjustmentPage 23 of 456
WARNING
cAfter adjustment, gently rock in the seat
to make sure it is securely locked.
cDo not ride in a moving vehicle when
the seatback is reclined. This can be
dangerous. The shoulder belt will not
be against your body. In an accident,
you could be thrown into it and receive
neck or other serious injuries. You
could also slide under the lap belt and
receive serious internal injuries.
cFor the most effective protection when
the vehicle is in motion, the seat should
be upright. Always sit well back in the
seat and adjust the seat belt properly.
See “Precautions on seat belt usage”
later in this section.
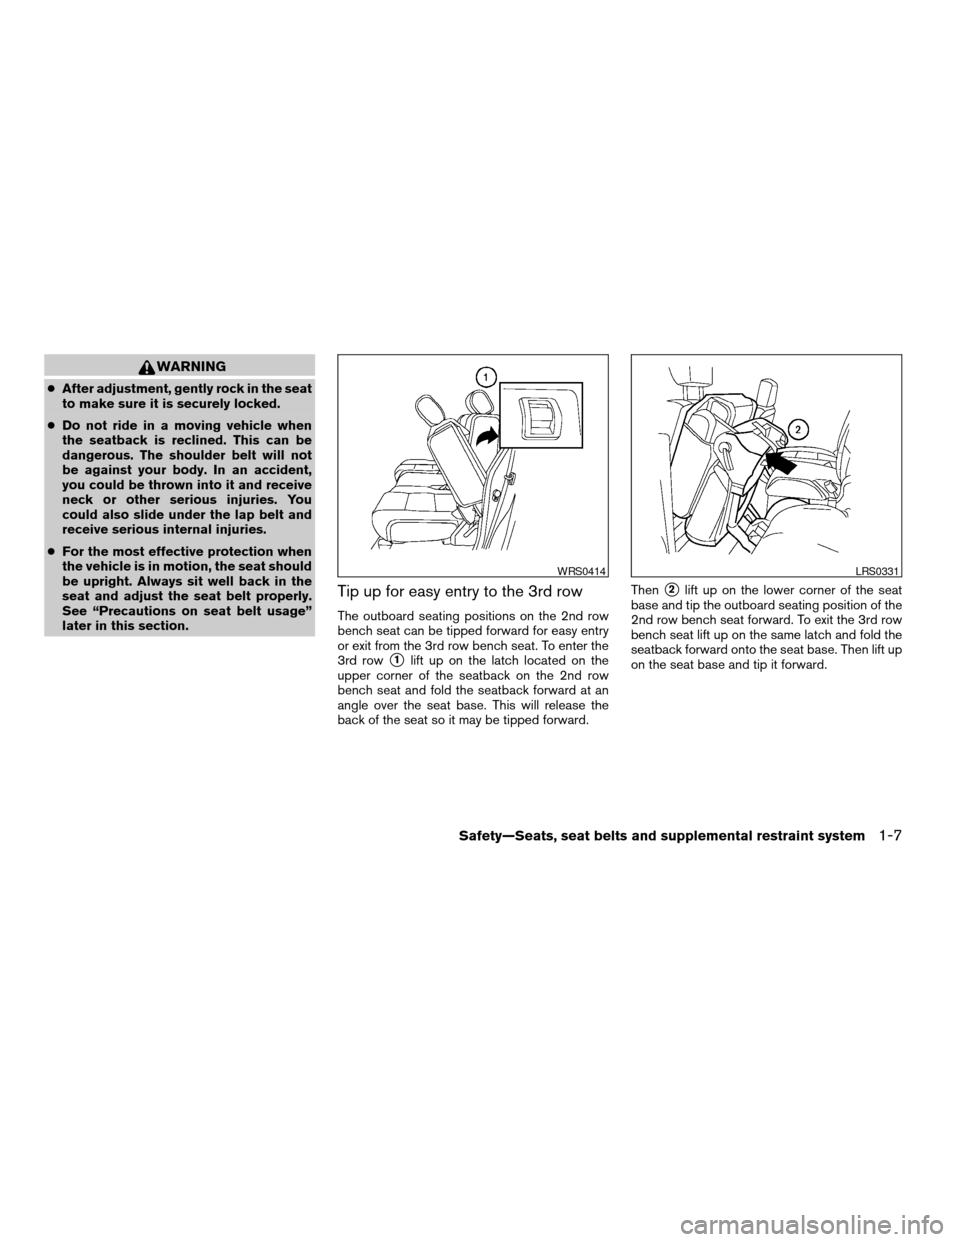
Tip up for easy entry to the 3rd row
The outboard seating positions on the 2nd row
bench seat can be tipped forward for easy entry
or exit from the 3rd row bench seat. To enter the
3rd row
s1lift up on the latch located on the
upper corner of the seatback on the 2nd row
bench seat and fold the seatback forward at an
angle over the seat base. This will release the
back of the seat so it may be tipped forward.Then
s2lift up on the lower corner of the seat
base and tip the outboard seating position of the
2nd row bench seat forward. To exit the 3rd row
bench seat lift up on the same latch and fold the
seatback forward onto the seat base. Then lift up
on the seat base and tip it forward.
WRS0414LRS0331
Safety—Seats, seat belts and supplemental restraint system1-7
ZREVIEW COPYÐ2008 Armada(wzw)
Owners ManualÐUSA_English(nna)
03/05/07Ðarosenma
X
Page 24 of 456
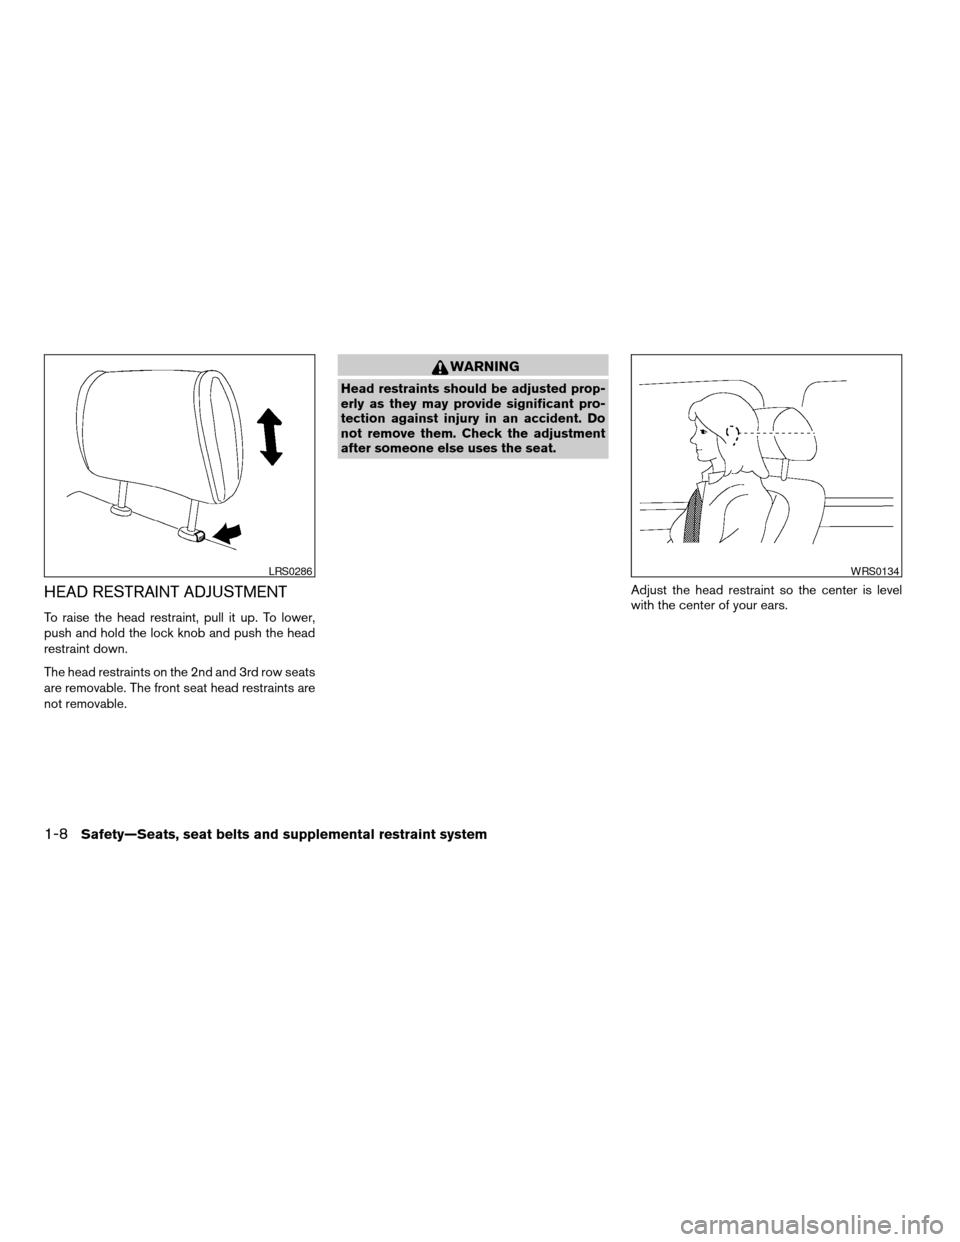
HEAD RESTRAINT ADJUSTMENT
To raise the head restraint, pull it up. To lower,
push and hold the lock knob and push the head
restraint down.
The head restraints on the 2nd and 3rd row seats
are removable. The front seat head restraints are
not removable.
WARNING
Head restraints should be adjusted prop-
erly as they may provide significant pro-
tection against injury in an accident. Do
not remove them. Check the adjustment
after someone else uses the seat.
Adjust the head restraint so the center is level
with the center of your ears.
LRS0286WRS0134
1-8Safety—Seats, seat belts and supplemental restraint system
ZREVIEW COPYÐ2008 Armada(wzw)
Owners ManualÐUSA_English(nna)
03/05/07Ðarosenma
X
Page 41 of 456
cWhen attaching the rear center seat
belt connector, be certain that the seat-
backs are completely secured in the
latched position and the rear center
seat belt connector is completely
secured.
cIf the rear center seat belt connector
and the seatbacks are not secured in
the correct position, serious personal
injury may result in an accident or sud-
den stop.
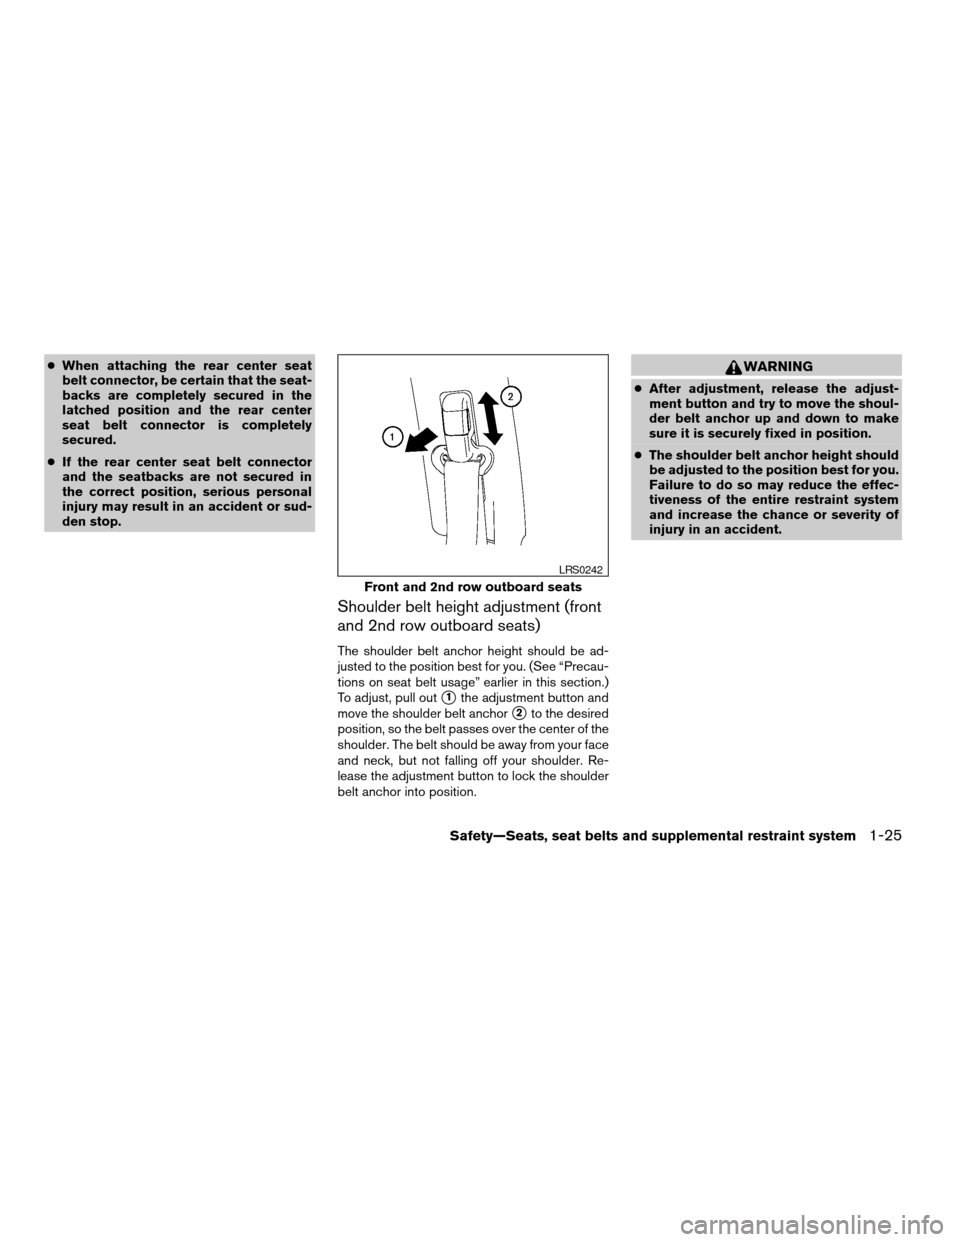
Shoulder belt height adjustment (front
and 2nd row outboard seats)
The shoulder belt anchor height should be ad-
justed to the position best for you. (See “Precau-
tions on seat belt usage” earlier in this section.)
To adjust, pull out
s1the adjustment button and
move the shoulder belt anchor
s2to the desired
position, so the belt passes over the center of the
shoulder. The belt should be away from your face
and neck, but not falling off your shoulder. Re-
lease the adjustment button to lock the shoulder
belt anchor into position.
WARNING
cAfter adjustment, release the adjust-
ment button and try to move the shoul-
der belt anchor up and down to make
sure it is securely fixed in position.
cThe shoulder belt anchor height should
be adjusted to the position best for you.
Failure to do so may reduce the effec-
tiveness of the entire restraint system
and increase the chance or severity of
injury in an accident.
Front and 2nd row outboard seats
LRS0242
Safety—Seats, seat belts and supplemental restraint system1-25
ZREVIEW COPYÐ2008 Armada(wzw)
Owners ManualÐUSA_English(nna)
03/05/07Ðarosenma
X
Page 44 of 456
cWhen your child restraint is not in use,
keep it secured with the LATCH System
or a seat belt to prevent it from being
thrown around in case of a sudden stop
or accident.
CAUTION
Remember that a child restraint left in a
closed vehicle can become very hot.
Check the seating surface and buckles
before placing your child in the child
restraint.
This vehicle is equipped with a universal child
restraint lower anchor system, referred to as the
Lower Anchors and Tethers for CHildren System
or LATCH. Some child restraints include two rigid
or webbing-mounted attachments that can be
connected to these lower anchors. For details,
see the “Lower Anchors and Tethers for CHildren
System (LATCH)” later in this section.
If you do not have a LATCH compatible child
restraint, the vehicle seat belts can be used. See
“Child restraint installation using the seat belts”
later in this section. In general, child restraints are
also designed to be installed with the lap portion
of a lap/shoulder seat belt.Several manufacturers offer child restraints for
infants and small children of various sizes. When
selecting any child restraint, keep the following
points in mind:
cChoose only a restraint with a label certifying
that it complies with Federal Motor Vehicle
Safety Standard 213 or Canadian Motor
Vehicle Safety Standard 213.
cCheck the child restraint in your vehicle to be
sure it is compatible with the vehicle’s seat
and seat belt system.
cIf the child restraint is compatible with your
vehicle, place your child in the child restraint
and check the various adjustments to be
sure the child restraint is compatible with
your child. Choose a child restraint that is
designed for your child’s height and weight.
Always follow all recommended procedures.
All U.S. states and Canadian provinces or
territories require that infants and small
children be restrained in an approved child
restraint at all times while the vehicle is
being operated.
LOWER ANCHORS AND TETHERS
FOR CHILDREN SYSTEM (LATCH)
Your vehicle is equipped with special anchor
points that are used with Lower Anchors and
Tethers for CHildren System (LATCH) compat-
ible child restraints. This system may also be
referred to as the ISOFIX or ISOFIX compatible
system. With this system, you do not have to use
a vehicle seat belt to secure the child restraint.
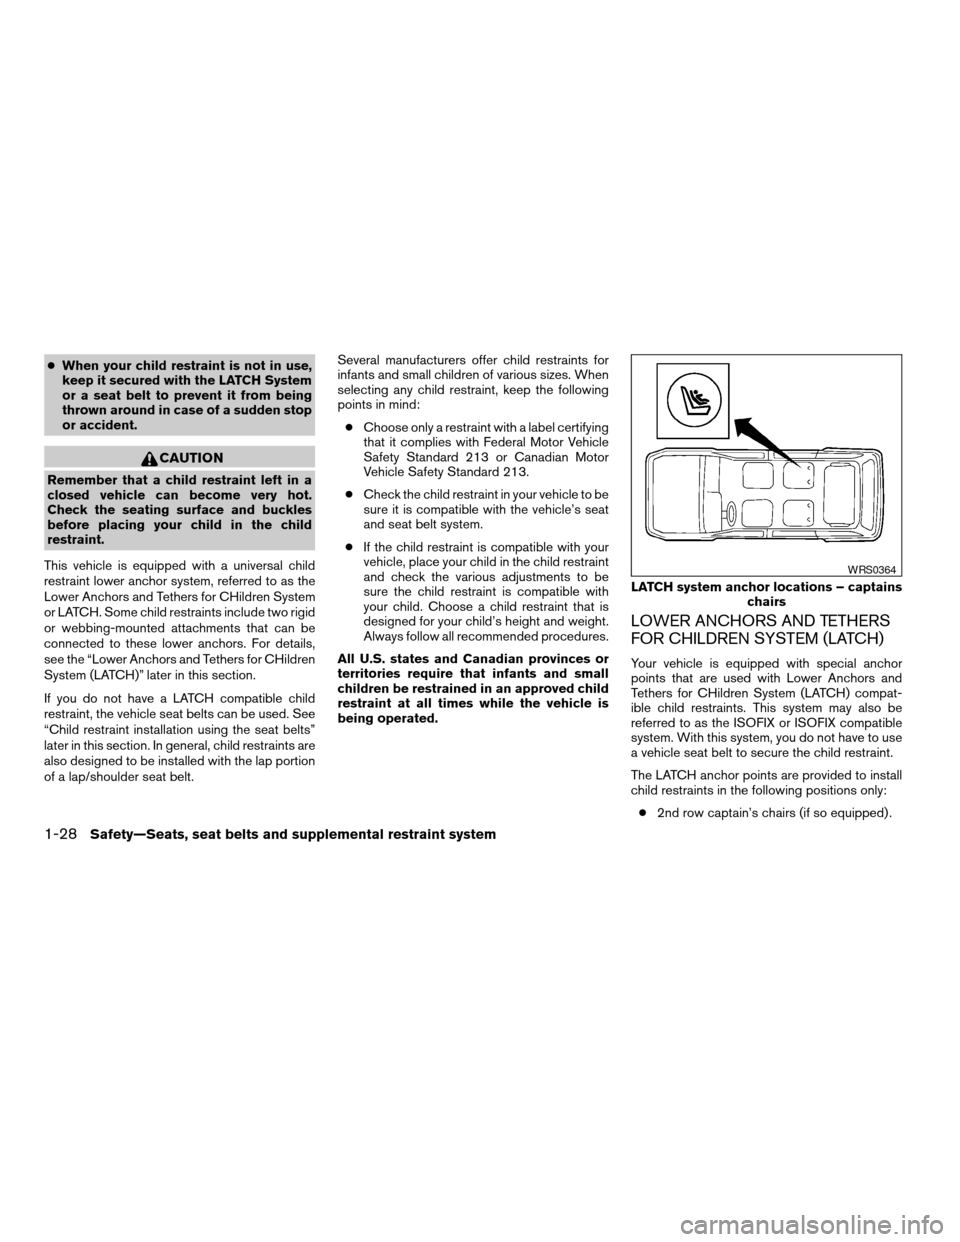
The LATCH anchor points are provided to install
child restraints in the following positions only:
c2nd row captain’s chairs (if so equipped) .
LATCH system anchor locations – captains
chairs
WRS0364
1-28Safety—Seats, seat belts and supplemental restraint system
ZREVIEW COPYÐ2008 Armada(wzw)
Owners ManualÐUSA_English(nna)
03/05/07Ðarosenma
X
Page 61 of 456
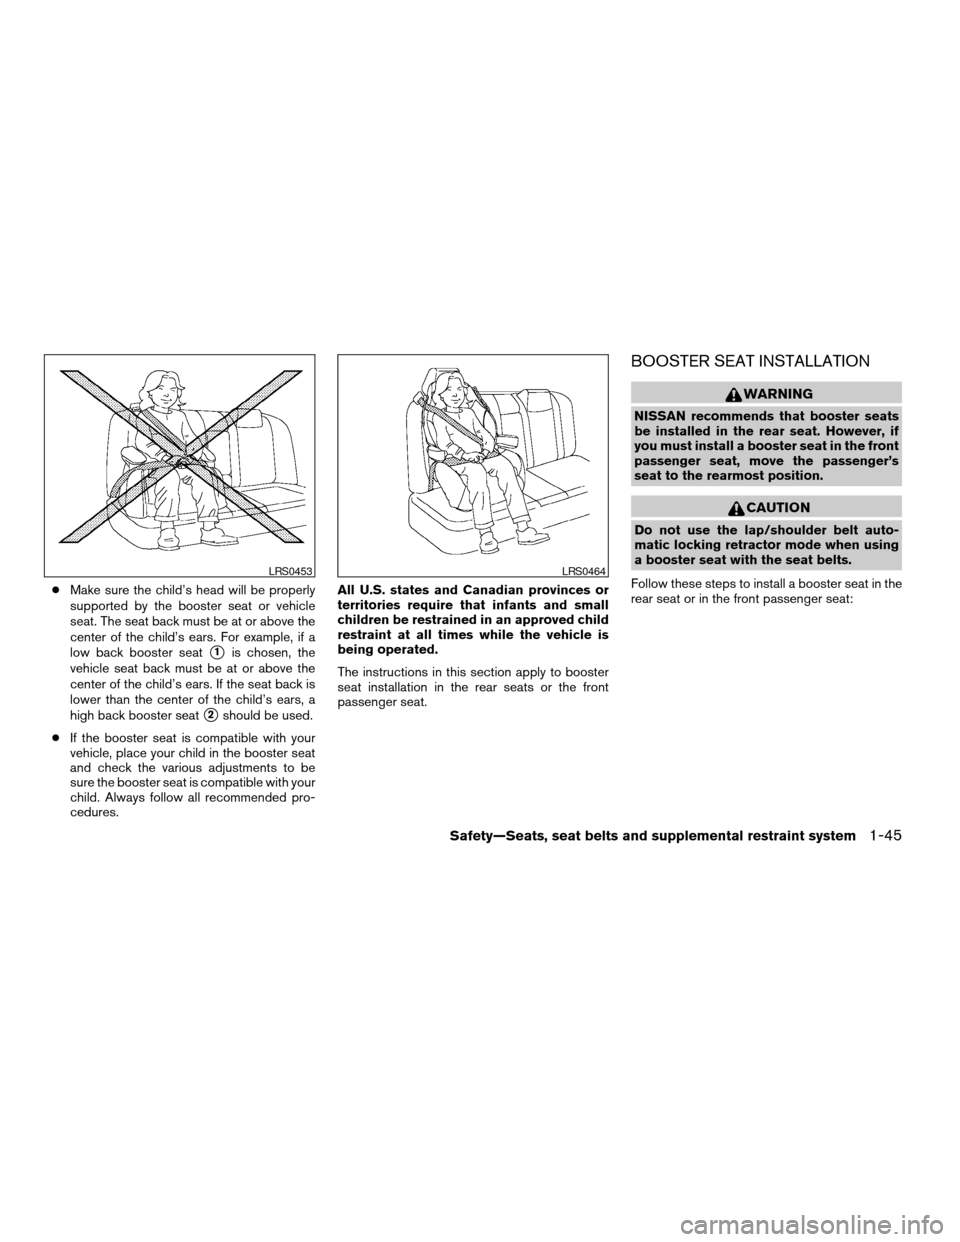
cMake sure the child’s head will be properly
supported by the booster seat or vehicle
seat. The seat back must be at or above the
center of the child’s ears. For example, if a
low back booster seat
s1is chosen, the
vehicle seat back must be at or above the
center of the child’s ears. If the seat back is
lower than the center of the child’s ears, a
high back booster seat
s2should be used.
cIf the booster seat is compatible with your
vehicle, place your child in the booster seat
and check the various adjustments to be
sure the booster seat is compatible with your
child. Always follow all recommended pro-
cedures.All U.S. states and Canadian provinces or
territories require that infants and small
children be restrained in an approved child
restraint at all times while the vehicle is
being operated.
The instructions in this section apply to booster
seat installation in the rear seats or the front
passenger seat.
BOOSTER SEAT INSTALLATION
WARNING
NISSAN recommends that booster seats
be installed in the rear seat. However, if
you must install a booster seat in the front
passenger seat, move the passenger’s
seat to the rearmost position.
CAUTION
Do not use the lap/shoulder belt auto-
matic locking retractor mode when using
a booster seat with the seat belts.
Follow these steps to install a booster seat in the
rear seat or in the front passenger seat:
LRS0453LRS0464
Safety—Seats, seat belts and supplemental restraint system1-45
ZREVIEW COPYÐ2008 Armada(wzw)
Owners ManualÐUSA_English(nna)
03/05/07Ðarosenma
X
Page 62 of 456

1.If you must install a booster seat in the
front seat, move the seat to the rear-
most position.
2. Position the booster seat on the seat. Only
place it in a front facing direction. Always
follow the booster seat manufacturer’s in-
structions.3. The booster seat should be positioned on
the vehicle seat so that it is stable. If neces-
sary, adjust or remove the head restraint to
obtain the correct booster seat fit. See
“Head restraint adjustment” earlier in this
section. If the head restraint is removed,
store it in a secure place. Be sure to install
the head restraint when the booster seat is
removed. If the seating position does not
have an adjustable head restraint and it is
interfering with the proper booster seat fit,
try another seating position or a different
booster seat.
WRS0699
Rear center position
WRS0534
Rear outboard position
WRS0533
1-46Safety—Seats, seat belts and supplemental restraint system
ZREVIEW COPYÐ2008 Armada(wzw)
Owners ManualÐUSA_English(nna)
03/05/07Ðarosenma
X
Page 85 of 456

16. Climate controls (P. 4-38)
17. Power outlet/cigarette lighter
(accessory) (P. 2-40/P. 2-41)
18. Heated seat switch (if so equipped)
(P. 2-37)
19. Vehicle dynamic control (VDC) off
switch (P. 2-38)
20. Tow mode switch (P. 2-40)
21. Shift selector lever (P. 5-12)
22. Heated steering wheel (if so equipped)
(P. 2-37)
23. Center stack storage (P. 2-42)
24. Power outlet (P. 2-40)
25. Front passenger air bag status light
(P. 1-57)
26. Auxiliary jack (P. 4-55)
27. 4WD shift switch (if so equipped)
(P. 5-20)
28. Tilt steering wheel control (P. 3-27)
29. Rear or front and rear sonar system off
switch (if so equipped) (P. 2-38)
30. Pedal position adjustment switch
(if so equipped) (P. 3-27)
31. Power vent window (if so equipped)
(P. 2-55)
32. Lift gate open/close switch
(if so equipped) (P. 3-20)*: Refer to the separate Navigation System
Owner’s Manual (if so equipped) .
See the page number indicated in paren-
theses for operating details.
Instruments and controls2-3
ZREVIEW COPYÐ2008 Armada(wzw)
Owners ManualÐUSA_English(nna)
03/05/07Ðarosenma
X
Page 150 of 456
The master key can be used for all the locks.
The valet key cannot be used for the console box
lock.
To protect belongings when you leave a key with
someone, give them the valet key only.
Never leave these keys in the vehicle.
Additional or replacement keys:
If you still have a key, the key number is not
necessary when you need extra NISSAN Vehicle
Immobilizer System keys. Your dealer can dupli-
cate your existing key. As many as five NISSAN
Vehicle Immobilizer System keys can be used
with one vehicle. You should bring all NISSAN
Vehicle Immobilizer System keys that you have to
your NISSAN dealer for registration. This is be-
cause the registration process will erase the
memory of all key codes previously registered
into the NISSAN Vehicle Immobilizer System.
After the registration process, these components
will only recognize keys coded into the NISSAN
Vehicle Immobilizer System during registration.
Any key that is not given to your dealer at the time
of registration will no longer be able to start your
vehicle.
Do not allow the immobilizer system key, which
contains an electrical transponder, to come into
contact with salt water. This could affect system
function.WARNING
cAlways have the doors locked while
driving. Along with the use of seat belts,
this provides greater safety in the event
of an accident by helping to prevent
persons from being thrown from the
vehicle. This also helps keep children
and others from unintentionally open-
ing the doors, and will help keep out
intruders.
cBefore opening any door, always look
for and avoid oncoming traffic.
cDo not leave children unattended inside
the vehicle. They could unknowingly ac-
tivate switches or controls. Unattended
children could become involved in seri-
ous accidents.
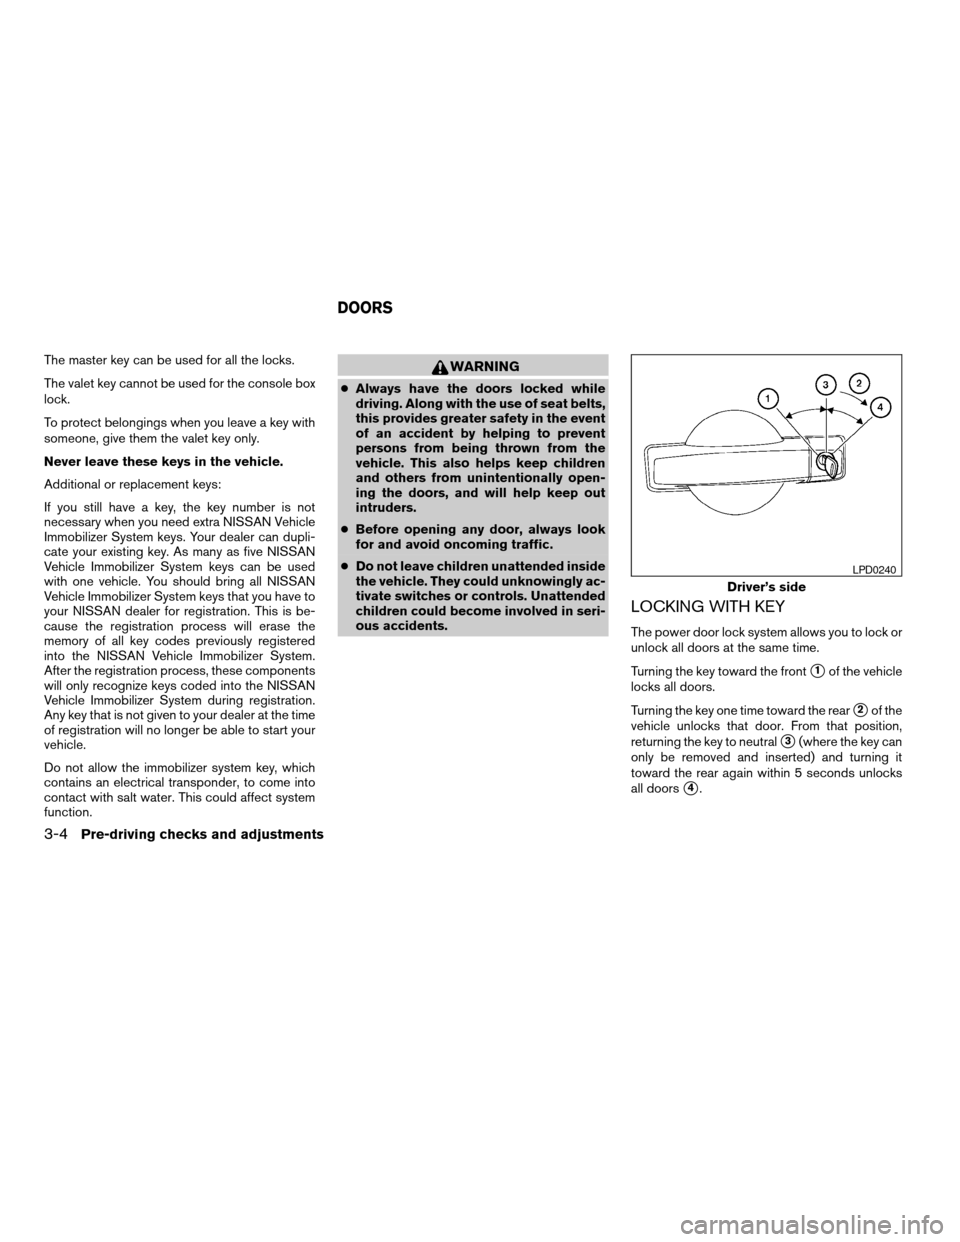
LOCKING WITH KEY
The power door lock system allows you to lock or
unlock all doors at the same time.
Turning the key toward the front
s1of the vehicle
locks all doors.
Turning the key one time toward the rear
s2of the
vehicle unlocks that door. From that position,
returning the key to neutral
s3(where the key can
only be removed and inserted) and turning it
toward the rear again within 5 seconds unlocks
all doors
s4.
Driver’s side
LPD0240
DOORS
3-4Pre-driving checks and adjustments
ZREVIEW COPYÐ2008 Armada(wzw)
Owners ManualÐUSA_English(nna)
03/05/07Ðarosenma
X