2008 NISSAN ARMADA oil
[x] Cancel search: oilPage 105 of 456

Setting mode (If so equipped)
The setting mode allows you to set reminders or
preferences for maintenance intervals or lan-
guage displays.
In the setting mode screen rotate the INFO but-
ton to move to:
cMaintenance
cDisplay
and press the INFO button to select the menu.Reset mode (If so equipped)
The reset mode can be selected in any screen
that allows for preferences to be programmed.
Once the screen is selected, you have the option
to reset their selected distances or time to a new
setting.Maintenance mode (If so equipped)
The maintenance mode allows you to set alerts
for the reminding of maintenance intervals for the
following:
cengine oil
coil filter
ctires
cother.
Set a desired interval by rotating the INFO button
to highlight the maintenance field, then press the
INFO button to select. The reset mode will open
up and allow you to enter the desired distance.
LIC1162WIC1163WIC1164
Instruments and controls2-23
ZREVIEW COPYÐ2008 Armada(wzw)
Owners ManualÐUSA_English(nna)
03/05/07Ðarosenma
X
Page 273 of 456
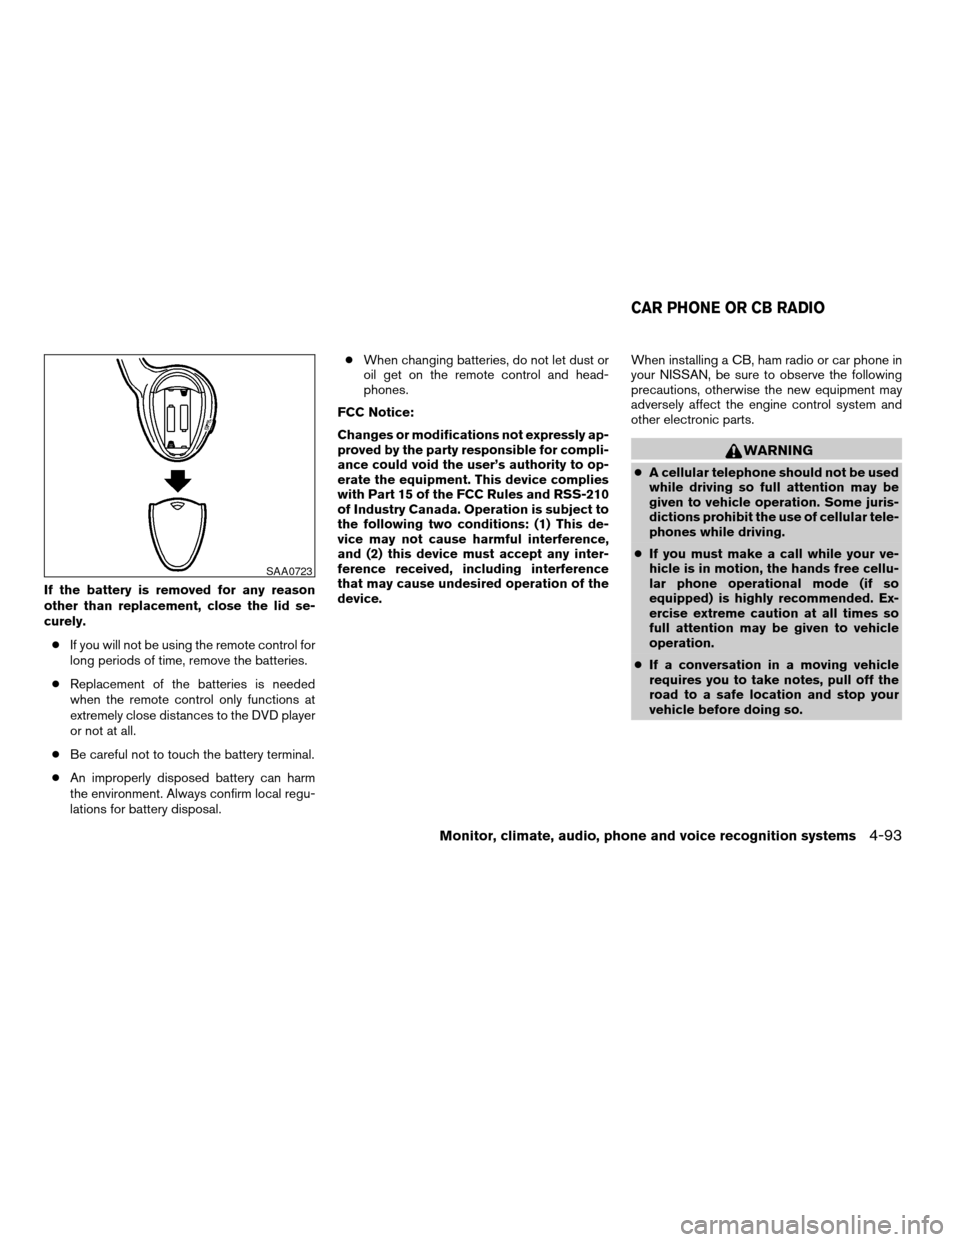
If the battery is removed for any reason
other than replacement, close the lid se-
curely.
cIf you will not be using the remote control for
long periods of time, remove the batteries.
cReplacement of the batteries is needed
when the remote control only functions at
extremely close distances to the DVD player
or not at all.
cBe careful not to touch the battery terminal.
cAn improperly disposed battery can harm
the environment. Always confirm local regu-
lations for battery disposal.cWhen changing batteries, do not let dust or
oil get on the remote control and head-
phones.
FCC Notice:
Changes or modifications not expressly ap-
proved by the party responsible for compli-
ance could void the user’s authority to op-
erate the equipment. This device complies
with Part 15 of the FCC Rules and RSS-210
of Industry Canada. Operation is subject to
the following two conditions: (1) This de-
vice may not cause harmful interference,
and (2) this device must accept any inter-
ference received, including interference
that may cause undesired operation of the
device.When installing a CB, ham radio or car phone in
your NISSAN, be sure to observe the following
precautions, otherwise the new equipment may
adversely affect the engine control system and
other electronic parts.
WARNING
cA cellular telephone should not be used
while driving so full attention may be
given to vehicle operation. Some juris-
dictions prohibit the use of cellular tele-
phones while driving.
cIf you must make a call while your ve-
hicle is in motion, the hands free cellu-
lar phone operational mode (if so
equipped) is highly recommended. Ex-
ercise extreme caution at all times so
full attention may be given to vehicle
operation.
cIf a conversation in a moving vehicle
requires you to take notes, pull off the
road to a safe location and stop your
vehicle before doing so.
SAA0723
CAR PHONE OR CB RADIO
Monitor, climate, audio, phone and voice recognition systems4-93
ZREVIEW COPYÐ2008 Armada(wzw)
Owners ManualÐUSA_English(nna)
03/05/07Ðarosenma
X
Page 325 of 456

START: (4)
This position starts the engine. As soon as the
engine has started, release the key. It automati-
cally returns to the ON position.
NISSAN VEHICLE IMMOBILIZER
SYSTEM
The NISSAN Vehicle Immobilizer System will not
allow the engine to start without the use of the
registered key.
If the engine fails to start using a registered key
(for example, when interference is caused by
another registered key, an automated toll road
device or automatic payment device on the key
ring) , restart the engine using the following pro-
cedures:
1. Leave the ignition switch in the ON position
for approximately 5 seconds.
2.
Turn the ignition switch to the OFF or LOCK
position, and wait approximately 10 seconds.
3. Repeat steps 1 and 2.
4. Restart the engine while holding the device
(which may have caused the interference)
separate from the registered key.
If the no start condition re-occurs, NISSAN rec-
ommends placing the registered key on a separate
key ring to avoid interference from other devices.
cMake sure the area around the vehicle is
clear.
cCheck fluid levels such as engine oil, cool-
ant, brake fluid, and window washer fluid as
frequently as possible, or at least whenever
you refuel.
cCheck that all windows and lights are clean.
cVisually inspect tires for their appearance
and condition. Also check tires for proper
inflation.
cLock all doors.
cPosition seat and adjust head restraints.
cAdjust inside and outside mirrors.
cFasten seat belts and ask all passengers to
do likewise.
cCheck the operation of warning lights when
the key is turned to the ON (3) position. See
“Warning/indicator lights and audible re-
minders” in the “Instruments and controls”
section of this manual.1. Apply the parking brake.
2. Move the shift selector lever to P (Park) or N
(Neutral) . P (Park) is recommended.
The shift selector lever cannot be
moved out of P (Park) and into any of
the other gear positions if the ignition
key is turned to the OFF position or if
the key is removed from the ignition
switch.
The starter is designed not to operate if
the shift selector lever is in any of the
driving positions.
3. Crank the enginewith your foot off the
accelerator pedalby turning the ignition
key to START. Release the key when the
engine starts. If the engine starts, but fails to
run, repeat the above procedure.
cIf the engine is very hard to start in ex-
tremely cold weather or when restarting,
depress the accelerator pedal a little (ap-
proximately 1/3 to the floor) and hold it
and then crank the engine. Release the
key and the accelerator pedal when the
engine starts.
cIf the engine is very hard to start because
it is flooded, depress the accelerator
pedal all the way to the floor and hold it.
Crank the engine for 5-6 seconds. After
BEFORE STARTING THE ENGINE STARTING THE ENGINE
Starting and driving5-11
ZREVIEW COPYÐ2008 Armada(wzw)
Owners ManualÐUSA_English(nna)
03/05/07Ðarosenma
X
Page 326 of 456
cranking the engine, release the accel-
erator pedal. Crank the enginewith your
foot off the accelerator pedalby turn-
ing the ignition key to START. Release the
key when the engine starts. If the engine
starts, but fails to run, repeat the above
procedure.
CAUTION
Do not operate the starter for more than
15 seconds at a time. If the engine does
not start, turn the key off and wait 10
seconds before cranking again, otherwise
the starter could be damaged.
4. Allow the engine to idle for at least 30 sec-
onds after starting. Do not race the engine
while warming it up. Drive at moderate
speed for a short distance first, especially in
cold weather.
In cold weather, keep the engine running for
a minimum of 2–3 minutes before shutting it
off. Starting and stopping the engine over a
short period of time may make the vehicle
more difficult to start.
ENGINE PROTECTION MODE
The engine has an engine protection mode to
reduce the chance of damage if the coolant tem-
perature becomes too high (for example, when
climbing steep grades in high temperature with
heavy loads, such as when towing a trailer) .
When the engine temperature reaches a certain
level:
cThe engine coolant temperature gauge will
move toward the H position.
cEngine power may be reduced.
cThe air conditioning cooling function may be
automatically turned OFF for a short time
(the blower will continue to operate) .
Engine power and, under some conditions, ve-
hicle speed will decrease. Vehicle speed can be
controlled with the accelerator pedal, but the
vehicle may not accelerate at the desired speed.
The transmission will downshift or upshift as it
reaches prescribed shift points. You can also
shift manually.
As driving conditions change and engine coolant
temperature is reduced, vehicle speed can be
increased using the accelerator pedal, and air
conditioning cooling function will automatically
be turned back ON.If:
1. The engine coolant temperature is not re-
duced.
2. The air conditioning cooling function does
not turn back ON.
3. The engine oil pressure warning/engine
coolant temperature high indicator
il-
luminates, this may indicate a malfunction.
Move the vehicle off the road in a safe area
and allow the engine to cool. If after check-
ing the oil and coolant, the
remains
on, do not continue to drive and call a
NISSAN dealer.
The malfunction indicator lamp may also come
ON. Ifonlyit remains on, you do not need to have
your vehicle towed, but have it inspected soon by
a NISSAN dealer. See “Malfunction indicator
lamp” in the “Warning and indicator lights” sec-
tion of this manual.
DRIVING THE VEHICLE
5-12Starting and driving
ZREVIEW COPYÐ2008 Armada(wzw)
Owners ManualÐUSA_English(nna)
03/05/07Ðarosenma
X
Page 327 of 456
WARNING
Overheating can result in reduced engine
power and vehicle speed. The reduced
speed may be lower than other traffic,
which could increase the chance of a col-
lision. Be especially careful when driving.
Pull to the side of the road to a safe area.
Allow the engine to cool and return to
normal operation. See “If your vehicle
overheats” in the “In case of emergency”
section of this manual.
CAUTION
Running the engine with the engine oil
pressure warning light on could cause se-
rious damage to the engine almost imme-
diately. Such damage is not covered by
warranty. Turn off the engine as soon as it
is safe to do so.
AUTOMATIC TRANSMISSION
WARNING
cDo not depress the accelerator pedal
while shifting from P (Park) or N (Neu-
tral) to R (Reverse) , or L (Low) . Always
depress the brake pedal until shifting is
completed. Failure to do so could cause
you to lose control and have an
accident.
cCold engine idle speed is high, so use
caution when shifting into a forward or
reverse gear before the engine has
warmed up.
cNever shift to P (Park) or R (Reverse)
while the vehicle is moving. This could
cause an accident.
CAUTION
cWhen stopping the vehicle on an uphill
grade, do not hold the vehicle by de-
pressing the accelerator pedal. The foot
brake should be used for this purpose.
cDo not downshift abruptly on slippery
roads. This may cause a loss of control.
The automatic transmission in your vehicle is
electronically controlled to produce maximum
power and smooth operation.The recommended operating procedures for this
transmission are shown on the following pages.
Follow these procedures for maximum vehicle
performance and driving enjoyment.
Starting the vehicle
1. After starting the engine, fully depress the
foot brake pedal before moving the shift
selector lever out of the P (Park) position.
2. Keep the foot brake pedal depressed and
move the shift selector lever into a driving
gear.
3. Release the foot brake, then gradually start
the vehicle in motion.
The automatic transmission is designed so
the foot brake pedal MUST be depressed
before shifting from P (Park) to any drive
position while the ignition switch is in the
ON position.
The shift selector lever cannot be moved
out of P (Park) and into any of the other
gear positions if the ignition key is turned
to the LOCK, OFF or ACC position or if the
key is removed.
Starting and driving5-13
ZREVIEW COPYÐ2008 Armada(wzw)
Owners ManualÐUSA_English(nna)
03/05/07Ðarosenma
X
Page 336 of 456
The transfer case 4WD shift switch is used to
select either 2WD or 4WD depending on the
driving conditions. There are four types of drive
modes available, AUTO, 2WD, 4H and 4LO.
The 4WD shift switch electronically controls the
transfer case operation. Rotate the switch to
move between each mode, 2WD, AUTO, 4H and
4LO.
You must push the switch in to select 4LO,
and the vehicle MUST be stationary and the
automatic transmission selector lever in
the N position when changing into or out of
4LO.
WARNING
When parking, apply the parking brake
before stopping the engine and make sure
that the 4WD shift indicator light is on and
the ATP warning light goes off. Otherwise,
the vehicle could unexpectedly move even
if the automatic transmission is in the P
position.
CAUTION
cNever shift the 4WD shift switch be-
tween 4LO and 4H while driving.cThe 4H position provides greater trac-
tion. Avoid excessive speed, as it will
cause increased fuel consumption and
higher oil temperatures, and could
damage drivetrain components.
Speeds over 62.5 MPH (100 km/h) in 4H
is not recommended.
cThe 4LO position provides maximum
power and traction. Avoid raising ve-
hicle speed excessively, as the maxi-
mum speed is approximately 31 MPH
(50 km/h) .
cWhen driving straight, shift the 4WD
shift switch to the 2WD, AUTO or 4H
position. Do not move the 4WD shift
switch when making a turn or reversing.
cDo not shift the 4WD shift switch (be-
tween 2WD, AUTO and 4H) while driving
on steep downhill grades. Use the en-
gine brake and low automatic transmis-
sion gears (D1 or D2) for engine
braking.
cDo not operate the 4WD shift switch
(between 2WD, AUTO and 4H) with the
rear wheels spinning.cDo not drive on dry hard surface roads
in the 4H or 4LO position. Driving on dry
hard surfaces in 4H or 4LO may cause
unnecessary noise and tire wear.
NISSAN recommends driving in the
2WD or AUTO position under these
conditions.
cThe 4WD transfer case may not be
shifted between 4H and 4LO at low am-
bient temperatures and the transfer
4LO position indicator light may blink
even when the 4WD shift switch is
shifted. After driving for a while you can
change the 4WD transfer case between
4H and 4LO.
When driving on rough roads,
cSet the 4WD shift switch to AUTO, 4H or
4LO.
cDrive carefully according to the road surface
conditions.
When the vehicle is stuck,
cSet the 4WD shift switch to 4H or 4LO.
cIf it is difficult to free the vehicle, repeat
forward and backward movement to in-
crease the movement.
5-22Starting and driving
ZREVIEW COPYÐ2008 Armada(wzw)
Owners ManualÐUSA_English(nna)
03/05/07Ðarosenma
X
Page 339 of 456
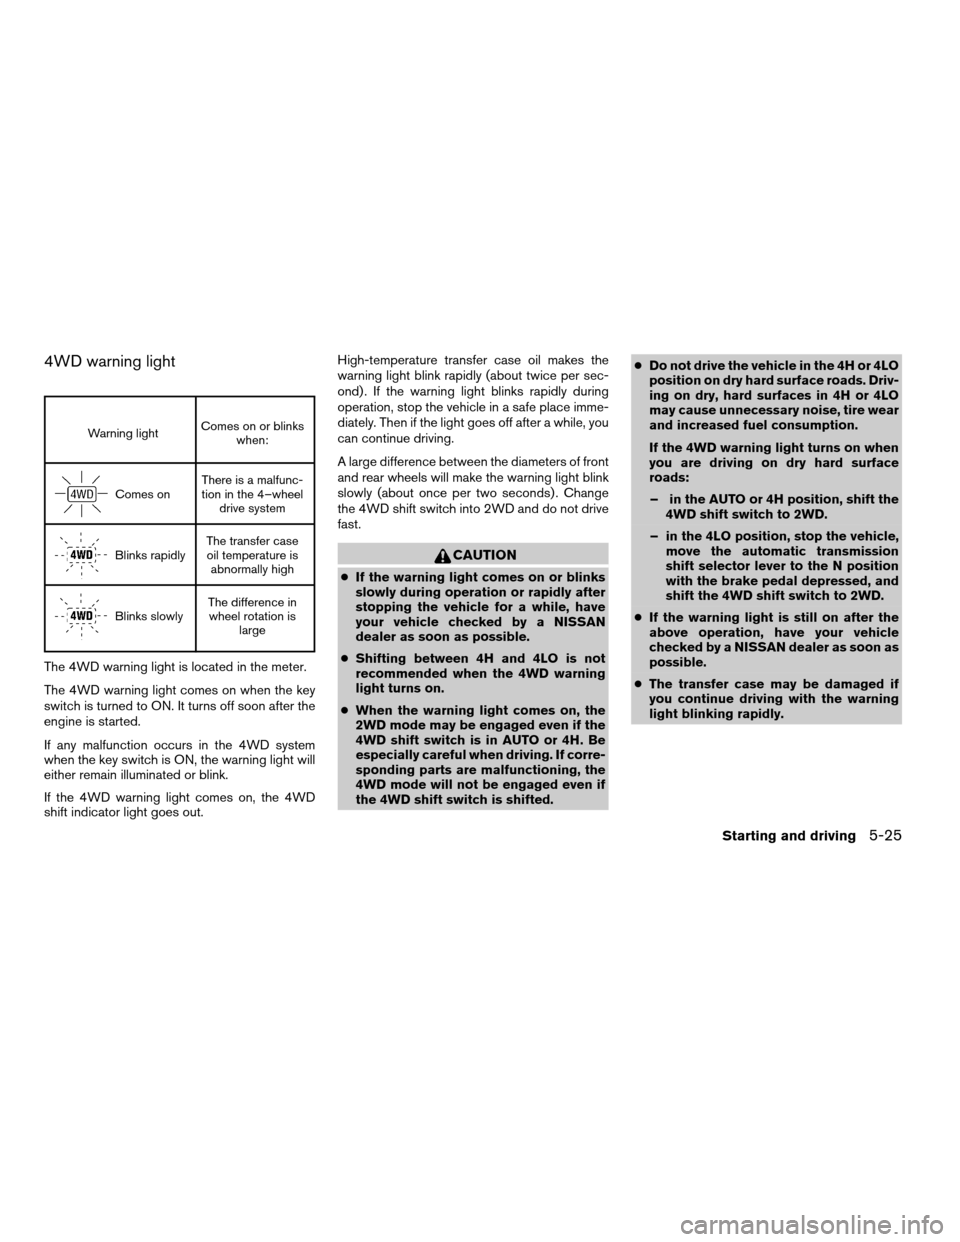
4WD warning light
Warning lightComes on or blinks
when:
Comes onThere is a malfunc-
tion in the 4–wheel
drive system
Blinks rapidlyThe transfer case
oil temperature is
abnormally high
Blinks slowlyThe difference in
wheel rotation is
large
The 4WD warning light is located in the meter.
The 4WD warning light comes on when the key
switch is turned to ON. It turns off soon after the
engine is started.
If any malfunction occurs in the 4WD system
when the key switch is ON, the warning light will
either remain illuminated or blink.
If the 4WD warning light comes on, the 4WD
shift indicator light goes out.High-temperature transfer case oil makes the
warning light blink rapidly (about twice per sec-
ond) . If the warning light blinks rapidly during
operation, stop the vehicle in a safe place imme-
diately. Then if the light goes off after a while, you
can continue driving.
A large difference between the diameters of front
and rear wheels will make the warning light blink
slowly (about once per two seconds) . Change
the 4WD shift switch into 2WD and do not drive
fast.
CAUTION
cIf the warning light comes on or blinks
slowly during operation or rapidly after
stopping the vehicle for a while, have
your vehicle checked by a NISSAN
dealer as soon as possible.
cShifting between 4H and 4LO is not
recommended when the 4WD warning
light turns on.
cWhen the warning light comes on, the
2WD mode may be engaged even if the
4WD shift switch is in AUTO or 4H. Be
especially careful when driving. If corre-
sponding parts are malfunctioning, the
4WD mode will not be engaged even if
the 4WD shift switch is shifted.cDo not drive the vehicle in the 4H or 4LO
position on dry hard surface roads. Driv-
ing on dry, hard surfaces in 4H or 4LO
may cause unnecessary noise, tire wear
and increased fuel consumption.
If the 4WD warning light turns on when
you are driving on dry hard surface
roads:
– in the AUTO or 4H position, shift the
4WD shift switch to 2WD.
– in the 4LO position, stop the vehicle,
move the automatic transmission
shift selector lever to the N position
with the brake pedal depressed, and
shift the 4WD shift switch to 2WD.
cIf the warning light is still on after the
above operation, have your vehicle
checked by a NISSAN dealer as soon as
possible.
cThe transfer case may be damaged if
you continue driving with the warning
light blinking rapidly.
Starting and driving5-25
ZREVIEW COPYÐ2008 Armada(wzw)
Owners ManualÐUSA_English(nna)
03/05/07Ðarosenma
X
Page 355 of 456
5. Remove the wheel nuts and then remove the
tire.
Installing the spare tire
The spare tire is designed for emergency
use. See specific instructions under the
heading “Wheels and tires” in the “Mainte-
nance and do-it-yourself” section of this
manual.
1. Clean any mud or dirt from the surface be-
tween the wheel and hub.
2. Carefully put the spare tire on and tighten
the wheel nuts finger tight.
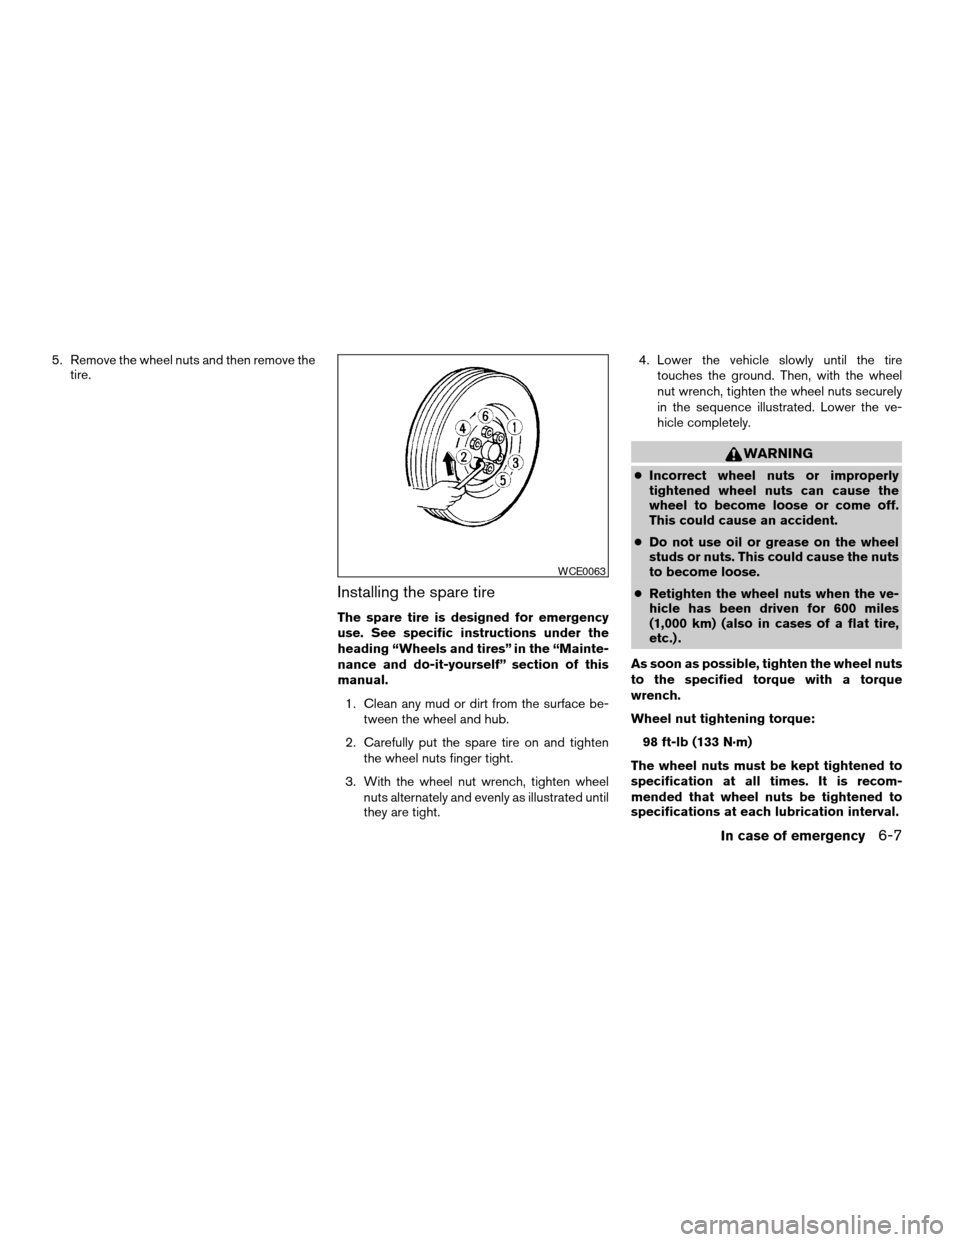
3. With the wheel nut wrench, tighten wheel
nuts alternately and evenly as illustrated until
they are tight.4. Lower the vehicle slowly until the tire
touches the ground. Then, with the wheel
nut wrench, tighten the wheel nuts securely
in the sequence illustrated. Lower the ve-
hicle completely.
WARNING
cIncorrect wheel nuts or improperly
tightened wheel nuts can cause the
wheel to become loose or come off.
This could cause an accident.
cDo not use oil or grease on the wheel
studs or nuts. This could cause the nuts
to become loose.
cRetighten the wheel nuts when the ve-
hicle has been driven for 600 miles
(1,000 km) (also in cases of a flat tire,
etc.) .
As soon as possible, tighten the wheel nuts
to the specified torque with a torque
wrench.
Wheel nut tightening torque:
98 ft-lb (133 N·m)
The wheel nuts must be kept tightened to
specification at all times. It is recom-
mended that wheel nuts be tightened to
specifications at each lubrication interval.
WCE0063
In case of emergency6-7
ZREVIEW COPYÐ2008 Armada(wzw)
Owners ManualÐUSA_English(nna)
03/05/07Ðarosenma
X