2008 NISSAN ARMADA audio
[x] Cancel search: audioPage 312 of 456

Learning function settings
While inside the Voice Command Learning
screen, touch the “Setting” key to enable the
following items:
cEdit Name:
Edit the user name using the keypad dis-
played on the screen.
cStore Result:
When this item is turned to ON, the voice
recognition system can easily recognize the
user’s voice that it has learned.cReset Result:
Resets the user’s voice that the voice recog-
nition system has learned.
cContinuous Learning:
When this item is turned to ON, you can
have the system learn the voice commands
in succession, without selecting commands
one by one.
VOICE RECOGNITION SETTINGS
Press the SETTING button, then touch the “Oth-
ers” key, then touch the “Voice Recognition” key;
the voice recognition settings screen will appear.
Command List:
For information, see “List of help commands”
earlier in this section.
Minimize Voice Feedback:
When this item is enabled (indicator is illumi-
nated) , vocal feedback during voice recognition
is reduced when the system is activated.
LHA1001LHA0884
4-132Monitor, climate, audio, phone and voice recognition systems
ZREVIEW COPYÐ2008 Armada(wzw)
Owners ManualÐUSA_English(nna)
03/05/07Ðarosenma
X
Page 313 of 456

Voice Command Learning:
For information, see “Voice command learning
function” earlier in this section.
User Guide:
For information, see “Displaying the user guide”
earlier in this section.
LHA0909LHA0910
Monitor, climate, audio, phone and voice recognition systems4-133
ZREVIEW COPYÐ2008 Armada(wzw)
Owners ManualÐUSA_English(nna)
03/05/07Ðarosenma
X
Page 314 of 456

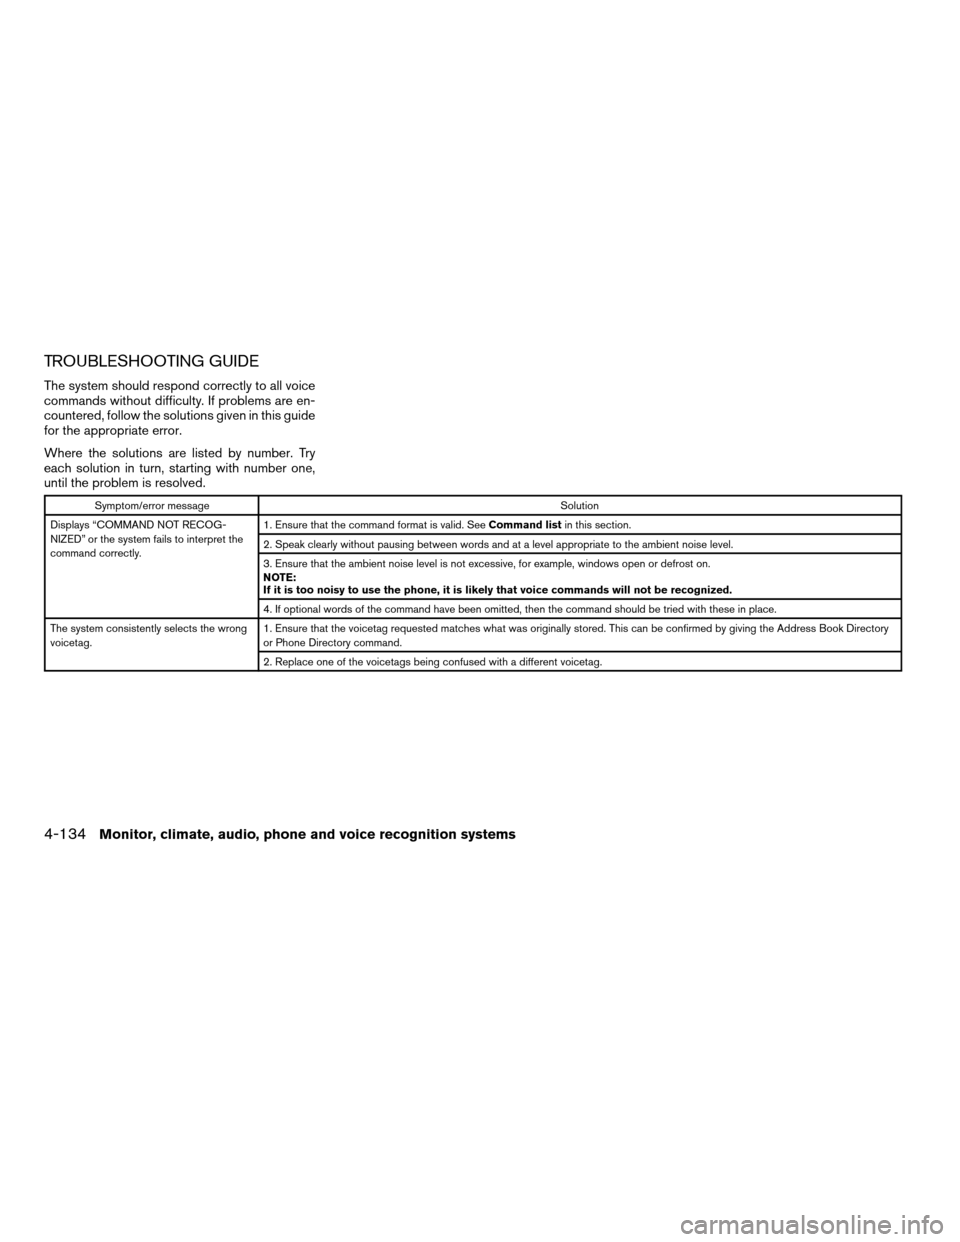
TROUBLESHOOTING GUIDE
The system should respond correctly to all voice
commands without difficulty. If problems are en-
countered, follow the solutions given in this guide
for the appropriate error.
Where the solutions are listed by number. Try
each solution in turn, starting with number one,
until the problem is resolved.
Symptom/error messageSolution
Displays “COMMAND NOT RECOG-
NIZED” or the system fails to interpret the
command correctly.1. Ensure that the command format is valid. SeeCommand listin this section.
2. Speak clearly without pausing between words and at a level appropriate to the ambient noise level.
3. Ensure that the ambient noise level is not excessive, for example, windows open or defrost on.
NOTE:
If it is too noisy to use the phone, it is likely that voice commands will not be recognized.
4. If optional words of the command have been omitted, then the command should be tried with these in place.
The system consistently selects the wrong
voicetag.1. Ensure that the voicetag requested matches what was originally stored. This can be confirmed by giving the Address Book Directory
or Phone Directory command.
2. Replace one of the voicetags being confused with a different voicetag.
4-134Monitor, climate, audio, phone and voice recognition systems
ZREVIEW COPYÐ2008 Armada(wzw)
Owners ManualÐUSA_English(nna)
03/05/07Ðarosenma
X
Page 318 of 456

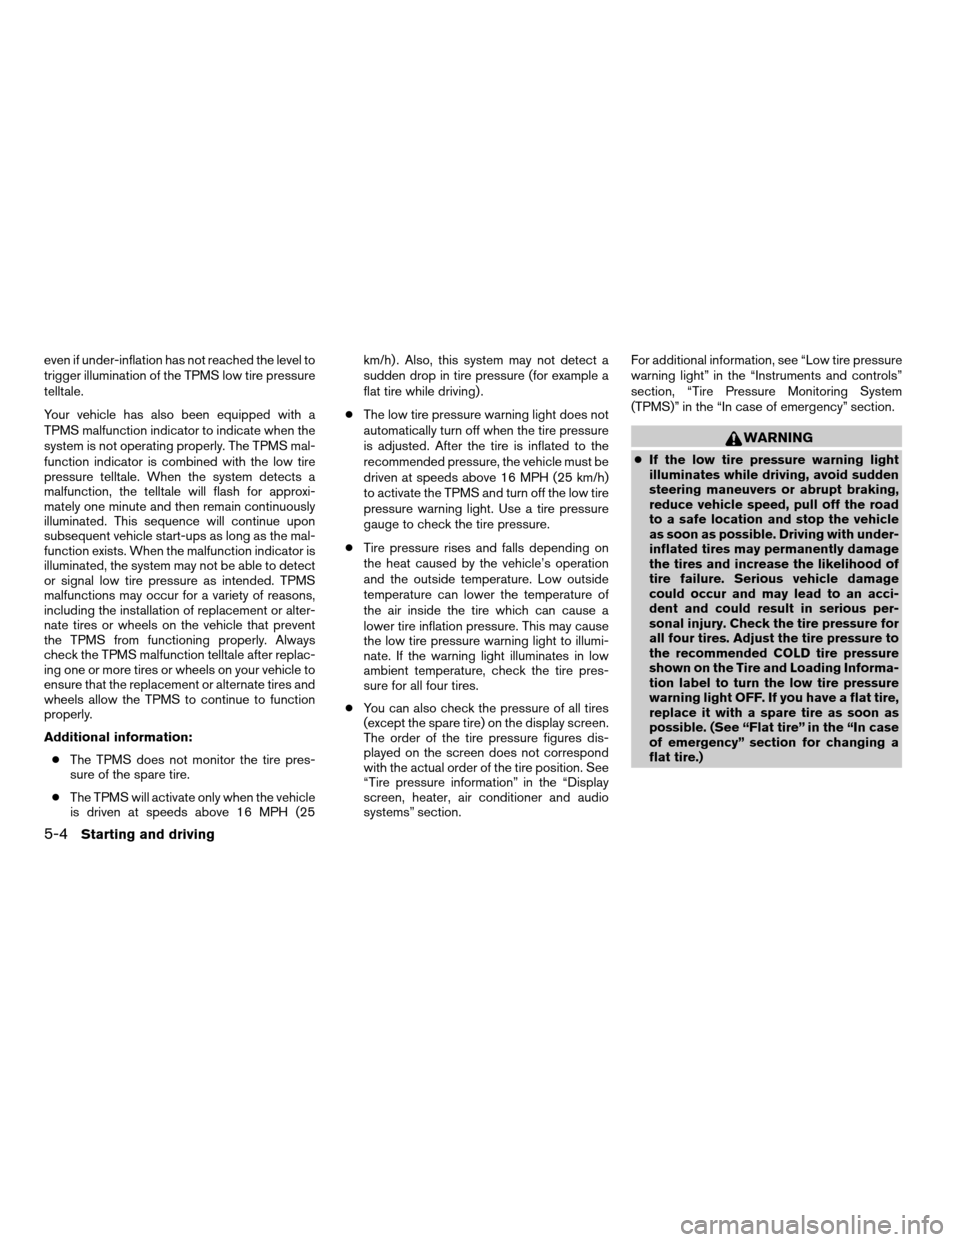
even if under-inflation has not reached the level to
trigger illumination of the TPMS low tire pressure
telltale.
Your vehicle has also been equipped with a
TPMS malfunction indicator to indicate when the
system is not operating properly. The TPMS mal-
function indicator is combined with the low tire
pressure telltale. When the system detects a
malfunction, the telltale will flash for approxi-
mately one minute and then remain continuously
illuminated. This sequence will continue upon
subsequent vehicle start-ups as long as the mal-
function exists. When the malfunction indicator is
illuminated, the system may not be able to detect
or signal low tire pressure as intended. TPMS
malfunctions may occur for a variety of reasons,
including the installation of replacement or alter-
nate tires or wheels on the vehicle that prevent
the TPMS from functioning properly. Always
check the TPMS malfunction telltale after replac-
ing one or more tires or wheels on your vehicle to
ensure that the replacement or alternate tires and
wheels allow the TPMS to continue to function
properly.
Additional information:
cThe TPMS does not monitor the tire pres-
sure of the spare tire.
cThe TPMS will activate only when the vehicle
is driven at speeds above 16 MPH (25km/h) . Also, this system may not detect a
sudden drop in tire pressure (for example a
flat tire while driving) .
cThe low tire pressure warning light does not
automatically turn off when the tire pressure
is adjusted. After the tire is inflated to the
recommended pressure, the vehicle must be
driven at speeds above 16 MPH (25 km/h)
to activate the TPMS and turn off the low tire
pressure warning light. Use a tire pressure
gauge to check the tire pressure.
cTire pressure rises and falls depending on
the heat caused by the vehicle’s operation
and the outside temperature. Low outside
temperature can lower the temperature of
the air inside the tire which can cause a
lower tire inflation pressure. This may cause
the low tire pressure warning light to illumi-
nate. If the warning light illuminates in low
ambient temperature, check the tire pres-
sure for all four tires.
cYou can also check the pressure of all tires
(except the spare tire) on the display screen.
The order of the tire pressure figures dis-
played on the screen does not correspond
with the actual order of the tire position. See
“Tire pressure information” in the “Display
screen, heater, air conditioner and audio
systems” section.For additional information, see “Low tire pressure
warning light” in the “Instruments and controls”
section, “Tire Pressure Monitoring System
(TPMS)” in the “In case of emergency” section.
WARNING
cIf the low tire pressure warning light
illuminates while driving, avoid sudden
steering maneuvers or abrupt braking,
reduce vehicle speed, pull off the road
to a safe location and stop the vehicle
as soon as possible. Driving with under-
inflated tires may permanently damage
the tires and increase the likelihood of
tire failure. Serious vehicle damage
could occur and may lead to an acci-
dent and could result in serious per-
sonal injury. Check the tire pressure for
all four tires. Adjust the tire pressure to
the recommended COLD tire pressure
shown on the Tire and Loading Informa-
tion label to turn the low tire pressure
warning light OFF. If you have a flat tire,
replace it with a spare tire as soon as
possible. (See “Flat tire” in the “In case
of emergency” section for changing a
flat tire.)
5-4Starting and driving
ZREVIEW COPYÐ2008 Armada(wzw)
Owners ManualÐUSA_English(nna)
03/05/07Ðarosenma
X
Page 350 of 456

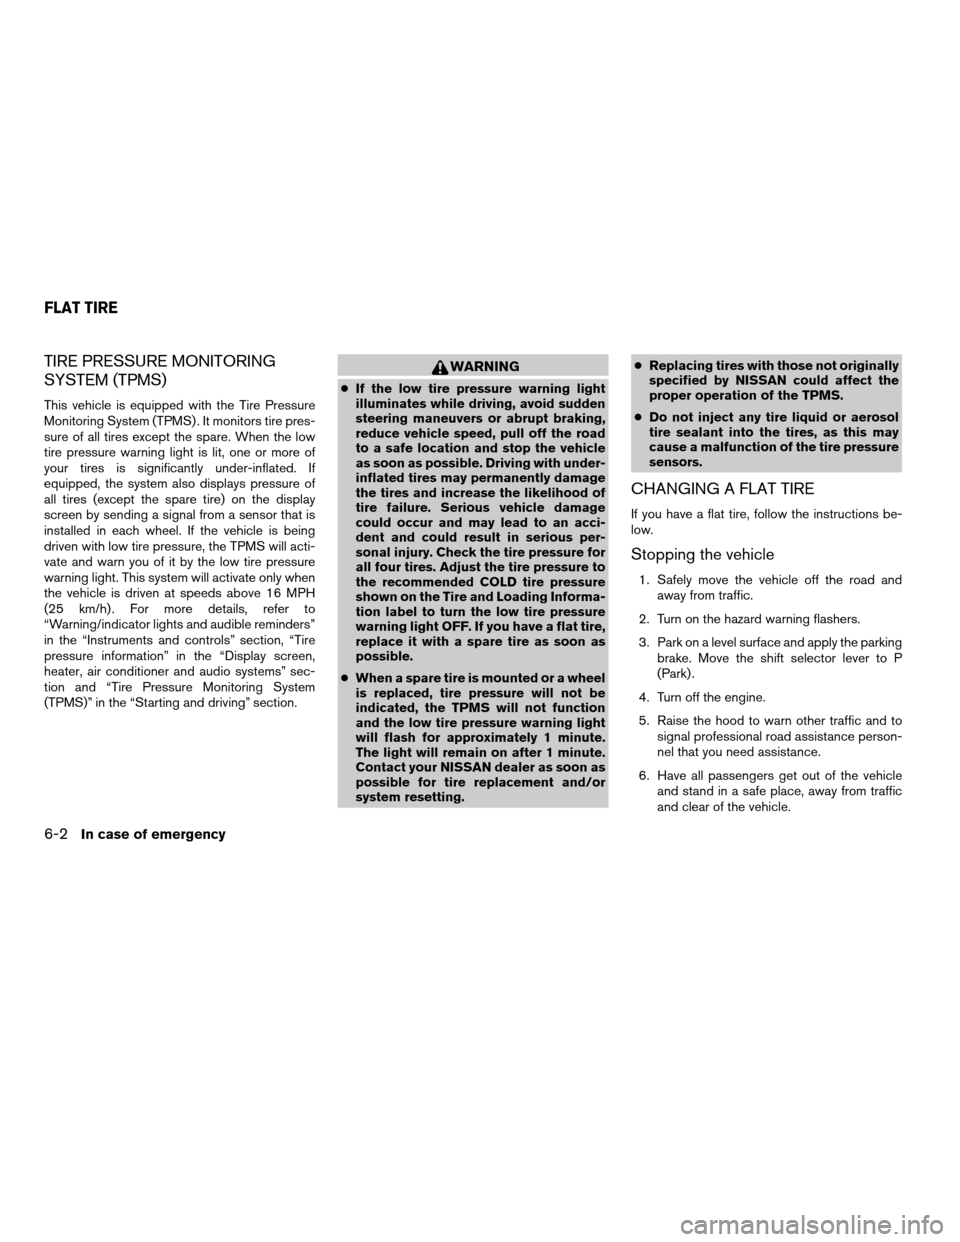
TIRE PRESSURE MONITORING
SYSTEM (TPMS)
This vehicle is equipped with the Tire Pressure
Monitoring System (TPMS) . It monitors tire pres-
sure of all tires except the spare. When the low
tire pressure warning light is lit, one or more of
your tires is significantly under-inflated. If
equipped, the system also displays pressure of
all tires (except the spare tire) on the display
screen by sending a signal from a sensor that is
installed in each wheel. If the vehicle is being
driven with low tire pressure, the TPMS will acti-
vate and warn you of it by the low tire pressure
warning light. This system will activate only when
the vehicle is driven at speeds above 16 MPH
(25 km/h) . For more details, refer to
“Warning/indicator lights and audible reminders”
in the “Instruments and controls” section, “Tire
pressure information” in the “Display screen,
heater, air conditioner and audio systems” sec-
tion and “Tire Pressure Monitoring System
(TPMS)” in the “Starting and driving” section.
WARNING
cIf the low tire pressure warning light
illuminates while driving, avoid sudden
steering maneuvers or abrupt braking,
reduce vehicle speed, pull off the road
to a safe location and stop the vehicle
as soon as possible. Driving with under-
inflated tires may permanently damage
the tires and increase the likelihood of
tire failure. Serious vehicle damage
could occur and may lead to an acci-
dent and could result in serious per-
sonal injury. Check the tire pressure for
all four tires. Adjust the tire pressure to
the recommended COLD tire pressure
shown on the Tire and Loading Informa-
tion label to turn the low tire pressure
warning light OFF. If you have a flat tire,
replace it with a spare tire as soon as
possible.
cWhen a spare tire is mounted or a wheel
is replaced, tire pressure will not be
indicated, the TPMS will not function
and the low tire pressure warning light
will flash for approximately 1 minute.
The light will remain on after 1 minute.
Contact your NISSAN dealer as soon as
possible for tire replacement and/or
system resetting.cReplacing tires with those not originally
specified by NISSAN could affect the
proper operation of the TPMS.
cDo not inject any tire liquid or aerosol
tire sealant into the tires, as this may
cause a malfunction of the tire pressure
sensors.
CHANGING A FLAT TIRE
If you have a flat tire, follow the instructions be-
low.
Stopping the vehicle
1. Safely move the vehicle off the road and
away from traffic.
2. Turn on the hazard warning flashers.
3. Park on a level surface and apply the parking
brake. Move the shift selector lever to P
(Park) .
4. Turn off the engine.
5. Raise the hood to warn other traffic and to
signal professional road assistance person-
nel that you need assistance.
6. Have all passengers get out of the vehicle
and stand in a safe place, away from traffic
and clear of the vehicle.
FLAT TIRE
6-2In case of emergency
ZREVIEW COPYÐ2008 Armada(wzw)
Owners ManualÐUSA_English(nna)
03/05/07Ðarosenma
X
Page 403 of 456

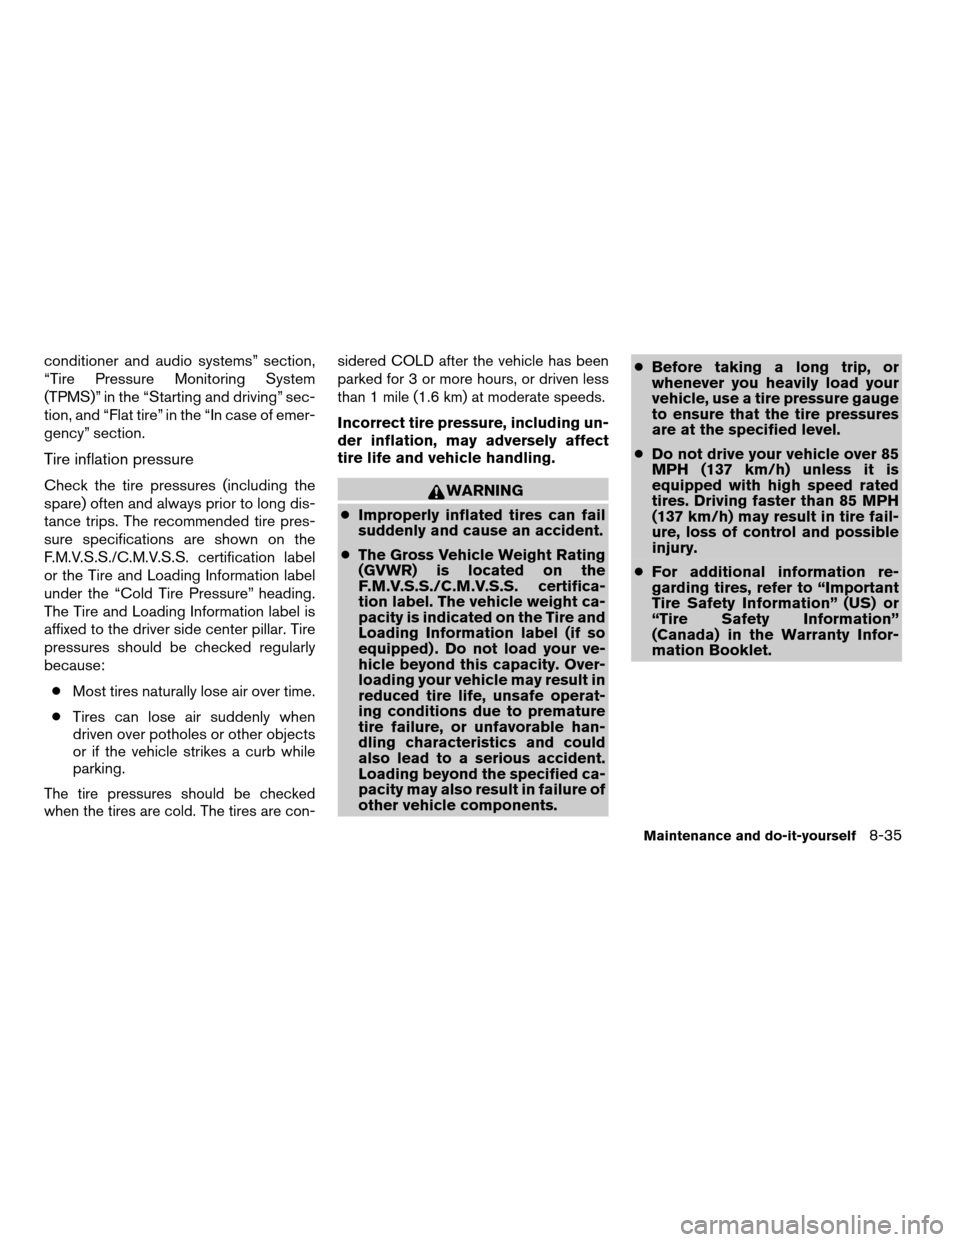
conditioner and audio systems” section,
“Tire Pressure Monitoring System
(TPMS)” in the “Starting and driving” sec-
tion, and “Flat tire” in the “In case of emer-
gency” section.
Tire inflation pressure
Check the tire pressures (including the
spare) often and always prior to long dis-
tance trips. The recommended tire pres-
sure specifications are shown on the
F.M.V.S.S./C.M.V.S.S. certification label
or the Tire and Loading Information label
under the “Cold Tire Pressure” heading.
The Tire and Loading Information label is
affixed to the driver side center pillar. Tire
pressures should be checked regularly
because:
cMost tires naturally lose air over time.
cTires can lose air suddenly when
driven over potholes or other objects
or if the vehicle strikes a curb while
parking.
The tire pressures should be checked
when the tires are cold. The tires are con-sidered COLD after the vehicle has been
parked for 3 or more hours, or driven less
than 1 mile (1.6 km) at moderate speeds.
Incorrect tire pressure, including un-
der inflation, may adversely affect
tire life and vehicle handling.
WARNING
cImproperly inflated tires can fail
suddenly and cause an accident.
cThe Gross Vehicle Weight Rating
(GVWR) is located on the
F.M.V.S.S./C.M.V.S.S. certifica-
tion label. The vehicle weight ca-
pacity is indicated on the Tire and
Loading Information label (if so
equipped) . Do not load your ve-
hicle beyond this capacity. Over-
loading your vehicle may result in
reduced tire life, unsafe operat-
ing conditions due to premature
tire failure, or unfavorable han-
dling characteristics and could
also lead to a serious accident.
Loading beyond the specified ca-
pacity may also result in failure of
other vehicle components.cBefore taking a long trip, or
whenever you heavily load your
vehicle, use a tire pressure gauge
to ensure that the tire pressures
are at the specified level.
cDo not drive your vehicle over 85
MPH (137 km/h) unless it is
equipped with high speed rated
tires. Driving faster than 85 MPH
(137 km/h) may result in tire fail-
ure, loss of control and possible
injury.
cFor additional information re-
garding tires, refer to “Important
Tire Safety Information” (US) or
“Tire Safety Information”
(Canada) in the Warranty Infor-
mation Booklet.
Maintenance and do-it-yourself8-35
ZREVIEW COPYÐ2008 Armada(wzw)
Owners ManualÐUSA_English(nna)
03/05/07Ðarosenma
X
Page 447 of 456

10 Index
4WD warning light...............2-16
A
Active Head Restraint..............1-9
Adjusting pedal position............3-27
Air bag (See supplemental restraint
system).....................1-48
Air bag system
Front (See supplemental front impact
air bag system)...............1-55
Air bag warning labels.............1-63
Air bag warning light...........1-63, 2-18
Air cleaner housing filter............8-17
Air conditioner
Air conditioner service...........4-41
Air conditioner specification label.....9-12
Air conditioner system refrigerant and
oil recommendations.............9-7
Heater and air conditioner controls. . . .4-38
Rear seat air conditioner..........4-40
Servicing air conditioner..........4-41
Alarm system
(See vehicle security system).........2-27
Anchor point locations.............1-31
Antenna.....................4-77
Anti-lock brake warning light......2-13, 2-14
Anti-lock Braking System (ABS)........5-28
Audible reminders................2-20
Audio system..................4-41
Compact Disc (CD) changer.......4-52Compact disc (CD) player.........4-60
Audio System
CompactFlash (CF) player.........4-62
Audio system
FM/AM/SAT radio with compact disc (CD)
changer...................4-49
FM/AM/SAT radio with compact disc (CD)
player....................4-57
Audio System
Music Box hard-disk drive audio
system....................4-64
Audio system
Radio....................4-41
Rear audio controls.............4-77
Audio System
Settings................4-49, 4-57
Audio system
Steering wheel audio control switch. . . .4-75
Autolight switch.................2-33
Automatic
Automatic drive positioner.........3-31
Automatic power window switch.....2-55
Automatic transmission position indicator
light.....................2-27
Driving with automatic
transmission.............5-12, 5-13
Transmission selector lever lock
release....................5-15
Automatic anti-glare inside mirror.......3-29
Automatic transmission fluid temperature
gauge.......................2-8AUX jack.................4-55, 4-62
B
Battery......................8-13
Charge warning light............2-15
Before starting the engine...........5-11
Belt (See drive belt)..............8-15
Block heater
Engine....................5-34
BluetoothThands-free phone
system..................4-94, 4-108
Booster seats..................1-43
Brake
Anti-lock Braking System (ABS)......5-28
Brake fluid..................8-12
Brake light (See stop light).........8-30
Brake system................5-27
Brake warning light.............2-14
Brake wear indicators........2-20, 8-22
Parking brake operation..........5-16
Self-adjusting brakes............8-22
Brakes......................8-22
Break-in schedule................5-19
Brightness control
Instrument panel..............2-35
Brightness/contrast button.......4-16, 4-34
Bulb check/instrument panel..........2-13
Bulb replacement................8-30
ZREVIEW COPYÐ2008 Armada(wzw)
Owners ManualÐUSA_English(nna)
03/05/07Ðarosenma
X
Page 448 of 456

C
Capacities and recommended
fuel/lubricants...................9-2
Captain’s chair adjustment (2nd row)......1-5
Car phone or CB radio.............4-93
Cargo light...................2-60
Cargo (See vehicle loading information) . . .9-13
CD care and cleaning.............4-73
CD changer (See audio system)........4-52
CD player (See audio system).........4-60
Child restraint with top tether strap......1-31
Child restraints.......1-18, 1-19, 1-26, 1-28
Precautions on child
restraints............1-26, 1-37, 1-43
Top tether strap anchor point locations . .1-31
Child safety rear door lock............3-6
Chimes, audible reminders...........2-20
Cigarette lighter.................2-41
Cleaning exterior and interior..........7-2
Clock...................4-50, 4-58
(models with navigation system) . .4-11, 4-28
Clock set.................4-11, 4-28
C.M.V.S.S. certification label..........9-11
Cold weather driving..............5-32
Compact disc (CD) player...........4-60
CompactFlash (CF) player...........4-62
Compass display.................2-9
Console box...............2-42, 2-49
Control panel buttons
Brightness/contrast
button.............4-16, 4-17, 4-34
Enter button..............4-2, 4-17
Setting button.............4-9, 4-26
Startup screen...............4-20Without navigation system..........4-2
Controls
Audio controls (steering wheel)......4-75
Heater and air conditioner controls. . . .4-38
Rear audio controls.............4-77
Rear seat air conditioner..........4-40
Coolant
Capacities and recommended
fuel/lubricants.................9-2
Changing engine coolant..........8-8
Checking engine coolant level........8-7
Engine coolant temperature gauge.....2-6
Corrosion protection...............7-5
Cruise control..................5-17
Cup holders...................2-46
Curtain side-impact and rollover air bag . . .1-60
D
Daytime running light system
(Canada only)..................2-34
Defroster switch
Rear window and outside mirror defroster
switch....................2-31
Digital video disc DVD.............4-78
Dimensions and weights.............9-9
Dimmer switch for instrument panel......2-35
Display controls
(see control panel buttons)........4-2, 4-17
Distance to empty.............4-5, 4-21
Door locks....................3-4
Drive belt....................8-15
Drive positioner, Automatic...........3-31
Driving
Cold weather driving............5-32Driving with automatic
transmission.............5-12, 5-13
Precautions when starting and driving . . .5-2
E
Economy - fuel.................5-19
Emission control information label.......9-11
Emission control system warranty.......9-30
Engine
Before starting the engine.........5-11
Block heater.................5-34
Capacities and recommended
fuel/lubricants.................9-2
Changing engine coolant..........8-8
Changing engine oil.............8-9
Changing engine oil filter..........8-10
Checking engine coolant level........8-7
Checking engine oil level..........8-8
Engine compartment check locations. . . .8-6
Engine coolant temperature gauge.....2-6
Engine cooling system............8-7
Engine oil...................8-8
Engine oil and oil filter
recommendation...............9-6
Engine oil viscosity..............9-6
Engine serial number............9-11
Engine specifications.............9-8
Starting the engine.............5-11
Engine oil pressure gauge............2-7
Engine oil pressure low/engine coolant
temperature high warning light.........2-15
Enter button................4-2, 4-17
Event data recorders..............9-32
Exhaust gas (Carbon monoxide)........5-2
10-2
ZREVIEW COPYÐ2008 Armada(wzw)
Owners ManualÐUSA_English(nna)
03/05/07Ðarosenma
X