Page 209 of 450
Starting and driving4-43
4
Traction control system (TCL)E00611800021
On slippery surfaces, the traction control system (TCL) pre-
vents the drive wheels from exces sive spinning, thus helping
the vehicle to start m oving from a stop. It also provides suffi-
cient driving force and steerin g performance as the vehicle
turns at accelerated speeds.
NOTE● When moving out of mud or fresh snow, pressing the
accelerator pedal may not cause the engine speed to
increase.
Active stability control system (ASC)E00612000020
The active stability control syst em (ASC) is designed to help
maintain the vehicle’s control in slippery conditions, or during
rapid steering manoeuvres. It works by controlling the engine
output and the brake on each wheel.
NOTE● The active stability control system (ASC) functions at
speeds of approximately 10 km/h or higher.CAUTION!
● When driving a vehicle on a snowy or icy road, be
sure to install snow tyre s and drive the vehicle at
moderate speeds.
Page 210 of 450

4-44 Starting and driving
4
Traction control system (TCL)/Active stability
control system (ASC) indicator lamp
E00612100092
The traction control system (TCL ) and active stability control
system (ASC) share the same indicator lamp.
The indicator lamp should illuminate when the ignition switch
is turned to the “ON” position, and should go off after a few
seconds. Always make sure that the lamp goes off before
begining to drive.
If the indicator lamp stays on or does not illuminate when the
ignition switch is turned to the “ON” position, we recommend
that you consult a MITSUBISHI MOTORS Authorized Serv-
ice Point.
indicator lamp blinks when the traction control system
(TCL) or active stability contro l system (ASC) is operating.
CAUTION!
●When the indicator lamp blinks, the traction con-
trol system (TCL) or acti ve stability control system
(ASC) is operating, which means that the road is
slippery or that your vehicle’s wheels are slipping
excessively. If this happens, drive more slowly with
less accelerator input.
● If a malfunction occurs in the device, the indica-
tor lamp will illuminate continuously. Park your
vehicle in a safe place and stop the engine. Then
start the engine again and check whether the
indicator lamp goes out.
If the indicator lamp re mains on even after your
vehicle is driven a short distance after starting the
engine, we recommend that you consult a
MITSUBISHI MOTORS Authorized Service Point.
Page 225 of 450
For pleasant driving5-9
5
Air selection switchE00701300138
To change the air selection, simply press the air selection
switch.
● Outside air {Indicator lamp (A) is OFF}
Outside air is introduced into the passenger compartment.
● Recirculated air {Indicat or lamp (A) is ON}
Air is recirculated inside the passenger compartment.
NOTE●Even if the recirculation position is being used before the
engine is stopped, outside air will automatically be
selected following the next engine startup.
CAUTION!
●Normally, use the outside po sition to keep the wind-
screen and side windows clear and quickly remove
fog or frost from the windscreen.
If the outside air is dust y or otherwise contaminated
use the recirculation positi on. Switch to the outside
position periodically to increase ventilation so that
the windows do not become fogged up.
● Use of the recirculation po sition for extended time
may cause the windows to fog up.
Page 233 of 450
For pleasant driving5-17
5
Air conditioning switchE00703500798
Push the switch, and the air conditioning compressor will start
working. The air conditioning indicator lamp (A) will come on.
Push the switch agai n and the air conditioning compressor will
stop working and the indicator lamp goes off.
Operating the air conditioning systemE00704100078
Heating
Set the mode selection dial to the “ ” position and set the air
selection switch (A) to the outside position.
Turn the temperature control dial clockwise or anticlockwise to
the desired temperature. Sel ect the desired blower speed.
NOTE●For maximum heat, set the bl ower speed at the 3rd posi-
tion.
CAUTION!
● When using the air conditi oning, the idling speed
may increase slightly as the air conditioning com-
pressor is switched on/off automatically. While the
vehicle with an automated manual transmission is
stationary, fully depress th e brake pedal to prevent
the vehicle from creeping.
Page 259 of 450

For pleasant driving5-43
5
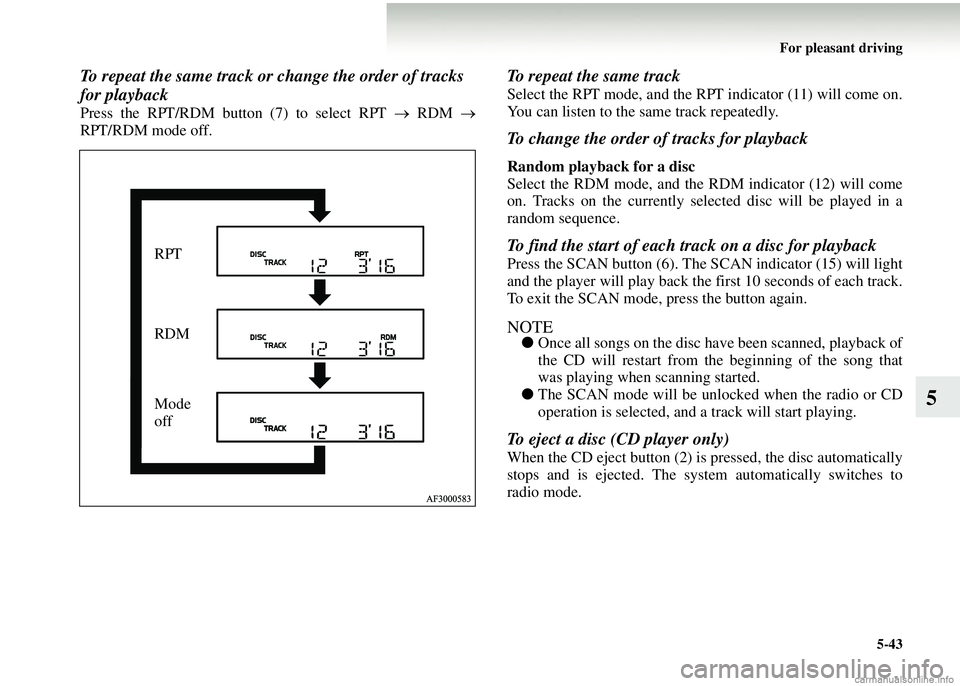
To repeat the same track or change the order of tracks
for playback
Press the RPT/RDM button (7) to select RPT → RDM →
RPT/RDM mode off.
To repeat the same track
Select the RPT mode, and the RPT indicator (11) will come on.
You can listen to the same track repeatedly.
To change the order of tracks for playback
Random playback for a disc
Select the RDM mode, and the RDM indicator (12) will come
on. Tracks on the currently select ed disc will be played in a
random sequence.
To find the start of each track on a disc for playback
Press the SCAN button (6). The SCAN indicator (15) will light
and the player will play back the first 10 seconds of each track.
To exit the SCAN mode, press the button again.
NOTE● Once all songs on the disc have been scanned, playback of
the CD will restart from the beginning of the song that
was playing when scanning started.
● The SCAN mode will be unlocked when the radio or CD
operation is selected, and a track will start playing.
To eject a disc (CD player only)
When the CD eject button (2) is pressed, the disc automatically
stops and is ejected. The syst em automatically switches to
radio mode.
RPT
RDM
Mode
off
Page 265 of 450

For pleasant driving5-49
5
NOTE●With a disc that contains both CD-DA and MP3 files, the
random mode causes only files of the same format (CD-
DA only or MP3 files only) to be played in a random
sequence.
To find the start of each track on a disc for playback
Press the SCAN button (10). “SCAN” will appear on the dis-
play and the CD player will play back the first 10 seconds of
each track on the selected disc.
The track number will blink while the scan mode is selected.
To exit the scan mode, press the SCAN button again.
NOTE●Once all tracks on the disc have been scanned, playback
of the disc will restart from the beginning of the track that
was playing when scanning started.
● The scan mode will be canceled when radio or CD opera-
tion is selected.
● With a disc that contains both CD-DA and MP3 files, the
scan mode causes only files of the same format (CD-DA
only or MP3 files only) to be played.
To eject a disc
When the CD eject button (2) is pressed, the disc automatically
stops and is ejected. The syst em automatically switches to
radio mode.
Page 274 of 450

5-58 For pleasant driving
5
●Do not put additional labels (A) or stickers (B) on com-
pact discs. Do not use any compact disc on which a label
or sticker has started to peel off or any compact disc that
has stickiness or other contamination left by a peeled-off
label or sticker. If you use such a compact disc, the CD
player may stop working properly and you may not be
able to eject the compact disc.Notes on CD-Rs/RWsE00725100026
●You may have trouble playing back some CD-R/RW discs
recorded on CD recorders (C D-R/RW drives), either due
to their recording characteris tics or dirt, fingerprints,
scratches, etc. on the disc surface.
● CD-R/RW discs are less resistant to high temperatures and
high humidity than ordinary music CDs. Leaving them
inside a vehicle for extended periods may damage them
and make playback impossible.
● The unit may not successfully play back a CD-R/RW that
was made by the combination of writing software, a CD
recorder (CD-R/RW drive) an d a disc if they are incom-
patible with one another.
● This player cannot play the CD-R/RW discs if the session
is not closed.
● This player cannot play CD-R/RW discs which contain
other than CD-DA or MP3 data (Video CD, etc.).
● Be sure to observe the handling instructions for the CD-
R/RW disc.
WARNING!
●Operating the CD player in a manner other than
specifically instructed herein may result in hazard-
ous radiation exposure. Do not remove the cover
and attempt to repair the CD player by yourself.
There are no user serviceabl e parts inside. In case of
malfunction, we recommend you to have it checked.
Page 292 of 450

6-2 For emergencies
6If the vehicle breaks down
E00800100185
If the vehicle breaks down on th
e road, move it to the shoulder
and use the hazard warning flashers.
If the engine stops/fails
Vehicle operation and control are affected if the engine stops.
Before moving the vehicle to a safe area be aware of the fol-
lowing: ● The brake booster becomes inoperative and the pedal
effort will increase. Press down the brake pedal harder
than usual.
● Turn the wheel with more effort than usual.
Emergency starting
E00800501229
If the engine cannot be started because the battery is weak or
dead, the battery from another vehicle can be used with jump
leads to start the engine.
1. Get the vehicles close enoug h so that the jump leads can
reach, but be sure the vehicles aren’t touching each other.
If they are, it could cause an unwanted ground connection.
The vehicle will not start in this case, and the bad ground-
ing could damage the electrical systems.
WARNING!
● To start the engine using jump leads connected to
another vehicle, perfor m the correct procedures
according to the instruct ion manual. Incorrect pro-
cedures could result in a fire or explosion or damage
to the vehicles.
CAUTION!
● Check the other vehicle. It must have a 12-volt bat-
tery.
If the other system isn’t 12-volt, shorting can dam-
age both vehicles.