2008 MITSUBISHI COLT audio
[x] Cancel search: audioPage 252 of 450

5-36 For pleasant driving
5
Traffic informationE00721600094
The radio will automatically tune in to traffic information
broadcasts while receiving FM broadcasts or playing compact
discs.
To select this function, follow the instructions below.1. Press the TP button (6). The display will show “TP” (11).
If the RDS data can be read, the display will show “RDS”
(9). If not, the display will show “NO RDS” for about 5
seconds.
2. If the radio detects traffic info rmation on either the station
currently selected or another station, the display will show
“TRAF INF” for 5 seconds followed by a 2-second indi-
cation of the frequency. Then, it will show the name of the
station broadcasting the traffic information to which you
will listen. The volume level is set separately for listening
to normal audio programs and for listening to traffic infor-
mation. The volume level will therefore change automati-
cally to that set when traffi c information was last received.
When the traffic information broadcast is over, the radio
will return to the previously received program and to the
corresponding volume level.
3. Press the TP button (6) to return to the previous condition.
NOTE● While “TP” is illuminated, the radio stops only at TP sta-
tions even if the TUNE/SEEK button (3 or 4) is pressed.
Page 254 of 450

5-38 For pleasant driving
5
Emergency broadcastsE00721700109
If an emergency broadcast is caught while receiving a FM
broadcast or playing back a compact disc with the ignition
switch in “ACC” or “ON” position, the display will show
“ALARM” and the emergency broadcast will interrupt the cur-
rent program. The volume level is set separately for listening to
normal audio programs and for listening to emergency broad-
casts. The volume level will ther efore change automatically to
that set when an emergency br oadcast or traffic information
broadcast was last received. Wh en the emergency broadcast is
over, the radio will return to the previously received program
and to the corresponding volume level.
Function setup modeE00722500104
It is possible to change the following functions: ● AF
● CT
● REG
● TP-S
● Language of PTY display
1. Press the “MENU” button to select the function setup
mode.
Page 261 of 450
For pleasant driving5-45
5
To listen to a CDE00709601020
With a CD player1. Insert the disc with the label facing up.
When a disc is inserted, the DISC indicator (13) will come
on and the CD player will begin playing even if the radio
is being used. The CD player will also start playback
when the CD button (9) is pres sed with a disc in the player
even if the radio is being used.
2. To adjust the volume and tone, refer to “To adjust the vol- ume” on page 5-27 and “To adjust the tone” on page 5-27.
NOTE● When an 8 cm compact disc is used, the adapter is not
needed for playback. Insert th e disc in the centre of the
disc-loading slot.
● For information concerning the handling of compact
discs, refer to “Handling co mpact discs” on page 5-56.
To fast forward/reverse the disc
To fast forward or reverse, use the TRACK buttons (12).
Fast forward
You can fast forward by holding down the side of the
TRACK button (12) for more than 1 second.
Fast reverse
You can fast reverse by holding down the side of the
TRACK button (12) for more than 1 second.
NOTE●When you have fast-forwarded /fast-reversed the disc, the
playing-time may be shown with deviation.
To listen to an MP3 CD
This CD player allows you to play MP3 (MPEG Audio Layer-
3) files recorded on CD-ROMs, CD-Rs (recordable CDs), and
CD-RWs (rewritable CDs) in ISO9660 Level 1/Level 2, Joliet,
and Romeo formats. Each disc may have a maximum of 100
trees, 100 folders, and 255 files per disc. During MP3 play-
back, the unit can display ID3 tag information (version 2.4).
For information concerning ID3 ta g, refer to “CD text and MP3
title display” on page 5-50.
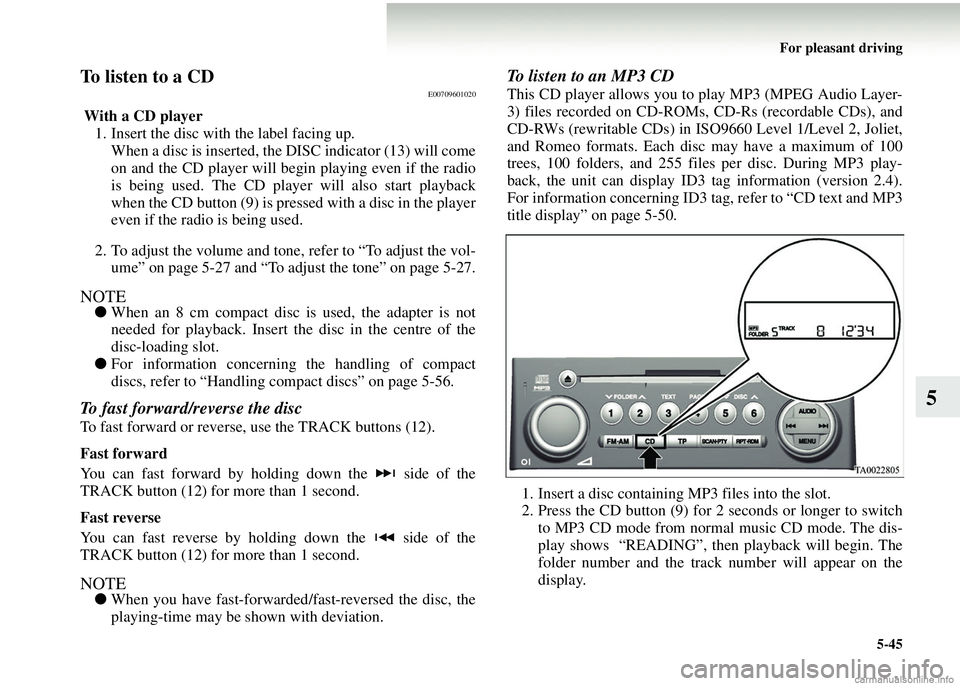
1. Insert a disc containing MP3 files into the slot.
2. Press the CD button (9) for 2 seconds or longer to switch to MP3 CD mode from normal music CD mode. The dis-
play shows “READING”, then playback will begin. The
folder number and the track number will appear on the
display.
Page 262 of 450
5-46 For pleasant driving
5
NOTE●While listening to a disc on which CD-DA (CD-Digital
Audio) and MP3 files have both been recorded, you can
switch between reading of the CD-DA, reading of the
MP3 files, and AUX (auxiliary input) by pressing the CD
button for 2 seconds or longer (until you hear a beep).
● With a disc containing both CD-DA and MP3 files, the
CD-DA are automatical ly played first.
● The playback sound quality differs depending on the
encoding software and the bit rate. For details, refer to the
user manual of your encoding software.
● Depending on file/folder configurations on a disc, it may
take some time before playback starts.
● MP3 encode software and writing software are not sup-
plied with this unit.
● You may encounter problems playing an MP3 or display-
ing the information of MP3 files recorded with certain
writing software or CD reco rders (CD-R/RW drivers).
● If you record too many folders or files other than MP3
onto a disc, it may take some time before playback starts.
● This unit does not record MP3 files.
● For information concerning CD-Rs/RWs, refer to “Notes
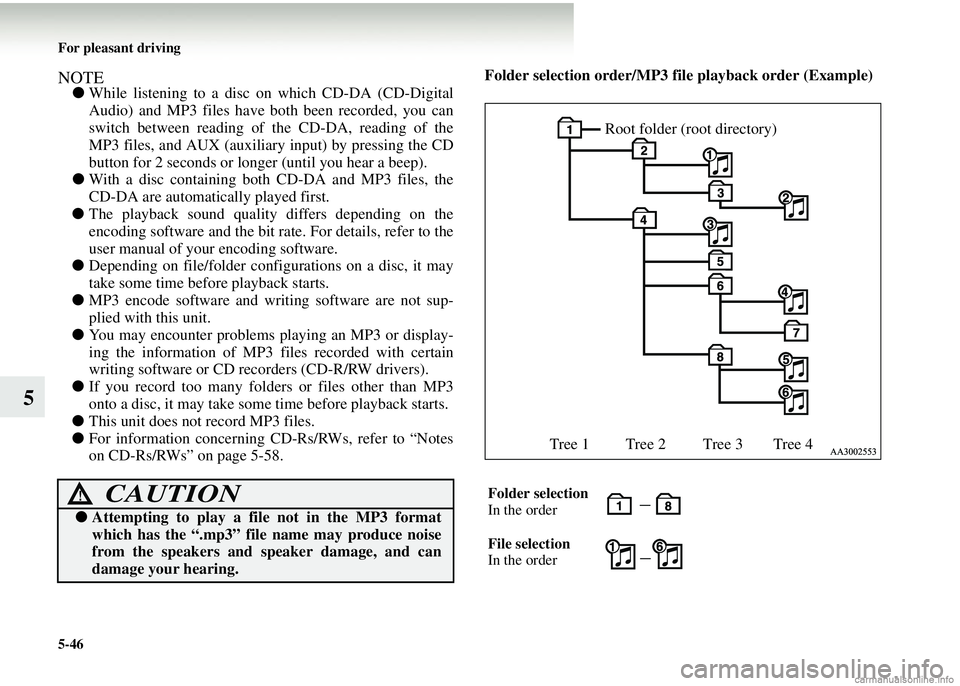
on CD-Rs/RWs” on page 5-58. Folder selection order/MP3 file
playback order (Example)
CAUTION!
● Attempting to play a file not in the MP3 format
which has the “.mp3” file name may produce noise
from the speakers and speaker damage, and can
damage your hearing.
Folder selection
In the order
File selection
In the order
Root folder (root directory)
Tree 1 Tree 2 Tree 3 Tree 4
Page 269 of 450
For pleasant driving5-53
5
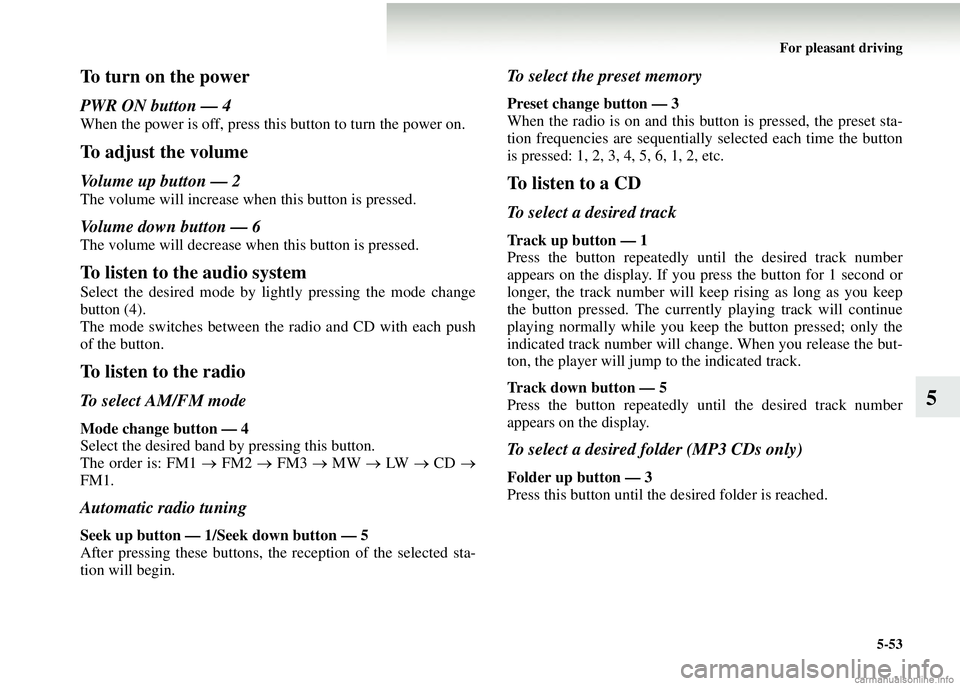
To turn on the power
PWR ON button — 4
When the power is off, press this button to turn the power on.
To adjust the volume
Volume up button — 2
The volume will increase when this button is pressed.
Volume down button — 6
The volume will decrease when this button is pressed.
To listen to the audio system
Select the desired mode by lightly pressing the mode change
button (4).
The mode switches between the radio and CD with each push
of the button.
To listen to the radio
To select AM/FM mode
Mode change button — 4
Select the desired band by pressing this button.
The order is: FM1 → FM2 → FM3 → MW → LW → CD →
FM1.
Automatic radio tuning
Seek up button — 1/S eek down button — 5
After pressing these buttons, th e reception of the selected sta-
tion will begin.
To select the preset memory
Preset change button — 3
When the radio is on and this bu tton is pressed, the preset sta-
tion frequencies are sequentiall y selected each time the button
is pressed: 1, 2, 3, 4, 5, 6, 1, 2, etc.
To listen to a CD
To select a desired track
Track up button — 1
Press the button repeatedly until the desired track number
appears on the display. If you press the button for 1 second or
longer, the track number will keep rising as long as you keep
the button pressed. The currentl y playing track will continue
playing normally while you keep the button pressed; only the
indicated track number will change. When you release the but-
ton, the player will jump to the indicated track.
Track down button — 5
Press the button repeatedly until the desired track number
appears on the display.
To select a desired folder (MP3 CDs only)
Folder up button — 3
Press this button until the desired folder is reached.
Page 273 of 450

For pleasant driving5-57
5
●In the following circumstan ces, moisture can form on
discs and inside the audio system, preventing normal
operation. • When there is high humidity (for example, when it is raining).
• When the temperature suddenly rises, such as right after
the heater is turned on in cold weather.
In this case, wait until the moisture has had time to dry
out.
● When the CD player is subj ected to violent vibrations,
such as during off-road dr iving, the tracking may not
work.
● When storing compact discs, always store them in their
separate cases. Never place compact discs in direct sun-
light, or in any place where th e temperature or humidity is
high.
● Never touch the flat surface of the disc where there isn’t a
label. This will damage the disc surface and could affect
the sound quality. When handling a compact disc, always
hold it by the outer edge and the centre hole. ●
To clean a disc, use a soft, cl ean, dry cloth. Wipe directly
from the centre hole towards the outer edge. Do not wipe
in a circle. Never use any chemicals such as benzine, paint
thinner, a disc spray cleaner, or an anti-static agent on the
disc.
● Do not use a ball point pen, felt pen, pencil, etc. to write
on the label surface of the disc.
Page 437 of 450

Alphabetical index1
A
Accessory socket 5-60
Accessory (Installation) 5
Active stability control system (ASC) 4-42Indicator lamp 4-44
Additional equipment 8-29
Air bag 2-47
Air conditioning Automatic air conditioning 5-13
Important operation tips for the air conditioning 5-22
Air purifier 5-23
Antenna 5-59
Anti-lock brake system (ABS) 4-36 Warning lamp 4-38
Audio Error codes 5-54
Handling of compact discs 5-56
LW/MW/FM electronic tuning radio with CD player 5-24
Steering wheel remote control switch 5-52
Automated manual transmission 4-25 Oil 9-21
Automatic air conditioning 5-13
B
Battery 8-15 Charge warning lamp 3-12
Discharged battery (Emergency starting) 6-2
Specification 9-14 Bonnet 8-4
Brake
Anti-lock brake 4-36
Braking 4-35
Fluid 8-14, 9-21
Parking brake 4-6
Parking brake lever stroke 8-24
Power brakes 4-35
Warning lamp 3-9
Bulb capacity 8-41
C
Capacities 9-21
Cargo loads 4-45
Catalytic converter 8-3
Central door locks 1-9
Changing a fuse 8-35
Charge warning lamp 3-12
Chassis number 9-2
Check engine warning lamp 3-11
Child restraint 2-31
Child-protection rear doors 1-13
Cleaning Exterior of your vehicle 7-4
Genuine leather 7-3
Interior of your vehicle 7-3
Plastic, vinyl leather, etc 7-3
Clutch Fluid 8-14