Page 113 of 164

ReferenceAt a glance Controls Driving tips Mobility
111
Exhaust emission values
The warning lamps come on. The
exhaust emission values have turned
poor and there is a danger of engine
damage. You can continue your jour-
ney, but moderate your speed and exercise due
caution. Have the car checked as soon as possi-
ble.
Under certain circumstances, one of the lamps
will flash or light up continuously. This indicates
excessive misfiring or a malfunction in the
engine. If this happens, reduce your speed and
visit the nearest MINI Dealer as soon as possible.
Severe misfiring can quickly lead to serious dam-
age of emissions-related components, espe-
cially the catalytic converter. In addition,
mechanical engine components can become
damaged.
If the fuel filler cap is not properly tightened, the
OBD system may conclude that fuel vapors are
escaping, causing an indicator to light up. If the
filler cap is then tightened, the indicator should
go out within a few days.
Event data recorders
Your vehicle may be equipped with one or sev-
eral measuring or diagnostic modules or a
device for recording or sending certain vehicle
data or information.
Page 114 of 164

Care
112
Care
Suitable car-care products
Use the cleaning and car-care products
available at your MINI Dealer.<
Cleaning agents may contain hazardous
or health-damaging substances. Follow
the warning and hazard instructions on the
packaging. For interior cleaning, always open
the doors or windows of the vehicle.
Do not use any products that are not intended
for cleaning the vehicle.<
Washing your vehicle
You can wash your new MINI in an automatic car
wash from the first day. Preference should be
given to cloth car washes. If, due to lack of avail-
ability, brush car washes must be used, modern
systems with soft brushes should be given pref-
erence.
When using steam jets or high-pressure
washers, ensure that you maintain a suffi-
cient distance to the vehicle and do not exceed a
maximum temperature of 1407/606. If the
jet is too close or the pressure is too high, this
can lead to damage or initial damage that can
develop into more serious damage. Water that
enters vehicle components can lead to damage
over the long term.
After washing the vehicle, apply the brakes
briefly to dry them, otherwise water can reduce
braking efficiency over the short term and the
brake rotors can corrode.
Switch the rain sensor off when passing through
an automatic car wash, page44. Failure to do so
could result in damage caused by undesired
wiper activation.<
Frameless doors
In car washes working with high pressures and
jet positions near the vehicle windows, small
amounts of water may drip into the interior.
Rear window wiper
In automatic car washes, the rear window wip-
ers may be damaged. Ask the car wash operator about measures that can be taken to protect the
wipers.
Rod antenna
If necessary, for example before entering a car
w a s h o r a g a r a g e w i t h a n e l e v a t o r r a m p , r e m o v e
the rod antenna.
Headlamps
Do not wipe dry and do not use abrasive or cor-
rosive cleaning agents. Remove dirt and con-
tamination, such as insects, by soaking with
shampoo and then rinsing with plenty of water.
Do not remove accumulated ice and snow with
an ice scraper; use window de-icers instead.
Vehicle paintwork
Regular care contributes greatly to driving safety
and value retention.
Environmental influences varying from one
region to the next can affect the vehicle paint-
work. Base the frequency and scope of car care
on these various influences.
Care of upholstery
Depressions that come about on the upholstery
material of the seats in daily use can be brushed
out using a slightly damp brush against the
grain.
The fact that velour lays down is not a quality
defect but rather is inevitable, as it is with home
textiles or clothing.
In the case of strong sunlight and longer parking
periods, cover the seats or all windows to pre-
vent discoloration.
Care of special parts
Light-alloy wheels*
Especially in the winter months, care for the
wheel rims with wheel rim cleaner. Do not use
acidic, strongly alkaline and abrasive cleaning
Page 115 of 164

ReferenceAt a glance Controls Driving tips Mobility
113
agents or steam jets. Follow the manufacturer's
instructions.
Chrome parts*
Carefully clean vehicle parts such as the radiator
grill and door handles with copious quantities of
water and, if necessary, a shampoo additive,
especially when contaminated with road salt.
For additional treatment, use chrome polish.
Rubber parts
Treat only with water or rubber care products.
Do not use silicon sprays or other silicon-
containing care products on rubber seals,
otherwise noise and damage could occur.<
Fine wood parts*
Clean fine wood trim and fine wood parts with a
damp cloth only. Wipe dry with a soft cloth.
Plastic parts
These include:
>Plastic surfaces
>Headliner
>Lamp glass
>Display panes
>Parts with matt black coating
Only clean with water and, if necessary, cleaning
agents for plastic materials. Do not dampen
seats or the headliner.
Do not use solvents such as alcohol, lac-
quer thinner, cold cleaners, fuel, or similar,
as these will damage the surfaces.<
Safety belts
Dirty safety belts resist being reeled in and thus
compromise safety.
Do not dry clean, as the fabric can be
destroyed.<
Only clean using mild soap, leaving the belts
installed.
A l lo w s a f e t y be l t s t o b e r e e le d in o n ly w h e n t h e y
are dry.
Floor carpets and mats*
Floor mats can be removed to allow the vehicle
interior to be cleaned.
Clean with interior cleaner if very soiled.
Wiper blades
Clean with soapy water. Replace wiper blades
twice a year, before and after the cold season.
This is particularly important on vehicles fitted
with a rain sensor.
Displays
To clean the displays, e.g. of the onboard moni-
tor, etc., use a display cleaning cloth or a cloth
lightly moistened with water.
Do not use chemical or household clean-
ing agents. Keep fluids of any kind and
moisture away from the device. Surfaces and
components may otherwise become corroded
or damaged.<
Leather care
The leather* used by the manufacturer of your
MINI is a high quality natural product processed
according to the latest methods in leather prep-
aration.
Dust and road grit in the pores and folds of the
leather have an abrasive effect, leading to
increased wear and causing the leather surface
to become brittle prematurely.
Frequently clean the leather of dust using a cloth
or vacuum cleaner.
Treat the leather twice a year using a leather
care product as dirt and grease will gradually
attack the leather's protective layer. This pre-
serves the quality of the leather and prevents
electrostatic charges.
Vehicle storage
Your MINI Dealer will be glad to advise you on
what is important if the vehicle is to be decom-
missioned for longer than three months.
Page 116 of 164

Replacing components
114
Replacing components
Onboard tool kit
Your vehicle comes with an onboard tool kit that
varies with the equipment version; it is stored
underneath the level load floor.
>Mobility System with onboard tool kit and
tire change set
*120
>Tire change set with onboard tool kit for
space-saver spare tire122
Wiper blades
Changing the front wiper blades
1.Fold up the wiper arm.
2.Position the wiper blade horizontally.
3.Press the securing spring, arrow.
4.Unhook the wiper blade toward the wind-
shield.
5.Pull the wiper blade past the wiper arm
toward the top.
6.Insert the new wiper blade.
7.Press into position until you hear it engage.To avoid damage, make sure that the
wiper arms are against the windshield
before you open the bonnet.<
Replacing the rear wiper blade in the
MINI
1.Fold up the wiper arm.
2.Rotate the wiper blade toward the back as
far as it will go, arrow.
3.Press the wiper blade against the limit and
thus out of the mounting.
4.Press the new wiper blade into the fixture
until it engages audibly.
Replacing the rear wiper blade in the
MINI Clubman
1.Fold out the wiper arm and hold it.
2.Press together the locking spring, arrow 1,
and fold out the wiper blade.
3.Pull the wiper blade away from and out of
the catch mechanism, arrow 2.
4.Press the new wiper blade into the fixture
until it engages audibly.
Page 117 of 164

ReferenceAt a glance Controls Driving tips Mobility
115
Lamps and bulbs
Lamps and bulbs make an essential contribution
to vehicle safety. They should, therefore, be
handled carefully. The manufacturer of your
MINI recommends having your MINI Dealer per-
f o r m a n y w o r k t h a t y o u d o n o t f e e l c o m p e t e n t t o
perform yourself or that is not described here.
Never touch the glass of new bulbs with
your bare fingers, as even minute
amounts of contamination will burn into the
bulb's surface and reduce its service life. Use a
clean tissue, cloth or something similar, or hold
the bulb by its base.<
You can obtain a selection of replacement bulbs
at your MINI Dealer.
When working on electrical systems,
always begin by switching off the con-
sumer in question, otherwise short circuits could
result. To avoid possible injury or equipment
damage when replacing bulbs, observe any
instructions provided by the bulb manufac-
turer.<
Caring for headlamps, refer to page112.
For any bulb replacement not described
below, contact a MINI Dealer or a work-
shop that has specially trained personnel work-
ing in accordance with the specifications of the
MINI manufacturer.<
For checking and adjusting headlamp aim,
please contact your MINI Dealer.<
Light-emitting diodes LEDs
Light-emitting diodes installed behind translu-
cent lenses serve as the light sources for many of
the controls and displays in your vehicle. These
light-emitting diodes are related to conven-
tional laser diodes, and legislation defines them
as Class 1 light-emitting diodes.
Do not remove the covers or expose the
eyes directly to the unfiltered light source
for several hours, otherwise this could cause irri-
tation to the retina.<
Bi-Xenon lamps*
The service life of these bulbs is very long and
the probability of failure very low, provided that
they are not switched on and off an excessive
number of times. If a xenon lamp fails neverthe-
less, switch on the fog lamps and continue the
journey with great care, provided that local leg-
islation does not prohibit this.
Have any work on the xenon lamp system,
including bulb replacement, carried out
only by a MINI Dealer or a workshop that has
specially trained personnel working in accor-
dance with the specifications of the MINI manu-
facturer. Due to high voltage, there is a risk of
fatal injury if work on the xenon lamps is carried
out improperly.<
Halogen low beams and high beams
H13 bulb, 60/55 watts
The H13 bulb is pressurized. Therefore,
wear safety glasses and protective gloves.
Otherwise there is a risk of injury if the bulb is
damaged.<
Be careful when installing the cover, oth-
erwise leaks could occur and cause dam-
age to the headlamp system.<
Accessing the lamp from the engine
compartment
The low-beam/high-beam bulb can be changed
from the engine compartment.
Removing the cover:
1.Press the tab.
2.Flip open the cover and take it out of the
holder.
Page 118 of 164
Replacing components
116
Follow the same steps in reverse order to reat-
tach the cover.
Be careful when installing the cover, oth-
erwise leaks could occur and cause dam-
age to the headlamp system.<
Replacing the bulb
1.Turn the lamp counterclockwise, arrow1,
and remove it, arrow2.
2.Push on the catch, arrow 1, and unplug the
connector, arrow2.
3.To insert the new bulb and replace the
cover, proceed in reverse order.
Turn signal indicators, parking lamps,
roadside parking lamps and fog lamps
Accessing the lamps via the wheel well
1Turn signal
2Parking/roadside parking/fog lamps
Replacing a turn signal bulb
21 watt bulb, PY 21 W
1.Turn in the wheel.
2.Remove cover 1.
To do so, turn the cover counterclockwise.
3.Remove the inside cover.
To do so, turn the cover counterclockwise.
4.Screw out the bulb counterclockwise.
5.To insert the new bulb and replace the cov-
ers, proceed in reverse order.
Page 119 of 164
ReferenceAt a glance Controls Driving tips Mobility
117
Replacing a parking/roadside parking
lamp bulb
5 watt bulb, W 5 W
1.Turn in the wheel.
2.Remove cover 2.
To do so, turn the cover counterclockwise.
3.Screw out the upper bulb counterclockwise.
4.To insert the new bulb and replace the
cover, proceed in reverse order.
Replacing a fog lamp bulb
H8 bulb, 35 watts
1.Turn in the wheel.
2.Remove cover 2.
To do so, turn the cover counterclockwise.
3.Screw out the lower bulb counterclockwise.
4.To insert the new bulb and replace the
cover, proceed in reverse order.
Side turn signal indicators
5 watt bulb, W 5 W1.Push the lamp with the ventilation grate for-
ward and remove.
2.Screw out the bulb holder counterclockwise.
3.Pull out and replace the bulb.
4.To insert the new bulb and replace the
cover, proceed in reverse order.
Tail lamps
MINI
1Brake lamp/tail lamp
21 watt/5 watt bulb, W 5 W
2Turn signal lamp
21 watt bulb, P 21 W
3Backup lamp
21 watt bulb, P 21 W
Page 120 of 164
Replacing components
118
MINI Clubman
1Brake lamp/tail lamp
21 watt/5 watt bulb, W 5 W
2Turn signal lamp
21 watt bulb, P 21 W
3Rear fog lamp
* P 21 W
4Backup lamp
21 watt bulb, P 21 W
Replacing bulbs in MINI
1.Remove the cover from the sidewall of the
cargo bay.
2.Screw out the desired bulb counterclock-
wise, arrows1.
Additional bulbs are located behind the
sidewall of the cargo bay, arrow 2.
3.To insert the new bulb and replace the
cover, proceed in reverse order.
Replacing bulbs in MINI Clubman
1.Using the screwdriver from the onboard tool
kit, remove the screw at the top.
2.Swing out the tail lamp and remove it
toward the top.
3.Pull off the cable connector 1, unlock the
bulb holder, arrow2, and remove it,
arrow3.
4.Screw out the respective bulb counterclock-
wise.
5.To insert the new bulb and reinstall the tail
lamp, proceed in reverse order.
Rear fog lamp*
21 watt bulb, P 21 W
Access to the lamp via the back or underside of
the bumper.
 1
1 2
2 3
3 4
4 5
5 6
6 7
7 8
8 9
9 10
10 11
11 12
12 13
13 14
14 15
15 16
16 17
17 18
18 19
19 20
20 21
21 22
22 23
23 24
24 25
25 26
26 27
27 28
28 29
29 30
30 31
31 32
32 33
33 34
34 35
35 36
36 37
37 38
38 39
39 40
40 41
41 42
42 43
43 44
44 45
45 46
46 47
47 48
48 49
49 50
50 51
51 52
52 53
53 54
54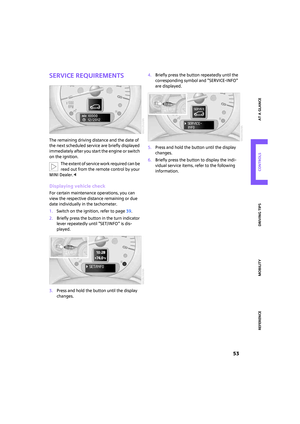 55
55 56
56 57
57 58
58 59
59 60
60 61
61 62
62 63
63 64
64 65
65 66
66 67
67 68
68 69
69 70
70 71
71 72
72 73
73 74
74 75
75 76
76 77
77 78
78 79
79 80
80 81
81 82
82 83
83 84
84 85
85 86
86 87
87 88
88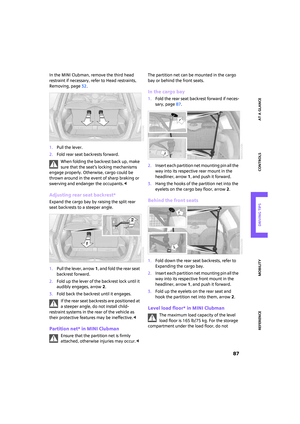 89
89 90
90 91
91 92
92 93
93 94
94 95
95 96
96 97
97 98
98 99
99 100
100 101
101 102
102 103
103 104
104 105
105 106
106 107
107 108
108 109
109 110
110 111
111 112
112 113
113 114
114 115
115 116
116 117
117 118
118 119
119 120
120 121
121 122
122 123
123 124
124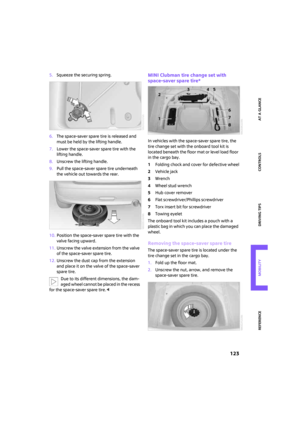 125
125 126
126 127
127 128
128 129
129 130
130 131
131 132
132 133
133 134
134 135
135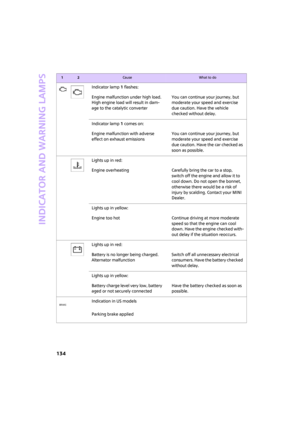 136
136 137
137 138
138 139
139 140
140 141
141 142
142 143
143 144
144 145
145 146
146 147
147 148
148 149
149 150
150 151
151 152
152 153
153 154
154 155
155 156
156 157
157 158
158 159
159 160
160 161
161 162
162 163
163

