2008 MINI COOPER CONVERTIBLE towing
[x] Cancel search: towingPage 6 of 176

CONTENTS
4
In the engine compartment:
Bonnet 118
Engine compartment:
MINI COOPER and
MINI COOPER Convertible119
MINI COOPER S and
MINI COOPER S Convertible120
Engine oil 121
Coolant 122
Brake system 124
Maintenance and care:
MINI Maintenance System 125
Socket for Onboard Diagnostics
OBD 126
Caring for your vehicle 126
Vehicle storage 129
OWNER SERVICE PROCEDURESReplacement procedures:
Onboard tool kit 132
Wiper blades 132
Lamps and bulbs 133
Repairing a flat tire 137
Space-saver spare tire137
Changing tires 139
MINI Mobility System141
Vehicle battery144
Fuses 145
Giving and receiving assistance:
Jump-starting146
Towing and tow-starting 147
TECHNICAL DATAEngine data 152
Dimensions:
MINI153
MINI Convertible154
Weights:
MINI155
MINI Convertible156
Capacities 157
Page 60 of 176

58
AUTOMATIC TRANSMISSION WITH STEPTRONIC
*
Switching from M/S + – Manual mode into
the selector lever positions P, R and N is
only possible via D.Shifting with the selector lever>Briefly press the selector lever in the +
direction:
Transmission shifts up
>Briefly press the selector lever in the –
direction:
Transmission shifts down.
M1 to M6 appear in the gear indicator.
Shifting on the steering wheel*The shift paddles allow the gears to be
changed rapidly and, above all, safely, since
both hands can remain on the steering
wheel.
To shift up or down with one of the two
shift paddles:
>Pull the shift paddle:
Transmission shifts up
>Press the shift paddle:
Transmission shifts down.
M1 to M6 appear in the gear indicator.
The transmission will execute only gear
changes that result in a plausible combina-
tion of vehicle speed and engine rpm, e.g. it
will not shift down if that would result in
excessive engine speed.
In the MINI COOPER S, with the selec-
tor lever in position D, automatic
mode, you can shift gears using the shift
paddles on the steering wheel. The trans-
mission automatically switches to manual
mode. If you do not shift gears with the
shift paddles or accelerate for a certain
amount of time, the transmission auto-
matically returns to automatic mode.<
MalfunctionEP appears on the display. The transmission
system is malfunctioning. Avoid high loads.
All selector lever positions can still be
engaged; in the forward driving positions,
however, the vehicle can only be driven
with a limited gear selection.
Have the system checked immediately.
Jump-starting and towing, refer to
page146 ff.
Page 83 of 176

81
OVERVIEW REPAIRS OPERATIONCONTROLS DATA INDEX
PARK DISTANCE CONTROL (PDC)
*
The concept
The PDC assists you when you back into a
parking space. A signal tone tells you the
current distance to an object behind your
vehicle. To do this, four ultrasonic sensors
in the rear bumper measure the distance to
the nearest object.
The sensors on each side have a range of
approx. 2 ft/60 cm, the middle sensors one
of approx. 5 ft/1.5 m.
PDC is a parking aid that can identify
objects if they are approached slowly,
as is generally the case when parking.
Avoid driving towards objects rapidly; due
to underlying physical principles, the sys-
tem may otherwise alert you too late for
you to take evasive steps.
one second after you select reverse gear or
place the selector lever in position R.
Wait for this one second before you
drive backwards.<
The system is deactivated when you shift
away from Reverse.
You can have a signal tone set as a
confirmation that PDC has been acti-
vated.<
Acoustical signalsThe distance to an object is indicated by a
tone sounding at intervals. As the distance
between vehicle and object decreases, the
intervals between the tones become
shorter. A continuous tone indicates the
presence of an object less than 12 in/30 cm
away.
The warning signal is canceled after
approx. three seconds if the distance to the
object remains constant during this time,
for instance if you are moving parallel to a
wall.MalfunctionA continuous high-pitched tone will sound
during initial activation. The system is mal-
functioning. Have the system checked.Volume controlThe volume of the Park Distance Control
signal can be adjusted from level 1, soft, to
level 6, loud.
You can have this function set.<
System limitations
Even with PDC, final responsibility for
estimating the distance between the
vehicle and any objects always remains
with the driver.
Even when sensors are involved, there is a
blind spot in which objects cannot be
detected. Recognition of some objects can
be beyond the limits of physical ultrasonic
measurement, for example with towing
bars or hitches or with thin or wedge-
shaped objects. It is also possible that low
objects already detected, such as a curb
edge, can disappear in the blind spot of the
sensors before a continuous tone is
sounded, or that protruding objects higher
above the ground, such as ledges, are not
detected.
Loud sources of sound outside and inside
your vehicle can drown the PDC signal
tone.<
Keep the sensors clean and free of ice
or snow in order to ensure that they
will continue to operate effectively.
Do not apply high pressure spray to the
sensors for a prolonged period of time.
Always maintain a distance which is
greater than 4 in/10 cm.<
Page 98 of 176

96
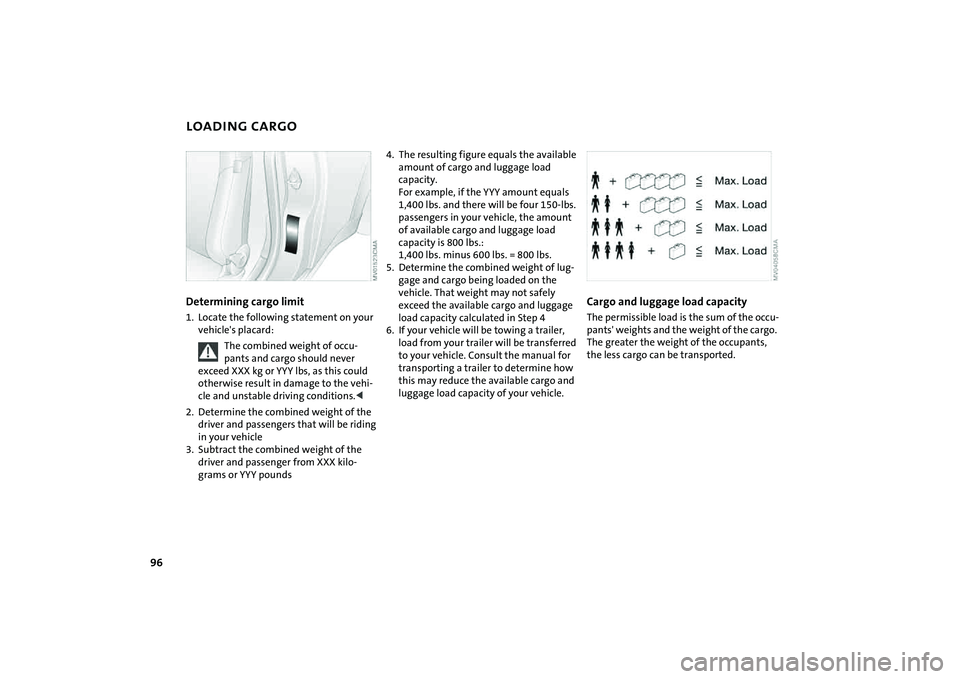
LOADING CARGODetermining cargo limit1. Locate the following statement on your
vehicle's placard:
The combined weight of occu-
pants and cargo should never
exceed XXX kg or YYY lbs, as this could
otherwise result in damage to the vehi-
cle and unstable driving conditions.<
2. Determine the combined weight of the
driver and passengers that will be riding
in your vehicle
3. Subtract the combined weight of the
driver and passenger from XXX kilo-
grams or YYY pounds
4. The resulting figure equals the available
amount of cargo and luggage load
capacity.
For example, if the YYY amount equals
1,400 lbs. and there will be four 150-lbs.
passengers in your vehicle, the amount
of available cargo and luggage load
capacity is 800 lbs.:
1,400 lbs. minus 600 lbs. = 800 lbs.
5. Determine the combined weight of lug-
gage and cargo being loaded on the
vehicle. That weight may not safely
exceed the available cargo and luggage
load capacity calculated in Step 4
6. If your vehicle will be towing a trailer,
load from your trailer will be transferred
to your vehicle. Consult the manual for
transporting a trailer to determine how
this may reduce the available cargo and
luggage load capacity of your vehicle.
Cargo and luggage load capacityThe permissible load is the sum of the occu-
pants' weights and the weight of the cargo.
The greater the weight of the occupants,
the less cargo can be transported.
Page 99 of 176

97
OVERVIEW REPAIRS OPERATIONCONTROLS DATA INDEX
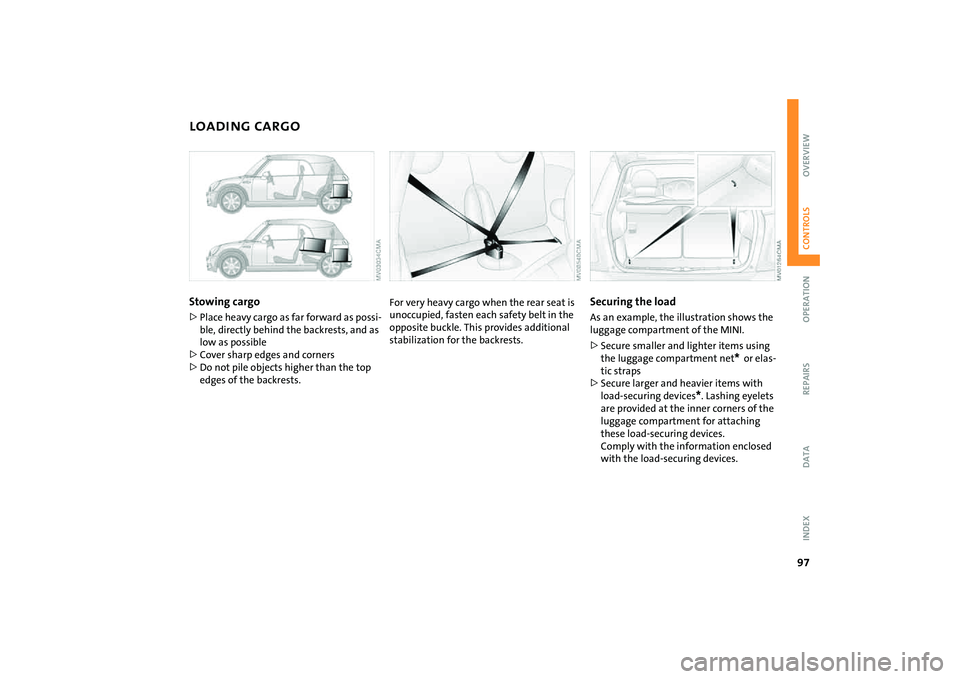
LOADING CARGOStowing cargo >Place heavy cargo as far forward as possi-
ble, directly behind the backrests, and as
low as possible
>Cover sharp edges and corners
>Do not pile objects higher than the top
edges of the backrests.
For very heavy cargo when the rear seat is
unoccupied, fasten each safety belt in the
opposite buckle. This provides additional
stabilization for the backrests.
Securing the loadAs an example, the illustration shows the
luggage compartment of the MINI.
>Secure smaller and lighter items using
the luggage compartment net
* or elas-
tic straps
>Secure larger and heavier items with
load-securing devices
*. Lashing eyelets
are provided at the inner corners of the
luggage compartment for attaching
these load-securing devices.
Comply with the information enclosed
with the load-securing devices.
Page 139 of 176

137
OVERVIEW REPAIRSOPERATION CONTROLS DATA INDEX
REPAIRING A FLAT TIRE SPACE-SAVER SPARE TIRE
*
Safety measures in the event of a
flat:
Park the vehicle as far away from flowing
traffic as possible, and switch on the haz-
ard warning flashers.
Turn the steering wheel to the straight-
ahead wheel position and engage the
steering lock. Engage the parking brake and
shift into 1st or reverse gear – selector lever
in P.
All passengers should be outside the vehi-
cle and well away from your immediate
working area – behind a guardrail, for
instance.
If a portable hazard warning lamp is avail-
able, set it up on the roadside at an appro-
priate distance from the rear of the vehicle.
Comply with all safety guidelines and regu-
lations.<
In the event of a flat tire, different proce-
dures should be followed depending on the
equipment included in your vehicle:
>Vehicles with Run-Flat Tires, refer to
page115
>Vehicles with a space-saver spare tire,
refer to the following section
>Vehicles with MINI Mobility System,
refer to page141.
To change a space-saver spare tire, proceed
as follows:
>Remove space-saver spare tire, refer to
the section after the next one
>Prepare for tire change, refer to page139
>Jack up the vehicle, refer to page140
>Mount the space-saver spare tire, refer
to page140
>Tighten the lug bolts, refer to page140
>Drive with space-saver spare tire, refer to
page139.
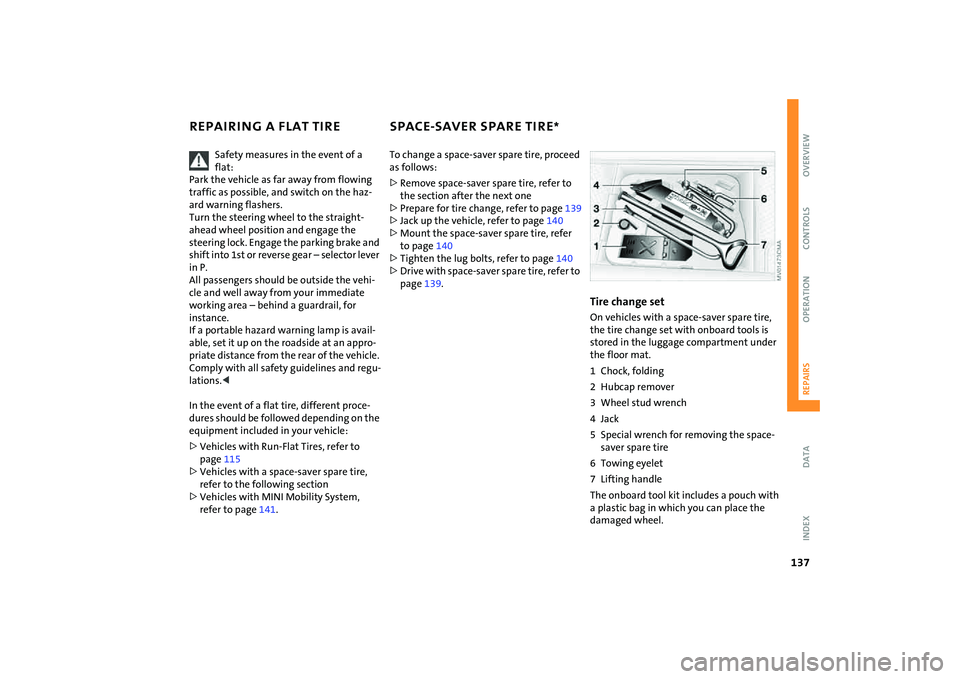
Tire change setOn vehicles with a space-saver spare tire,
the tire change set with onboard tools is
stored in the luggage compartment under
the floor mat.
1 Chock, folding
2 Hubcap remover
3 Wheel stud wrench
4Jack
5 Special wrench for removing the space-
saver spare tire
6 Towing eyelet
7 Lifting handle
The onboard tool kit includes a pouch with
a plastic bag in which you can place the
damaged wheel.
Page 143 of 176

141
OVERVIEW REPAIRSOPERATION CONTROLS DATA INDEX
MINI MOBILITY SYSTEM
*
MINI Mobility System
The MINI Mobility System is provided to
help you repair a flat tire. With the help of
this system you can apply a liquid sealant
on the inside of the tire, which seals the
damaged area and enables you to continue
to drive.Preparing for tire repair
Before using the MINI Mobility Sys-
tem read the warning and danger
precautions on the equipment.<
If possible, leave objects in which have
been forced into the tire.
Take off the tag regarding speed limits and
stick it onto the steering wheel.
Using the MINI Mobility SystemIn order to repair a flat tire with the MINI
Mobility System, proceed as follows:
>Pump in liquid sealant, refer to page142
>Reinflate the tire, refer to page142
>Distribute liquid sealant, refer to
page143
>Check tire inflation pressure, refer to
page143
>Drive on, refer to page143.
MINI Mobility System with onboard
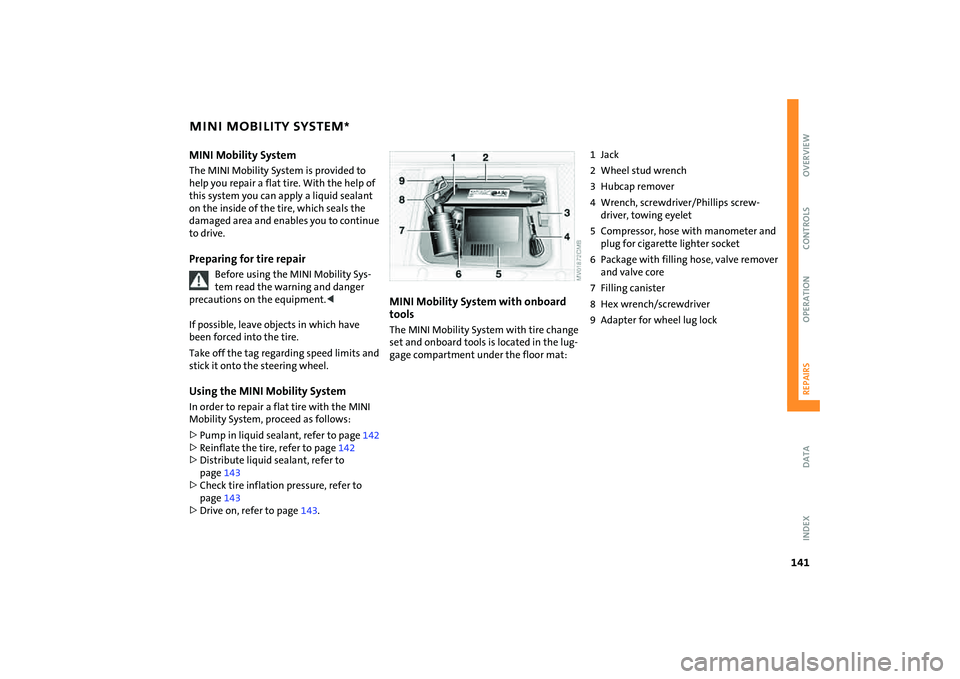
tools The MINI Mobility System with tire change
set and onboard tools is located in the lug-
gage compartment under the floor mat:
1Jack
2 Wheel stud wrench
3 Hubcap remover
4 Wrench, screwdriver/Phillips screw-
driver, towing eyelet
5 Compressor, hose with manometer and
plug for cigarette lighter socket
6 Package with filling hose, valve remover
and valve core
7 Filling canister
8 Hex wrench/screwdriver
9 Adapter for wheel lug lock
Page 149 of 176

147
OVERVIEW REPAIRSOPERATION CONTROLS DATA INDEX
JUMP-STARTING TOWING AND TOW-STARTING
Flip open the cover of the auxiliary
jump-starting terminal, arrow 1
2. Connect one terminal clamp of the
plus/+ jumper cable to the positive bat-
tery terminal or to an auxiliary jump-
starting terminal of the support vehicle
3. Connect the other terminal clamp of the
plus/+ jumper cable to the positive bat-
tery terminal or to an auxiliary jump-
starting terminal of the vehicle to be
started
Engine or body ground in your MINI or MINI
Convertible: arrow 2.
4. Connect one terminal clamp of the
minus/– jumper cable to the negative
battery terminal or to an engine or body
ground of the support vehicle
5. Connect the second terminal clamp of
the minus/– jumper cable to the nega-
tive terminal of the battery or to the
engine or body ground of the vehicle to
be started.
Performing the jump-start1. Start the engine of the support vehicle
and allow it to run at increased idle
speed for several minutes
2. Start the engine of the other vehicle in
the usual manner.
If the first start attempt is not success-
ful, wait a few minutes before another
attempt in order to allow the discharged
battery to recharge
3. Allow the engines of both vehicles to run
for several minutes.
On the MINI or MINI Convertible:
Before disconnecting the jumper
cables, switch on the lighting, the rear
window defroster and the highest
blower speed to prevent a voltage surge
from the regulator to the electrical sys-
tems and components.<
4. Then disconnect the jumper cables in
the reverse order.
If necessary have the battery checked and
completely charged at a MINI Dealer.
Do not use spray starter fluids to start
the engine.<
Observe all applicable laws and regu-
lations for towing and tow-start-
ing.<
Do not transport any occupant other
than the driver in a vehicle that is
being towed.<
Using the towing eyelet The screw-in towing eyelet is stored in the
onboard tool kit, refer to page132; be sure
that it remains with the vehicle at all times.
It can be attached at the front or rear of
your vehicle.
Use only the towing eyelet supplied
with the vehicle and screw it in firmly
until it stops. Use the towing eyelet for
towing on paved roads only. Avoid subject-
ing the towing eyelet to lateral loads, e.g.
do not lift the vehicle using the towing eye-
let. Otherwise, the towing eyelet and the
vehicle could be damaged.<