Page 117 of 474

116 Controls in detail
Lighting
Switching on hazard warning flasher
�Press hazard warning flasher
switch1.
All turn signal lamps are flashing.
Switching off hazard warning flasher
�Press hazard warning flasher switch1
again.
Interior lighting
The controls are located in the overhead
control panel.
1Interior lighting on/off
2Automatic control on/off
3Right reading lamp on/off
4Left reading lamp on/offAutomatic control
Deactivating
�Press automatic control switch2 until
it engages at a deeper position than the
other switches.
The interior lighting remains switched
off in darkness, even when you
�unlock the vehicle
�remove the SmartKey from the
starter switch
�open a door
iWith the hazard warning flasher activated
and the combination switch set for either left or
right turn, only the respective turn signals will
operate when the ignition is switched on.
iIf the hazard warning flasher has been
activated automatically, press hazard warning
flasher switch1 once to switch it off.
!An interior lamp switched on manually does
not go out automatically.
Leaving an interior lamp switch in the ON posi-
tion for extended periods of time with the engine
turned off could result in a discharged battery.
iThe interior lighting is factory-set to
automatic mode.
iWhen you open the trunk, the trunk lighting
switches on automatically.
Page 273 of 474

272 Controls in detail
Useful features
Step 5:
�After indicator lamp1 changes from a
slow to a rapidly flashing light, release
the hand-held remote control button
and the signal transmitter button.
Step 6:
�Press and hold the just-trained signal
transmitter button (2, 3 or4) and
observe indicator lamp1.
If indicator lamp1 stays on
constantly, programming is complete
and your device should activate when
the respective signal transmitter
button (2, 3 or4) is pressed and
released.
Step 7:
�To program the remaining two signal
transmitter buttons, repeat the steps
above starting with step 3.Rolling code programming
To train a garage door opener (or other
rolling code devices) with the rolling code
feature, follow these instructions after
completing the “Programming” portion
(steps 1 through 6) of this text. (A second
person may make the following training
procedures quicker and easier.)
Step 8:
�Locate “training” button on the garage
door opener motor head unit.
Exact location and color of the button
may vary by garage door opener brand.
Depending on manufacturer, the
“training” button may also be referred
to as “learn”or “smart” button. If there
is difficulty locating the transmitting
button, refer to the garage door opener
Operator’s Manual. Step 9:
�Press the “training” button on the
garage door opener motor head unit.
The “training light” is activated.
You have 30 seconds to initiate the follow-
ing step.
Step 10:
�Return to the vehicle and firmly press,
hold for 2 seconds and release the
programmed signal transmitter
button (2, 3 or4).
iIf indicator lamp1 flashes rapidly for about
2 seconds and then turns to a constant light,
continue with programming steps 8 through 12
as your garage door opener may be equipped
with the “rolling code” feature.
��
Page 344 of 474

343 Operation
Vehicle care
Ornamental moldings
For regular cleaning and care of very dirty
chrome-plated parts, use a chrome clean-
er.Headlamps, tail lamps, side makers,
turn signal lenses
�Use a mild car wash detergent, such as
Mercedes-Benz approved Car
Shampoo, with plenty of water.Cleaning the windows and the wiper
blades
�Make sure the hood is fully closed.
�Switch on the ignition (�page 37).
�Turn combination switch to wiper
settingII (
�page 56).
�With wiper arms in vertical position,
switch off the ignition (
�page 37).
iAfter running the vehicle through an
automatic car wash, wipe any wax off of the
windshield (
�page 343). This will prevent
smears and reduce wiping noise which can be
caused by residual wax on the windshield.
When leaving the car wash, make sure that the
mirrors are folded out. Otherwise they may
vibrate.
!Do not use chrome cleaner on ornamental
moldings. Although ornamental moldings may
have chrome appearance, they could be made of
anodized aluminum that will be damaged when
cleaned with chrome cleaner. Instead, use a
damp cloth to clean those ornamental moldings.
For very dirty ornamental moldings of which
you are sure are chrome-plated, use a chrome
cleaner. If in doubt whether an ornamental mold-
ing is chrome-plated, contact an authorized
Mercedes-Benz Center.
!Only use window cleaners that are suitable
for plastic lamp lenses. Window cleaning solu-
tions which are not suitable may damage the
plastic lamp lenses of the headlamps. Therefore,
do not use abrasives, solvents or cleaners that
contain solvents.
Never apply strong force and use only a soft,
non-scratchy cloth when cleaning the lenses. Do
not attempt to wipe dirty lenses with a dry cloth
or sponge.
Otherwise you may scratch or damage the lens
surface.
!The windshield wipers must be in a vertical
position before folding them away from the wind-
shield. They could otherwise damage the hood.
Never open the hood when the wiper arms are
folded forward.
Warning!G
For safety reasons, switch off wipers and
remove SmartKey from starter switch be-
fore cleaning the windshield and/or the wip-
er blades. Otherwise, the wiper motor could
suddenly turn on and cause injury.
��
Page 362 of 474
361 Practical hints
What to do if …
On the pages that follow, you will find
a compilation of the most important warn-
ing and malfunction messages that may
appear in the multifunction display.
For your convenience the messages are
divided into two sections:
�Text messages (�page 362)
�Symbol messages (�page 371)
Warning!G
No messages will be displayed if either the
instrument cluster or the multifunction dis-
play is inoperative.
Contact your nearest authorized
Mercedes-Benz Center.
iSwitching on ignition (�page 37) causes all
instrument cluster lamps (except high beam
headlamp indicator lamp and turn signal indica-
tor lamps unless activated) as well as the multi-
function display to come on. Make sure the
lamps and multifunction display are in working
order before starting your journey.
Page 387 of 474

386 Practical hints
What to do if …
Display symbolDisplay messagePossible cause/consequencePossible solution
.Left Mirror
Turn SignalThe left turn signal in the side mirror
is malfunctioning. This message will
only appear if a critical number of
LEDs have stopped working.�Contact an authorized Mercedes-Benz
Center as soon as possible.
Right Mirror
Turn SignalThe right turn signal in the side mir-
ror is malfunctioning. This message
will only appear if a critical number
of LEDs have stopped working.�Contact an authorized Mercedes-Benz
Center as soon as possible.
Turn Signal
Front LeftThe left front turn signal is malfunc-
tioning.�Replace the bulb as soon as
possible (
�page 400).
Turn Signal
Front RightThe right front turn signal is
malfunctioning.�Replace the bulb as soon as
possible (
�page 400).
Rear Left Turn Signal
Auxiliary Bulb OnThe left rear turn signal is malfunc-
tioning. A backup bulb has been
brought into use.�Replace the bulb as soon as
possible (
�page 400).
Rear Right Turn Signal
Auxiliary Bulb OnThe right rear turn signal is malfunc-
tioning. A backup bulb has been
brought into use.�Replace the bulb as soon as
possible (
�page 400).
Page 402 of 474
401 Practical hints
Replacing bulbs
Front lamps
LampType
1Additional turn signal
lampLED
2Turn signal lamp3457 AK
3Halogen headlamp:
Low beam
H7 (55 W)
Bi-Xenon* headlamp:
Low and high beam1
1Vehicles with Bi-Xenon* headlamps: Low beam
and high beam use the same D2S-35W lamp. Do
not replace the Bi-Xenon* bulbs yourself. Contact
an authorized Mercedes-Benz Center.
D2S-35 W
4Front fog lampHB4 (51 W)
Front fog lamp
(vehicles with Sport
Package* and
SLK 55 AMG)H7 (55 W)
Corner illuminating
front fog lamp*H7 (55 W)
LampType
5Parking and standing
lampW5W
6Halogen headlamp:
High beam/high beam
flasher
H7 (55 W)
Bi-Xenon* headlamp:
High beam flasher
H7 (55 W)
7Side marker lampW5W
Page 403 of 474

402 Practical hints
Replacing bulbs
Rear lamps Notes on bulb replacement
�Only use 12-volt bulbs of the same type
and with the specified watt rating.
�Switch the lights off before replacing a
bulb to prevent short circuits.
�Always use a clean lint-free cloth when
handling bulbs.
�Your hands should be dry and free of oil
and grease.
�If the newly installed bulb does not
come on, contact an authorized
Mercedes-Benz Center.Have the LEDs and bulbs for the following
lamps replaced by an authorized
Mercedes-Benz Center:
�Additional turn signal lamps in the
exterior rear view mirrors
�Bi-Xenon* lamps
�Front fog lamps
�High mounted brake lamp
�Brake lamps
�Front and rear side marker lamps
�Parking/standing lamps in the tail
lamp assemblies
LampType
8Rear fog lamp (driver’s
side only)P21W
9High mounted brake
lampLED
aSide marker lampLED
bTail, parking, standing,
and brake lampLED
cLicense plate lampsC5W
dBackup lampP21W
eTurn signal lampPY 21 W
!Do not replace the LEDs yourself. You could
otherwise damage the LEDs or parts of the
vehicle. Only have the LEDs replaced by an
authorized Mercedes-Benz Center.
Page 404 of 474
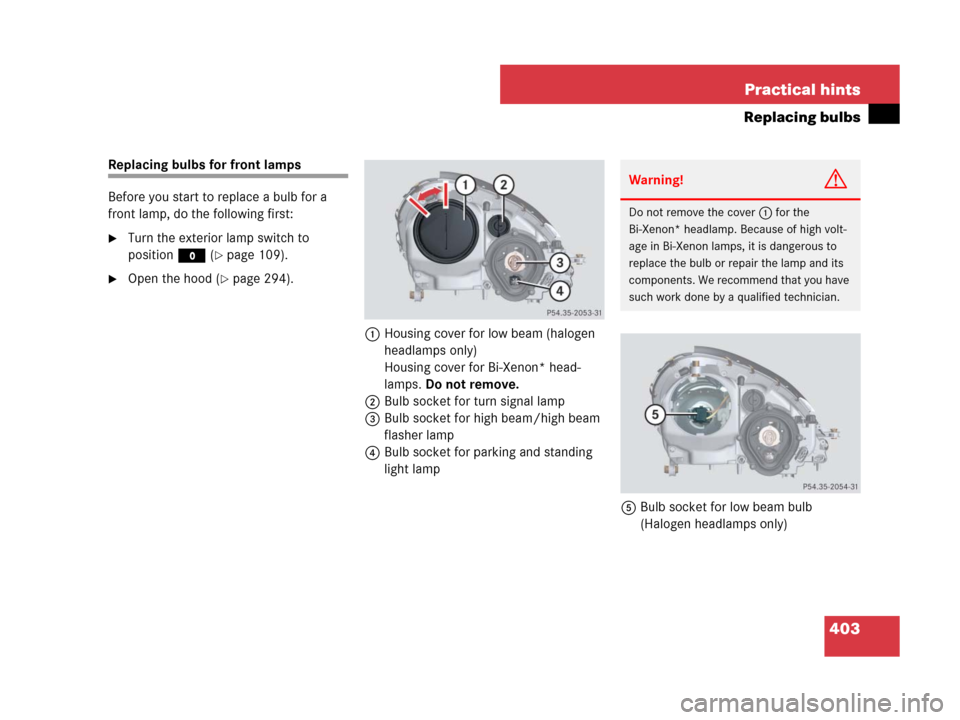
403 Practical hints
Replacing bulbs
Replacing bulbs for front lamps
Before you start to replace a bulb for a
front lamp, do the following first:
�Turn the exterior lamp switch to
positionM (
�page 109).
�Open the hood (�page 294).
1Housing cover for low beam (halogen
headlamps only)
Housing cover for Bi-Xenon* head-
lamps. Do not remove.
2Bulb socket for turn signal lamp
3Bulb socket for high beam/high beam
flasher lamp
4Bulb socket for parking and standing
light lamp
5Bulb socket for low beam bulb
(Halogen headlamps only)
Warning!G
Do not remove the cover1 for the
Bi-Xenon* headlamp. Because of high volt-
age in Bi-Xenon lamps, it is dangerous to
replace the bulb or repair the lamp and its
components. We recommend that you have
such work done by a qualified technician.


Bi-Xenon* headlamp:
Low and high beam1
1Vehicle")