Page 340 of 474

339 Operation
Maintenance
Resetting the maintenance service
indicator
In the event that the maintenance service
on your vehicle is not carried out by an
authorized Mercedes-Benz Center, you can
have the maintenance service indicator
reset. The automotive maintenance facility
carrying out the maintenance service will
find the information for resetting the main-
tenance service indicator in the mainte-
nance-relevant literature for your vehicle.
Such literature is available from any autho-
rized Mercedes-Benz Center or directly
from Mercedes-Benz.iIf the battery is disconnected, the days of
disconnection will not be included in the count
shown by the maintenance service indicator. To
arrive at the true maintenance service deadline,
you will need to subtract these days from the
days shown in the maintenance service indicator
message or maintenance service indicator dis-
play.
Do not confuse the maintenance service indica-
tor with the engine oil level indicatorN.
iIf the maintenance service indicator was
inadvertently reset, have an authorized
Mercedes-Benz Center correct it.
Only reset if the proper maintenance service has
been performed. Resetting the system without
performing the proper maintenance service as
called for by the maintenance service indicator
will result in engine damage and/or other vehicle
damage not covered by the Mercedes-Benz
Limited Warranty.
Page 341 of 474
340 Operation
Vehicle care
Cleaning and care of vehicle
Regular and proper care will help to main-
tain the value of your vehicle. The best way
to protect your vehicle from harmful envi-
ronmental influences is to wash it and use
protective treatments regularly.
While in operation, even while parked, your
vehicle is subjected to varying external in-
fluences which, if gone unchecked, can at-
tack the paintwork as well as the
undercarriage and cause lasting damage.Such damage is caused not only by
extreme and varying climatic conditions,
but also by:
�Air pollution
�Road salt
�Tar
�Gravel and stone chipping
To avoid paint damage, you should imme-
diately remove:
�Grease and oil
�Fuel
�Coolant
�Brake fluid
�Bird droppings
�Insects
�Tree resins, etc.
Frequent washing reduces and/or elimi-
nates the aggressiveness and potency of
the above adverse influences.More frequent washings are necessary to
deal with unfavorable conditions:
�near the ocean
�in industrial areas (smoke, exhaust
emissions)
�during winter operation
You should check your vehicle from time to
time for stone chipping or other damage.
Any damage should be repaired as soon as
possible to prevent corrosion.
In doing so, do not neglect the underbody
of the vehicle. A prerequisite for a
thorough check is a washing of the under-
body followed by a thorough inspection.
Damaged areas need to be
re-undercoated.
Your vehicle has been treated at the
factory with a wax-base rustproofing in the
body cavities which will last for the lifetime
of the vehicle. Post-production treatment
is neither necessary nor recommended by
Mercedes-Benz because of the possibility
Warning!G
Many cleaning products can be hazardous.
Some are poisonous, others are flammable.
Always follow the instructions on the partic-
ular container. Always open your vehicle’s
doors or windows when cleaning the inside.
Never use fluids or solvents that are not de-
signed for cleaning your vehicle.
Always lock away cleaning products and
keep them out of reach of children.
Page 346 of 474
345 Operation
Vehicle care
Plastic and rubber parts
�Use a gentle dishwashing detergent or
mild detergent for delicate fabrics as a
washing solution.
�Wipe with a cloth moistened in a luke-
warm solution.
The surface may temporarily change
color. If this is the case, wait for it to
dry.Hard plastic trim items
�Use Mercedes-Benz approved Interior
Care, a soft, lint-free cloth and apply
with light pressure.Steering wheel and gearshift/gear
selector lever
�Wipe with a damp cloth and dry
thoroughly or clean with
Mercedes-Benz approved Leather
Care.
Carpets
�Use Mercedes-Benz approved Carpet
and Fabric Care for cleaning the
carpets.
Headliner
�Use a soft bristle brush or a
dry-shampoo cleaner in case of
excessive dirt.
Warning!G
Do not use cleaners or cockpit care sprays
containing solvents to clean the cockpit or
the steering wheel. Cleaners containing
solvents will make the surface porous and
vehicle occupants could suffer serious
injuries from plastic parts coming loose in
the event of air bag deployment.
!Do not use oil, wax or scouring agents on
these parts.
Never apply strong force and only use a soft,
non-scratching cloth when cleaning the surface.
Do not attempt to wipe the surface with a dry
cloth or sponge.
Otherwise you may scratch or damage the
surface.
!Never apply strong force and only use a soft,
non-scratching cloth when cleaning the surface.
Do not attempt to wipe the surface with a dry
cloth or sponge.
Otherwise you may scratch or damage the
surface.
Page 378 of 474
377 Practical hints
What to do if …
Display symbolDisplay messagePossible cause/consequencePossible solution
±Display Malfunction
Drive To WorkshopCertain electronic systems are un-
able to relay information to the con-
trol system. The following systems
may have failed:
�Coolant temperature display
�Tachometer
�Cruise control display
�Have the electronic systems checked by an
authorized Mercedes-Benz Center.
NCheck oil level
when next refueling
.
SLK 280 and SLK 350 only:
The engine oil level has dropped to
a critical level.�Check the engine oil level (�page 296) and
add engine oil as required (
�page 299).
�If you must add engine oil frequently, have
the engine checked for possible leaks.
Page 379 of 474
378 Practical hints
What to do if …
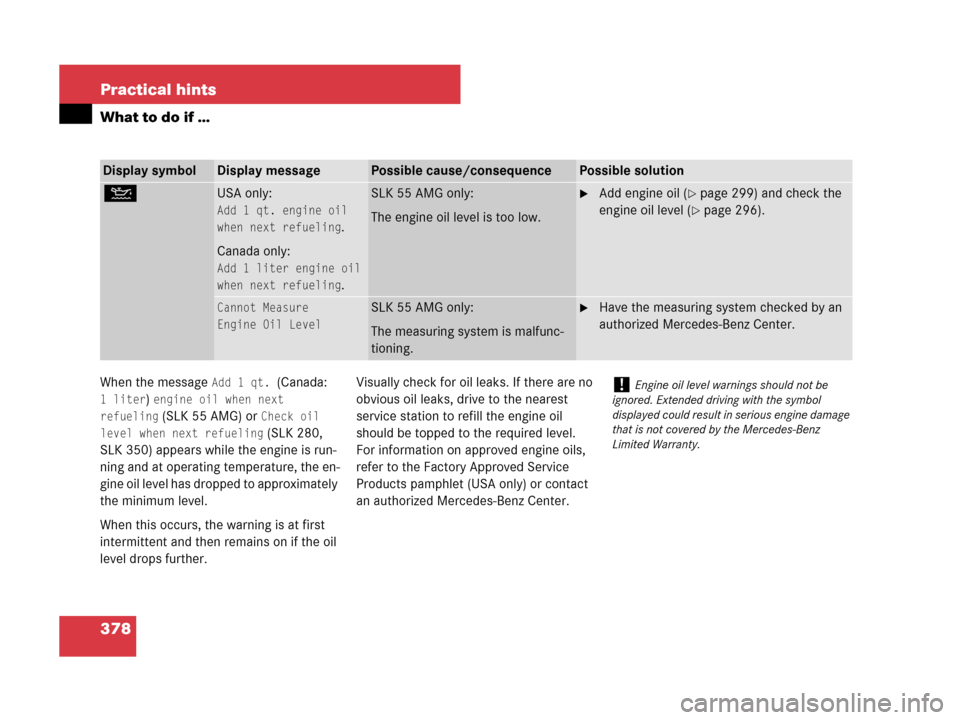
When the message Add 1 qt. (Canada:
1 liter) engine oil when next
refueling
(SLK 55 AMG) or Check oil
level when next refueling
(SLK 280,
SLK 350) appears while the engine is run-
ning and at operating temperature, the en-
gine oil level has dropped to approximately
the minimum level.
When this occurs, the warning is at first
intermittent and then remains on if the oil
level drops further.Visually check for oil leaks. If there are no
obvious oil leaks, drive to the nearest
service station to refill the engine oil
should be topped to the required level.
For information on approved engine oils,
refer to the Factory Approved Service
Products pamphlet (USA only) or contact
an authorized Mercedes-Benz Center.
Display symbolDisplay messagePossible cause/consequencePossible solution
NUSA only:
Add 1 qt. engine oil
when next refueling
.
Canada only:
Add 1 liter engine oil
when next refueling
.
SLK 55 AMG only:
The engine oil level is too low.�Add engine oil (�page 299) and check the
engine oil level (
�page 296).
Cannot Measure
Engine Oil LevelSLK 55 AMG only:
The measuring system is malfunc-
tioning.�Have the measuring system checked by an
authorized Mercedes-Benz Center.
!Engine oil level warnings should not be
ignored. Extended driving with the symbol
displayed could result in serious engine damage
that is not covered by the Mercedes-Benz
Limited Warranty.
Page 380 of 474
379 Practical hints
What to do if …
Display symbolDisplay messagePossible cause/consequencePossible solution
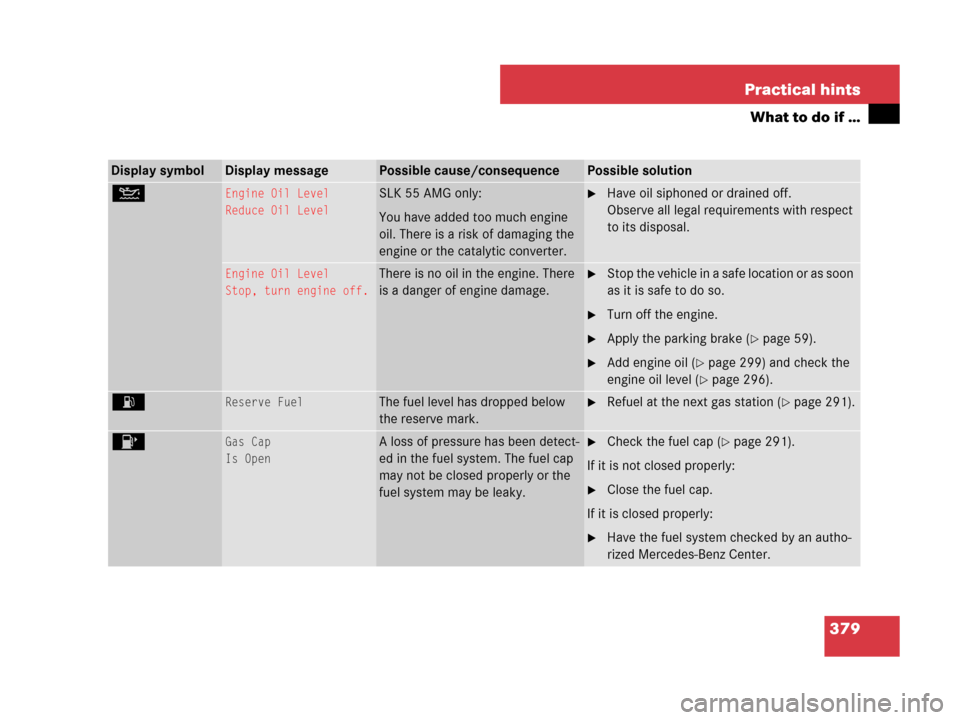
NEngine Oil Level
Reduce Oil LevelSLK 55 AMG only:
You have added too much engine
oil. There is a risk of damaging the
engine or the catalytic converter.�Have oil siphoned or drained off.
Observe all legal requirements with respect
to its disposal.
Engine Oil Level
Stop, turn engine off.There is no oil in the engine. There
is a danger of engine damage.�Stop the vehicle in a safe location or as soon
as it is safe to do so.
�Turn off the engine.
�Apply the parking brake (�page 59).
�Add engine oil (�page 299) and check the
engine oil level (
�page 296).
AReserve FuelThe fuel level has dropped below
the reserve mark.�Refuel at the next gas station (�page 291).
4Gas Cap
Is OpenA loss of pressure has been detect-
ed in the fuel system. The fuel cap
may not be closed properly or the
fuel system may be leaky.�Check the fuel cap (�page 291).
If it is not closed properly:
�Close the fuel cap.
If it is closed properly:
�Have the fuel system checked by an autho-
rized Mercedes-Benz Center.
Page 403 of 474
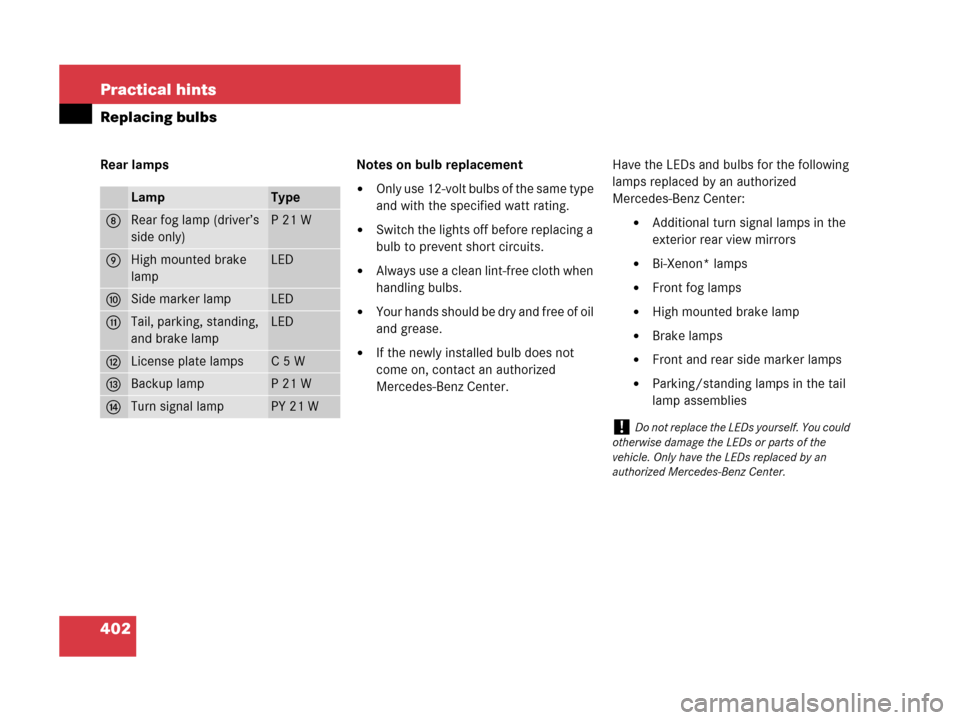
402 Practical hints
Replacing bulbs
Rear lamps Notes on bulb replacement
�Only use 12-volt bulbs of the same type
and with the specified watt rating.
�Switch the lights off before replacing a
bulb to prevent short circuits.
�Always use a clean lint-free cloth when
handling bulbs.
�Your hands should be dry and free of oil
and grease.
�If the newly installed bulb does not
come on, contact an authorized
Mercedes-Benz Center.Have the LEDs and bulbs for the following
lamps replaced by an authorized
Mercedes-Benz Center:
�Additional turn signal lamps in the
exterior rear view mirrors
�Bi-Xenon* lamps
�Front fog lamps
�High mounted brake lamp
�Brake lamps
�Front and rear side marker lamps
�Parking/standing lamps in the tail
lamp assemblies
LampType
8Rear fog lamp (driver’s
side only)P21W
9High mounted brake
lampLED
aSide marker lampLED
bTail, parking, standing,
and brake lampLED
cLicense plate lampsC5W
dBackup lampP21W
eTurn signal lampPY 21 W
!Do not replace the LEDs yourself. You could
otherwise damage the LEDs or parts of the
vehicle. Only have the LEDs replaced by an
authorized Mercedes-Benz Center.
Page 418 of 474
417 Practical hints
Flat tire
�Clean contact surfaces of wheel and
wheel hub.
�Guide the spare wheel onto the align-
ment bolt and push it on.
�Insert the wheel bolts and tighten them
slightly.
!Wheel bolts2 must be used when mount-
ing the spare wheel with collapsible tire. The use
of any wheel bolts other than wheel bolts2 for
the spare wheel with collapsible tire will physi-
cally damage the vehicle’s brakes.
!To avoid paint damage, place wheel flat
against hub and hold it there while installing first
wheel bolt.
Warning!G
Always replace wheel bolts that are
damaged or rusted.
Never apply oil or grease to wheel bolts.
Damaged wheel hub threads should be
repaired immediately. Do not continue to
drive under these circumstances! Contact
an authorized Mercedes-Benz Center or call
Roadside Assistance.
Incorrect wheel bolts or improperly tight-
ened wheel bolts can cause the wheel to
come off. This could cause an accident. Be
sure to use the correct wheel bolts.
��