Page 302 of 474
301 Operation
Engine compartment
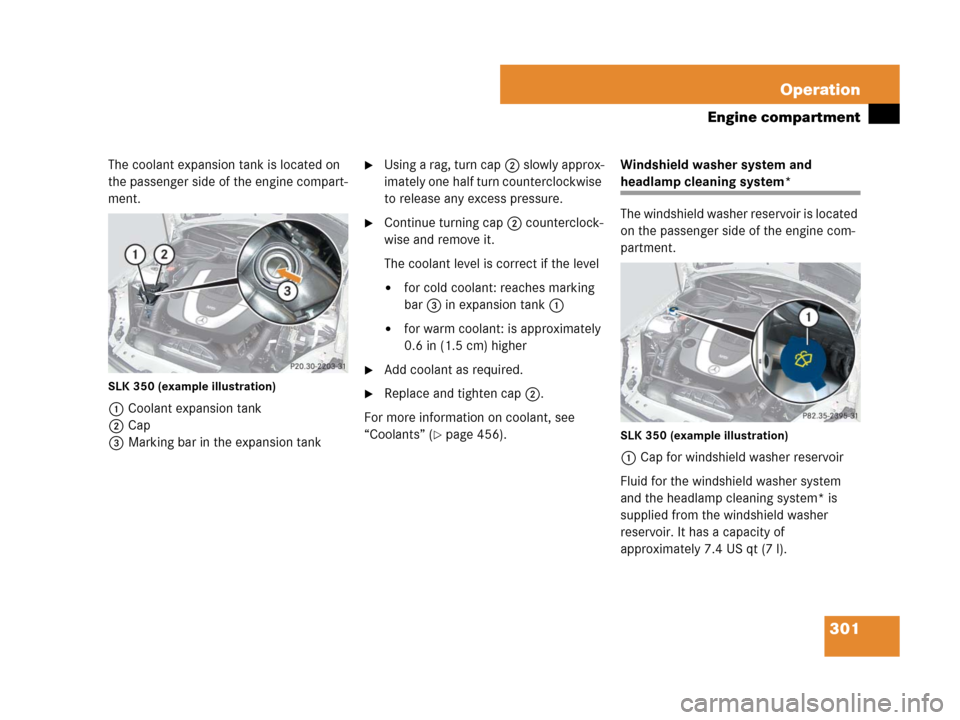
The coolant expansion tank is located on
the passenger side of the engine compart-
ment.
SLK 350 (example illustration)
1Coolant expansion tank
2Cap
3Marking bar in the expansion tank
�Using a rag, turn cap2 slowly approx-
imately one half turn counterclockwise
to release any excess pressure.
�Continue turning cap2 counterclock-
wise and remove it.
The coolant level is correct if the level
�for cold coolant: reaches marking
bar3 in expansion tank1
�for warm coolant: is approximately
0.6 in (1.5 cm) higher
�Add coolant as required.
�Replace and tighten cap2.
For more information on coolant, see
“Coolants” (
�page 456).Windshield washer system and
headlamp cleaning system*
The windshield washer reservoir is located
on the passenger side of the engine com-
partment.
SLK 350 (example illustration)
1Cap for windshield washer reservoir
Fluid for the windshield washer system
and the headlamp cleaning system* is
supplied from the windshield washer
reservoir. It has a capacity of
approximately 7.4 US qt (7 l).
Page 392 of 474
391 Practical hints
Where will I find...?
The vehicle jack is located in the storage
compartment underneath the trunk floor.
Storage position
�Remove vehicle jack from its
compartment.
�Turn crank handle in the direction of
arrow as far as it will go.
Operational position
�Turn crank handle clockwise.
Before storing the vehicle jack in its
compartment:
�It should be fully collapsed.
�The handle must be folded in (storage
position).Setting up the collapsible wheel chock
The collapsible wheel chock serves to
additionally secure the vehicle, e.g. while
changing the wheel.
1Tilt the plate upward
2Fold the lower plate outward
3Insert the plate
Page 393 of 474
392 Practical hints
Where will I find...?
�Tilt both plates upward1.
�Fold the lower plate outward2.
�Guide the tabs of the lower plate all the
way into the openings of the base
plate3.
For information on where to place wheel
chocks when changing a wheel, see
“Lifting the vehicle” (
�page 414).
Spare wheel with collapsible tire
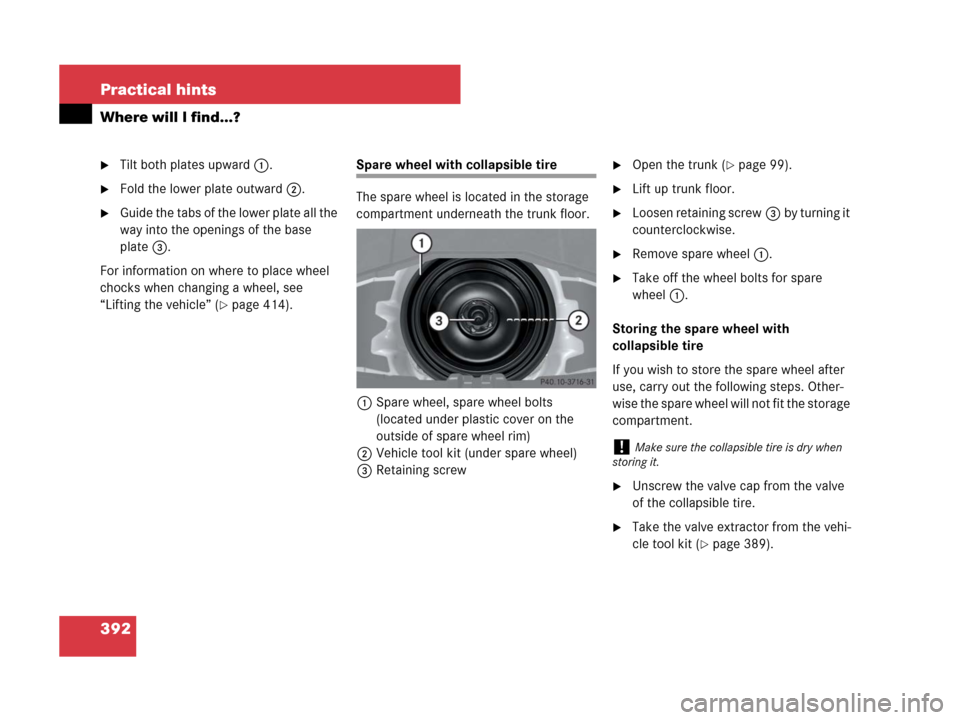
The spare wheel is located in the storage
compartment underneath the trunk floor.
1Spare wheel, spare wheel bolts
(located under plastic cover on the
outside of spare wheel rim)
2Vehicle tool kit (under spare wheel)
3Retaining screw�Open the trunk (�page 99).
�Lift up trunk floor.
�Loosen retaining screw3by turning it
counterclockwise.
�Remove spare wheel1.
�Take off the wheel bolts for spare
wheel1.
Storing the spare wheel with
collapsible tire
If you wish to store the spare wheel after
use, carry out the following steps. Other-
wise the spare wheel will not fit the storage
compartment.
�Unscrew the valve cap from the valve
of the collapsible tire.
�Take the valve extractor from the vehi-
cle tool kit (
�page 389).
!Make sure the collapsible tire is dry when
storing it.
Page 394 of 474
393 Practical hints
Where will I find...?
�Unscrew the valve insert from the valve
and allow the air to escape.
�Screw the valve insert back into the
valve.
�Screw the valve cap back on the valve.
�Pull the protective wrap provided with
the vehicle tool kit over the spare
wheel.
�Store the spare wheel and the valve
extractor in the storage compartment
underneath the trunk floor.
�Pierce the protective wrap with retain-
ing screw3.
�Secure the spare wheel by turning
retaining screw3 clockwise.
For information on mounting the spare
wheel, see “Flat tire” (
�page 408).
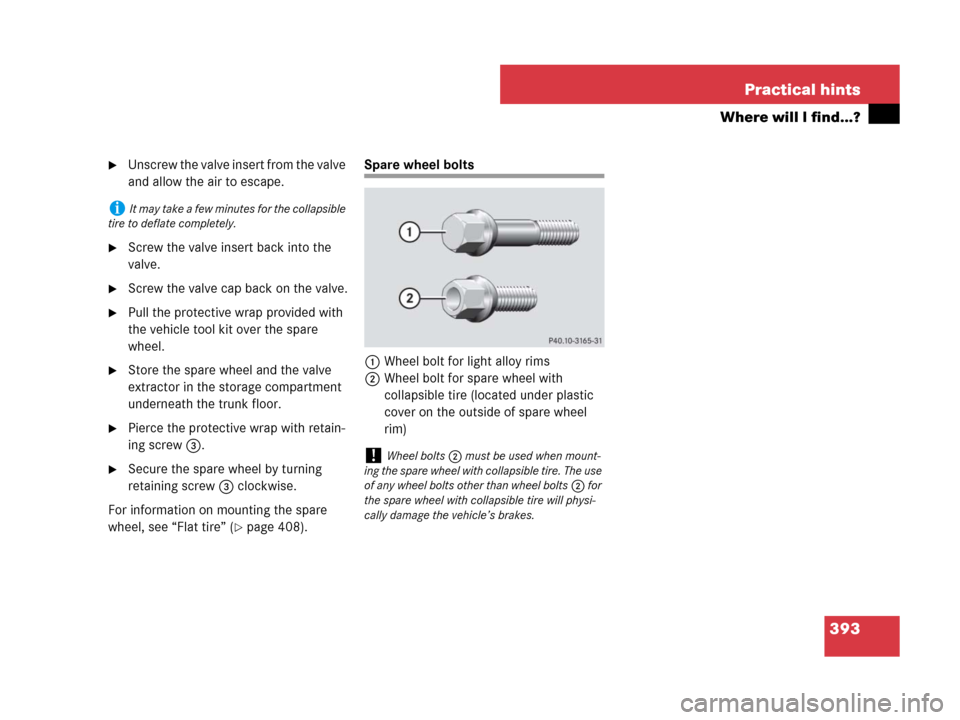
Spare wheel bolts
1Wheel bolt for light alloy rims
2Wheel bolt for spare wheel with
collapsible tire (located under plastic
cover on the outside of spare wheel
rim)
iIt may take a few minutes for the collapsible
tire to deflate completely.
!Wheel bolts2 must be used when mount-
ing the spare wheel with collapsible tire. The use
of any wheel bolts other than wheel bolts2 for
the spare wheel with collapsible tire will physi-
cally damage the vehicle’s brakes.
Page 395 of 474
394 Practical hints
Unlocking/locking in an emergency
Unlocking the vehicle
If you cannot unlock the vehicle with the
SmartKey, open the driver’s door and the
trunk using the mechanical key. Removing the mechanical key
1Mechanical key locking tab
2Mechanical key
�Move locking tab1 in direction of
arrow.
�Slide mechanical key2 out of the
housing.Unlocking the driver’s door
�Insert mechanical key 2 into the
driver’s door lock until it stops.
�Turn mechanical key 2 counterclock-
wise to position1 until the locking
knob moves up.
The driver’s door is unlocked.
�Pull the door handle to open the
driver’s door.
iUnlocking the vehicle with the mechanical
key and opening the driver’s door or the trunk
will trigger the anti-theft alarm system
(
�page 90).
To cancel the alarm, insert the SmartKey in the
starter switch.
1Unlocking
2Mechanical key
Page 396 of 474
395 Practical hints
Unlocking/locking in an emergency
Unlocking and opening the trunk
A minimum height clearance of
5.78 ft (1.76 m) is required to open the
trunk lid.�Insert mechanical key 3 into the trunk
lid lock until it stops.
�Turn mechanical key 3 counterclock-
wise to position1 until it stops,
and simultaneously
�pull trunk lid handle 2 and lift lid.
�Turn mechanical key 3 back and
remove it from the trunk lid lock.
Locking the vehicle
If you cannot lock the vehicle with the
SmartKey, do the following:
�Close the passenger door and the trunk
lid.
�Press the central locking switch in the
upper part of the center console
(
�page 103).
�Check to see whether the locking knob
on the passenger door has moved
down.
�If necessary, push it down manually.
The passenger door is locked.
�Exit the vehicle and close the driver’s
door.
1Unlocking
2Handle
3Mechanical key
!Always make sure there is sufficient over-
head clearance.
��
Page 397 of 474
396 Practical hints
Unlocking/locking in an emergency
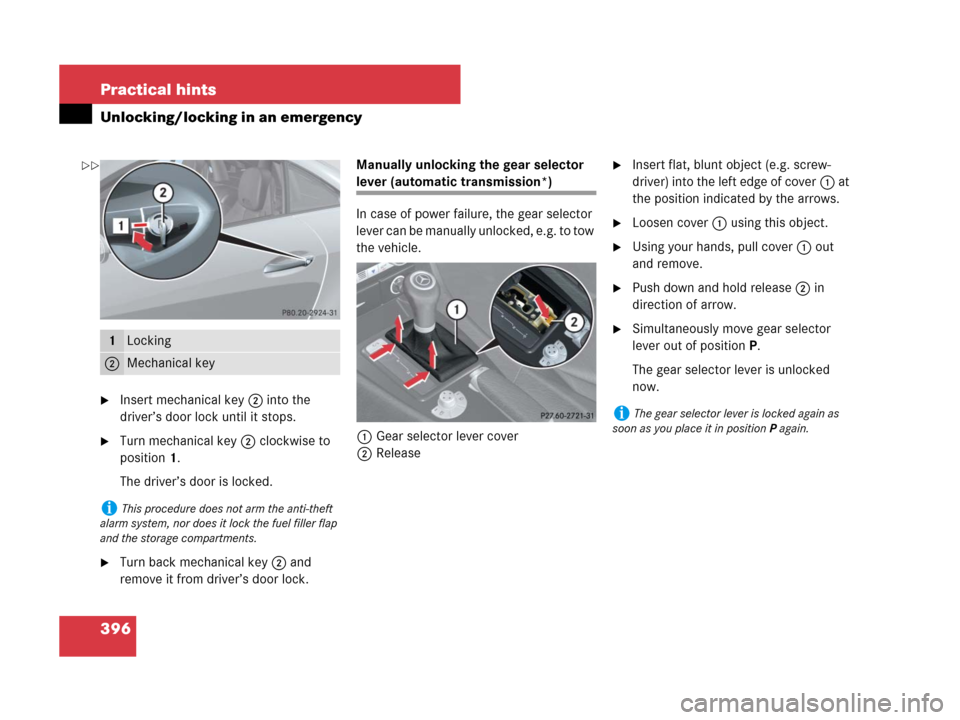
�Insert mechanical key 2 into the
driver’s door lock until it stops.
�Turn mechanical key 2 clockwise to
position1.
The driver’s door is locked.
�Turn back mechanical key 2 and
remove it from driver’s door lock.Manually unlocking the gear selector
lever (automatic transmission*)
In case of power failure, the gear selector
lever can be manually unlocked, e.g. to tow
the vehicle.
1Gear selector lever cover
2Release
�Insert flat, blunt object (e.g. screw-
driver) into the left edge of cover1 at
the position indicated by the arrows.
�Loosen cover1 using this object.
�Using your hands, pull cover1 out
and remove.
�Push down and hold release2 in
direction of arrow.
�Simultaneously move gear selector
lever out of positionP.
The gear selector lever is unlocked
now.1Locking
2Mechanical key
iThis procedure does not arm the anti-theft
alarm system, nor does it lock the fuel filler flap
and the storage compartments.
iThe gear selector lever is locked again as
soon as you place it in positionP again.
��
Page 405 of 474
404 Practical hints
Replacing bulbs
Low beam bulb (Halogen headlamps
only)
�Turn housing cover1 counterclock-
wise and remove.
�Turn bulb socket5 with the bulb
counterclockwise and remove.
�Pull the bulb out of bulb socket5.
�Press the new bulb into bulb socket5.
�Place bulb socket5 back into the
lamp and turn it clockwise.
�Reinstall housing cover1.
High beam/high beam flasher bulb
(Halogen headlamps) / High beam
flasher bulb (Bi-Xenon* headlamps)
�Turn bulb socket3 with the bulb
counterclockwise and remove.
�Pull the bulb out of bulb socket3.
�Press the new bulb into bulb socket3.
�Place bulb socket3 back into the
lamp and turn it clockwise.Front turn signal bulb
�Turn bulb socket2 with the bulb
counterclockwise and remove.
�Press gently onto the bulb and turn it
counterclockwise out of bulb
socket2.
�Press the new bulb gently into bulb
socket2 and turn it clockwise.
�Place bulb socket2 back into the
lamp and turn it clockwise.
Parking and standing lamp bulb
�Turn bulb socket4 with the bulb
counterclockwise and remove.
�Pull the bulb out of bulb socket4.
�Press the new bulb into bulb socket4.
�Place bulb socket4 back into the
lamp and turn it clockwise.
Replacing bulbs for rear lamps
Before you start to replace a bulb for a rear
lamp, do the following first:
�Turn the exterior lamp switch to
positionM (
�page 109).
�Open the trunk lid (�page 99).
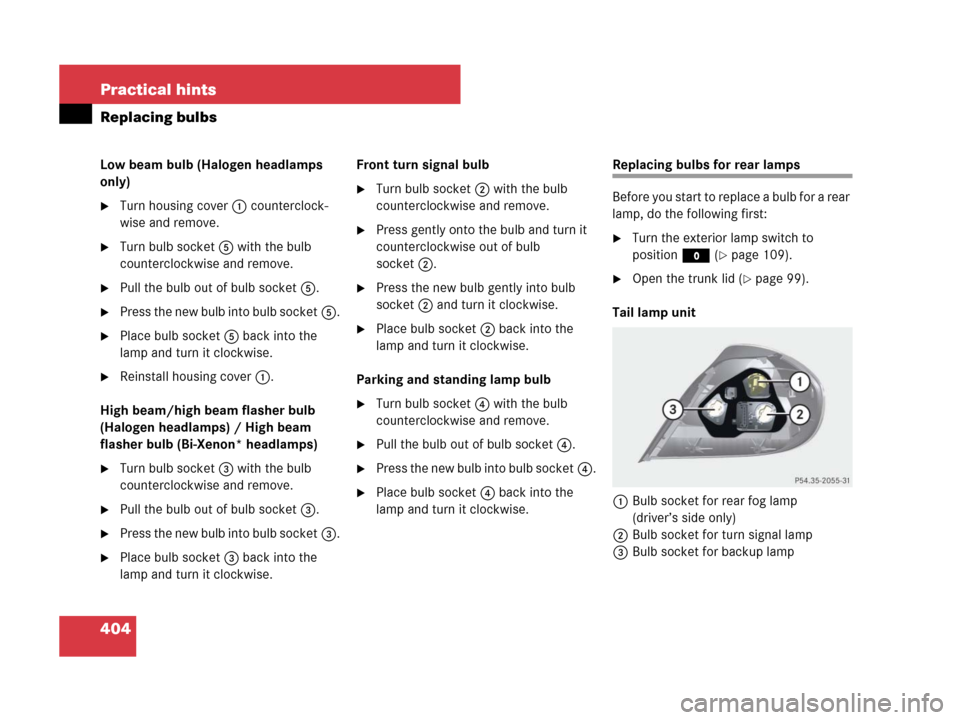
Tail lamp unit
1Bulb socket for rear fog lamp
(driver’s side only)
2Bulb socket for turn signal lamp
3Bulb socket for backup lamp