Page 387 of 474

386 Practical hints
What to do if …
Display symbolDisplay messagePossible cause/consequencePossible solution
.Left Mirror
Turn SignalThe left turn signal in the side mirror
is malfunctioning. This message will
only appear if a critical number of
LEDs have stopped working.�Contact an authorized Mercedes-Benz
Center as soon as possible.
Right Mirror
Turn SignalThe right turn signal in the side mir-
ror is malfunctioning. This message
will only appear if a critical number
of LEDs have stopped working.�Contact an authorized Mercedes-Benz
Center as soon as possible.
Turn Signal
Front LeftThe left front turn signal is malfunc-
tioning.�Replace the bulb as soon as
possible (
�page 400).
Turn Signal
Front RightThe right front turn signal is
malfunctioning.�Replace the bulb as soon as
possible (
�page 400).
Rear Left Turn Signal
Auxiliary Bulb OnThe left rear turn signal is malfunc-
tioning. A backup bulb has been
brought into use.�Replace the bulb as soon as
possible (
�page 400).
Rear Right Turn Signal
Auxiliary Bulb OnThe right rear turn signal is malfunc-
tioning. A backup bulb has been
brought into use.�Replace the bulb as soon as
possible (
�page 400).
Page 401 of 474

400 Practical hints
Replacing bulbs
Bulbs
Safe vehicle operation depends on proper
exterior lighting and signaling. It is there-
fore essential that all bulbs and lamp
assemblies are in good working order at
all times.
Correct headlamp adjustment is extremely
important. Have headlamps checked and
readjusted at regular intervals and when a
bulb has been replaced. Contact an
authorized Mercedes-Benz Center for
headlamp adjustment.
Warning!G
Bulbs and bulb sockets can be very hot. Al-
low the lamp to cool down before changing
a bulb.
Keep bulbs out of reach of children.
Halogen lamps contain pressurized gas.
A bulb can explode if you:
�touch or move it when hot
�drop the bulb
�scratch the bulb
Wear eye and hand protection.
Because of high voltage in Xenon lamps, it is
dangerous to replace the bulb or repair the
lamp and its components. We recommend
that you have such work done by a qualified
technician.
iIf the headlamps are fogged up on the inside
as a result of high humidity, driving the vehicle a
short distance with the lights on should clear up
the fogging.
iBackup bulbs will be brought into use
when lamps malfunction. Read and observe
the messages in the multifunction
display (
�page 381).
Page 402 of 474
401 Practical hints
Replacing bulbs
Front lamps
LampType
1Additional turn signal
lampLED
2Turn signal lamp3457 AK
3Halogen headlamp:
Low beam
H7 (55 W)
Bi-Xenon* headlamp:
Low and high beam1
1Vehicles with Bi-Xenon* headlamps: Low beam
and high beam use the same D2S-35W lamp. Do
not replace the Bi-Xenon* bulbs yourself. Contact
an authorized Mercedes-Benz Center.
D2S-35 W
4Front fog lampHB4 (51 W)
Front fog lamp
(vehicles with Sport
Package* and
SLK 55 AMG)H7 (55 W)
Corner illuminating
front fog lamp*H7 (55 W)
LampType
5Parking and standing
lampW5W
6Halogen headlamp:
High beam/high beam
flasher
H7 (55 W)
Bi-Xenon* headlamp:
High beam flasher
H7 (55 W)
7Side marker lampW5W
Page 403 of 474

402 Practical hints
Replacing bulbs
Rear lamps Notes on bulb replacement
�Only use 12-volt bulbs of the same type
and with the specified watt rating.
�Switch the lights off before replacing a
bulb to prevent short circuits.
�Always use a clean lint-free cloth when
handling bulbs.
�Your hands should be dry and free of oil
and grease.
�If the newly installed bulb does not
come on, contact an authorized
Mercedes-Benz Center.Have the LEDs and bulbs for the following
lamps replaced by an authorized
Mercedes-Benz Center:
�Additional turn signal lamps in the
exterior rear view mirrors
�Bi-Xenon* lamps
�Front fog lamps
�High mounted brake lamp
�Brake lamps
�Front and rear side marker lamps
�Parking/standing lamps in the tail
lamp assemblies
LampType
8Rear fog lamp (driver’s
side only)P21W
9High mounted brake
lampLED
aSide marker lampLED
bTail, parking, standing,
and brake lampLED
cLicense plate lampsC5W
dBackup lampP21W
eTurn signal lampPY 21 W
!Do not replace the LEDs yourself. You could
otherwise damage the LEDs or parts of the
vehicle. Only have the LEDs replaced by an
authorized Mercedes-Benz Center.
Page 404 of 474
403 Practical hints
Replacing bulbs
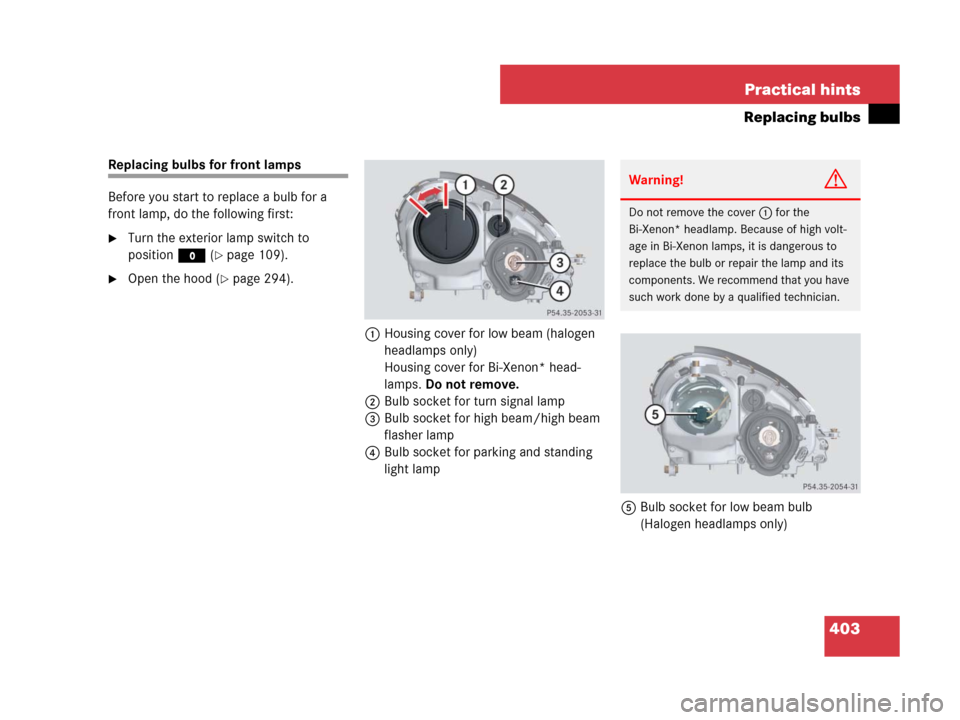
Replacing bulbs for front lamps
Before you start to replace a bulb for a
front lamp, do the following first:
�Turn the exterior lamp switch to
positionM (
�page 109).
�Open the hood (�page 294).
1Housing cover for low beam (halogen
headlamps only)
Housing cover for Bi-Xenon* head-
lamps. Do not remove.
2Bulb socket for turn signal lamp
3Bulb socket for high beam/high beam
flasher lamp
4Bulb socket for parking and standing
light lamp
5Bulb socket for low beam bulb
(Halogen headlamps only)
Warning!G
Do not remove the cover1 for the
Bi-Xenon* headlamp. Because of high volt-
age in Bi-Xenon lamps, it is dangerous to
replace the bulb or repair the lamp and its
components. We recommend that you have
such work done by a qualified technician.
Page 405 of 474

�Turn housing cover1 counterclock-
wise and remove.
�Turn bulb socket5 with the bulb
counterclockwise and remove.
�Pull the")
404 Practical hints
Replacing bulbs
Low beam bulb (Halogen headlamps
only)
�Turn housing cover1 counterclock-
wise and remove.
�Turn bulb socket5 with the bulb
counterclockwise and remove.
�Pull the bulb out of bulb socket5.
�Press the new bulb into bulb socket5.
�Place bulb socket5 back into the
lamp and turn it clockwise.
�Reinstall housing cover1.
High beam/high beam flasher bulb
(Halogen headlamps) / High beam
flasher bulb (Bi-Xenon* headlamps)
�Turn bulb socket3 with the bulb
counterclockwise and remove.
�Pull the bulb out of bulb socket3.
�Press the new bulb into bulb socket3.
�Place bulb socket3 back into the
lamp and turn it clockwise.Front turn signal bulb
�Turn bulb socket2 with the bulb
counterclockwise and remove.
�Press gently onto the bulb and turn it
counterclockwise out of bulb
socket2.
�Press the new bulb gently into bulb
socket2 and turn it clockwise.
�Place bulb socket2 back into the
lamp and turn it clockwise.
Parking and standing lamp bulb
�Turn bulb socket4 with the bulb
counterclockwise and remove.
�Pull the bulb out of bulb socket4.
�Press the new bulb into bulb socket4.
�Place bulb socket4 back into the
lamp and turn it clockwise.
Replacing bulbs for rear lamps
Before you start to replace a bulb for a rear
lamp, do the following first:
�Turn the exterior lamp switch to
positionM (
�page 109).
�Open the trunk lid (�page 99).
Tail lamp unit
1Bulb socket for rear fog lamp
(driver’s side only)
2Bulb socket for turn signal lamp
3Bulb socket for backup lamp
Page 406 of 474
405 Practical hints
Replacing bulbs
�Fold corresponding trim to side.
�Turn the respective bulb socket coun-
terclockwise and remove.
�Press gently onto the bulb and turn
counterclockwise out of its bulb sock-
et.
�Press the new bulb gently into its bulb
socket and turn clockwise.
�Reinstall the bulb socket and turn
clockwise until it engages.
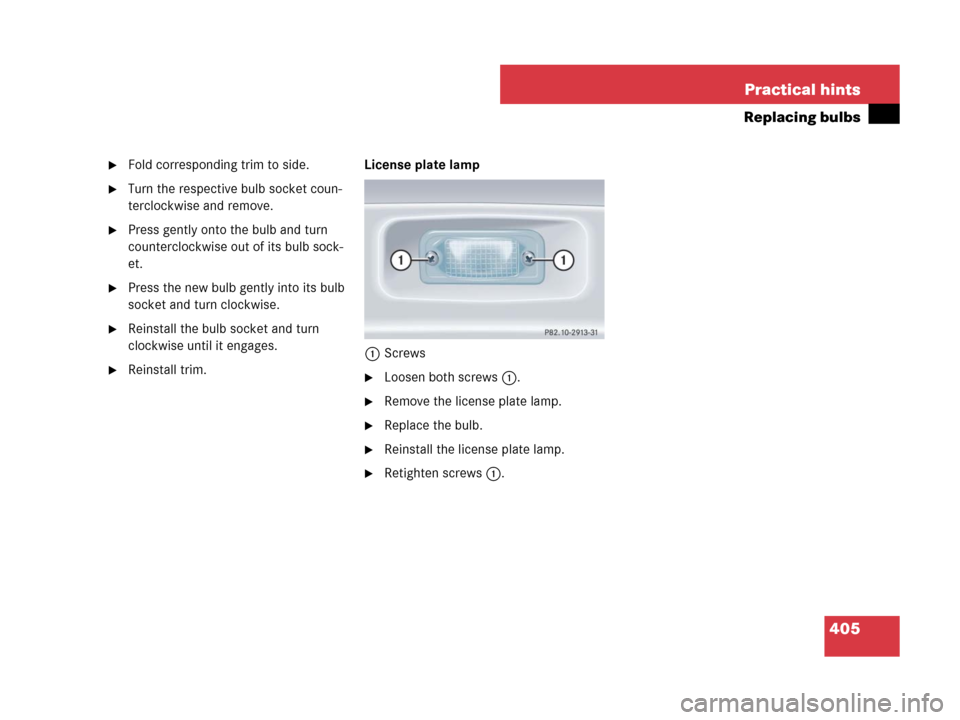
�Reinstall trim.License plate lamp
1Screws�Loosen both screws1.
�Remove the license plate lamp.
�Replace the bulb.
�Reinstall the license plate lamp.
�Retighten screws1.
Page 461 of 474

460 Index
Gear shifting malfunctions 167
Gearshift pattern 52
Kickdown 159
Kickdown, manual shift
program* 167
Manual shift program* 165
Program mode selector switch 161
Shifting procedure 156
Steering wheel gearshift control
one-touch gearshifting* 163
B
Backup lamp
Messages in the multifunction
display 383
Replacing bulbs 402
Bar 331
BAS 86
Batteries (SmartKey)
Replacing 398
Battery (Vehicle) 302, 422
Charging 424
Jump starting 426
Messages in the multifunction
display 372
Bead 331
Bi-Xenon headlamps* 401Brake Assist System see BAS
Brakes 280
Brake fluid 292, 454
Messages in the multifunction
display 373
SLK 55 AMG 281
Warning lamp 350
Break-in period 278
Bulbs
Messages in the multifunction
display 381–386
Replacing 400
C
California retail buyers and lessees,
Important notice for 11
Call priority, Tele Aid* 268
Capacities and recommended
fuels/lubricants 451
Carpets, cleaning 345
Catalytic converter 288
CD
Changer* 208, 253
Player/Changer*,
operation 134, 208
CD changer* (Audio system) 212Center console
Lamp 358
Lower part 30
Upper part 29
Central locking
Automatic 102, 146
Locking/unlocking from inside 103
SmartKey 62
Certification label 438
CHECK ENGINE indicator lamp 351
Checking tire pressure electronically
Tire Pressure Monitoring System
(TPMS), (USA only) 317
Children in the vehicle
Air bags 79
Infant and child restraint systems 79
Occupant Classification System
(OCS) 71
Passenger front air bag off indicator
lamp 74, 358
Chrome-plated exhaust tip*
Cleaning 346
Cigarette lighter 32, 256

Bi-Xenon* headlamp:
Low and high beam1
1Vehicle")