Page 345 of 474

344 Operation
Vehicle care
�Fold the wiper arms forward until they
snap into place.
�Clean the wiper blade inserts with a
clean cloth and detergent solution.
�Use a clean cloth and a mild window
cleaning solution on all outside and
inside glass surfaces.
An automotive glass cleaner is recom-
mended.Rear window cleaning
Clean the rear window with the hardtop
fully raised and closed.
�Use a clean cloth and a mild window
cleaning solution on all outside and
inside glass surfaces.
An automotive glass cleaner is recom-
mended.Light alloy wheels
If possible, clean wheels once a week.
�Use Mercedes-Benz approved Wheel
Care, a soft bristle brush and a strong
spray of water for cleaning the light al-
loy wheels.!Do not pull on the wiper blade inserts. They
could tear.
!Fold the windshield wiper arms back onto
the windshield before turning the SmartKey in
the starter switch.
Hold on to the wiper when folding the wiper arm
back. If released, the force of the impact from
the tensioning spring could crack the windshield.
!To clean the window interior, do not use a
dry cloth, abrasives, solvents or cleaners con-
taining solvents. Do not touch the inside of the
front, rear or side windows with hard objects
such as an ice scraper or ring. Doing so may
damage the windows.
Warning!G
Do not clean the rear window with the hard-
top in a position other than the fully raised
and closed position. Otherwise, the hardtop
may move unexpectedly which may result in
personal injury to you or others.!Only use acid-free cleaning materials. Acid
may cause corrosion or damage the clear coat.
!The vehicle should not be parked for an
extended period of time immediately after it has
been cleaned, especially not after the wheel rims
have been cleaned with wheel rim cleaner.
Wheel rim cleaners can lead to increased corro-
sion of the brake discs and brake pads.
Non-approved wheel cleaners may also damage
the wheel paint if the car is not driven after
cleaning. Therefore, the vehicle’s brake system
should always be warmed-up before it is parked
after cleaning. To do so, please drive your vehicle
for several minutes to allow the brakes to dry.
When applying Mercedes-Benz approved Tire
Care and Mercedes-Benz approved Wheel Care
products, take care not to spray them on the
brake discs.
��
Page 348 of 474
347 Practical hints
What to do if …
Where will I find...?
Unlocking/locking in an emergency
Opening/closing in an emergency
Replacing SmartKey batteries
Replacing bulbs
Replacing wiper blades
Flat tire
Battery
Jump starting
Towing the vehicle
Fuses
Page 373 of 474
372 Practical hints
What to do if …
Display symbolDisplay messagePossible cause/consequencePossible solution
#The battery is no longer charging.
Possible causes:
�Alternator malfunctioning
�Broken poly-V-belt
Do not forget that the brake system
requires electrical energy and may
be operating with restricted capa-
bility. Considerably greater brake
pedal force is required and the stop-
ping distance is increased.
�Stop the vehicle immediately in a safe loca-
tion and check the poly-V-belt.
If it is broken:
�Do not continue to drive.
Otherwise, the engine will overheat due
to an inoperative water pump which may
result in damage to the engine. Contact
an authorized Mercedes-Benz Center.
If it is in order:
�Contact an Mercedes-Benz Center
immediately. Adjust driving to be consis-
tent with reduced braking responsive-
ness.
USA only:
;
Canada only:
!
Release
Parking BrakeYou are driving with the parking
brake set.�Release the parking brake (�page 53).
Page 382 of 474
381 Practical hints
What to do if …
Display symbolDisplay messagePossible cause/consequencePossible solution
IPlease
get a new key.The SmartKey is malfunctioning.�Contact an authorized Mercedes-Benz
Center.
Remove KeyYou have forgotten to remove the
SmartKey from the starter switch.�Remove the SmartKey from the starter
switch.
.3rd Brake LampThe high mounted brake lamp is
malfunctioning. This message will
only appear if a critical number of
LEDs have stopped working.�Contact an authorized Mercedes-Benz
Center as soon as possible.
AUTO-Light
InoperativeThe light sensor is malfunctioning.
The headlamps switch on automati-
cally.�Contact an authorized Mercedes-Benz
Center as soon as possible.
To switch off the headlamps (U.S. vehicles only):
�In the control system, set lamp operation to
manual mode (
�page 143).
�Switch off headlamps using the exterior
lamp switch (
�page 109).
Page 386 of 474

385 Practical hints
What to do if …
Display symbolDisplay messagePossible cause/consequencePossible solution
.Marker Lamp
Rear RightThe right rear side marker lamp is
malfunctioning. This message will
only appear if a critical number of
LEDs have stopped working.�Contact an authorized Mercedes-Benz
Center as soon as possible.
Tail Lamp, Left
Auxiliary Bulb OnThe left tail lamp is malfunctioning.
This message will only appear if a
critical number of LEDs have
stopped working. A backup bulb
has been brought into use.�Contact an authorized Mercedes-Benz
Center as soon as possible.
Tail Lamp, Right
Auxiliary Bulb OnThe right tail lamp is malfunction-
ing. This message will only appear if
a critical number of LEDs have
stopped working. A backup bulb
has been brought into use.�Contact an authorized Mercedes-Benz
Center as soon as possible.
Switch Off
LightsYou have removed the SmartKey
from the starter switch, opened the
driver’s door and left the headlamps
on.�Switch off the headlamps (�page 61).
Switch off lights or
remove key
.
The exterior lamp switch is set to
positionU, and you have forgot-
ten to remove the SmartKey from
the starter switch. The parking
lamps remain switched on.�Switch off the headlamps (�page 61).
or
�Remove the SmartKey from the starter
switch.
Page 395 of 474
394 Practical hints
Unlocking/locking in an emergency
Unlocking the vehicle
If you cannot unlock the vehicle with the
SmartKey, open the driver’s door and the
trunk using the mechanical key. Removing the mechanical key
1Mechanical key locking tab
2Mechanical key
�Move locking tab1 in direction of
arrow.
�Slide mechanical key2 out of the
housing.Unlocking the driver’s door
�Insert mechanical key 2 into the
driver’s door lock until it stops.
�Turn mechanical key 2 counterclock-
wise to position1 until the locking
knob moves up.
The driver’s door is unlocked.
�Pull the door handle to open the
driver’s door.
iUnlocking the vehicle with the mechanical
key and opening the driver’s door or the trunk
will trigger the anti-theft alarm system
(
�page 90).
To cancel the alarm, insert the SmartKey in the
starter switch.
1Unlocking
2Mechanical key
Page 396 of 474
395 Practical hints
Unlocking/locking in an emergency
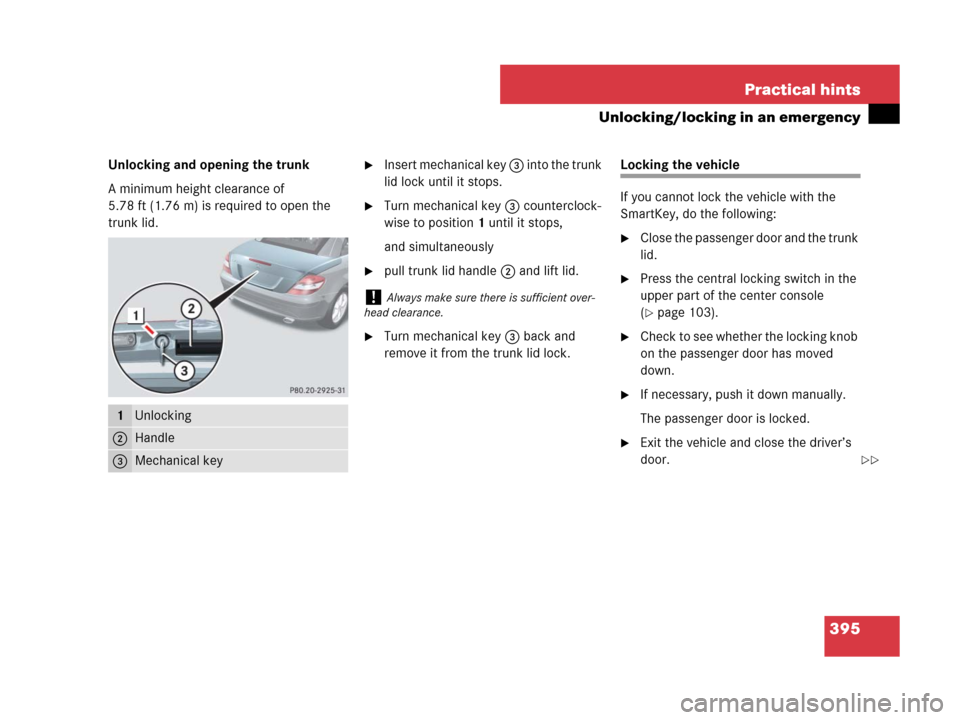
Unlocking and opening the trunk
A minimum height clearance of
5.78 ft (1.76 m) is required to open the
trunk lid.�Insert mechanical key 3 into the trunk
lid lock until it stops.
�Turn mechanical key 3 counterclock-
wise to position1 until it stops,
and simultaneously
�pull trunk lid handle 2 and lift lid.
�Turn mechanical key 3 back and
remove it from the trunk lid lock.
Locking the vehicle
If you cannot lock the vehicle with the
SmartKey, do the following:
�Close the passenger door and the trunk
lid.
�Press the central locking switch in the
upper part of the center console
(
�page 103).
�Check to see whether the locking knob
on the passenger door has moved
down.
�If necessary, push it down manually.
The passenger door is locked.
�Exit the vehicle and close the driver’s
door.
1Unlocking
2Handle
3Mechanical key
!Always make sure there is sufficient over-
head clearance.
��
Page 397 of 474

396 Practical hints
Unlocking/locking in an emergency
�Insert mechanical key 2 into the
driver’s door lock until it stops.
�Turn mechanical key 2 clockwise to
position1.
The driver’s door is locked.
�Turn back mechanical key 2 and
remove it from driver’s door lock.Manually unlocking the gear selector
lever (automatic transmission*)
In case of power failure, the gear selector
lever can be manually unlocked, e.g. to tow
the vehicle.
1Gear selector lever cover
2Release
�Insert flat, blunt object (e.g. screw-
driver) into the left edge of cover1 at
the position indicated by the arrows.
�Loosen cover1 using this object.
�Using your hands, pull cover1 out
and remove.
�Push down and hold release2 in
direction of arrow.
�Simultaneously move gear selector
lever out of positionP.
The gear selector lever is unlocked
now.1Locking
2Mechanical key
iThis procedure does not arm the anti-theft
alarm system, nor does it lock the fuel filler flap
and the storage compartments.
iThe gear selector lever is locked again as
soon as you place it in positionP again.
��