Page 129 of 474

128 Controls in detail
Control system
�When in the standard display menu,
press buttonjork repeatedly
until the coolant temperature appears
in the multifunction display.Displaying digital speedometer or
outside temperature
�Press buttonjork repeatedly
until the digital speedometer appears
in the multifunction display.
The current vehicle speed or the
outside temperature appears in the
multifunction display.
Example illustration for selected vehicle
speed
AMG menu
The main screen of the AMG menu shows
you the gear currently engaged as well as
the engine oil temperature.
�Press button è or ÿ repeatedly
until the AMG menu appears in the
multifunction display.
1Gear indicator
2Engine oil temperature
!Excessive coolant temperature triggers a
warning message in the multifunction display
(
�page 374).
The engine should not be operated with a
coolant temperature above 248°F (120°C).
Doing so may cause serious engine damage
which is not covered by the Mercedes-Benz
Limited Warranty.
iDuring severe operating conditions, e.g.
stop-and-go city traffic, the coolant temperature
may rise close to 248°F (120°C).
iYou can select to either display the digital
speedometer or the outside temperature
indicator (
�page 140).
iThis function is only available in AMG
vehicles.
Page 130 of 474

129 Controls in detail
Control system
�Use buttons k or j to select the
following functions in the AMG menu:Vehicle supply voltage
�Press button è or ÿ repeatedly
until you see the AMG menu.
�Press button j repeatedly until the
vehicle supply voltage appears in the
multifunction display.
1Gear indicator
2Vehicle supply voltageRACETIMER
The RACETIMER allows you to time and
save driving stretches in hours, minutes
and seconds.
�Press button è or ÿ repeatedly
until the AMG menu appears in the
multifunction display.
iThe engine oil temperature symbol
flashes if the engine oil temperature has not yet
reached 80°C. During this time, avoid driving at
full engine speed.
FunctionPage
Vehicle supply voltage129
RACETIMER129
Overall analysis132
Lap analysis132
iIf the engine reaches the overspeed range in
the manual shift program (
�page 165), the
menu will be shown in red. In addition, you will
see
UP n e x t t o g e a r i n d i c a t o r 1 as a reminder to
upshift.
Warning!G
The RACETIMER feature is only for use on
roads and in conditions where high speed
driving is permitted. Racing on public roads
is prohibited under all circumstances and
the driver is and must always remain
responsible for following posted speed
limits.
��
Page 131 of 474
130 Controls in detail
Control system
�Press button j repeatedly until the
RACETIMER appears in the
multifunction display.
1Gear indicator
2RACETIMER
3Lap numberStarting the RACETIMER
�Press button æ.
The timer starts.
Displaying intermediate time
�Press button ç while the timer is
running.
The intermediate time is shown for
5 seconds.Stopping the RACETIMER
�Press button æ.
The timer stops.
iYou can start the RACETIMER when the
engine is running or the starter switch is in
position2 (
�page 37).
iWhile the RACETIMER is being displayed,
you cannot adjust the audio volume using
buttonsæ or ç.
iWhen you stop the vehicle and turn the
SmartKey to position 1 (
�page 37), the
RACETIMER stops timing. Timing is resumed
when you switch the ignition back on
(
�page 37) or restart the engine (�page 51)
and then press the æbutton.
��
Page 132 of 474
131 Controls in detail
Control system
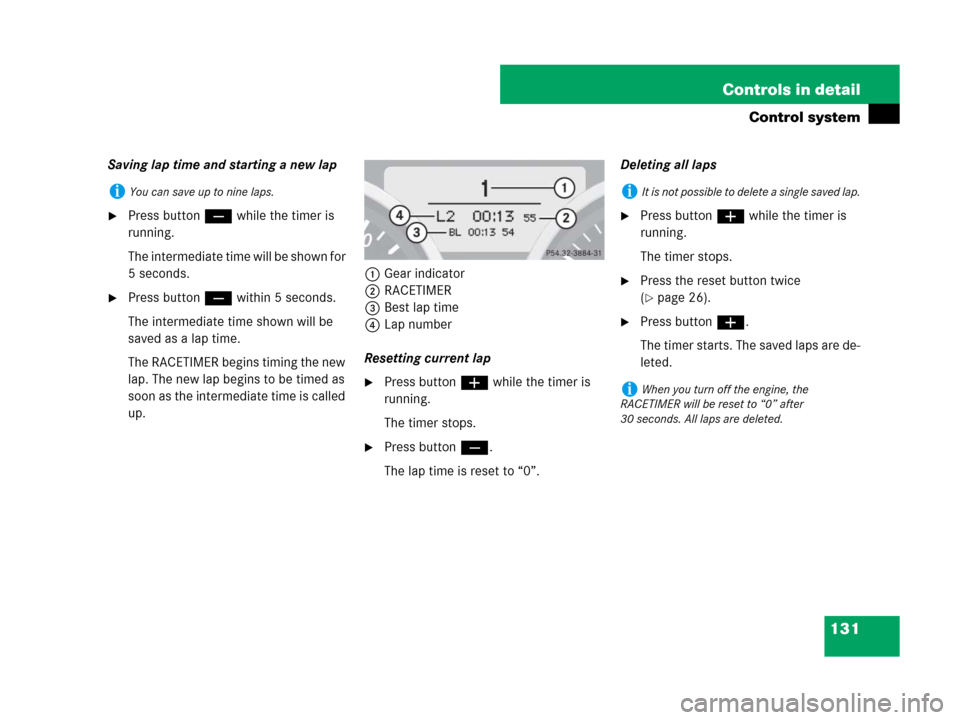
Saving lap time and starting a new lap
�Press button ç while the timer is
running.
The intermediate time will be shown for
5 seconds.
�Press button ç within 5 seconds.
The intermediate time shown will be
saved as a lap time.
The RACETIMER begins timing the new
lap. The new lap begins to be timed as
soon as the intermediate time is called
up.1Gear indicator
2RACETIMER
3Best lap time
4Lap number
Resetting current lap
�Press button æ while the timer is
running.
The timer stops.
�Press button ç.
The lap time is reset to “0”.Deleting all laps
�Press button æ while the timer is
running.
The timer stops.
�Press the reset button twice
(
�page 26).
�Press button æ.
The timer starts. The saved laps are de-
leted.
iYou can save up to nine laps.iIt is not possible to delete a single saved lap.
iWhen you turn off the engine, the
RACETIMER will be reset to “0” after
30 seconds. All laps are deleted.
Page 145 of 474

144 Controls in detail
Control system
Setting locator lighting
With the locator lighting feature activated
and the exterior lamp switch in
positionU, the following lamps will
switch on during darkness when the vehi-
cle is unlocked with the SmartKey:
�Parking lamps
�Tail lamps
�License plate lamps
�Side marker lamps
�Front fog lamps
The locator lighting switches off when the
driver’s door is opened.
If you do not open a door after unlocking
the vehicle with the SmartKey, the lamps
will switch off automatically after approxi-
mately 40 seconds.
�Move the selection marker with
buttonæorç to the
Lighting
submenu.
�Press buttonjork repeatedly
until the message
Surround Lighting
Function
appears in the multifunction
display.
The selection marker is on the current
setting.
�Press buttonæorç to switch
the locator lighting function
On or Off.
�Turn the exterior lamp switch to
positionU when exiting the vehicle
(
�page 55).
The locator lighting feature is
activated.Setting night security illumination
(Headlamps delayed shut-off)
Use this function to set whether you would
like the exterior lamps to remain on for
15 seconds during darkness after exiting
the vehicle and closing all doors.
With the headlamps delayed shut-off
feature activated and the exterior lamp
switch in positionU before the engine
is turned off, the following lamps will
switch on when the engine is turned off:
�Parking lamps
�Tail lamps
�License plate lamps
�Side marker lamps
�Front fog lamps
Page 146 of 474

145 Controls in detail
Control system
If after turning off the engine you do not
open a door or do not close an opened
door, the lamps will automatically switch
off after 60 seconds.
�Move the selection marker with
buttonæorç to the
Lighting
submenu.
�Press buttonjork repeatedly
until the message
Headlamps Delayed
Shut-off
appears in the multifunction
display.
The selection marker is on the current
setting.
�Press buttonæorç to switch
the headlamps delayed shut-off feature
On or Off.
�Turn the exterior lamp switch to
positionU before turning off the
engine (
�page 55).
The headlamps delayed shut-off
feature is activated.
You can temporarily deactivate the
delayed shut-off feature:
�Before exiting the vehicle, turn the
SmartKey in the starter switch to
position0.
�Then turn it to position2 and back to
position0.
The delayed shut-off feature is deacti-
vated. It will reactivate as soon as you
reinsert the SmartKey in the starter
switch.Setting interior lighting delayed shut-off
Use this function to set whether you would
like the interior lighting to remain on for
10 seconds during darkness after you have
removed the SmartKey from the starter
switch.
�Move the selection marker with
buttonæorç to the
Lighting
submenu.
�Press buttonjork repeatedly
until the message
Interior Lighting
Delayed Shut-off
appears in the
multifunction display.
The selection marker is on the current
setting.
�Press buttonæorç to
switch the interior delayed shut-off
feature
On or Off.
Page 149 of 474

148 Controls in detail
Control system
Trip computer menu
Use the trip computer menu to call up
statistical data on your vehicle.
The following information is available:Fuel consumption statistics since start
�Press buttonèorÿ repeatedly
until the message
From Start appears
in the multifunction display.
1Statistics called up: since start
2Time elapsed since start
3Average fuel consumption since start
4Average speed since start
5Distance driven since startFuel consumption since last reset
�Press buttonèorÿ repeatedly
until the message
From Start appears
in the multifunction display.
�Press buttonjork repeatedly
until the message
From Reset appears
in the multifunction display.
1Statistics called up: since last reset
2Time elapsed since last reset
3Average fuel consumption since last
reset
4Average speed since last reset
5Distance driven since last resetFunctionPage
Fuel consumption statistics
since start148
Fuel consumption statistics
since last reset148
Resetting fuel consumption
statistics149
Calling up range
(distance to empty)149
iAll statistics stored since the last engine
start will be reset approximately four hours after
the SmartKey in the starter switch is turned to
position0 or removed from the starter switch.
Resetting will not occur if you turn the SmartKey
back to position1or2 within this time period.
Page 151 of 474

150 Controls in detail
Control system
You can use the functions in the TEL menu
to operate your telephone, provided it is
connected to a hands-free system and
switched on.
�Switch on the telephone and Audio or
COMAND*.
See separate operating instructions.
�Press buttonèorÿ repeatedly
until the
TEL menu appears in the
multifunction display.Which messages will appear in the multi-
function display depends on whether your
telephone is switched on or off:
�If the telephone is switched off, the
message in the multifunction display is:
PHONE OFF.
�If the telephone is switched on:
The telephone will then search for a
network. During this time the multi-
function display is empty.
As soon as the telephone has found a
network,
Ready is indicated in the mul-
tifunction display.
This standby message indicates that your
telephone is ready for use and you can op-
erate it using the control system.Answering a call
When your telephone is ready to receive
calls, you can answer a call at any time. In
the multifunction display you will see the
message, or if available, the caller ID
(name and number):Audio system
COMAND*
�Press buttons.
You have answered the call.
The duration of the call appears in the
multifunction display.
Never operate radio transmitters equipped
with a built-in or attached antenna (i.e. with-
out being connected to an external antenna)
from inside the vehicle while the engine is
running. Doing so could lead to a malfunc-
tion of the vehicle’s electronic system, pos-
sibly resulting in an accident and/or
personal injury.��