Page 375 of 474
374 Practical hints
What to do if …
Display symbolDisplay messagePossible cause/consequencePossible solution
•Coolant
Stop, turn engine
off
.
The coolant is too hot.
Among other possible causes,
the poly-V-belt could be broken.�Stop the vehicle in a safe location or as soon as it is
safe to do so.
�Turn off the engine.
�Apply the parking brake (�page 59).
�Check the poly-V-belt.
If it is broken:
�Do not continue to drive. Otherwise, the engine will
overheat due to an inoperative water pump which
may result in damage to the engine. Contact an
authorized Mercedes-Benz Center.
If it is intact:
�Wait for the message to disappear before restarting
the engine.
Doing otherwise could result in serious engine
damage that is not covered by the Mercedes-Benz
Limited Warranty.
(Continued on next page)
Page 380 of 474
379 Practical hints
What to do if …
Display symbolDisplay messagePossible cause/consequencePossible solution
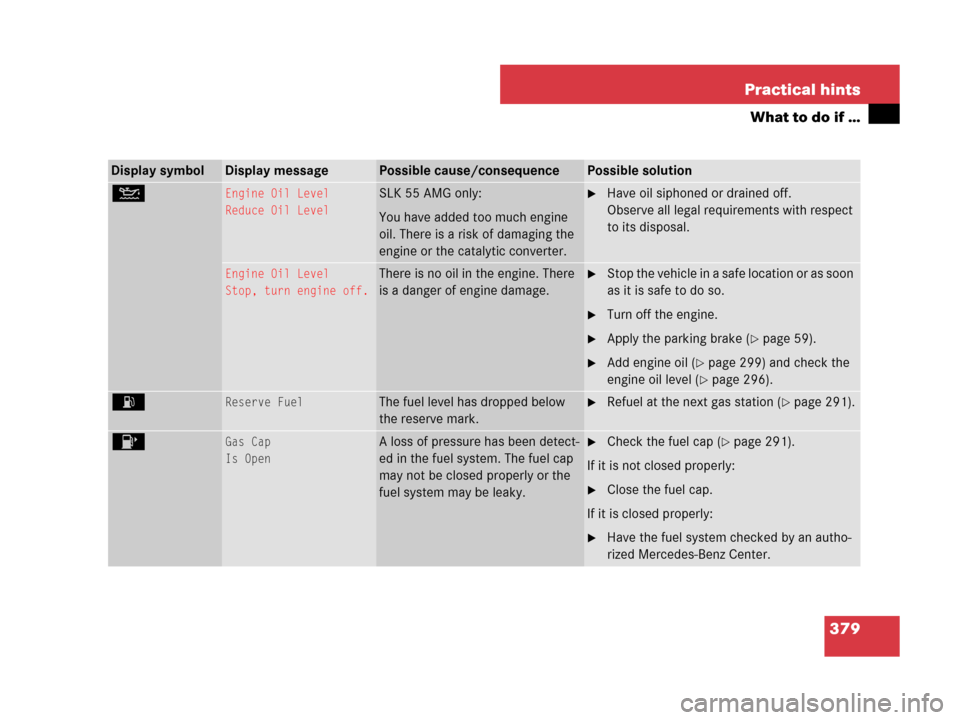
NEngine Oil Level
Reduce Oil LevelSLK 55 AMG only:
You have added too much engine
oil. There is a risk of damaging the
engine or the catalytic converter.�Have oil siphoned or drained off.
Observe all legal requirements with respect
to its disposal.
Engine Oil Level
Stop, turn engine off.There is no oil in the engine. There
is a danger of engine damage.�Stop the vehicle in a safe location or as soon
as it is safe to do so.
�Turn off the engine.
�Apply the parking brake (�page 59).
�Add engine oil (�page 299) and check the
engine oil level (
�page 296).
AReserve FuelThe fuel level has dropped below
the reserve mark.�Refuel at the next gas station (�page 291).
4Gas Cap
Is OpenA loss of pressure has been detect-
ed in the fuel system. The fuel cap
may not be closed properly or the
fuel system may be leaky.�Check the fuel cap (�page 291).
If it is not closed properly:
�Close the fuel cap.
If it is closed properly:
�Have the fuel system checked by an autho-
rized Mercedes-Benz Center.
Page 391 of 474
390 Practical hints
Where will I find...?
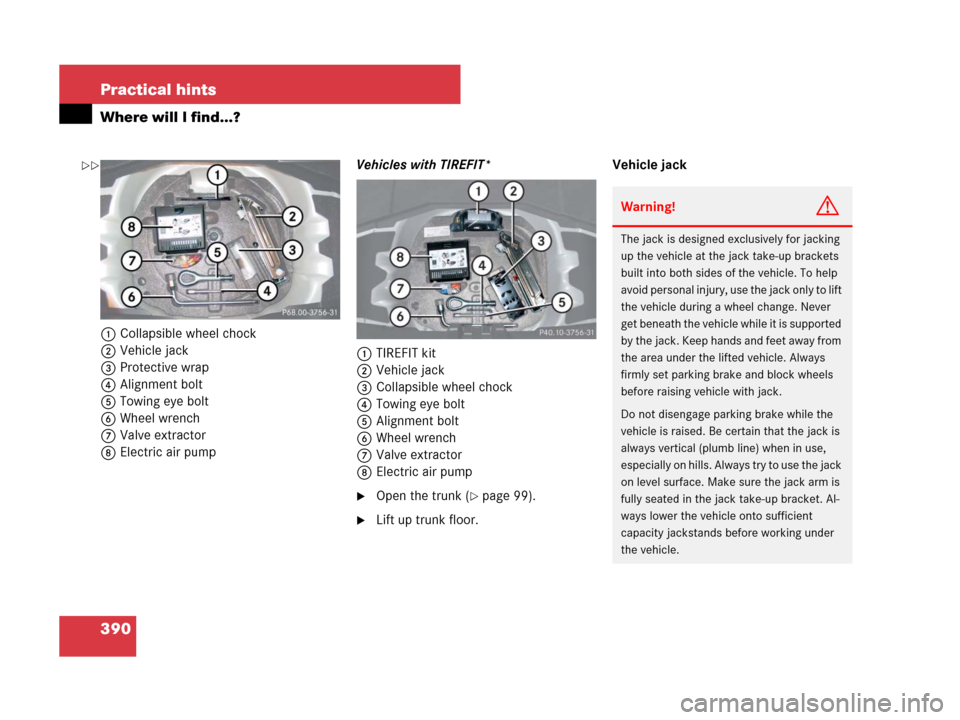
1Collapsible wheel chock
2Vehicle jack
3Protective wrap
4Alignment bolt
5Towing eye bolt
6Wheel wrench
7Valve extractor
8Electric air pumpVehicles with TIREFIT*
1TIREFIT kit
2Vehicle jack
3Collapsible wheel chock
4Towing eye bolt
5Alignment bolt
6Wheel wrench
7Valve extractor
8Electric air pump
�Open the trunk (�page 99).
�Lift up trunk floor.Vehicle jack
Warning!G
The jack is designed exclusively for jacking
up the vehicle at the jack take-up brackets
built into both sides of the vehicle. To help
avoid personal injury, use the jack only to lift
the vehicle during a wheel change. Never
get beneath the vehicle while it is supported
by the jack. Keep hands and feet away from
the area under the lifted vehicle. Always
firmly set parking brake and block wheels
before raising vehicle with jack.
Do not disengage parking brake while the
vehicle is raised. Be certain that the jack is
always vertical (plumb line) when in use,
especially on hills. Always try to use the jack
on level surface. Make sure the jack arm is
fully seated in the jack take-up bracket. Al-
ways lower the vehicle onto sufficient
capacity jackstands before working under
the vehicle.
��
Page 403 of 474
402 Practical hints
Replacing bulbs
Rear lamps Notes on bulb replacement
�Only use 12-volt bulbs of the same type
and with the specified watt rating.
�Switch the lights off before replacing a
bulb to prevent short circuits.
�Always use a clean lint-free cloth when
handling bulbs.
�Your hands should be dry and free of oil
and grease.
�If the newly installed bulb does not
come on, contact an authorized
Mercedes-Benz Center.Have the LEDs and bulbs for the following
lamps replaced by an authorized
Mercedes-Benz Center:
�Additional turn signal lamps in the
exterior rear view mirrors
�Bi-Xenon* lamps
�Front fog lamps
�High mounted brake lamp
�Brake lamps
�Front and rear side marker lamps
�Parking/standing lamps in the tail
lamp assemblies
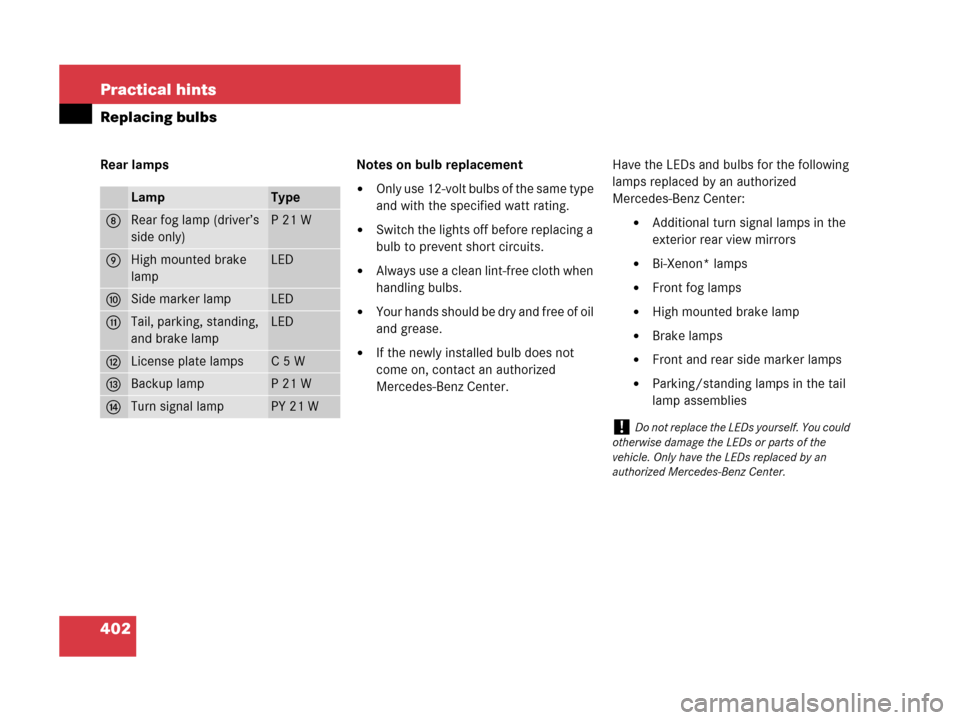
LampType
8Rear fog lamp (driver’s
side only)P21W
9High mounted brake
lampLED
aSide marker lampLED
bTail, parking, standing,
and brake lampLED
cLicense plate lampsC5W
dBackup lampP21W
eTurn signal lampPY 21 W
!Do not replace the LEDs yourself. You could
otherwise damage the LEDs or parts of the
vehicle. Only have the LEDs replaced by an
authorized Mercedes-Benz Center.
Page 409 of 474
408 Practical hints
Flat tire
The SLK 55 AMG with Performance
Package* is equipped with a TIREFIT kit.
Preparing the vehicle
�Park the vehicle in a safe distance from
moving traffic on a hard, flat surface
when possible.
�Turn on the hazard warning flashers.
�Turn the steering wheel so that the
front wheels are in a straight ahead
position.
�Set the parking brake (�page 53).
�Move the gear selector lever* toP
(manual transmission to first or reverse
gear).
�Turn off the engine (�page 61).
�Remove the SmartKey from the starter
switch.
�Have any passenger exit the vehicle at
a safe distance from the roadway.
Sealing tires with TIREFIT
Small tire punctures, particularly those in
the tread, can be sealed with TIREFIT.
TIREFIT can be used in ambient tempera-
tures down to -4°F (-20°C).�Foreign objects (e.g. screws or nails)
should not be removed from the tire.
�Take TIREFIT, the sticker, and the
electric air pump out of the trunk
(
�page 389).
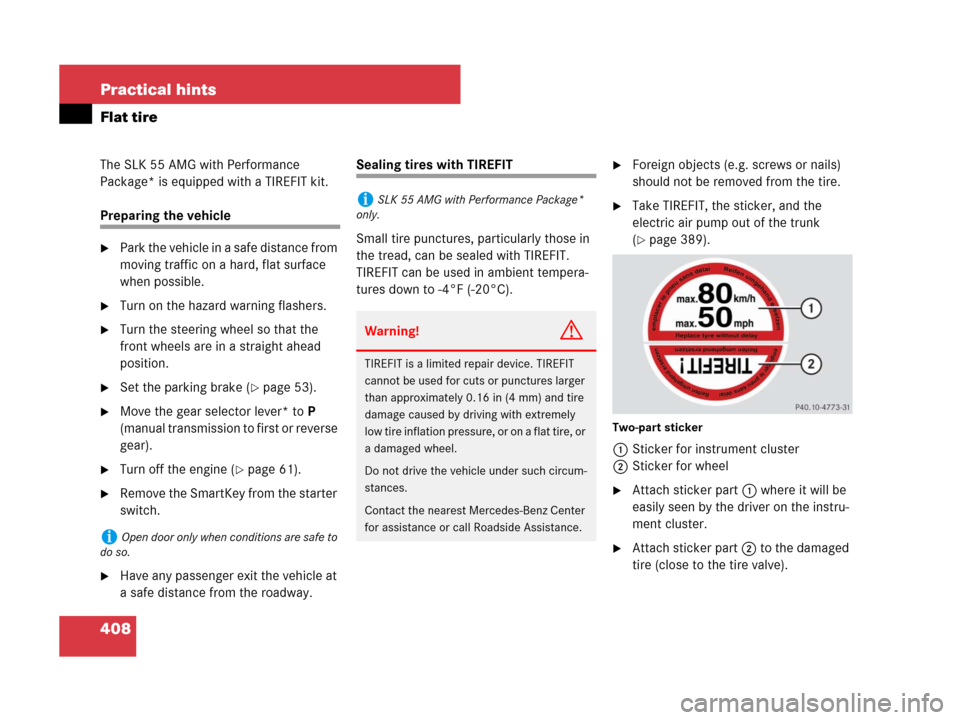
Two-part sticker
1Sticker for instrument cluster
2Sticker for wheel
�Attach sticker part 1 where it will be
easily seen by the driver on the instru-
ment cluster.
�Attach sticker part 2 to the damaged
tire (close to the tire valve).iOpen door only when conditions are safe to
do so.
iSLK 55 AMG with Performance Package*
only.
Warning!G
TIREFIT is a limited repair device. TIREFIT
cannot be used for cuts or punctures larger
than approximately 0.16 in (4 mm) and tire
damage caused by driving with extremely
low tire inflation pressure, or on a flat tire, or
a damaged wheel.
Do not drive the vehicle under such circum-
stances.
Contact the nearest Mercedes-Benz Center
for assistance or call Roadside Assistance.
Page 416 of 474
415 Practical hints
Flat tire
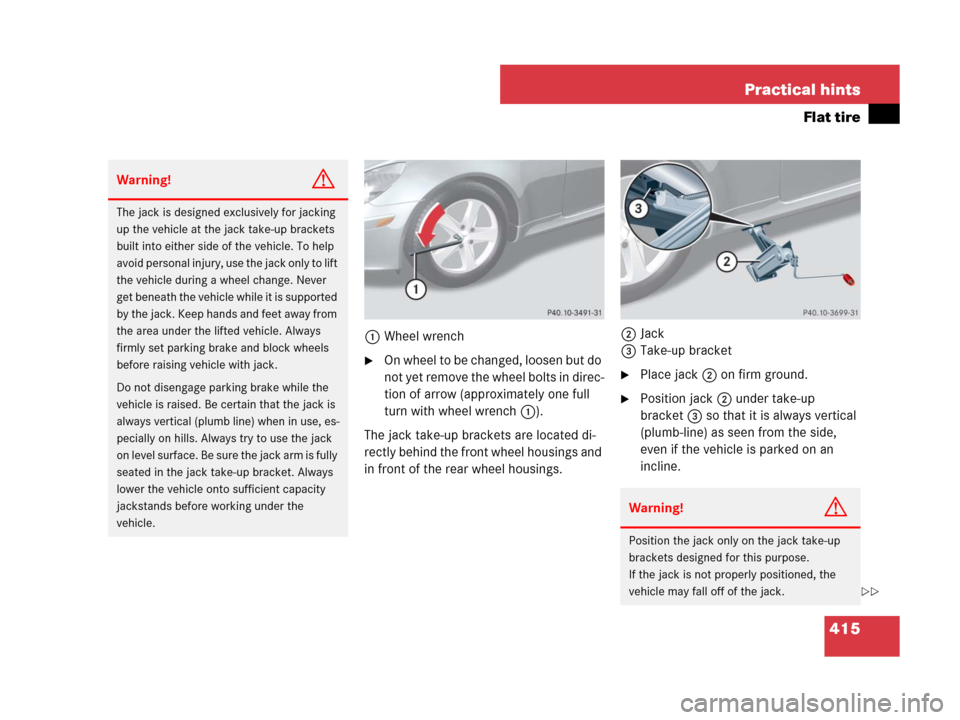
1Wheel wrench
�On wheel to be changed, loosen but do
not yet remove the wheel bolts in direc-
tion of arrow (approximately one full
turn with wheel wrench1).
The jack take-up brackets are located di-
rectly behind the front wheel housings and
in front of the rear wheel housings.2Jack
3Take-up bracket�Place jack2 on firm ground.
�Position jack2 under take-up
bracket3 so that it is always vertical
(plumb-line) as seen from the side,
even if the vehicle is parked on an
incline.
Warning!G
The jack is designed exclusively for jacking
up the vehicle at the jack take-up brackets
built into either side of the vehicle. To help
avoid personal injury, use the jack only to lift
the vehicle during a wheel change. Never
get beneath the vehicle while it is supported
by the jack. Keep hands and feet away from
the area under the lifted vehicle. Always
firmly set parking brake and block wheels
before raising vehicle with jack.
Do not disengage parking brake while the
vehicle is raised. Be certain that the jack is
always vertical (plumb line) when in use, es-
pecially on hills. Always try to use the jack
on level surface. Be sure the jack arm is fully
seated in the jack take-up bracket. Always
lower the vehicle onto sufficient capacity
jackstands before working under the
vehicle.
Warning!G
Position the jack only on the jack take-up
brackets designed for this purpose.
If the jack is not properly positioned, the
vehicle may fall off of the jack.
��
Page 424 of 474
423 Practical hints
Battery
Disconnecting the battery
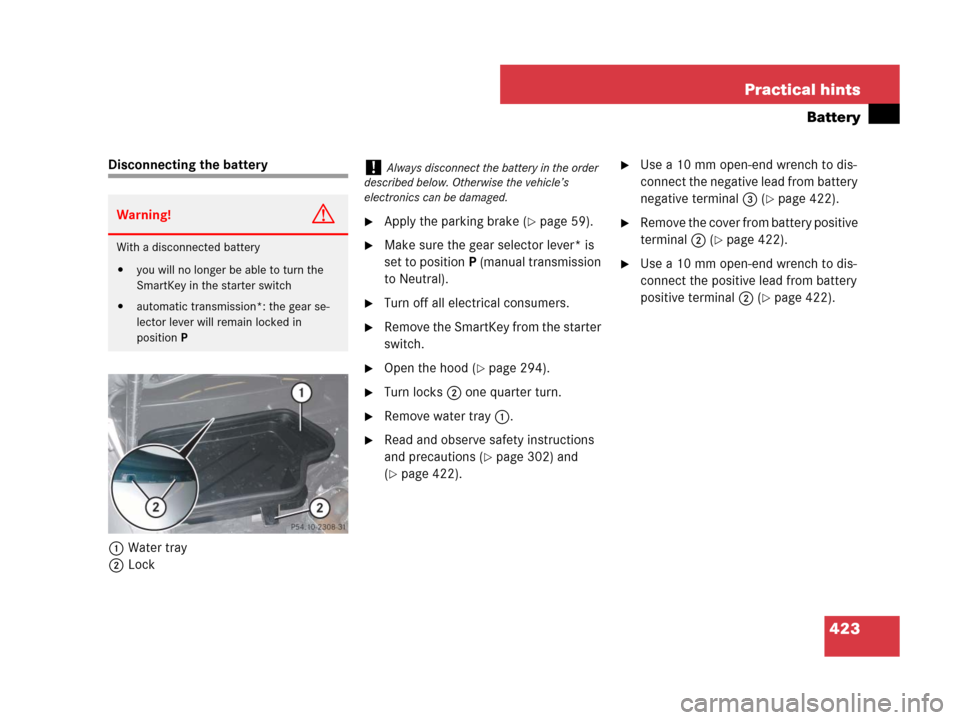
1Water tray
2Lock
�Apply the parking brake (�page 59).
�Make sure the gear selector lever* is
set to positionP (manual transmission
to Neutral).
�Turn off all electrical consumers.
�Remove the SmartKey from the starter
switch.
�Open the hood (�page 294).
�Turn locks2 one quarter turn.
�Remove water tray1.
�Read and observe safety instructions
and precautions (
�page 302) and
(
�page 422).
�Use a 10 mm open-end wrench to dis-
connect the negative lead from battery
negative terminal3 (
�page 422).
�Remove the cover from battery positive
terminal 2 (
�page 422).
�Use a 10 mm open-end wrench to dis-
connect the positive lead from battery
positive terminal2 (
�page 422).
Warning!G
With a disconnected battery
�you will no longer be able to turn the
SmartKey in the starter switch
�automatic transmission*: the gear se-
lector lever will remain locked in
positionP
!Always disconnect the battery in the order
described below. Otherwise the vehicle’s
electronics can be damaged.
Page 428 of 474
427 Practical hints
Jump starting
�Make sure the two vehicles do not
touch.
�Turn off all electrical consumers.
�Apply the parking brake (�page 59).
�Make sure the gear selector lever* is
set to positionP (manual transmission
to Neutral).
�Open the hood (�page 294).
�Flip up cover from positive under hood
terminal2 in front of water tray1
(
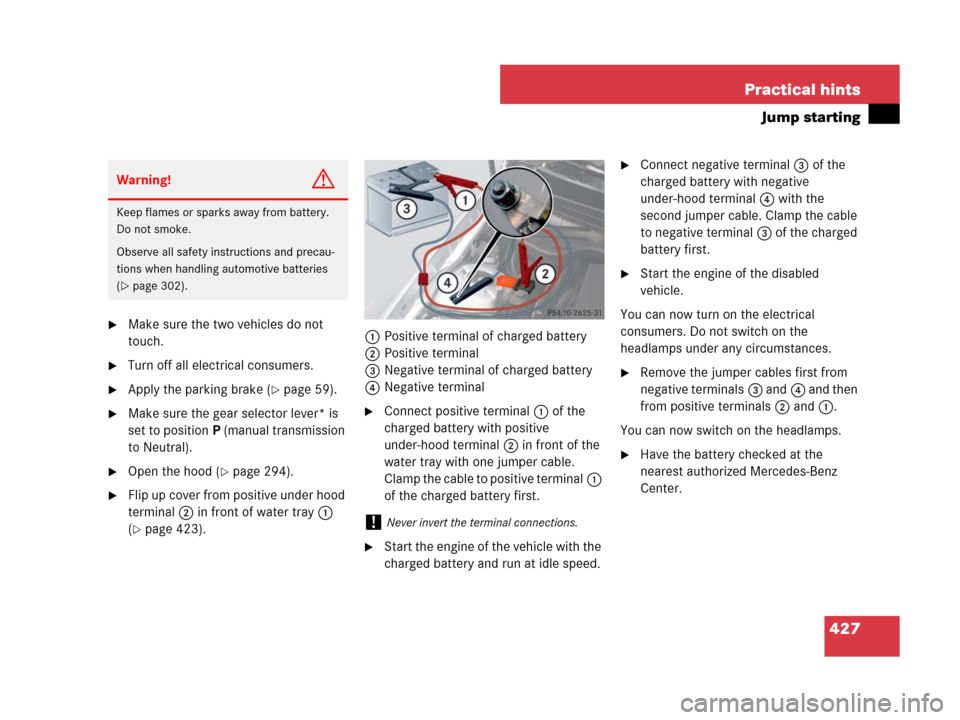
�page 423).1Positive terminal of charged battery
2Positive terminal
3Negative terminal of charged battery
4Negative terminal
�Connect positive terminal1 of the
charged battery with positive
under-hood terminal2 in front of the
water tray with one jumper cable.
Clamp the cable to positive terminal1
of the charged battery first.
�Start the engine of the vehicle with the
charged battery and run at idle speed.
�Connect negative terminal3 of the
charged battery with negative
under-hood terminal4 with the
second jumper cable. Clamp the cable
to negative terminal3 of the charged
battery first.
�Start the engine of the disabled
vehicle.
You can now turn on the electrical
consumers. Do not switch on the
headlamps under any circumstances.
�Remove the jumper cables first from
negative terminals3 and4 and then
from positive terminals2 and1.
You can now switch on the headlamps.
�Have the battery checked at the
nearest authorized Mercedes-Benz
Center.
Warning!G
Keep flames or sparks away from battery.
Do not smoke.
Observe all safety instructions and precau-
tions when handling automotive batteries
(
�page 302).
!Never invert the terminal connections.