Page 79 of 474

78 Safety and Security
Occupant safety
Enhanced seat belt reminder system
When the engine is started, the seat belt
telltale< will always illuminate
for 6 seconds to remind you and your
passenger to fasten your seat belts.
If the driver’s seat belt is not fastened
when the engine is started, an additional
warning chime will also sound for a maxi-
mum of 6 seconds or until the driver’s seat
belt is fastened.
If after these 6 seconds, the driver’s or the
passenger’s seat belt (with the passenger
seat occupied) are not fastened with both
doors closed,
�the seat belt telltale< remains illu-
minated for as long as either the driv-
er’s or passenger’s seat belt is not
fastened.
�and if the vehicle speed once exceeds
15 mph (25 km/h), the seat belt
telltale< starts flashing and a
warning chime sounds with increasing intensity for a maximum of 60 seconds
or until both the driver’s and
passenger’s seat belt are fastened.
If the driver’s or the passenger’s seat
belt remains unfastened after
60 seconds, the warning chime stops
sounding. The seat belt telltale<
stops flashing but continues to be
illuminated.
The seat belt telltale< will only go out
if both the driver’s and the passenger’s
seat belt (with the passenger seat occu-
pied) are fastened, or the vehicle is stand-
ing still and a door is opened.
For more information, see the “Practical
hints” section (
�page 353).
�Seat belts should not be worn twisted.
In a crash, you would not have the full
width of the seat belt to manage impact
forces. The twisted seat belt against
your body could cause injuries.
�Pregnant women should also always use
a lap-shoulder belt. The lap belt portion
should be positioned as low as possible
on the hips to avoid any possible
pressure on the abdomen.
�Never place your feet on the instrument
panel, dashboard or on the seat. Always
keep both feet on the floor in front of the
seat.
�When using a seat belt to secure infant
or toddler restraints or children in
booster seats, always follow the child
seat manufacturer’s instructions.
��
Page 83 of 474

82 Safety and Security
Occupant safety
�If you place a child in a forward-facing
child restraint on the passenger seat,
move the seat as far back as possible,
use the proper child restraint recom-
mended for the age, size and weight of
the child, and secure child restraint with
the vehicle’s seat belt according to the
child seat manufacturer’s instructions.
For children larger than the typical
12-month-old child, the passenger front
air bag may or may not be activated
(
�page 72).
Warning!G
Infants and small children should never
share a seat belt with another occupant.
During an accident, they could be crushed
between the occupant and seat belt.
A child’s risk of serious or fatal injuries is
significantly increased if the child restraints
are not properly secured in the vehicle
and/or the child is not properly secured in
the child restraint.
Warning!G
Children too big for a toddler restraint must
ride in seats using regular seat belts.
Position the shoulder belt across chest and
shoulder, not face or neck. A booster seat
may be necessary to achieve proper seat
belt positioning for children over 41 lbs until
they reach a height where a lap/shoulder
belt fits properly without a booster.
When the child restraint is not in use,
remove it from the vehicle or secure it with
the seat belt to prevent the child restraint
from becoming a projectile in the event of
an accident.
Do not leave children unattended in the
vehicle, even if the children are secured in a
child restraint system. Unsupervised
children in a child restraint system may use
vehicle equipment and may cause an
accident and/or serious personal injury.
��
Page 94 of 474
93 Controls in detail
Locking and unlocking
Seats
Memory function*
Lighting
Instrument cluster
Control system
Manual transmission
Automatic transmission*
Good visibility
Climate control
Automatic climate control*
Audio system
Power windows
Retractable hardtop
Driving systems
Loading
Useful features
Page 105 of 474

104 Controls in detail
Seats
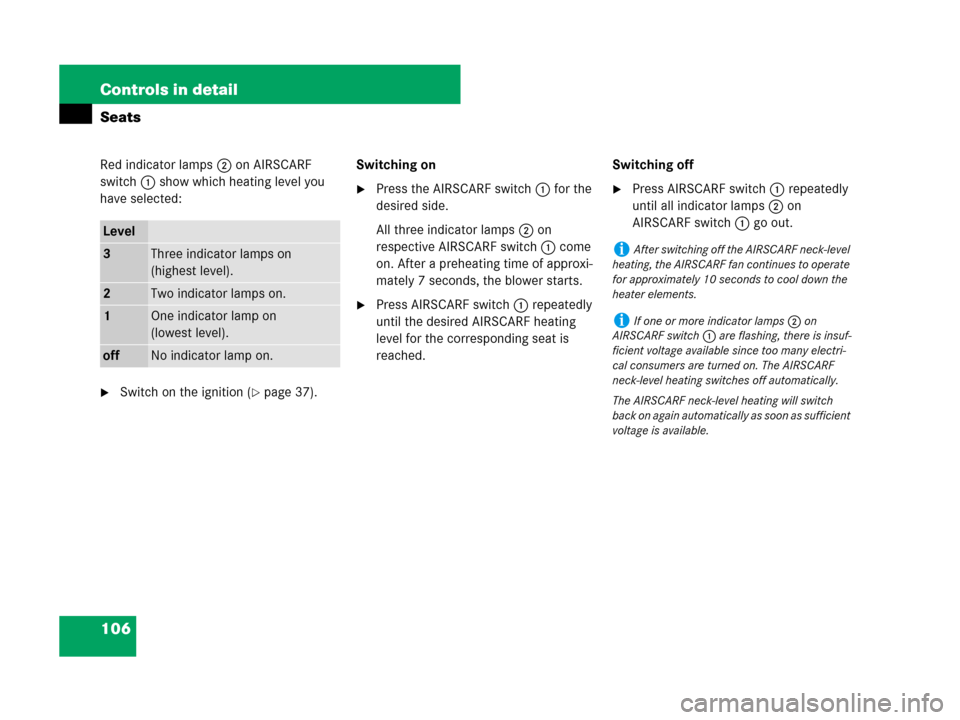
For information on seat adjustment, see
“Adjusting” (
�page 39).
Seat heating*
1Seat heating switch
2Indicator lampsRed indicator lamps2 on seat heating
switch 1 show which heating level you
have selected:
�Switch on the ignition (�page 37).Switching on seat heating
�Press switch 1 repeatedly until the
desired heating level is set.
One or more red indicator lamps2
show the selected heating level.
Switching off seat heating
�Press switch 1 repeatedly until all
indicator lamps2 go out.
Level
3Three indicator lamps on
(highest level).
After approximately 5 minutes,
seat heating is automatically
switched to level 2.
2Two indicator lamps on.
After approximately 10 minutes,
seat heating is automatically
switched to level 1.
1One indicator lamp on
(lowest level).
After approximately 20 minutes,
seat heating is automatically
switched to off.
offNo indicator lamp on.
iIf one or more indicator lamps2 on the
seat heating switch are flashing, there is insuffi-
cient voltage available since too many electrical
consumers are turned on. The seat heating
switches off automatically.
The seat heating will switch back on again
automatically as soon as sufficient voltage is
available.
Page 106 of 474
105 Controls in detail
Seats
Lumbar support*
The curvature of the seats can be adjusted
to help enhance lower back support and
seating comfort.
1Upper seat curvature
2Lower seat curvature
�Switch on the ignition (�page 37).
�Turn adjustment wheels 1 and 2
until you have reached the desired seat
curvature.
AIRSCARF neck-level heating*
The AIRSCARF neck-level heating provides
the area surrounding the occupants’ necks
with a heated air stream flowing from
openings in the head restraints.
1AIRSCARF switch
2Indicator lamps
Warning!G
When switching on the AIRSCARF neck-level
heating, the air streaming from the openings
may be very hot. When in close proximity to
the openings, you could be seriously
burned. To help avoid serious personal
injuries, switch the AIRSCARF to a lower
heating level.
Page 107 of 474

106 Controls in detail
Seats
Red indicator lamps2 on AIRSCARF
switch 1 show which heating level you
have selected:
�Switch on the ignition (�page 37).Switching on
�Press the AIRSCARF switch1 for the
desired side.
All three indicator lamps 2 on
respective AIRSCARF switch 1 come
on. After a preheating time of approxi-
mately 7 seconds, the blower starts.
�Press AIRSCARF switch 1 repeatedly
until the desired AIRSCARF heating
level for the corresponding seat is
reached.Switching off
�Press AIRSCARF switch1 repeatedly
until all indicator lamps 2 on
AIRSCARF switch 1 go out.
Level
3Three indicator lamps on
(highest level).
2Two indicator lamps on.
1One indicator lamp on
(lowest level).
offNo indicator lamp on.
iAfter switching off the AIRSCARF neck-level
heating, the AIRSCARF fan continues to operate
for approximately 10 seconds to cool down the
heater elements.
iIf one or more indicator lamps2 on
AIRSCARF switch 1 are flashing, there is insuf-
ficient voltage available since too many electri-
cal consumers are turned on. The AIRSCARF
neck-level heating switches off automatically.
The AIRSCARF neck-level heating will switch
back on again automatically as soon as sufficient
voltage is available.
Page 109 of 474
108 Controls in detail
Memory function*
Storing positions into memory
�Adjust the seat, on the driver’s side
also the steering wheel and exterior
rear view mirrors, to the desired
positions (
�page 39).
�Press memory buttonM.
�Release memory buttonM and press a
memory position switch 2 within
3 seconds.
All settings are stored to the selected
position.
Recalling positions from memory
�Press and hold desired memory
position switch2 until the seat, on
the driver’s side also the steering
wheel and exterior rear view mirrors,
have completely moved to the stored
positions.
!Do not operate the power seats using the
memory position switches if the seat backrest is
in an excessively reclined position. Doing so
could cause damage to the seats.
iReleasing the memory position switches
immediately stops movement to the stored
positions.
Page 332 of 474

331 Operation
Tires and wheels
Tire and loading terminology
Accessory weight
The combined weight (in excess of those
standard items which may be replaced) of
automatic transmission, power steering,
power brakes, power windows, power
seats, radio, and heater, to the extent that
these items are available as
factory-installed equipment (whether
installed or not).
Air pressure
The amount of air inside the tire pressing
outward on each square inch of the tire.
Air pressure is expressed in pounds per
square inch (psi), or kilopascal (kPa), or
bars.
Aspect ratio
Dimensional relationship between tire
section height and section width
expressed in percentage.Bar
Another metric unit for air pressure. There
are 14.5038 pounds per square inch (psi)
to 1 bar; there are 100 kilopascals (kPa)
to 1 bar.
Bead
The tire bead contains steel wires wrapped
by steel cords that hold the tire onto the
rim.
Cold tire inflation pressure
Tire inflation pressure when your vehicle
has been sitting for at least three hours or
driven no more than 1 mile (1.6 km).
Curb weight
The weight of a motor vehicle with stan-
dard equipment including the maximum
capacity of fuel, oil, and coolant, and, if so
equipped, air conditioning and additional
optional equipment, but without passen-
gers and cargo.DOT (Department of Transportation)
A tire branding symbol which denotes the
tire meets requirements of the
U.S. Department of Transportation.
GAWR (G
ross Axle Weight Rating)
The GAWR is the maximum permissible
axle weight. The gross vehicle weight on
each axle must never exceed the GAWR for
the front and rear axle indicated on the
certification label located on the driver’s
door B-pillar.
GVW (G
ross Vehicle Weight)
The GVW comprises the weight of the
vehicle including fuel, tools, spare wheel,
installed accessories, passengers and
cargo and, if applicable, trailer tongue
load. The GWV must never exceed the
GWVR indicated on the certification label
located on the driver’s door B-pillar.