2008 MERCEDES-BENZ SLK ROADSTER seat adjustment
[x] Cancel search: seat adjustmentPage 28 of 273
Instrument cluste
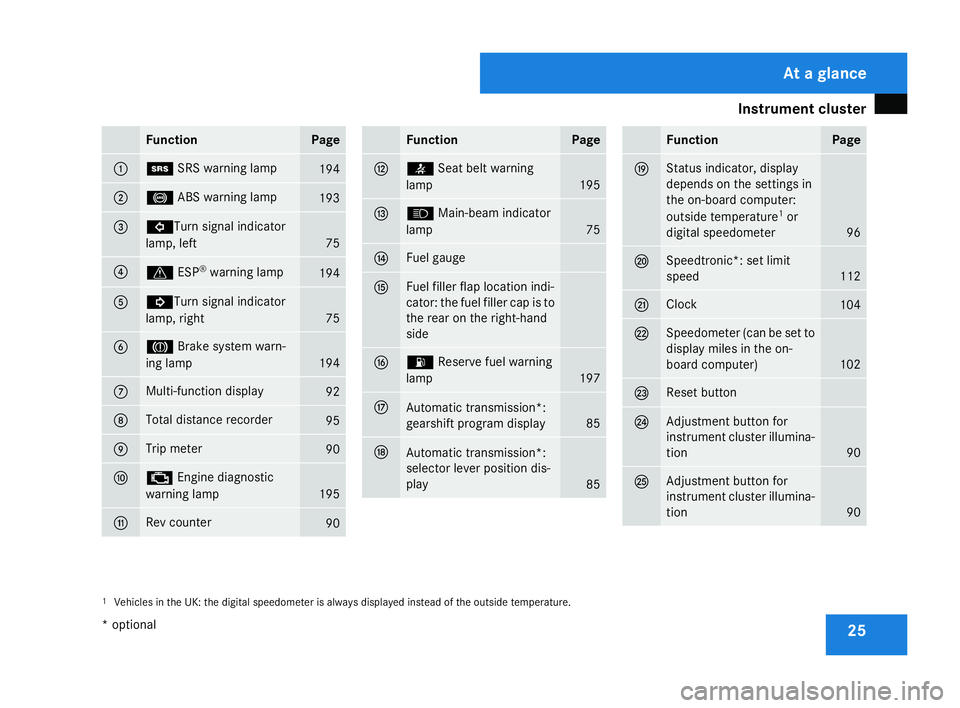
r 25Function Page
1 1
SRS warning lamp 194
2 -
ABS warning lamp 193
3 L
Turn signal indicator
lamp, left 75
4
v
ESP®
warning lamp 19
4 5 K
Turn signal indicator
lamp, right 75
6 3
Brake system warn-
ing lamp 194
7 Multi-function display
92
8 Total distance recorder
95
9 Trip meter
90
a ±
Engine diagnostic
warning lamp 195
b Rev counter
90 Function Page
c <
Seat belt warning
lamp 195
d A
Main-beam indicator
lamp 75
e Fuel gaug
e f Fuel filler flap location indi
-
cator: the fuel filler cap is to
the rear on the right-hand
sid e g A
Reserve fuel warnin g
lamp 197
h
Automatic transmission*
:
gearshift program display 85
j
Automatic transmission*
:
selector lever position dis-
play 85 Function Page
k Status indicator, display
depends on the settings in
the on-board computer:
outside temperature
1
or
digital speedometer 96
l Speedtronic*: set limit
speed
112
m Cloc
k 104
n Speedometer (can be set to
display miles in the on-
board computer)
102
o Reset button
p Adjustment button for
instrument cluster illumina
-
tio n 90
q Adjustment button for
instrument cluster illumina
-
tio n 90
1
Vehicles in the UK: the digital speedometer is always displayed instead of the outside temperature. At a glance
* optional
171_AKB; 3; 4, en-GB
vpfaff7,
2007-11-13T10:50:25+01:00 - Seite 25
Page 30 of 273
Instrument cluste
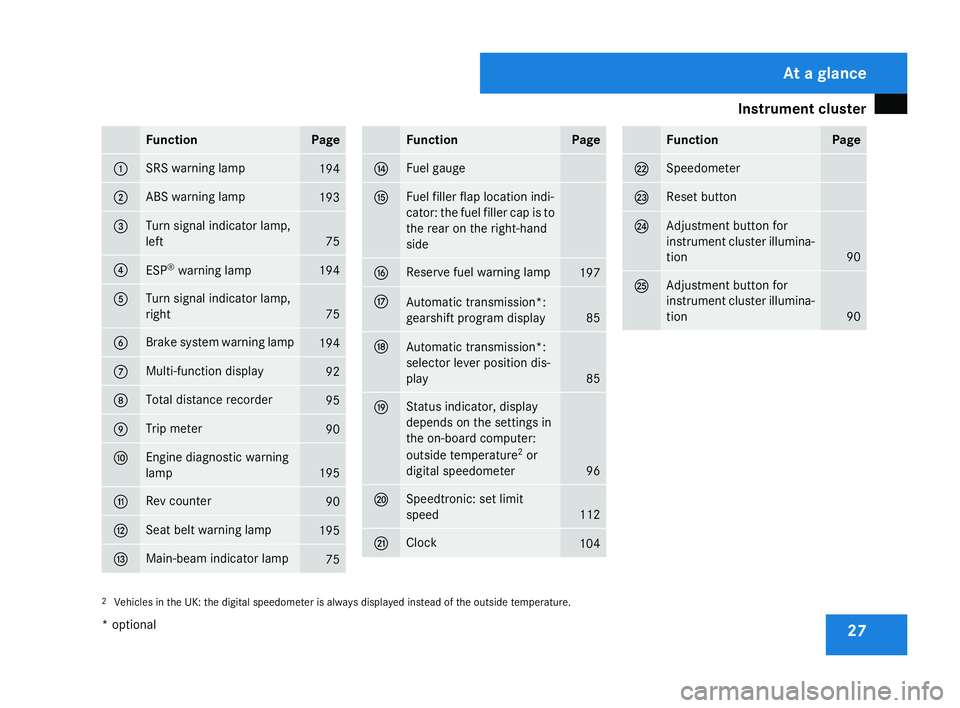
r 27Function Page
1 SRS warning lamp
194
2 ABS warning lamp
193
3 Turn signal indicator lamp,
left
75
4
ESP
®
warning lamp 19
4 5 Turn signal indicator lamp,
right
75
6 Brake system warning lamp
194
7 Multi-function display
92
8 Total distance recorder
95
9 Trip meter
90
a Engine diagnostic warning
lamp
195
b Rev counter
90
c Seat belt warning lamp
195
d Main-beam indicator lamp
75 Function Page
e Fuel gaug
e f Fuel filler flap location indi
-
cator: the fuel filler cap is to
the rear on the right-hand
sid e g Reserve fuel warning lamp
19
7 h
Automatic transmission*
:
gearshift program display 85
j
Automatic transmission*
:
selector lever position dis-
play 85
k Status indicator, display
depends on the settings in
the on-board computer:
outside temperature
2
or
digital speedometer 96
l Speedtronic: set limit
speed
112
m Cloc
k 104 Function Page
n Speedometer
o Reset button
p Adjustment button for
instrument cluster illumina
-
tio n 90
q Adjustment button for
instrument cluster illumina
-
tio n 90
2
Vehicles in the UK: the digital speedometer is always displayed instead of the outside temperature. At a glance
* optional
171_AKB; 3; 4, en-GB
vpfaff7,
2007-11-13T10:50:25+01:00 - Seite 27
Page 62 of 273
Seats
59
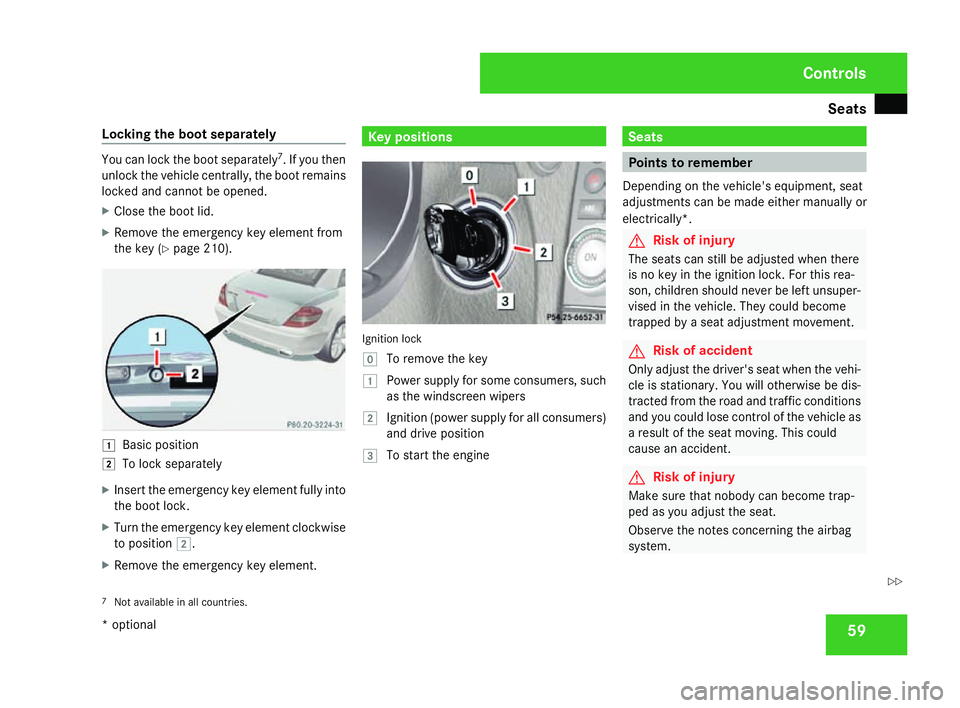
Locking the boot separately You can lock the boot separately
7
. If you then
unlock the vehicle centrally, the boot remains
locked and cannot be opened.
X Close the boot lid.
X Remove the emergency key element from
the key (Y page 210). $
Basic position
% To lock separately
X Insert the emergency key element fully into
the boot lock.
X Turn the emergency key element clockwise
to position %.
X Remove the emergency key element. Key positions
Ignition loc
k
} To remove the key
$ Power supply for some consumers, such
as the windscreen wipers
% Ignition (power supply for all consumers)
and drive positio n
& To start the engine Seats
Points to remember
Depending on the vehicle's equipment, seat
adjustments can be made either manually or
electrically*. G
Risk of injury
The seats can still be adjusted when there
is no key in the ignition lock. For this rea -
son, children should never be left unsuper-
vised in the vehicle. They could become
trapped by a seat adjustment movement. G
Risk of accident
Only adjust the driver's seat when the vehi-
cle is stationary. You will otherwise be dis-
tracted from the road and traffic conditions
and you could lose control of the vehicle as
a result of the seat moving. This could
cause an accident. G
Risk of injury
Make sure that nobody can become trap -
ped as you adjust the seat.
Observe the notes concerning the airbag
system.
7 Not available in all countries. Controls
* optional
171_AKB; 3; 4, en-GB
vpfaff7,
2007-11-13T10:50:25+01:00 - Seite 59 Z
Page 63 of 273
Seats
60 Secure children as recommended; see the
"Children in the vehicle" section.
! When you move the seats, make sure that
there are no objects in the footwell or
behind the seats. Otherwise, you could
damage the seats and the objects.
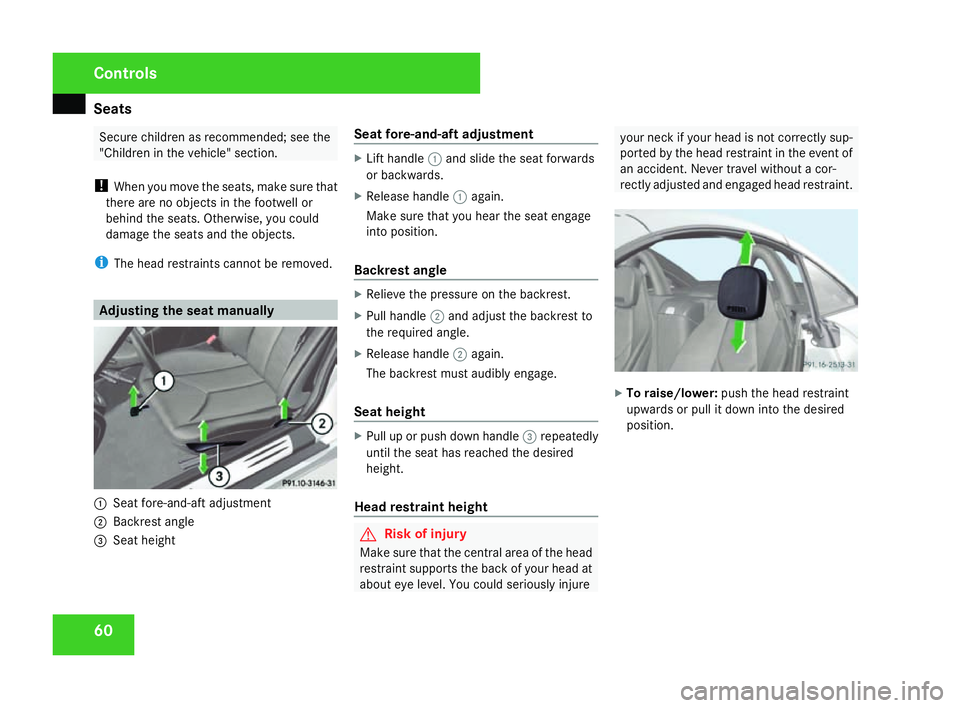
i The head restraints cannot be removed. Adjusting the seat manually
1
Seat fore-and-aft adjustment
2 Backrest angle
3 Seat height Seat fore-and-aft adjustmen
t X
Lift handle 1and slide the seat forwards
or backwards.
X Release handle 1again.
Make sure that you hear the seat engag e
into position .
Backrest angle X
Relieve the pressure on the backrest.
X Pull handle 2and adjust the backrest to
the required angle.
X Release handle 2again.
The backrest must audibly engage.
Seat height X
Pull up or push down handle 3repeatedly
until the seat has reached the desired
height.
Head restraint height G
Risk of injury
Make sure that the central area of the head
restraint supports the back of your head at
about eye level. You could seriously injure your neck if your head is not correctly sup-
ported by the head restraint in the event of
an accident. Never travel without a cor-
rectly adjusted and engaged head restraint. X
To raise/lower: push the head restraint
upwards or pull it down into the desire d
position. Controls
171_AKB; 3; 4, en-GB
vpfaff7,
2007-11-13T10:50:25+01:00 - Seite 60
Page 64 of 273
Seats
61Adjusting the seat electrically*
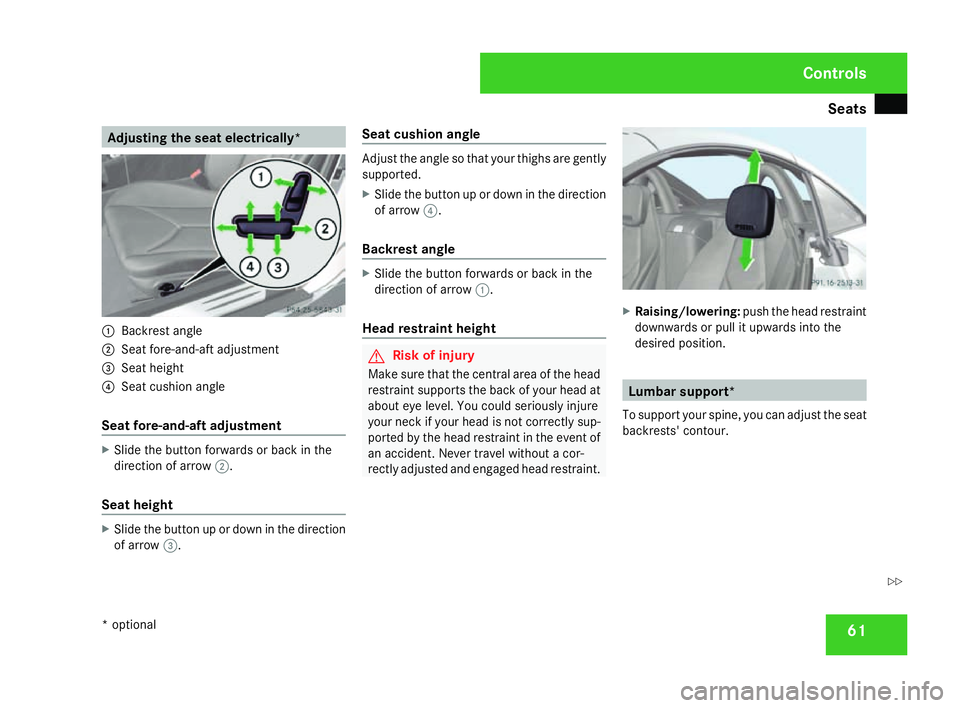
1
Backrest angle
2 Seat fore-and-aft adjustment
3 Seat height
4 Seat cushion angle
Seat fore-and-aft adjustmen tX
Slide the button forwards or back in the
direction of arrow 2.
Seat height X
Slide the button up or down in the directio n
of arrow 3. Seat cushion angle Adjust the angle so that your thighs are gently
supported.
X
Slide the button up or down in the directio n
of arrow 4.
Backrest angle X
Slide the button forwards or back in the
direction of arrow 1.
Head restraint height G
Risk of injury
Make sure that the central area of the head
restraint supports the back of your head at
about eye level. You could seriously injure
your neck if your head is not correctly sup-
ported by the head restraint in the event of
an accident. Never travel without a cor-
rectly adjusted and engaged head restraint. X
Raising/lowering :push the head restraint
downwards or pull it upwards into the
desired position. Lumbar support*
To support your spine, you can adjust the seat
backrests' contour. Controls
* optional
171_AKB; 3; 4, en-GB
vpfaff7,
2007-11-13T10:50:25+01:00 - Seite 61 Z
Page 66 of 273
Steering wheel
63Seat heating*
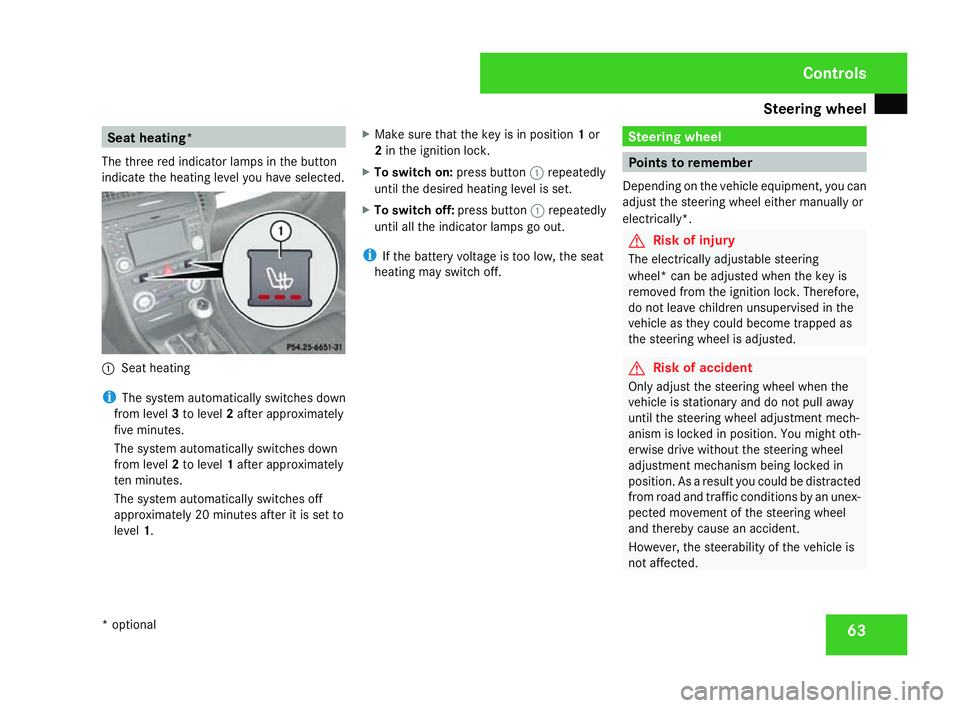
The three red indicator lamps in the button
indicate the heating level you have selected. 1
Seat heating
i The system automatically switches down
from level 3to level 2after approximately
five minutes.
The system automatically switches down
from level 2to level 1after approximately
ten minutes.
The system automatically switches off
approximately 20 minutes after it is set to
level 1. X
Make sure that the key is in position 1or
2 in the ignition lock .
X To switch on: press button1repeatedly
until the desired heating level is set.
X To switch off: press button1repeatedly
until all the indicator lamps go out.
i If the battery voltage is too low, the sea t
heating may switch off. Steering wheel
Points to remember
Depending on the vehicle equipment, you can
adjust the steering wheel either manually or
electrically*. G
Risk of injury
The electrically adjustable steering
wheel* can be adjusted when the key is
removed from the ignition lock. Therefore,
do not leave children unsupervised in the
vehicle as they could become trapped as
the steering wheel is adjusted . G
Risk of acciden
t
Only adjust the steering wheel when the
vehicle is stationary and do not pull away
until the steering wheel adjustment mech-
anism is locked in position. You might oth-
erwise drive without the steering whee l
adjustment mechanism being locked in
position. As a result you could be distracted
from road and traffic conditions by an unex -
pected movement of the steering wheel
and thereby cause an accident.
However, the steerability of the vehicle is
not affected. Controls
* optional
171_AKB; 3; 4, en-GB
vpfaff7,
2007-11-13T10:50:25+01:00 - Seite 63
Page 72 of 273
Seat belts
69Storing a parking position
To make it easier to park, you can store the
front-passenger side exterior mirror position
in such a way that you can see the rear wheel
on that side as soon as you engage reverse
gear.
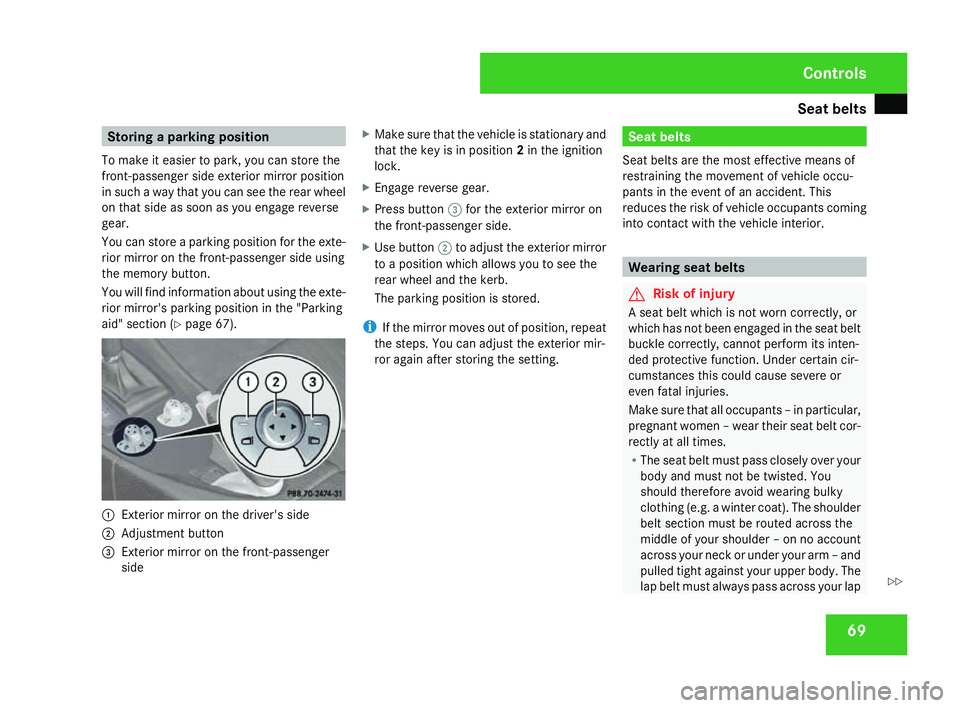
You can store a parking position for the exte-
rior mirror on the front-passenger side using
the memory button.
You will find information about using the exte-
rior mirror's parking position in the "Parkin g
aid" section (Y page 67). 1
Exterior mirror on the driver's side
2 Adjustment button
3 Exterior mirror on the front-passenge r
side X
Make sure that the vehicle is stationary and
that the key is in position 2in the ignition
lock .
X Engage reverse gear .
X Press button 3for the exterior mirror on
the front-passenger side.
X Use button 2to adjust the exterior mirro r
to a position which allows you to see the
rear wheel and the kerb.
The parking position is stored.
i If the mirror moves out of position, repeat
the steps. You can adjust the exterior mir-
ror again after storing the setting. Seat belts
Seat belts are the most effective means of
restraining the movement of vehicle occu-
pants in the event of an accident. Thi s
reduces the risk of vehicle occupants coming
into contact with the vehicle interior. Wearing seat belts
G
Risk of injury
A seat belt which is not worn correctly, or
which has not been engaged in the seat belt
buckle correctly, cannot perform its inten-
ded protective function. Under certain cir -
cumstances this could cause severe or
even fatal injuries.
Make sure that all occupants – in particular,
pregnant women – wear their seat belt cor-
rectly at all times.
R The seat belt must pass closely over your
body and must not be twisted. You
should therefore avoid wearing bulky
clothing (e.g. a winter coat). The shoulder
belt section must be routed across the
middle of your shoulder – on no account
across your neck or under your arm – and
pulled tight against your upper body. The
lap belt must always pass across your lap Controls
171_AKB; 3; 4, en-GB
vpfaff7,
2007-11-13T10:50:25+01:00 - Seite 69 Z
Page 75 of 273
Seat belts
72 G
Risk of accident
Only adjust the driver's seat when the vehi-
cle is stationary. You will otherwise be dis-
tracted from the road and traffic conditions
and you could lose control of the vehicle as
a result of the seat moving. This could
cause an accident. G
Risk of accident
Only adjust the steering wheel when the
vehicle is stationary and do not pull away
until the steering wheel adjustment mech -
anism is locked in position. You might oth-
erwise drive without the steering wheel
adjustment mechanism being locked in
position. As a result you could be distracte d
from road and traffic conditions by an unex-
pected movement of the steering wheel
and thereby cause an accident.
However, the steerability of the vehicle is
not affected .
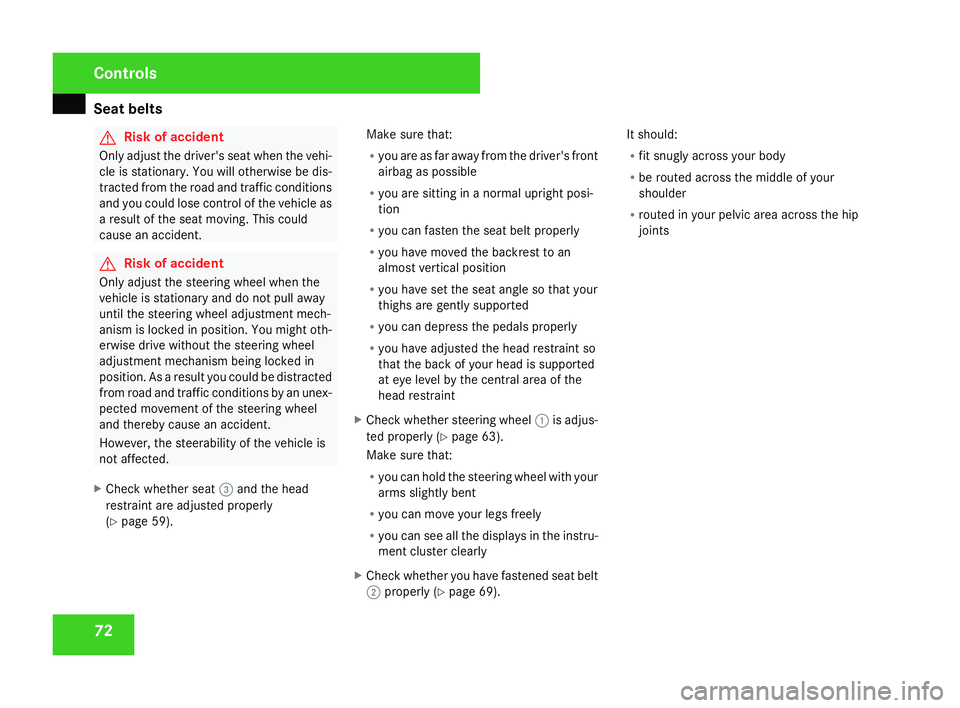
X Check whether seat 3and the head
restraint are adjusted properl y
( Y page 59). Make sure that
:
R you are as far away from the driver's fron t
airbag as possible
R you are sitting in a normal upright posi-
tion
R you can fasten the seat belt properly
R you have moved the backrest to an
almost vertical position
R you have set the seat angle so that your
thighs are gently supporte d
R you can depress the pedals properly
R you have adjusted the head restraint so
that the back of your head is supporte d
at eye level by the central area of th e
head restraint
X Check whether steering wheel 1is adjus-
ted properly (Y page 63).
Make sure that :
R you can hold the steering wheel with your
arms slightly ben t
R you can move your legs freely
R you can see all the displays in the instru-
ment cluster clearly
X Check whether you have fastened seat belt
2 properly (Y page 69). It should:
R
fit snugly across your body
R be routed across the middle of your
shoulder
R routed in your pelvic area across the hip
joints Controls
171_AKB; 3; 4, en-GB
vpfaff7,
2007-11-13T10:50:25+01:00 - Seite 72