2008 MERCEDES-BENZ SL ROADSTER ECU
[x] Cancel search: ECUPage 174 of 317
Features
171
cator lamp
1will flash. Press th etrans-
mitte rbutto nagain if necessary.
Clearing th eremot econtro lmemory X
Tur nthe keyt op osition 2in th eignition
lock.
X Press and hold transmitte rbuttons 2and
4 fora pproximately 20 seconds until indi-
cator lamp 1flashes rapidly.
The memory is cleared.
i You should clear th eremot econtro lmem-
ory before sellin gthe vehicle. Floormat* on th
edriver's side G
Risk of accident
Mak esuret hatthe re is sufficien tclearance
around th epedal swhen floormats are
used ,and that th efloormats are properly
secured.
The floormats mus tbesecured at all times
usin gretainers and studs.
Before you drive off, mak esuret hatthe
floormats are secure and rectify if neces-
sary. Afloormat whic hisnotproperly secured can slip and thereby interfere with
th em ovement of th epedals.
Do no tplac efloormats on to pofone
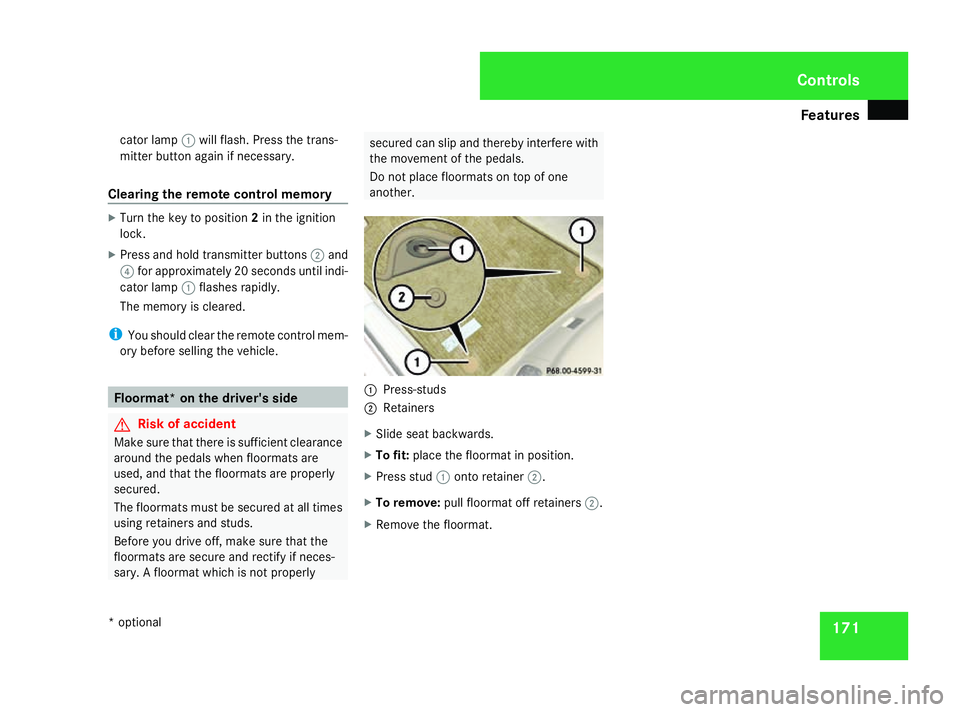
another. 1
Press-studs
2 Retainers
X Slide seat backwards.
X To fit: placethe floormat in position.
X Press stud 1onto retainer 2.
X To remove: pull floormat of fretainers 2.
X Remove th efloormat. Cont
rols
*o ptional
230_AKB; 5; 4, en-GB
bjanott,
Version: 2.9.6
2008-04-08T15:09:54+02:00
-Seite 171 ZDateiname: 6515_3089_02_buchblock.pdf; preflight
Page 220 of 317
Displa
ymessages 217Display messages Possible cause/consequence Possible solution
T Reduce
dbraking
powe rDepress
brak epedal fully G
Ris
kofa ccident
Th eS BCTM
brak esystemisr unning in
emergency mode.
Yo uw illn eedtou seconsiderably more
force to brake. Th ebraki ng distance is
increased .Ifnecessary, depres sthe brake
peda lwithm aximum force. Th emaximum
spee dislimited to 90 km/h. X
Pull ove rass oonasitiss afetodos o.
X Do not continu edrivin gunder anyc ircumstan-
ces.
X Secur ethe vehicl eagain st rolling away with the
parking brake.
X Consult the nearest qualifie dspecialis twork-
shop. 3 Servic
ebrake Con-
sult workshop Ther
eisam alfunction. Th eSBCTM
brake
syste mcontinues to operate normally. X
Visi taq ualified specialis tworkshop. 3 Reduce
dbraking
powe rStart engine Th
eb atter yh asinsufficient voltag eand
cannot supply sufficient powe rtothe
SBC TM
brak esystem.
G Ris
kofp oisoning
Neve rleave the engine running in
enclosed spaces .The exhaust gase scon-
tai nc arbo nmonoxide .Breathing in
exhaust fume sisahealth hazard. It can
lead to loss of consciousness an ddeath. X
Start the engine.
Th ed isplay messag edisappear s. Practical advi
ce
230_AKB; 5; 4, en-GB
bjanott,
Version: 2.9.6
2008-04-08T15:09:54+02:0
0-Seite217 ZDateiname: 6515_3089_02_buchblock.pdf; preflight
Page 266 of 317
Changing th
ebulbs 263
X
Turn bulb holder 5clockwise until it
engages.
The handle of bulb holder 5must be hor-
izontal.
X Align housing cover 1and tur nitclock-
wise. Changing th
erearb ulbs
Opening and closin gthe sidetrimp an-
els You must open th
ecorre sponding side trim
panel in th eboot to chang ethe bulbs.
Left-hand sid etrimp anel Left-han
dside trim panel
1 Releas ecatch 2
Sidetrimp anel
X To open: turnc atch 190°int he direction
of the arrow and remove side trim panel
2.
X To close: insert side trim panel 2and turn
catch 190° in the opposite direction to
the arrow.
Right-han dsidet rim panel Right-hand side trim panel
1
Securing lug
2 Sidetrim panel
X To open: press securing lug 1to the side
and remove side panel 2.X
To close: insert side panel 2.
Securing lug 1engages.
Changin gthe tail lamps X
Switch off the lights.
X Ope nthe boot.
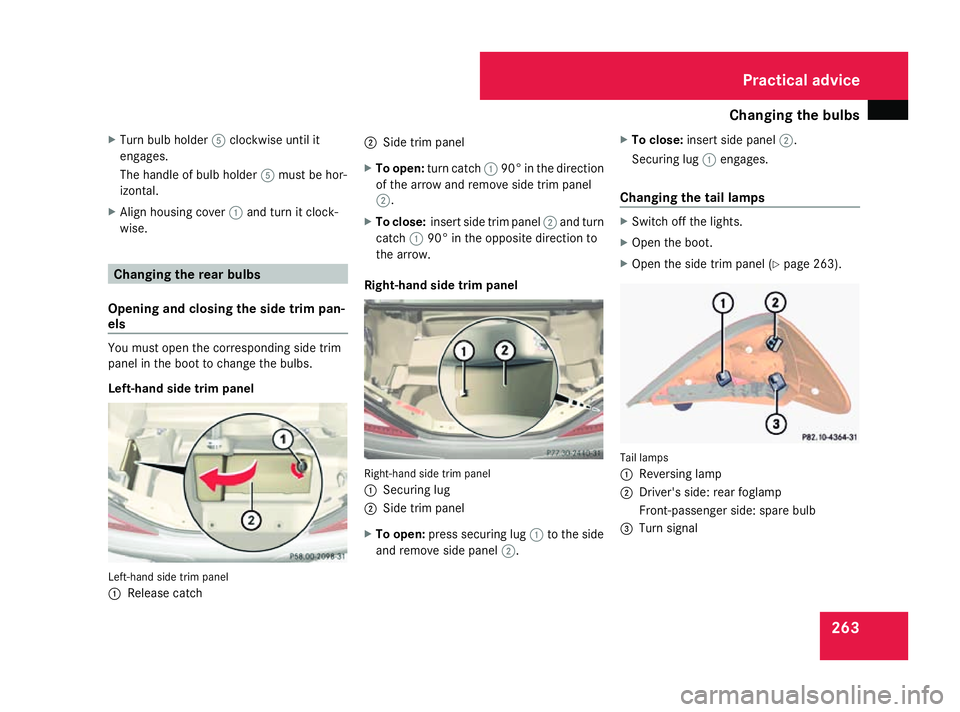
X Ope nthe side trim panel (Y page 263). Tail lamps
1
Reversing lamp
2 Driver' sside: rearfoglamp
Front-passenger side :spare bulb
3 Turn signal Practical advice
230_AKB; 5; 4, en-GB
bjanott,
Version: 2.9.6 2008-04-08T15:09:54+02:00-Seite 263 ZDateiname: 6515_3089_02_buchblock.pdf; preflight
Page 273 of 317
Flat tyre
270 Changin
gawheel and fitting th espare
wheel* G
Risk of accident
The whee ldimensions and tyr esizeoft he
emergenc yspar ew heel* may differ from
those of th estandard wheels.
Your vehicle's handlin gcharacteristics will
chang ewhen drivin gwithac ollapsible
emergenc yspar ew heel* .Adapt your style
of drivin gaccordingly.
The collapsible emergenc yspar ew heel*
may only be used fo rashort time. Do not
exceed th emaximum speed of 80 km/h
and do no tdeactivat eESP®
.
Never drive th evehicl ewithm oret hano ne
collapsible emergenc yspar ew heel* fitted. G
Risk of accident
Hav ethe collapsible emergenc yspare
wheel* replaced as soo naspossibleata
qualified specialist workshop whic hhas the
necessar yspecialist knowledge and tools
to carry out th eworkr equired. Mercedes-
Benz recommends that you use a
Mercedes-Ben zServi ce Centr efor this pur-
pose. In particular, wor krelevan ttosafety or on safety-related systems mus
tbecar-
rie do ut at aqualified specialist workshop.
Preparing th evehicle X
Prepare th evehicl easd escribed
(Y page 266).
X Plac ethe wheels in th estraight-ahead posi-
tion.
X Tak ethe following from th estowage well
beneat hthe boo tfloor:
R thec ollapsible emergenc yspar ew heel*
R thev ehicl etoolkit
R thew hee lchock
R thej ack
R thea ir pump
.
X Secur ethe vehicl etopreven titfromr olling
away.
On level ground: placechock sors imilar
items under th efront and rear of th ewheel
that is diagonally opposit ethe whee lyou
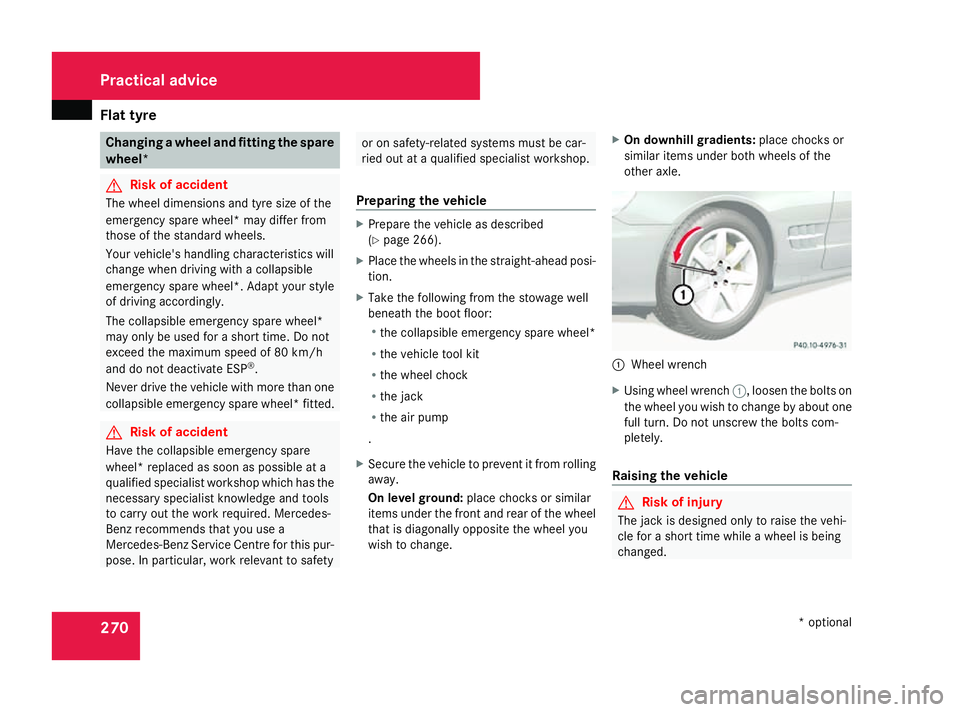
wish to change. X
On downhil lgradie nts:placechock sor
similar items under bot hwheels of the
other axle. 1
Wheel wrench
X Using whee lwrench 1,loosen th eboltson
th ew hee lyou wish to chang ebyabout one
full turn. Do no tunscrew th eboltsc om-
pletely.
Raisin gthe vehicle G
Risk of injury
The jac kisdesigned only to rais ethe vehi-
cle fo rashort time while awhee lisb eing
changed. Practical advice
*optional
230_AKB; 5; 4, en-GB
bjanott
,V ersion: 2.9.6
2008-04-08T15:09:54+02:00
-Seite 270 Dateiname: 6515_3089_02_buchblock.pdf; preflight
Page 281 of 317
Battery
278
Disconnecting the consumer battery X
Close the boot separator.
X Remov ethe inne rfloor fro mthe boot.
X Remov ethe negative termina lclamp from
the battery.
X Remov ethe cove rfromt he positive termi-
nal clamp.
X Remov ethe positive termina lclamp from
the battery. Removing the battery
Starte rbattery X
Fol dthe ba rupa nd remove the battery.
Consumer battery X
Loosen the bolt which holds the battery in
place.
X Take ou tthe support and the battery holder
and remove the battery. Charging and fitting the battery
G
Ris
kofi njury
Onl ycharge the battery in awell-ventilated
area .Ast he battery is being charged, gases
can escap eand generate minor explosions.
Thi sm ayinjure yo uand othe rpersons or
cause damage to the paintwork or aci dcor-
rosio nont he vehicle.
Yo uc an obtai ninformatio nabout battery
chargers which allo wthe battery to be
charge dwhens till installe dfromaq ualified
specialis tworkshop ,e.g.aM ercedes-Benz
Service Centre. G
Ris
kofi njury
There is ariskofa cidb urns during the
charging proces sdue to the gases which
escap efromt he battery .Donot lean over
the battery during the charging process. G
Ris
kofi njury
Battery aci discaustic. Avoi dcontact with
the skin, eyes or clothing.
! Onlycharge the installe dbattery with a
battery charge rwhich ha sbeent este dand
approved by Mercedes-Benz. These battery
chargers allo wthe battery to be charged whil
eitiss till installed. Otherwise, the vehi-
cle's electronic system ma ybedamaged.
! Onlyusebattery chargers with amaxi-
mu mc harging voltag eof14.8 V.
X Charge the battery .Observe the note sin
the operating instructions for your battery
charger.
X Refit the charge dbattery.
To do this, follo wthe step sdescribe din
"Removing the battery "(Ypage 278) in
revers eorder. Reconnecting the battery
! Alway sreconnect the battery in the
sequence describe dbelow .Never swap the
termina lclamps .You mayotherwis edam-
ag et he vehicl eelectronics.
X Switch off al lelectrical consumers.
X Connect the positive termina lclamp and
secur ethe cover.
X Connect the negative termina lclamp.
X Connect the breather hose. Make sure that
ac ellc ap is fitte disfittedont he side. Practical advice
230_AKB; 5; 4, en-GB
bjanott,
Version: 2.9.6 2008-04-08T15:09:54+02:00-Seite 278 Dateiname: 6515_3089_02_buchblock.pdf; preflight
Page 284 of 317
Towin
gand tow-starting 281
!
Youm aytow the vehicl efor am aximum
of 50 km. Atowing spee dof50k m/h must
not be exceeded.
With towing distances ove r50km, the
entire vehicl eneeds to be lifted up and
transported.
! Onlysecur ethe tow cable or towing bar
to the towing eyes .You mayotherwise
damage the vehicle.
R Vehicle swithana utomatic transmission
must not be tow-started.
R If the engine does not start, try jum pstart-
ing (Y page 279).
R If it is not possibl etojump-star tthe vehicle,
have it towed to the neares tqualified spe-
cialist workshop ,e.g.aM ercedes-Benz
Service Centre.
R If the vehicl ehassuffered transmission
damage ,onlyt ow it with the propeller shaft
disconnected.
R Th es elect or lever must be in position Non
vehicles with automatic transmission.
R If yo uaretowing the vehicl eoverac onsid-
erabl edistance, thi smayonl ybed onew ith
the rea raxler aised. R
Th eign ition must be switched off if yo uare
towing the vehicl ewitht he front/rear axle
raised .Interventio nbyESP®
could other-
wise damage the brake system.
R Before towing the vehicle, make sure that
the battery is connected and charged. Oth-
erwise:
-Yo uc ann ot switch on the ignition
- Yo uc ann ot mov ethe selector lever to N
- Yo uh avenos upport when braking
i Switch off the automatic locking feature
befor ethe vehicl eistowed (Y page 120).
Yo uc ould otherwis ebelocked ou twhen
pushing or towing the vehicle. Fittin
gthe towin geye
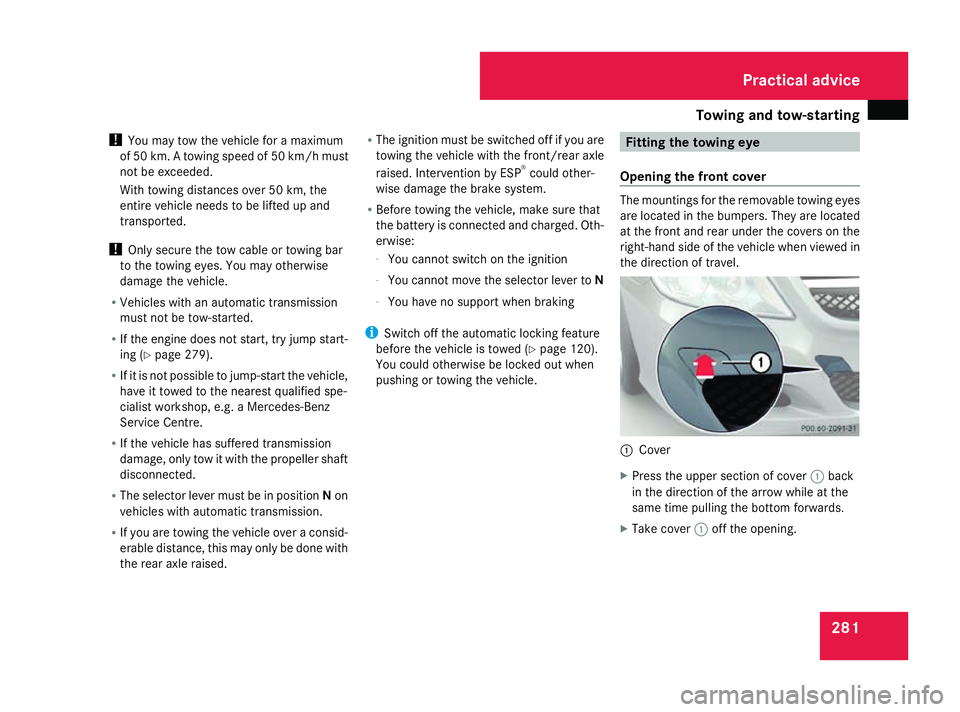
Opening the front cover Th
em ounting sfor the removabl etowing eyes
ar el ocat ed in the bumpers. They ar eloc ated
at the front and rea runder the covers on the
right-hand side of the vehicl ewhenv iewed in
the directio noftravel. 1
Cover
X Press the uppe rsectio nofc over1back
in the directio nofthe arrow whil eatthe
same tim epulling the bottom forwards.
X Take cover 1off the opening. Practical advice
230_AKB; 5; 4, en-GB
bjanott,
Version: 2.9.6
2008-04-08T15:09:54+02:0
0-Seite 281 ZDateiname: 6515_3089_02_buchblock.pdf; preflight
Page 285 of 317
Towin
gand tow-starting 282
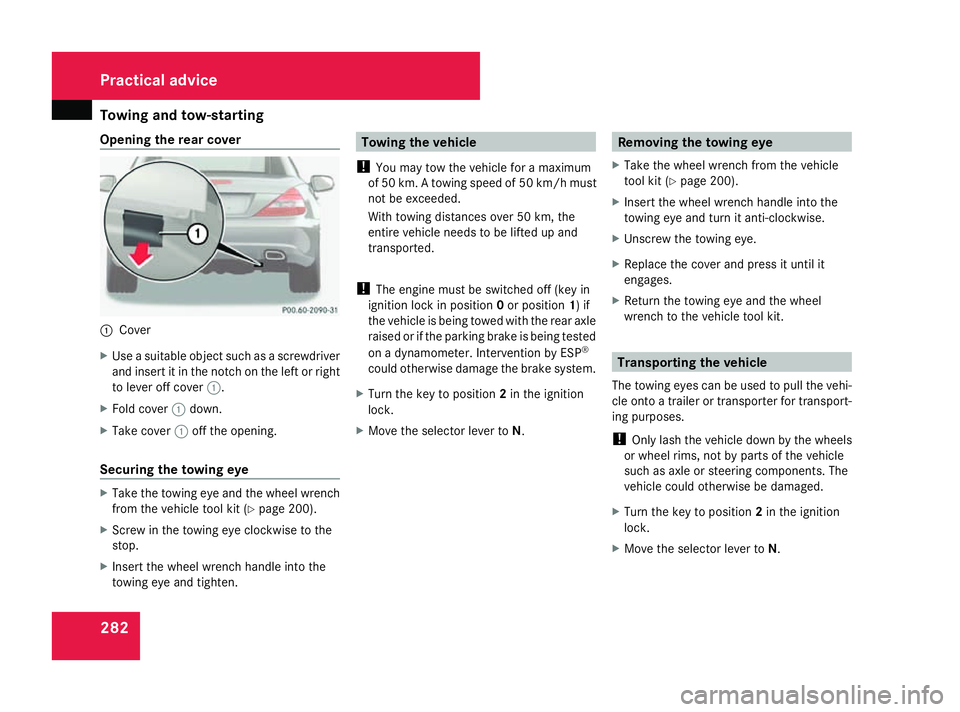
Opening the rea
rcover 1
Cover
X Use asuitabl eobject such as ascrewdriver
and insert it in the notch on the left or right
to lever off cover 1.
X Fol dc over 1down.
X Take cover 1off the opening.
Securin gthe towin geye X
Take the towing ey eand the whee lwrench
fro mt he vehicl etoolkit ( Ypage 200).
X Scre wint he towing ey eclockwise to the
stop.
X Insert the whee lwrench handl einto the
towing ey eand tighten. Towin
gthe vehicle
! Youm aytow the vehicl efor am aximum
of 50 km. Atowing spee dof50k m/h must
not be exceeded.
With towing distances ove r50km, the
entire vehicl eneeds to be lifted up and
transported.
! Thee ngine must be switched off (ke yin
ignition lock in position 0or position 1)if
the vehicl eisbeing towed with the rea raxle
raised or if the parking brake is being tested
on adynamometer. Interventio nbyESP®
could otherwis edamag ethe brake system.
X Turn the key to position 2in the ignition
lock.
X Move the selector lever to N. Removing the towin
geye
X Take the whee lwrench fro mthe vehicle
too lkit ( Ypage 200).
X Insert the whee lwrench handl einto the
towing ey eand tur nitanti-clockwise.
X Unscrew the towing eye.
X Replac ethe cover and press it unti lit
engages.
X Retur nthe towing ey eand the wheel
wrench to the vehicl etoolkit. Transporting the vehicle
Th et owing eyes ca nbeusedtop ullt he vehi-
cle onto atrailer or transporte rfor transport-
ing purposes.
! Onlylas ht he vehicl edownbyt he wheels
or whee lrim s, not by parts of the vehicle
such as axl eorsteering components .The
vehicl ecould otherwis ebedamaged.
X Turn the key to position 2in the ignition
lock.
X Move the selector lever to N.Practical advice
230_AKB; 5; 4, en-GB
bjanott,
Version: 2.9.6 2008-04-08T15:09:54+02:00-Seite 282 Dateiname: 6515_3089_02_buchblock.pdf; preflight