Page 115 of 801

114 Control systemsCOMAND satellite radioTuning in channels using the channel
list�
Select “Audio” � “Audio” � “Sat Ra-
dio” � “Sat Radio” � “Channel List”.
The channel list appears. The dotR in
front of a list entry indicates the cur-
rently selected channel.
�
Select channel by rotating ymz or
slidingqmr and press n.
Saving channels
Option 1�
Select “Audio” � “Audio” � “Sat Ra-
dio” � “Sat Radio” � “Save Channel”.
Option 2
�
Press n when the main area is select-
ed.
Option 3
�
Select “Audio” � “Audio” � “Sat Ra-
dio” � “Presets”.
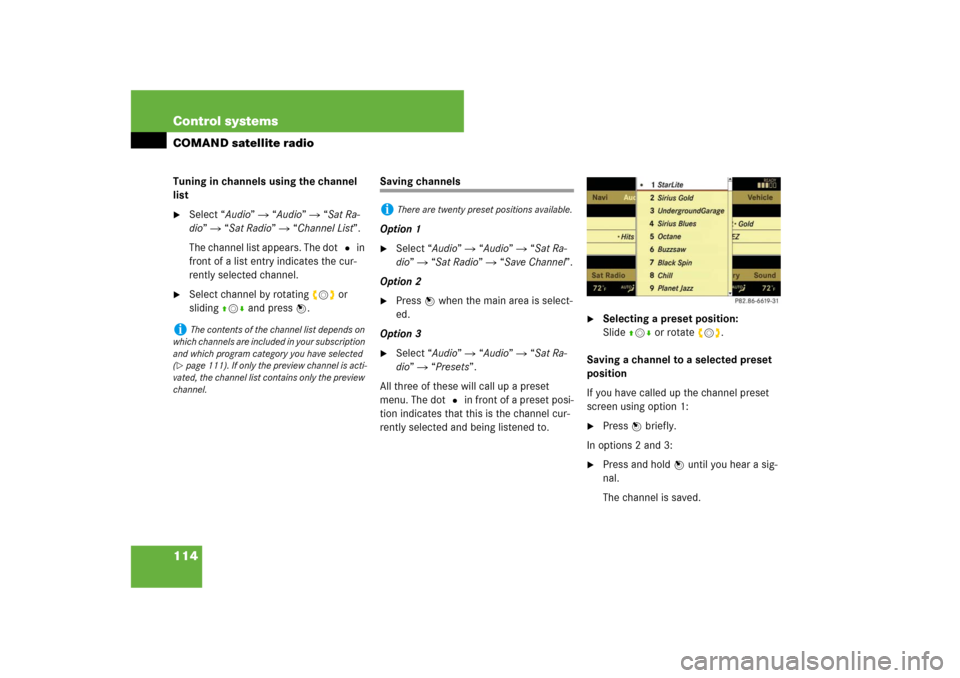
All three of these will call up a preset
menu. The dot R in front of a preset posi-
tion indicates that this is the channel cur-
rently selected and being listened to.
�
Selecting a preset position:
Slideqmr or rotate ymz.
Saving a channel to a selected preset
position
If you have called up the channel preset
screen using option 1:
�
Press n briefly.
In options 2 and 3:
�
Press and hold n until you hear a sig-
nal.
The channel is saved.
i
The contents of the channel list depends on
which channels are included in your subscription
and which program category you have selected
(
�page 111). If only the preview channel is acti-
vated, the channel list contains only the preview
channel.
i
There are twenty preset positions available.
Page 145 of 801

144 Control systemsCOMAND telephone*Activating telephone mode�
Select “Telephone” � “Telephone”.
or
�
Press s on telephone keypad.
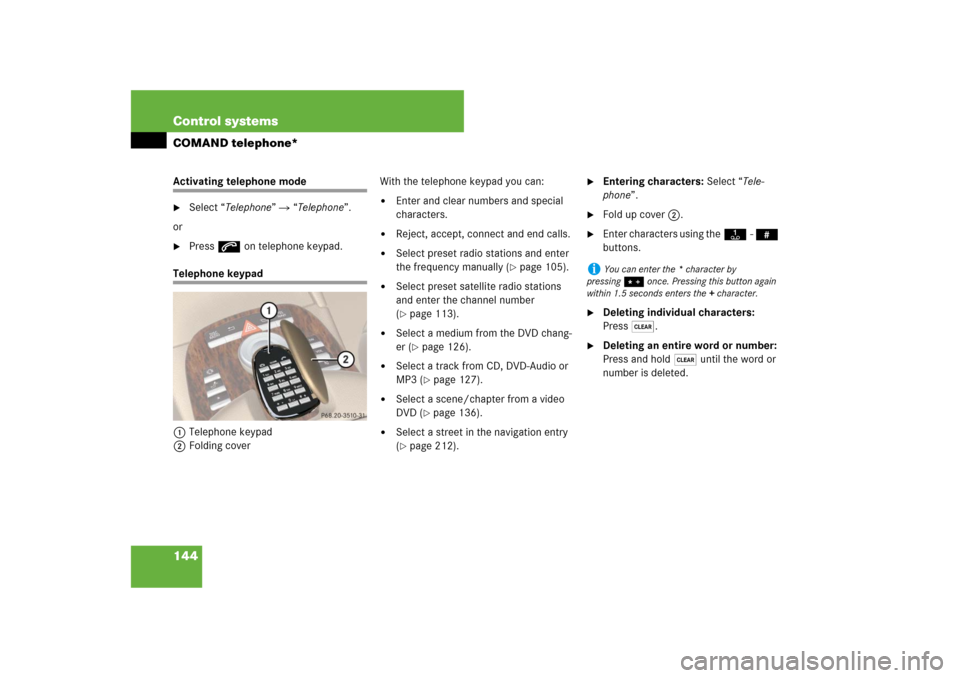
Telephone keypad
1Telephone keypad
2Folding coverWith the telephone keypad you can:
�
Enter and clear numbers and special
characters.
�
Reject, accept, connect and end calls.
�
Select preset radio stations and enter
the frequency manually (
�page 105).
�
Select preset satellite radio stations
and enter the channel number
(�page 113).
�
Select a medium from the DVD chang-
er (
�page 126).
�
Select a track from CD, DVD-Audio or
MP3 (
�page 127).
�
Select a scene/chapter from a video
DVD (
�page 136).
�
Select a street in the navigation entry
(�page 212).
�
Entering characters: Select “Tele-
phone”.
�
Fold up cover 2.
�
Enter characters using theA- #
buttons.
�
Deleting individual characters:
Press*.
�
Deleting an entire word or number:
Press and hold * until the word or
number is deleted.
i
You can enter the * character by
pressing> once. Pressing this button again
within 1.5 seconds enters the + character.
Page 155 of 801

154 Control systemsCOMAND telephone*Redial�
Switching screen to telephone
mode: Call up main telephone menu
(�page 149).
�
Use COMAND controller to select
“S”.
or
�
Press s on the telephone keypad
(�page 90).
The list of dialed numbers appears. The
most recently dialed number is at the
top.
�
Select desired entry.
�
Connecting a call: Press n.Placing a call to a call list entry or
COMAND phone book entry
�
Call up a call list and select an entry
(�page 150).
or
�
Call up COMAND phone book and se-
lect an entry (
�page 158).
�
Connecting a call: Press n.Speed dialing
You can save telephone numbers in the
speed-dial preset locations on the mobile
phone and call up the speed-dial presets
(see mobile phone operating instructions).
You can also call up speed-dial numbers
using COMAND.
Calling up speed-dial presets using the
COMAND controller
�
Switching screen to telephone
mode: Call up main telephone menu
(�page 149).
�
Entering number of a speed-dial pre-
set: Select all the digits in sequence.�
Deleting individual digits:
Select) and briefly press n.
i
If the list of dialed calls contains no entries,
the “S” menu item cannot be selected and the
s button on the telephone keypad does not
function.
i
By default, the mailbox number is preset in
the speed dial memory unless you have modified
it. For more information on the mailbox
(
�page 149).
i
Operation during call connection depends
on the speed-dial preset position called up.
Page 226 of 801

225 Control systems
COMAND navigation system (entering a destination)
Entering a destination from the list of last destinations�
Select “Navi” � “Destination” �
“From Last Destinations”.
The list of last destinations appears.
The most recent destination is at the
top of the list.
�
Select desired destination.
�
Starting route calculation:
Select “Start”, see also (
�page 222).
Entering a destination from the map
Calling up the map�
In the address input menu, select
“Map” (
�page 202).
You will see the map with a crosshair.
The map is set to the address set in the
address input menu.
or
�
Select “Navi” � “Destination” �
“Via Map”.
You will see the map with a crosshair.1Crosshair
2Details of the crosshair position
3Map scale
i
Depending on the factory settings of the ve-
hicle, it may not be possible to enter a destina-
tion while the vehicle exceeds a preset speed. As
soon as the vehicles speed drops to below the
preset speed, the function is available again.
You can enter a destination via the map if the dig-
ital map does not contain the address of the des-
tination, but the destination must be within the
area of the digital map.
i
Display 2 may be the name of a road, for
example, provided the digital map contains the
necessary data.
If no data is available, display 2 shows:
�
the coordinates if the geo-coordinate display
is switched on (
�page 200)
�
no display if the geo-coordinate display is
switched off (
�page 200)
Page 260 of 801

259 Control systems
COMAND system settings
�COMAND system settings
System settings menu overviewDisplay settings
Switching the display on or off�
Switching off: Select “Vehicle” �
“Display OFF”.
�
Switching back on: Rotate ymz or
slideqmr.Setting the display design
�
Select “Vehicle” � “System Settings”
� “Display”.
�
Select “Day Mode”, “Night Mode” or
“Automatic”.
Time settings
Setting the time�
Select “Vehicle” � “System Settings”
� “Time” � “Time”.
�
Selecting hour or minute(s):
Slideomp.
i
The components and operating principles of
COMAND can be found on (
�page 87).
Display
(�page 259)
Time
(�page 259)
Voice Control
(�page 261)
Language
(�page 262)
Favorite
(�page 263)
Reset
(�page 259)
Display settings
Time settings
Voice Control set-
tings
Language settings
Assign favorite but-
ton
Reset COMAND to
factory settings
i
In the “Automatic” setting, COMAND ana-
lyzes the automatic vehicle light sensor and
switches between the display design automati-
cally.
i
The correct time must be set for the follow-
ing navigation system functions to operate cor-
rectly:
�
Route guidance on routes with time-depen-
dent traffic guidance
�
Calculation of estimated arrival time
��
Page 264 of 801

263 Control systems
COMAND system settings
Assigning the favorite button
1Favorite button
You can assign the following predefined
functions to the favorite buttonP:�
“Rear Window Sunshade” (
�page 535)
You can use the favorite button to ex-
tend or retract the rear window sun-
shade. This is the default setting.
�
“Display OFF” (
�page 259)
You can use the favorite button to
switch the COMAND display on or off.
�
“Repeat Navigation Command”
(�page 243)You can use the favorite button to re-
call the last announcement issued by
the navigation system.
�
Select “Vehicle” � “System Settings”
� “Favorite”.
The list of predefined functions appears.
The dot R in front of the list entry indi-
cates the current setting.
�
Changing setting: Rotate ymz and
select desired function.
�
Saving setting and exit the menu:
Press n.
Reset�
Select “Vehicle” � “System Settings”
� “Reset”.
A prompt appears asking whether you
really want to reset.
�
Select “Yes” or “No”.
If you select “Yes” another prompt will
appear asking whether you really want
to reset.
�
Select “Yes” or “No”.
If you select “Yes”, COMAND will be re-
set and restarted.
i
You can reset COMAND back to its factory
settings.
In this case, all personal data (e.g. address book
entries, entries in the destination memory and
the list of last destinations of the navigation sys-
tem), among other things, is deleted.
Page 290 of 801
289 Control systems
Instrument cluster control system
Menus
Trip (
�page 291)
Navi (
�page 292)
Audio (
�page 294)
AMG
1 (�page 296)
1S63AMG and S65AMG only.Commands/submenusStandard display
Showing route guidance in-
structions, current direction
traveled
Selecting radio station
Gear currently engaged
Engine oil temperature
Vehicle supply voltage
Fuel consumption statistics since start
Selecting satellite radio
channel
RACETIMER
Fuel consumption statistics since last
reset
Operating DVD changer/
audio CD/ audio DVD/MP3
Overall analysis
Resetting fuel consumption statistics
Operating video DVD
Lap analysis
Distance to emptyDigital speedometer
Page 292 of 801

291 Control systems
Instrument cluster control system
Trip menu
In the “Trip” menu, you can show an addi-
tional display for the speedometer and call
up or reset your vehicle’s statistical data.
Standard display
In the standard display, the trip odometer
and main odometer are shown in the mul-
tifunction display.�
Press ( or & to select the “Trip”
menu.
1Main odometer
2Trip odometerFuel consumption statistics since start
�
Press ( or & to select the “Trip”
menu.
�
Press % to select “From Start”.
1Distance driven since start
2Time elapsed since start
3Average speed since start
4Average fuel consumption since startFuel consumption statistics since last
reset
�
Press ( or & to select the “Trip”
menu.
�
Press % or $ to select “Since
Reset”.
1Distance driven since last reset
2Time elapsed since last reset
3Average fuel consumption since last re-
set
4Average speed since last reset
i
The menu overview can be found on
(
�page 289).
i
All values that are based on the last start are
reset when you turn off the vehicle’s engine for
more than four hours (
�page 424).
i
If you turn the SmartKey to position1 or2
again during this time, the values will not be re-
set. After 9 999 hours or 99 999 miles (kilome-
ters), the fuel consumption statistics since start
are automatically reset.
i
After 9 999 hours or 99 999 miles (kilome-
ters), the fuel consumption statistics since last
reset are automatically reset.