Page 26 of 569
25 At a glance
Cockpit
ItemPage
1Cruise control lever258
2Instrument cluster26
3Multifunction steering
wheel30
4Horn
5Steering wheel gearshift
buttons201
6Gear selector lever for
automatic transmission53
7Front Parktronic* warning
indicators283
8Overhead control panel33
9Glove box release
Glove box lock304
305
ItemPage
aGlove box
CD changer*
AUX-socket304
304
304
bCenter console31
cPower outlet314
dStarter switch39
eSteering wheel adjustment,
manual46
fSteering wheel adjustment,
electrical*47
Heated steering wheel*318
gHood lock release356
hParking brake release56
ItemPage
jParking brake pedal65
kDoor control panel36
lExterior lamp switch143
mCombination switch
�High beam58
�Turn signals59
�Windshield wipers59
�Rear window wiper61
Page 334 of 569

333 Controls in detail
Useful features
Reprogramming a single signal
transmitter button
To program a device using a signal trans-
mitter button previously trained, follow
these steps:
�Switch on the ignition (�page 39).
�Press and hold the desired signal
transmitter button (2, 3 or4).
Do not release the button.
�Indicator lamp1 will begin to flash
after 20 seconds. Without releasing
the signal transmitter button, proceed
with programming starting with step 3.Operation of integrated remote control
�Switch on the ignition (�page 39).
�Select and press the appropriate
integrated signal transmitter
button (2, 3 or4) to activate the
remote controlled device.
The integrated remote control trans-
mitter continues to send the signal as
long as the button is pressed – up to
20 seconds.
Erasing the integrated remote control
memory
�Switch on the ignition (�page 39).
�Simultaneously press and hold outer
signal transmitter buttons2 and 4,
for approximately 20 seconds, until the
indicator lamp1 flashes rapidly. Do
not hold for longer than 30 seconds.
The codes of all three channels are
erased.Programming tips
If you are having difficulty programming
the integrated remote control, here are
some helpful tips:
�Check the frequency of the hand-held
remote control5 (typically located on
the reverse side of the remote).
The integrated remote control is com-
patible with radio-frequency devices
operating between 280-390 MHz.
�Put a new battery in hand-held remote
control5. This will increase the likeli-
hood of the hand-held remote control
sending a faster and more accurate sig-
nal to the integrated remote control.
�While performing step 3, hold
hand-held remote control5 at differ-
ent lengths and angles from the signal
transmitter button (2, 3 or4) you
are programming.
Attempt varying angles at the distance
of 2 to 5 in (5 to 12 cm) away or the
same angle at varying distances.
iUpon completion of programming the
integrated remote control, make sure you retain
the hand-held remote control that came with the
garage door opener, gate operator or other
device. You may need it for use in other vehicles,
for future programming of an integrated
remote control, or simply for continued use as a
hand-held remote control to operate the respec-
tive device in other situations.
iIf you sell your vehicle, erase the codes of all
three channels.
Page 357 of 569

356 Operation
Engine compartment
Hood
Opening
Warning!G
Do not pull the release lever while the vehi-
cle is in motion. Otherwise the hood could
be forced open by passing air flow.
This could cause the hood to come loose
and injure you and/or others.
Warning!G
If you see flames or smoke coming from the
engine compartment, or if the coolant tem-
perature display indicates that the engine is
overheated, do not open the hood. Move
away from the vehicle and do not open the
hood until the engine has cooled.
If necessary, call the fire department.
Warning!G
You could be injured when the hood is open
– even when the engine is turned off.
Parts of the engine can become very hot. To
prevent burns, let the engine cool of com-
pletely before touching any components on
the vehicle. Comply with all relevant safety
precautions.
Warning!G
To help prevent personal injury, stay clear of
moving parts when the hood is open and the
engine is running.
The radiator fan may continue to run for
approximately 30 seconds or may even
restart after the engine has been turned off.
Stay clear of fan blades.
Warning!G
Vehicles with gasoline engine:
The engine is equipped with a transistor-
ized ignition system. Because of the high
voltage it is dangerous to touch any compo-
nents (ignition coils, spark plug sockets,
diagnostic socket) of the ignition system
�with the engine running
�while starting the engine
�if ignition is “on” and the engine is
turned manually
Page 358 of 569
357 Operation
Engine compartment
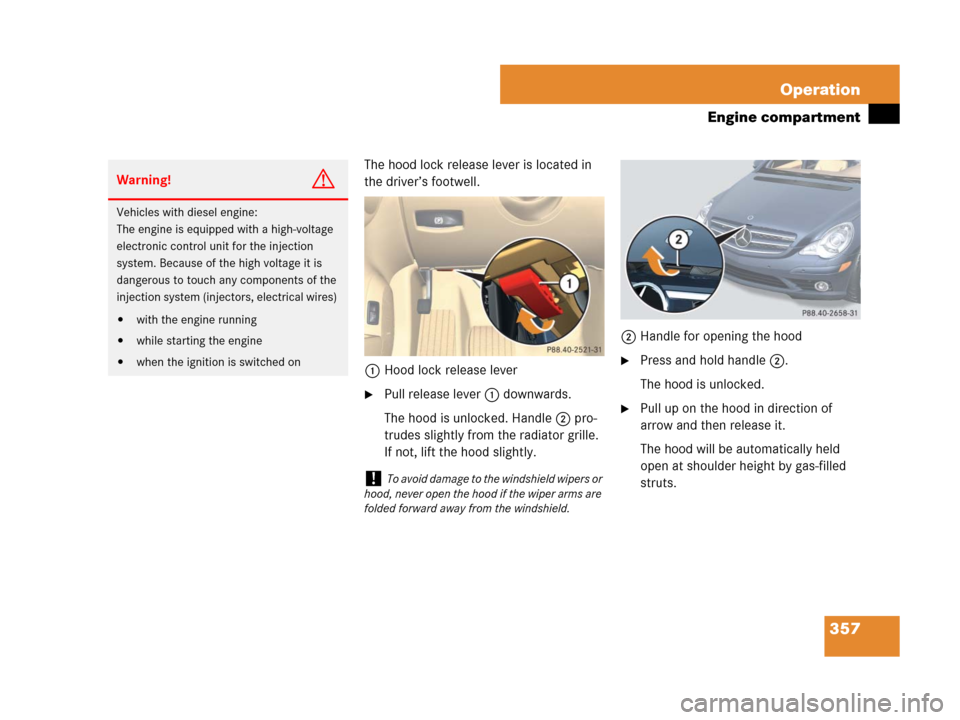
The hood lock release lever is located in
the driver’s footwell.
1Hood lock release lever
�Pull release lever1 downwards.
The hood is unlocked. Handle2 pro-
trudes slightly from the radiator grille.
If not, lift the hood slightly.2Handle for opening the hood
�Press and hold handle2.
The hood is unlocked.
�Pull up on the hood in direction of
arrow and then release it.
The hood will be automatically held
open at shoulder height by gas-filled
struts.
Warning!G
Vehicles with diesel engine:
The engine is equipped with a high-voltage
electronic control unit for the injection
system. Because of the high voltage it is
dangerous to touch any components of the
injection system (injectors, electrical wires)
�with the engine running
�while starting the engine
�when the ignition is switched on
!To avoid damage to the windshield wipers or
hood, never open the hood if the wiper arms are
folded forward away from the windshield.
Page 490 of 569

489 Practical hints
Replacing wiper blades
�Replacing wiper blades
Front wiper blades
�Remove the SmartKey from the starter
switch.
Vehicles with KEYLESS-GO*:
�Make sure the vehicle’s on-board
electronics have status0
(
�page 41).Removing
�Fold the wiper arms forward until they
engage.
1Wiper blade
2Tab
3Wiper arm
�Press tabs2 together.
�Tilt wiper blade 1 away from wiper
arm 3.
�Take off wiper blade 1 in direction of
arrow.
Warning!G
For safety reasons, switch off wipers and
remove SmartKey from starter switch
(vehicles with KEYLESS-GO*: Make sure
the vehicle’s on-board electronics have
status0) before replacing a wiper blade.
Otherwise the motor could suddenly turn on
and cause injury.
Warning!G
Wiper blades are components that are
subject to wear and tear. Replace the wiper
blades twice a year, preferably in the spring
and fall. Otherwise the windows will not be
properly wiped. As a result, you may not
be able to observe surrounding traffic condi-
tions and could cause an accident.
!Never open the hood when the wiper arms
are folded forward.
Hold on to the wiper when folding the wiper arm
back. If released, the force of the impact from
the tensioning spring could crack the windshield.
Do not allow the wiper arms to contact the wind-
shield glass without a wiper blade inserted.
For your convenience, we recommend that you
have this work carried out by an authorized
Mercedes-Benz Light Truck Center.!Do not pull on the wiper blade inserts. They
could tear.
Page 520 of 569
519 Practical hints
Fuses
Fuse box in engine compartment
The main fuse box is located on the pas-
senger side of the engine compartment.
�Open the hood (�page 356).
1Clamp
2Main fuse box cover
�Release clamp1.
�Lift fuse box cover2 up.
�Install fuse box cover in reverse order.
�Close the hood after checking or re-
placing fuses (
�page 358).
Fuse box in cargo compartment
The fuse box is located under the cargo
compartment cover on the right-hand side
of the spare wheel well.
�Open the tailgate (�page 119).
�Lift the cargo compartment cover
(
�page 467).
�Secure cargo compartment cover with
securing hook (
�page 468).
1Cover
�Fold cover1 to the left as indicated by
the arrow.
!The fuse box cover must be installed
properly to prevent moisture and/or dirt from
entering the fuse box and possibly impairing fuse
operation.