Page 468 of 569
467 Practical hints
Where will I find ...?
�Where will I find ...?
First aid kit
The first aid kit is stored under the cargo
compartment floor, see “Vehicle tool kit”
(
�page 467).
Vehicle tool kit
The vehicle tool kit is stored under the
cargo compartment floor.
The vehicle tool kit includes:
�Towing eye bolt
�Wheel wrench
�Alignment bolt
�Vehicle jack
�Fuse chart
�Collapsible wheel chock
�Wheel bolts for spare wheel
(if applicable, see “Mounting the spare
wheel” (
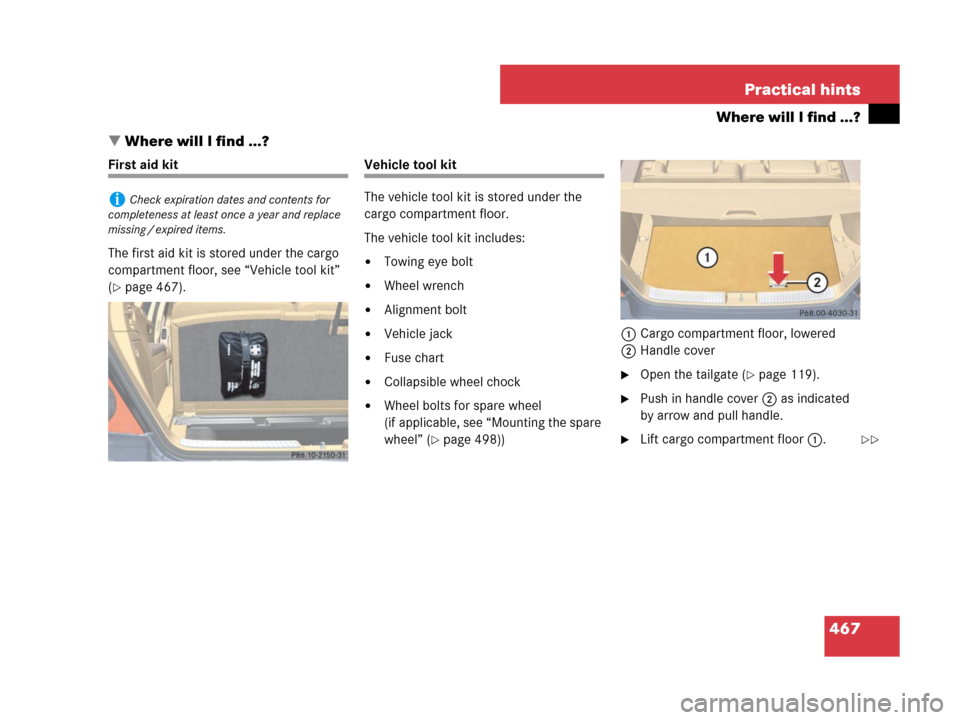
�page 498))1Cargo compartment floor, lowered
2Handle cover
�Open the tailgate (�page 119).
�Push in handle cover2 as indicated
by arrow and pull handle.
�Lift cargo compartment floor 1.
iCheck expiration dates and contents for
completeness at least once a year and replace
missing / expired items.
��
Page 470 of 569

1Wheel wrench
2Electric air pump
3Mounting direction indicator")
469 Practical hints
Where will I find ...?
Vehicle tool kit storage well casing
Example illustration1
(vehicles with scissors-type jack)
1Wheel wrench
2Electric air pump
3Mounting direction indicator
4Fuse chart
5Hook and loop fastener
6Alignment bolt
7Collapsible wheel chock
8Towing eye bolt
9Spare wheel (collapsible tire)
aSpare wheel bolts
bVehicle tool kit storage well casing
cReversible ratchet
(comes with scissors-type jack only)
dJack
�To remove jackd, loosen hook and
loop fastener 5.
�To remove the vehicle tool kit storage
well casing, proceed as described
on (
�page 472).Vehicle jack
The vehicle jack is located underneath the
storage compartment floor.�Remove vehicle jack from its storage
compartment (
�page 467).
1Appearance and alignment of the items may vary.
Warning!G
Only use the jack supplied with your vehicle
to lift the vehicle briefly for wheel changes.
If you use the jack for any other purpose,
you or others could be inju re d, as the j ac k is
designed only for the purpose of changing a
wheel.
When using the jack, observe the safety
notes in the “Mounting the spare wheel”
section (
�page 493) and the notes on the
jack.
Page 514 of 569

513 Practical hints
Towing the vehicle
�Towing the vehicle
Mercedes-Benz recommends that the
vehicle be transported with all wheels off
the ground using flatbed or appropriate
wheel lift/dolly equipment. This method is
preferable to other types of towing.If circumstances do not permit the recom-
mended towing methods, the vehicle may
be towed with all wheels on the ground
only so far as necessary to have the vehicle
moved to a safe location where the recom-
mended towing methods can be employed.
When towing the vehicle with all wheels on
the ground, the vehicle may be towed only
for distances up to 30 miles (50 km) and at
a speed not to exceed 30 mph (50 km/h).
!Do not tow-start the vehicle.
!Use flatbed or wheel lift/dolly equipment,
with the SmartKey in starter switch turned to
position0.
Do not tow with sling-type equipment. Towing
with sling-type equipment over bumpy roads will
damage radiator and supports.
To prevent damage during transport, do not tie
down vehicle by its chassis or suspension parts.
Use the towing eyes.
Switch off the ESP
® (�page 104) and the
automatic central locking (
�page 126).
!Do not tow with one axle raised. Doing so
could damage the transfer case, which is not
covered by the Mercedes-Benz Limited
Warranty.
All wheels must be on or off the ground. Observe
instructions for towing the vehicles with all
wheels on the ground.
Warning!G
If circumstances require towing the vehicle
with all wheels on the ground, always tow
with a tow bar if
�the engine will not run
�there is a malfunction in the brake
system
�there is a malfunction in the power
supply or in the vehicle’s electrical
system
as that will be necessary to adequately
control the vehicle.
Prior to towing the vehicle with all wheels on
the ground, make sure the automatic trans-
mission is in neutral positionN.
Page 515 of 569

514 Practical hints
Towing the vehicle
If you want the gear position to remain in
neutral positionN, observe the following
instructions.Vehicles with SmartKey:
�With the vehicle at a standstill and the
ignition switched on, shift the
automatic transmission to neutral
positionN.
�If engaged, release the parking brake
(
�page 56).
�Switch off the ignition and leave the
SmartKey in the starter switch.
Vehicles with KEYLESS-GO*:
�With the vehicle at a standstill, depress
the brake pedal and keep it pressed.
�With the ignition switched on shift the
automatic transmission to park
positionP.
�Release the brake pedal.
Warning!G
With the engine not running, there is no
power assistance for the brake and steering
systems. In this case, it is important to keep
in mind that a considerably higher degree of
effort is necessary to brake and steer the
vehicle. Adapt your driving accordingly.
!When towing the vehicle with all wheels on
the ground, the automatic transmission must be
in neutral positionN.
If you turn off the engine
�using the SmartKey and
�remove the SmartKey from the starter
switch
or
�open a front door
�or when using the KEYLESS-GO* start/stop
button and open a front door
the automatic transmission will shift to park
positionP automatically.
Warning!G
When leaving the SmartKey or SmartKey
with KEYLESS-GO* in the starter switch, do
not leave children unattended in the vehicle.
It is possible for children to switch on the
ignition which could result in unsupervised
use of vehicle equipment.
A child’s unsupervised access to a vehicle
could result in an accident and/or serious
personal injury.
Page 516 of 569
.
�Insert the SmartKey with
KEYLESS-GO* into the starter switch.
�Switch on the i")
515 Practical hints
Towing the vehicle
�Remove the KEYLESS-GO* start/stop
button from the starter switch
(
�page 41).
�Insert the SmartKey with
KEYLESS-GO* into the starter switch.
�Switch on the ignition.
�Depress the brake pedal.
�Shift the automatic transmission to
neutral positionN.
�Release the brake pedal.
�If engaged, release the parking brake
(
�page 56).
�Switch off the ignition and leave the
SmartKey with KEYLESS-GO* in the
starter switch.
Installing towing eye bolt
Depending on whether you are towing a
vehicle or you are being towed, the towing
eye bolt can be screwed into threaded
holes which are located behind covers on
the right-hand side of each bumper.
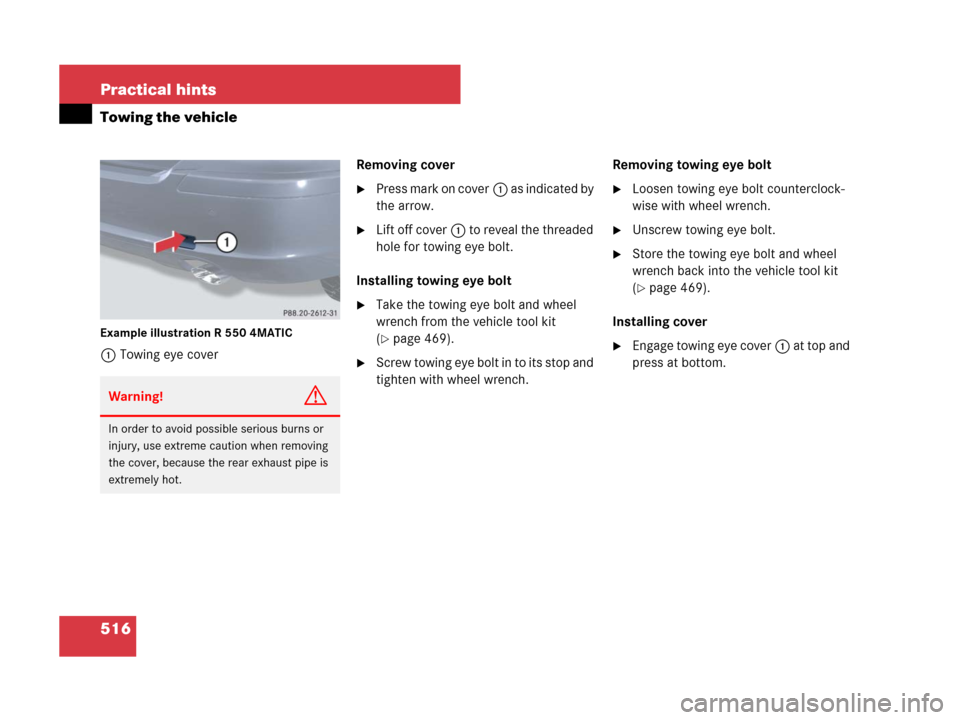
Example illustration R 550 4MATIC
1Towing eye cover
!Towing of the vehicle should only be done
using the properly installed towing eye bolt.
Never attach a tow cable, tow rope or tow rod to
the vehicle chassis, frame or suspension parts.
iTo signal turns while being towed with
hazard warning flasher in use, set the starter
switch to position2 and activate combination
switch for left or right turn signal in usual manner
– only the selected turn signal will operate.
Upon canceling the turn signal, the hazard warn-
ing flasher will operate again.
Page 517 of 569
516 Practical hints
Towing the vehicle
Example illustration R 550 4MATIC
1Towing eye coverRemoving cover
�Press mark on cover1 as indicated by
the arrow.
�Lift off cover1 to reveal the threaded
hole for towing eye bolt.
Installing towing eye bolt
�Take the towing eye bolt and wheel
wrench from the vehicle tool kit
(
�page 469).
�Screw towing eye bolt in to its stop and
tighten with wheel wrench.Removing towing eye bolt
�Loosen towing eye bolt counterclock-
wise with wheel wrench.
�Unscrew towing eye bolt.
�Store the towing eye bolt and wheel
wrench back into the vehicle tool kit
(
�page 469).
Installing cover
�Engage towing eye cover1 at top and
press at bottom.
Warning!G
In order to avoid possible serious burns or
injury, use extreme caution when removing
the cover, because the rear exhaust pipe is
extremely hot.
Page 518 of 569
517 Practical hints
Towing the vehicle
Stranded vehicle
Freeing a stranded vehicle, on which the
wheels are dug into sand or mud, should
be done with the greatest of care, espe-
cially if the vehicle is heavily loaded.
Avoid pulling the vehicle abruptly or diago-
nally, since it could result in damage to the
chassis alignment.
Never try to free a vehicle that is still cou-
pled to a trailer.
If possible, a vehicle equipped with trailer
hitch receiver should be pulled backward
in its own previously made tracks.
Page 551 of 569

550 Index
Drinking and driving 339
Driving 50
Abroad 348
Hydroplaning 344
In winter 346, 398
Instructions 50, 339
Problems 62
Safety systems 99
Systems 257
Through standing water 347
With Distronic* 273
Driving off 56
Driving safety systems
ABS 99
BAS 101
EBP 105
ESP
®101
ETS/4-ETS 103
Driving systems 257
AIRMATIC* 276
Cruise control 257
Distronic* (Canada only) 262
Parktronic* 281
Rear view camera* 285
Driving tips 197
Kickdown 197E
Easy-entry/exit feature* 128
Control system 184
EBP 105
Indicator and warning lamps 416
Electric air pump 499
Electrical fuses see Fuses
Electrical system, Technical data 533
Electronic Brake Proportioning see EBP
Electronic Stability Program see ESP
®
Electronic Traction System see ETS/4-ETS
Emergency calls
Tele Aid* 323
Emergency, In case of
Battery, Jump starting 511
First aid kit 467
Flat tire 492
Fuses 518
Hazard warning flasher 150
Instrument cluster, Indicator
lamps 414–422
Roadside Assistance 12, 325
Towing the vehicle 513Emergency operation
Locking/unlocking the vehicle 474
Remote door unlock, Tele Aid* 328
Tailgate, Opening from the
inside 120
Emergency operation (Limp-Home
Mode) 202
Emergency tensioning device see ETD
Emission control 350
Information label 525
System warranties 10
Engine
Belt layout 526
Break-in recommendations 338
Cleaning 405
Compartment 356
Malfunction indicator lamp 29, 417
Maximum engine speed 155, 527
Number 525
Starting 53
Tachometer 29, 155
Technical data 527
Turning off 66