Page 497 of 569

496 Practical hints
Flat tire
The jack take-up brackets are located
directly behind the front wheel housings
and in front of the rear wheel housings as
indicated by the arrows.Depending on production date, your vehi-
cle may be equipped with either a
screw-type vehicle jack or a scissors-type
jack, see “Vehicle jack” (
�page 469).
Screw-type jack
2Take-up bracket
3Jack
4Crank
Scissors-type jack
2Take-up bracket
3Jack
4Ratchet
�Vehicles with scissors-type jack:
Attach reversible ratchet4 to vehicle
jack in such a way that the wordUP
can be seen.
�Place jack 3 on firm ground.
�Position jack3 under take-up
bracket2 so that it is always vertical
(plumb-line) as seen from the side,
even if the vehicle is parked on an
incline.
Warning!G
The jack is designed exclusively for
jacking up the vehicle at the jack take-up
brackets. Make sure the jack arm is fully
seated in the jack take-up bracket.
If you do not position the jack correctly in
the jack take-up bracket, the vehicle can:
�fall off the jack
�seriously or fatally injure you or others
!Do not position the jack on the body of the
vehicle, as this may cause damage to the
vehicle.
Page 498 of 569
497 Practical hints
Flat tire
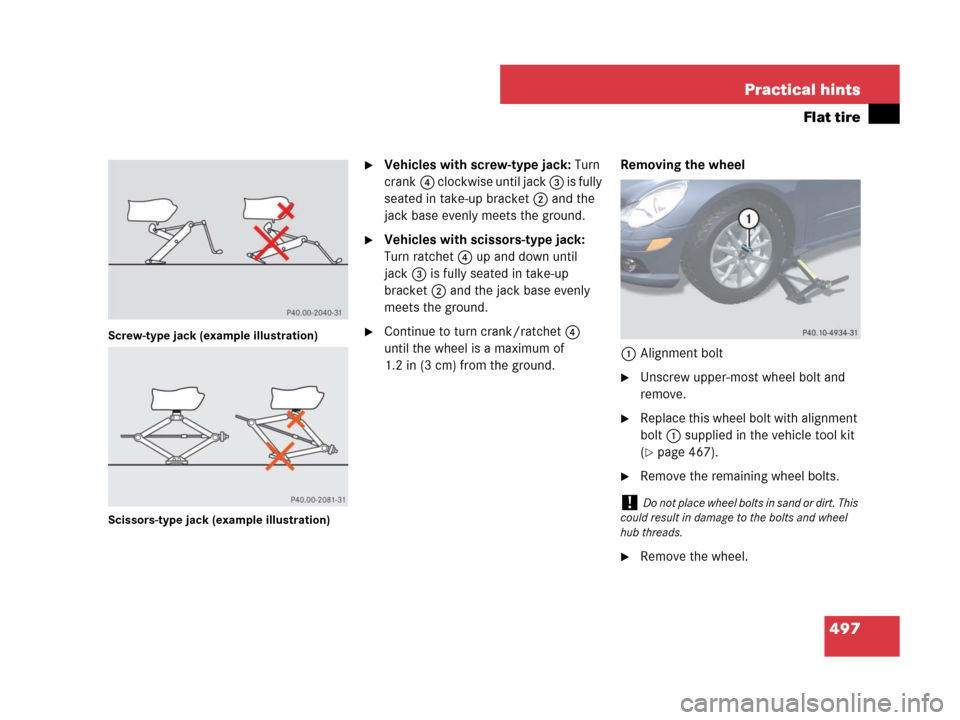
Screw-type jack (example illustration)
Scissors-type jack (example illustration)
�Vehicles with screw-type jack: Turn
crank4 clockwise until jack 3 is fully
seated in take-up bracket2 and the
jack base evenly meets the ground.
�Vehicles with scissors-type jack:
Turn ratchet 4 up and down until
jack3 is fully seated in take-up
bracket2 and the jack base evenly
meets the ground.
�Continue to turn crank/ratchet 4
until the wheel is a maximum of
1.2 in (3 cm) from the ground.Removing the wheel
1Alignment bolt
�Unscrew upper-most wheel bolt and
remove.
�Replace this wheel bolt with alignment
bolt1 supplied in the vehicle tool kit
(
�page 467).
�Remove the remaining wheel bolts.
�Remove the wheel.
!Do not place wheel bolts in sand or dirt. This
could result in damage to the bolts and wheel
hub threads.
Page 502 of 569

501 Practical hints
Flat tire
Lowering the vehicle
�Vehicles with scissors-type jack:
Attach ratchet to vehicle jack in such a
way that the wordDOWN can be seen.
�Lower the vehicle until it is resting fully
on its own weight:
�Vehicles with screw-type jack:
Turn crank counterclockwise.
�Vehicles with scissors-type jack:
Turn ratchet in directionDOWN.
�Remove the jack.1-5Wheel bolts
6Wheel wrench
�Tighten the five wheel bolts evenly,
following the diagonal sequence
illustrated (1to5), until all bolts
are tight. Observe a tightening torque
of 110 lb-ft (150 Nm).
�Store jack and all other vehicle tool kit
items back into the storage well.
Warning!G
Inflate collapsible tire only after the wheel is
properly mounted.
Inflate the collapsible tire using the electric
air pump (
�page 499) before lowering the
vehicle.
Warning!G
Have the tightening torque checked after
changing a wheel. The wheels could come
loose if they are not tightened to a torque of
110 lb-ft (150 Nm).
iThe removed road wheel cannot be stored in
the spare wheel well under the cargo compart-
ment floor, but should be transported in the
cargo compartment wrapped in a protective
wrap.
Vehicles with TPMS or Advanced TPMS*:
Do not activate the tire inflation pressure moni-
tor until a full size wheel/tire with functioning
sensor has been placed back into service on the
vehicle.
Page 548 of 569
 502
Bolts, Spare wheel 498
Bottle opener 309
Brake Assist System see BAS
Brake fluid 539
Checking 355
Messages in the multifunction
display 447
Bra")
547 Index
Bleeding the fuel system (diesel
engine) 502
Bolts, Spare wheel 498
Bottle opener 309
Brake Assist System see BAS
Brake fluid 539
Checking 355
Messages in the multifunction
display 447
Brake lamp
Cleaning lenses 407
Messages in the multifunction
display 455–460
Replacing bulbs 480
Brake pads 340
Messages in the multifunction
display 445
Brakes 340
Warning lamp 415
Break-in the vehicle 338
Bulbs, replacing see Replacing bulbsC
CAC (Customer Assistance Center) 17
California retail buyers and lessees,
Important notice for 11
Call priority, Tele Aid* 328
Can holder see Cup holder
Capacities and recommended
fuel/lubricants 536
Card holder 32, 309
Cargo compartment
Tie-down rings 290
Cargo compartment cover blind 299
Cargo net* 301
Cargo tie-down rings 290
Carpets, Cleaning 411
Catalytic converter (gasoline
engine) 349
CD changer* 167, 304
CD player 167
Center console 31
Central locking 183
Automatic 126
Locking/unlocking from the
inside 126Central locking switch 126
Certification label 524, 525
CHECK ENGINE malfunction indicator
lamp 417, 418
Checking tire pressure electronically
Advanced Tire Pressure Monitoring
System (Advanced TPMS)*, (Canada
only) 379
Tire Pressure Monitoring System
(TPMS), (USA only) 376
Child safety
Infant and child restraint systems 88
Children in the vehicle 87
Air bags 73, 89
Blocking rear door window
operation 97
Indicator lamp, Front passenger front
air bag 81
Infant and child restraint
systems 91, 92
LATCH-type child seat anchors 91
Occupant Classification System
(OCS) 77
Cigarette lighter 313
Page 558 of 569

557 Index
Multifunction display
messages 427–466
ABS 429, 436
AIRMATIC* 465
Brake fluid 447
Brake pads 445
Coolant 448–450
Cruise control 430
Doors 452
EBP 446
Engine coolant 448–450
ESP
®435, 436
Fog lamps, Front 456
Fog lamps, Rear 458
Front passenger front air
bag 438–441
Fuel cap 452
Gear selector lever 437
Headlamps 455–460
Hood 452
Key, SmartKey 454
Key, SmartKey with
KEYLESS-GO* 453, 454Lamps 457
Lamps, exterior 455
Low tire pressure 442, 462, 463
Parking brake 446
Parking lamps 458
SmartKey with KEYLESS-GO* 453
SRS 437
Tele Aid* 461
Telephone* 461
Windshield washer fluid 461
Multifunction steering wheel 30, 158
Button operation 158
N
Navigation system* 167
See separate COMAND system
operating instructions
Net, Cargo* 301
Net, Parcel 307
Neutral gear position, Automatic
transmission 190, 194
New vehicle, Break-in period 338
Night security illumination 146, 179
Normal occupant weight 395
Number, Vehicle Identification
(VIN) 524, 525O
Occupant Classification System see OCS
Occupant distribution 395
Occupant safety 70
Active head restraint 86
Air bags 72
Children and air bags 73, 89
Children in the vehicle 87
Fastening the seat belts 50
Front passenger front air bag off
indicator lamp 77, 81, 82
Infant and child restraint systems 88
LATCH-type child seat anchors 91
OCS 77
OCS, Messages in the multifunction
display 438–441
Seat belts 50, 74
OCS 77
Messages in the multifunction
display 438
Self-test 82