Page 47 of 569

46 Getting started
Adjusting
Raising:
�Manually adjust the height of head
restraint 1 by pulling it upward.
If head restraint 1 is fully retracted,
push release button 2 in direction of
arrow and pull head restraint 1
upward.
Lowering:
�To lower head restraint 1, press
release button 2 in direction of arrow
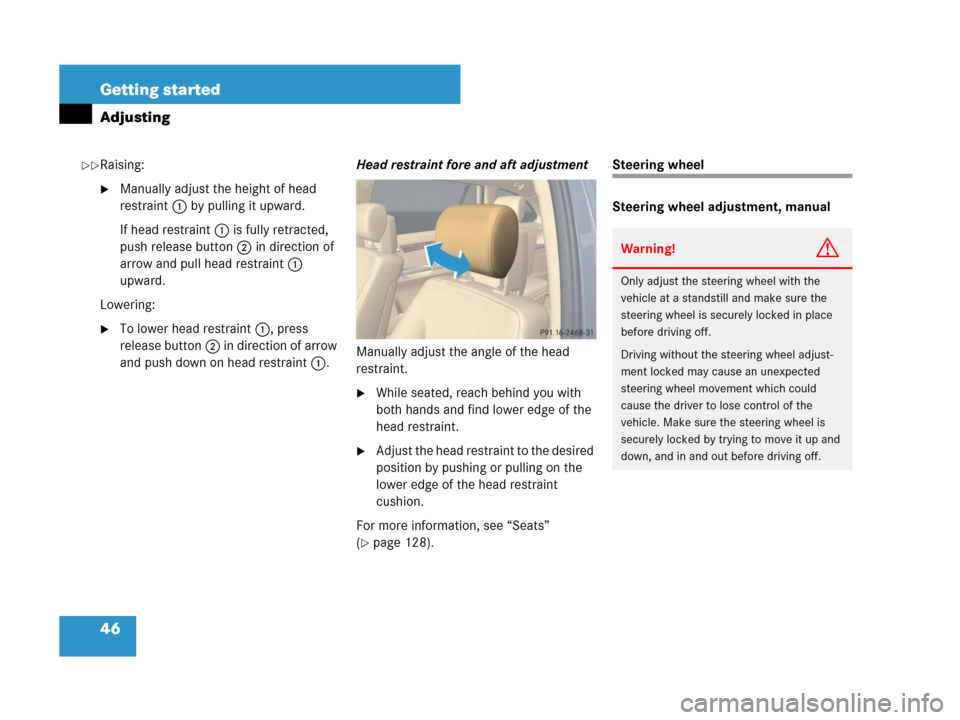
and push down on head restraint 1.Head restraint fore and aft adjustment
Manually adjust the angle of the head
restraint.
�While seated, reach behind you with
both hands and find lower edge of the
head restraint.
�Adjust the head restraint to the desired
position by pushing or pulling on the
lower edge of the head restraint
cushion.
For more information, see “Seats”
(
�page 128).
Steering wheel
Steering wheel adjustment, manual
Warning!G
Only adjust the steering wheel with the
vehicle at a standstill and make sure the
steering wheel is securely locked in place
before driving off.
Driving without the steering wheel adjust-
ment locked may cause an unexpected
steering wheel movement which could
cause the driver to lose control of the
vehicle. Make sure the steering wheel is
securely locked by trying to move it up and
down, and in and out before driving off.
��
Page 48 of 569

47 Getting started
Adjusting
Make sure that
�you can reach the steering wheel with
your arms slightly bent at the elbows
�you can move your legs freely
�all displays (including malfunction and
indicator lamps) on the instrument
cluster are clearly visible
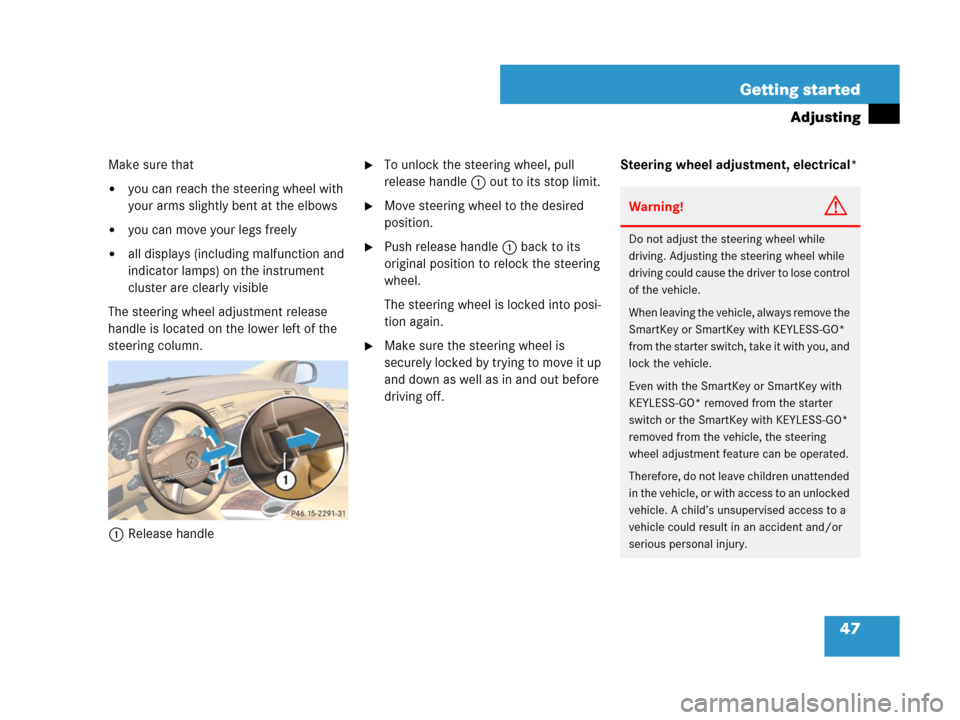
The steering wheel adjustment release
handle is located on the lower left of the
steering column.
1Release handle
�To unlock the steering wheel, pull
release handle 1 out to its stop limit.
�Move steering wheel to the desired
position.
�Push release handle 1 back to its
original position to relock the steering
wheel.
The steering wheel is locked into posi-
tion again.
�Make sure the steering wheel is
securely locked by trying to move it up
and down as well as in and out before
driving off.Steering wheel adjustment, electrical*
Warning!G
Do not adjust the steering wheel while
driving. Adjusting the steering wheel while
driving could cause the driver to lose control
of the vehicle.
When leaving the vehicle, always remove the
SmartKey or SmartKey with KEYLESS-GO*
from the starter switch, take it with you, and
lock the vehicle.
Even with the SmartKey or SmartKey with
KEYLESS-GO* removed from the starter
switch or the SmartKey with KEYLESS-GO*
removed from the vehicle, the steering
wheel adjustment feature can be operated.
Therefore, do not leave children unattended
in the vehicle, or with access to an unlocked
vehicle. A child’s unsupervised access to a
vehicle could result in an accident and/or
serious personal injury.
Page 49 of 569

48 Getting started
Adjusting
Make sure that
�you can reach the steering wheel with
your arms slightly bent at the elbows
�you can move your legs freely
�all displays (including malfunction and
indicator lamps) on the instrument
cluster are clearly visible
The steering wheel adjustment stalk is
located on the lower left of the steering
column.1Adjusting steering wheel, in or out
2Adjusting steering wheel, up or down
Adjusting steering wheel in or out
�Move stalk forward or back in direction
of arrow1.
Adjusting steering wheel up or down
�Move stalk up or down in direction of
arrow2.
Mirrors
Adjust the interior and exterior rear view
mirrors before driving so that you have
a good view of the road and traffic
conditions.
Interior rear view mirror
�Manually adjust the interior rear view
mirror.
For more information, see “Rear view
mirrors” (
�page 203).
Exterior rear view mirrors
iThe memory function* (�page 141) lets
you store the settings for the steering wheel
together with the settings for seat positions and
the exterior rear view mirrors.
Warning!G
Exercise care when using the
passenger-side exterior rear view mirror.
The mirror surface is convex (outwardly
curved surface for a wider field of view).
Objects in mirror are closer than they ap-
pear. Check your interior rear view mirror or
glance over your shoulder before changing
lanes.
Page 50 of 569

49 Getting started
Adjusting
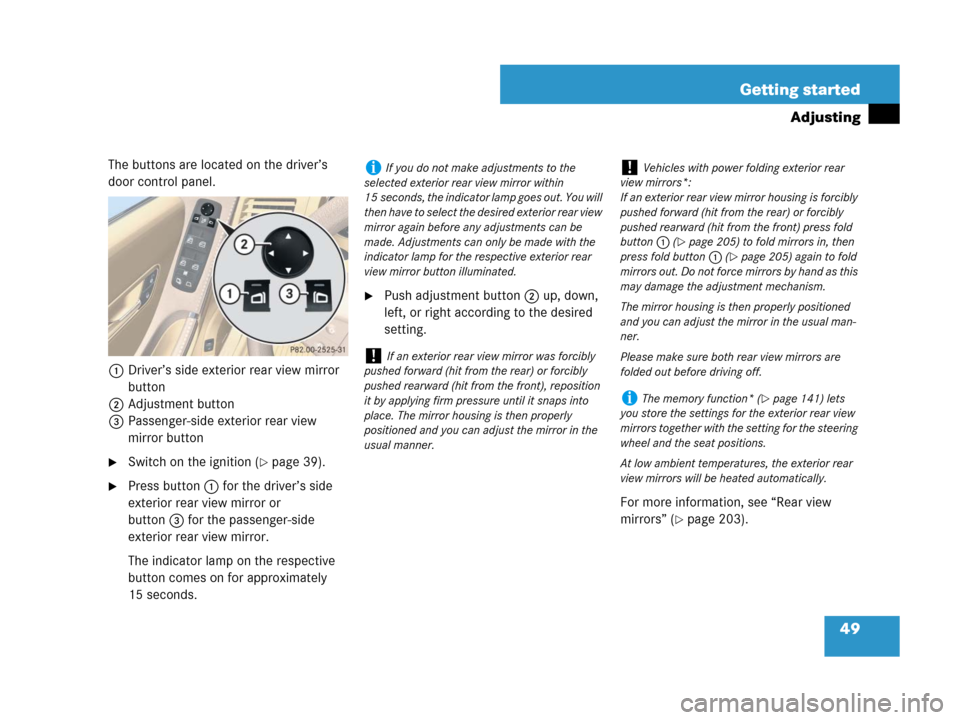
The buttons are located on the driver’s
door control panel.
1Driver’s side exterior rear view mirror
button
2Adjustment button
3Passenger-side exterior rear view
mirror button
�Switch on the ignition (�page 39).
�Press button1 for the driver’s side
exterior rear view mirror or
button3for the passenger-side
exterior rear view mirror.
The indicator lamp on the respective
button comes on for approximately
15 seconds.
�Push adjustment button2up, down,
left, or right according to the desired
setting.
For more information, see “Rear view
mirrors” (
�page 203).
iIf you do not make adjustments to the
selected exterior rear view mirror within
15 seconds, the indicator lamp goes out. You will
then have to select the desired exterior rear view
mirror again before any adjustments can be
made. Adjustments can only be made with the
indicator lamp for the respective exterior rear
view mirror button illuminated.
!If an exterior rear view mirror was forcibly
pushed forward (hit from the rear) or forcibly
pushed rearward (hit from the front), reposition
it by applying firm pressure until it snaps into
place. The mirror housing is then properly
positioned and you can adjust the mirror in the
usual manner.
!Vehicles with power folding exterior rear
view mirrors*:
If an exterior rear view mirror housing is forcibly
pushed forward (hit from the rear) or forcibly
pushed rearward (hit from the front) press fold
button1 (
�page 205) to fold mirrors in, then
press fold button1 (
�page 205) again to fold
mirrors out. Do not force mirrors by hand as this
may damage the adjustment mechanism.
The mirror housing is then properly positioned
and you can adjust the mirror in the usual man-
ner.
Please make sure both rear view mirrors are
folded out before driving off.
iThe memory function* (�page 141) lets
you store the settings for the exterior rear view
mirrors together with the setting for the steering
wheel and the seat positions.
At low ambient temperatures, the exterior rear
view mirrors will be heated automatically.
Page 59 of 569
58 Getting started
Driving
Switching on headlamps
For more information on headlamps, see
“Lighting” (
�page 143).
Low beam headlamps
The exterior lamp switch is located on the
dashboard to the left of the steering wheel.
Exterior lamp switch
1 Off
2Low beam headlamps on
�Switch on the ignition (�page 39).
�Turn the exterior lamp switch to
positionB.
The low beam headlamps come on.
High beam
The combination switch is located on the
left of the steering column.
Combination switch
1High beam
2High beam flasher
�Push the combination switch in
direction of arrow1.
The high beam headlamps and the
highbeam indicator lampA in the
instrument cluster come on
(
�page 29).
For more information on headlamps, see
“Combination switch” (
�page 147).
Page 60 of 569
59 Getting started
Driving
Turn signals
The combination switch is located on the
left of the steering column.
Combination switch
1Turn signals, right
2Turn signals, left
�Press the combination switch in
direction of arrow1 or2.
The corresponding turn signal indicator
lampLorK in the instrument
cluster flashes.
The combination switch resets automati-
cally after major steering wheel move-
ment.Windshield wipers
The combination switch is located on the
left of the steering column.
Combination switch
1Single wipe
Wiping with windshield washer fluid
2Switching on windshield wipers
�Switch on the ignition (�page 39).
iTo signal minor directional changes such as
changing lanes, press combination switch only
to point of resistance and release. The corre-
sponding turn signals will flash three times.
Page 65 of 569

64 Getting started
Parking and locking
You have now completed your first drive.
You have properly stopped and parked
your vehicle. End your drive as follows.
Warning!G
With the engine not running, there is no
power assistance for the brake and the
steering system. In this case, it is important
to keep in mind that a considerably higher
degree of effort is necessary to brake and
steer the vehicle.
Warning!G
Do not park this vehicle in areas where com-
bustible materials such as grass, hay or
leaves can come into contact with the hot
exhaust system, as these materials could be
ignited and cause a vehicle fire.
To reduce the risk of personal injury as a
result of vehicle movement, before turning
off the engine and leaving the vehicle
always:
�Keep right foot on brake pedal.
�Firmly depress parking brake pedal.
�Shift the automatic transmission to
positionP.
�Slowly release brake pedal.
�When parked on an incline, turn front
wheel towards the road curb.
�Turn the SmartKey in the starter switch
to position0 and remove the SmartKey
from the starter switch, or press the
start/stop button (vehicles with
KEYLESS-GO*).
�Take the SmartKey or the SmartKey with
KEYLESS-GO* and lock vehicle when
leaving.
Page 67 of 569

66 Getting started
Parking and locking
Turning off the engine
�Shift the automatic transmission to
positionP (
�page 192).
�Apply the parking brake (�page 65).Turning off with the SmartKey
�Turn the SmartKey in the starter switch
to position0 (
�page 40).
�Remove the SmartKey from the starter
switch.
The immobilizer is activated.Turning off with KEYLESS-GO*
�Press the KEYLESS-GO start/stop
button (
�page 41) to turn off the
engine.
With the driver’s door closed, the
starter switch is now in position1. With
the driver’s door opened, the starter
switch is set to position0, same as
SmartKey removed from starter switch
(
�page 39).
iIf the engine cannot be turned off as
described, see “Emergency engine shut-down”
(
�page 520).
Warning!G
Do not turn off the engine before the vehicle
has come to a complete stop. With the
engine not running, there is no power assis-
tance for the brake and steering systems. In
this case, it is important to keep in mind that
a considerably higher degree of effort is
necessary to brake and steer the vehicle.
iAlways set the parking brake in addition to
shifting to positionP (
�page 192).
When parked on an incline, also turn front wheel
towards the road curb.
!Observe instructions when taking the
vehicle through an automatic conveyor type
car wash (
�page 406).
!If you turn off the engine using the
SmartKey and
�remove the SmartKey from the starter
switch
or
�open a front door
the automatic transmission will shift to park
positionP automatically.
Keep in mind that turning off the engine with the
SmartKey alone only will automatically shift the
automatic transmission to neutral positionN.
iIn an emergency you can turn off the engine
while driving by pressing and holding the
KEYLESS-GO start/stop button for
approximately 3 seconds.
!If you turn off the engine using the
KEYLESS-GO start/stop button and open a front
door, the automatic transmission will shift to
park positionP automatically.
Keep in mind that turning off the engine using
the KEYLESS-GO start/stop button alone only
will automatically shift the automatic transmis-
sion to neutral positionN.