Page 359 of 569
.
The hood will lock audibly.
�Check to make sure the hood is fully
closed.
If you can raise th")
358 Operation
Engine compartment
Closing
�Let the hood drop from a height of
approximately 1 ft (30 cm).
The hood will lock audibly.
�Check to make sure the hood is fully
closed.
If you can raise the hood at a point
above the headlamps, then it is not
properly closed. Open it again and let it
drop with somewhat greater force.
Engine oil
The amount of oil your engine needs will
depend on a number of factors, including
driving style. Increased oil consumption
can occur when
�the vehicle is new
�the vehicle is driven frequently at
higher engine speeds
Engine oil consumption checks should only
be made after the vehicle break-in period.Checking engine oil level
When checking the oil level
�the vehicle must be parked on level
ground
�the vehicle must have been stationary
for at least 5 minutes with the engine
turned off
Example illustration R 350 4MATIC
1Oil dipstick
2Upper mark
3Lower mark
�Open the hood (�page 356).
�Pull out oil dipstick1.
Warning!G
When closing the hood, use extreme caution
not to catch hand or fingers. Be careful that
you do not close the hood on anyone.
Make sure the hood is securely engaged be-
fore driving. Do not continue driving if the
hood can no longer engage after an accident
for example. The hood could otherwise
come loose while the vehicle is in motion
and injure you and/or others.
!Do not use any special lubricant additives,
as these may damage the drive assemblies.
Using special additives not approved by
Mercedes-Benz may cause damage not covered
by the Mercedes-Benz Limited Warranty.
More information on this subject is available at
any Mercedes-Benz Light Truck Center.
Page 361 of 569

360 Operation
Engine compartment
Be careful not to spill any oil when adding.
Avoid environmental damage caused by oil
entering the ground or water.
�Screw filler cap1 back on filler neck.
For more information on engine oil, see
“Technical data” section (
�page 536) and
(
�page 538).
Transmission fluid level
The transmission fluid level does not need
to be checked. If you notice transmission
fluid loss or gear shifting malfunctions,
have an authorized Mercedes-Benz Light
Truck Center check the automatic trans-
mission.Coolant level
The engine coolant is a mixture of water
and anticorrosion/antifreeze. To check
the coolant level, the vehicle must be
parked on level ground.
!Excess oil must be siphoned or drained off.
It could cause damage to the engine or
emission control system not covered by the
Mercedes-Benz Limited Warranty.
Warning!G
In order to avoid any potentially serious
burns:
�Use extreme caution when opening the
hood if there are any signs of steam or
coolant leaking from the cooling system,
or if the coolant temperature display
indicates that the coolant is overheated.
�Do not remove pressure cap on coolant
reservoir if coolant temperature is
above 158°F (70°C). Allow engine to
cool down before removing cap. The
coolant reservoir contains hot fluid and
is under pressure.
�Using a rag, slowly open the cap approx-
imately 1/2turn to relieve excess pres-
sure. If opened immediately, scalding
��
Page 450 of 569
.
Display symbolDisplay messagePossib")
449 Practical hints
What to do if …
During severe operation conditions and
stop-and-go city traffic, the coolant tem-
perature may rise close to 248°F (120°C).
Display symbolDisplay messagePossible cause/consequencePossible solution
�Observe the coolant temperature in the
multifunction display (
�page 164).
If the temperature rises again:
�Contact an authorized
Mercedes-Benz Light Truck Center
immediately.
Warning!G
�Driving when your engine is overheated
can cause some fluids which may have
leaked into the engine compartment to
catch fire. You could be seriously
burned.
�Steam from an overheated engine can
cause serious burns and can occur just
by opening the engine hood. Stay away
from the engine if you see or hear steam
coming from it.
Turn off the engine, get out of the vehicle
and do not stand near the vehicle until the
engine has cooled down.
!The engine should not be operated with the
coolant temperature above 248°F (120°C).
Doing so may cause serious damage which is
not covered by the Mercedes-Benz Limited
Warranty.
Page 453 of 569

452 Practical hints
What to do if …
Display symbolDisplay messagePossible cause/consequencePossible solution
c You are driving with one or more
doors open.�Stop the vehicle in a safe location or as
soon as it is safe to do so.
�Close the doors.
]Clean
Fuel Filter�Contact an authorized Mercedes-Benz
Light Truck Center.
A Gas Cap OpenA loss of pressure has been
detected in the fuel system. The
fuel cap may not be closed
properly or the fuel system may
be leaky.�Check the fuel cap (�page 352).
If it is not closed properly:
�Close the fuel cap.
If it is closed properly:
�Have the fuel system checked by an
authorized Mercedes-Benz Light Truck
Center.
aYou are driving with the hood or
the tailgate open.�Carefully bring the vehicle to a halt as
soon as it is safe to do so in a safe
location.
�Close the hood (�page 356) or the
tailgate (
�page 119).
You are trying to lock the vehicle
with the KEYLESS-GO* function
with a door or the tailgate open.�Close all doors and/or the tailgate
(
�page 119).
Page 484 of 569
483 Practical hints
Replacing bulbs
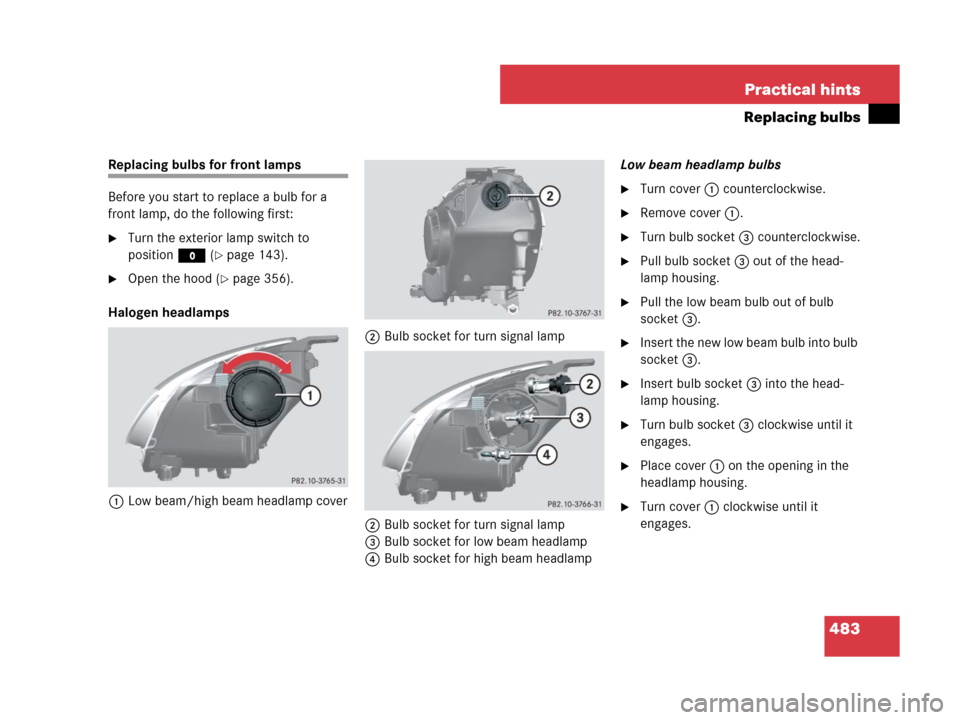
Replacing bulbs for front lamps
Before you start to replace a bulb for a
front lamp, do the following first:
�Turn the exterior lamp switch to
positionM (
�page 143).
�Open the hood (�page 356).
Halogen headlamps
1Low beam/high beam headlamp cover2Bulb socket for turn signal lamp
2Bulb socket for turn signal lamp
3Bulb socket for low beam headlamp
4Bulb socket for high beam headlampLow beam headlamp bulbs
�Turn cover 1 counterclockwise.
�Remove cover 1.
�Turn bulb socket 3 counterclockwise.
�Pull bulb socket 3 out of the head-
lamp housing.
�Pull the low beam bulb out of bulb
socket 3.
�Insert the new low beam bulb into bulb
socket 3.
�Insert bulb socket 3 into the head-
lamp housing.
�Turn bulb socket 3 clockwise until it
engages.
�Place cover 1 on the opening in the
headlamp housing.
�Turn cover 1 clockwise until it
engages.
Page 490 of 569

489 Practical hints
Replacing wiper blades
�Replacing wiper blades
Front wiper blades
�Remove the SmartKey from the starter
switch.
Vehicles with KEYLESS-GO*:
�Make sure the vehicle’s on-board
electronics have status0
(
�page 41).Removing
�Fold the wiper arms forward until they
engage.
1Wiper blade
2Tab
3Wiper arm
�Press tabs2 together.
�Tilt wiper blade 1 away from wiper
arm 3.
�Take off wiper blade 1 in direction of
arrow.
Warning!G
For safety reasons, switch off wipers and
remove SmartKey from starter switch
(vehicles with KEYLESS-GO*: Make sure
the vehicle’s on-board electronics have
status0) before replacing a wiper blade.
Otherwise the motor could suddenly turn on
and cause injury.
Warning!G
Wiper blades are components that are
subject to wear and tear. Replace the wiper
blades twice a year, preferably in the spring
and fall. Otherwise the windows will not be
properly wiped. As a result, you may not
be able to observe surrounding traffic condi-
tions and could cause an accident.
!Never open the hood when the wiper arms
are folded forward.
Hold on to the wiper when folding the wiper arm
back. If released, the force of the impact from
the tensioning spring could crack the windshield.
Do not allow the wiper arms to contact the wind-
shield glass without a wiper blade inserted.
For your convenience, we recommend that you
have this work carried out by an authorized
Mercedes-Benz Light Truck Center.!Do not pull on the wiper blade inserts. They
could tear.
Page 513 of 569
 terminal
2Positive (+) terminal
3Positive terminal cover
�Make sure the two vehicles do")
512 Practical hints
Jump starting
The jump-start contacts are located in the
engine compartment.
1Negative (-) terminal
2Positive (+) terminal
3Positive terminal cover
�Make sure the two vehicles do not
touch.
�Turn off all electrical consumers.
�Apply the parking brake (�page 65).
�Set automatic transmission to
positionP (
�page 192).
�Open the hood (�page 356).
�Remove cover from negative
terminal1.
�Flip up cover 3 of positive terminal 2
in direction of arrow.
1Negative terminal of discharged
battery
2Positive terminal of discharged battery
4Positive terminal of charged battery
5Negative terminal of charged battery
�Connect positive terminals2 and 4
with the jumper cable. Clamp cable to
charged battery 4 first.
�Start engine of the vehicle with the
charged battery and run at idle speed.
�Connect negative terminals1 and 5
of the batteries with the jumper cable.
Clamp cable to charged battery 5
first.
�Start the engine of the disabled vehi-
cle.
You can now turn on the electrical con-
sumers. Do not switch on the headlamps
under any circumstances.
�Remove the jumper cables first from
negative terminals1 and 5 and then
from positive terminals2 and 4.
You can now switch on the headlamps.
�Have the battery checked at the
nearest authorized Mercedes-Benz
Light Truck Center.
Warning!G
Keep flames or sparks away from battery.
Do not smoke.
Observe all safety instructions and precau-
tions when handling automotive batteries.
!Never invert the terminal connections!
Page 520 of 569
519 Practical hints
Fuses
Fuse box in engine compartment
The main fuse box is located on the pas-
senger side of the engine compartment.
�Open the hood (�page 356).
1Clamp
2Main fuse box cover
�Release clamp1.
�Lift fuse box cover2 up.
�Install fuse box cover in reverse order.
�Close the hood after checking or re-
placing fuses (
�page 358).
Fuse box in cargo compartment
The fuse box is located under the cargo
compartment cover on the right-hand side
of the spare wheel well.
�Open the tailgate (�page 119).
�Lift the cargo compartment cover
(
�page 467).
�Secure cargo compartment cover with
securing hook (
�page 468).
1Cover
�Fold cover1 to the left as indicated by
the arrow.
!The fuse box cover must be installed
properly to prevent moisture and/or dirt from
entering the fuse box and possibly impairing fuse
operation.