2008 MERCEDES-BENZ R-CLASS MPV trailer
[x] Cancel search: trailerPage 146 of 373

Driving sys
tems 143Distronic*
i Distronic is only available for certain
countries.
Distronic regulates the speed and automati-
cally maintains the distance to the vehicle in
front. It brakes automatically in order to avoid
exceeding the set speed. On long and steep
downhill gradients, especially if the vehicle is
laden or towing a trailer, you must select shift
range 1,2or 3in good time. By doing so you
will make use of the braking effect of the
engine, which relieves the load on the brake
system and prevents the brakes from over-
heating and wearing too quickly. G
Risk of accident
The brake pedal is retracted when Distronic
brakes. Do not restrict the movement of the
pedal in any way.
R Do not put any objects in the footwell.
R Ensure that floor mats and carpets are
fixed securely.
R Do not place your foot under the brake
pedal as it could become trapped.
You could otherwise cause an accident and
injure yourself and others. G
Risk of accident
Do not change down for additional engine
braking on a slippery road surface. This
could cause the drive wheels to lose their
grip and the vehicle could skid. G
Risk of accident
Distronic is only an aid designed to assist
driving. The driver remains fully responsible
for the vehicle's distance to other vehicles,
the vehicle's speed and braking in good
time.
Distronic does not react to:
R pedestrians
R stationary obstacles on the road, e.g. sta-
tionary or parked vehicles
R oncoming and crossing traffic
Distronic may not detect narrow vehicles
driving in front, e.g. motorcycles, or vehi-
cles driving on a different line. Therefore,
always pay attention to traffic conditions
even when Distronic is activated. Other-
wise, you may fail to recognise danger in
time, could cause an accident and injure
yourself and others.
If a slower-moving vehicle is detected in front,
Distronic causes your vehicle to brake and maintain the preset distance to the vehicle in
front that you have set. G
Risk of accident
Distronic cannot take account of road and
traffic conditions. Deactivate, or do not
activate, Distronic if it does not detect the
vehicle in front, or if it no longer detects it.
This is especially the case:
R before corners
R on filter lanes
R when changing to a lane with faster mov-
ing traffic
R in complex driving situations or where
the lanes are diverted, e.g. at motorway/
roadway construction sites
Otherwise, Distronic maintains the current
speed or accelerates to the set speed.
Distronic cannot take account of weather
conditions. Deactivate, or do not activate,
Distronic:
R if the roads are slippery, snow-covered or
icy. The wheels could lose their grip Controls
* optional
251_AKB; 5; 7, en-GB
wobuchh
,V ersion: 2.10.6
2008-05-11T14:51:51+02:00 - Seite 143 ZDateiname: 6515_1825_02_buchblock.pdf; preflight
Page 152 of 373

Driving sys
tems 149
of its narrow width. The distance to the vehi-
cle in front will be too short. Speedtronic
Speedtronic brakes automatically so that you
do not exceed the set speed. On long and
steep downhill gradients, especially if the
vehicle is laden or towing a trailer, you must
select shift range 1,2or 3in good time. By
doing so you will make use of the braking
effect of the engine, which relieves the load
on the brake system and prevents the brakes
from overheating and wearing too quickly. If
you need additional braking, depress the
brake pedal repeatedly rather than continu-
ously. G
Risk of accident
Never depress the brake pedal continu-
ously while the vehicle is in motion, e.g.
never cause the brakes to rub by applying
constant slight pedal pressure. This causes
the brake system to overheat, increases
the braking distance and can lead to the
brakes failing completely. G
Risk of accident
Do not change down for additional engine
braking on a slippery road surface. This could cause the drive wheels to lose their
grip and the vehicle could skid.
You can set a variable or permanent limit
speed:
R variable for speed limits, e.g. in built-up
areas
R permanent for long-term speed restric-
tions, e.g. for driving on winter tyres
(Y page 151) G
Risk of accident
Speedtronic is only an aid designed to
assist driving. You are responsible for the
vehicle's speed and for braking in good
time.
i The speed indicated in the speedometer
may differ slightly from the limit speed
stored.
Variable Speedtronic With the cruise control lever, you can operate
cruise control, Distronic* and variable
Speedtronic.The LIM indicator lamp on the cruise control
lever indicates which system you have selec-
ted:
R
LIM indicator lamp off:
Cruise control or Distronic* is selected.
R LIM indicator lamp lit:
Variable Speedtronic is selected.
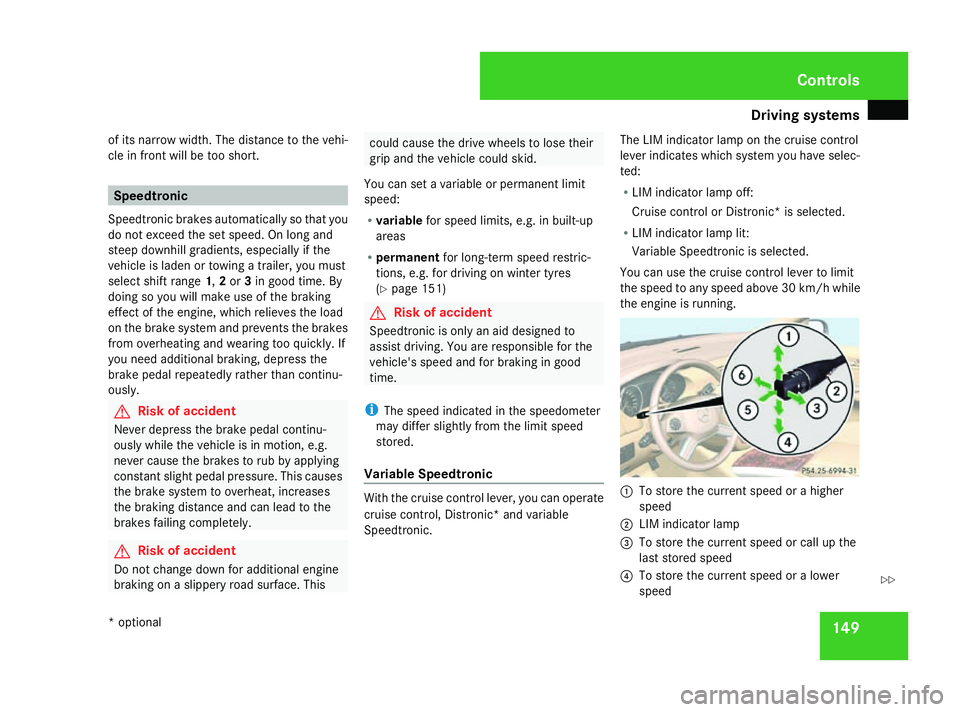
You can use the cruise control lever to limit
the speed to any speed above 30 km/h while
the engine is running. 1
To store the current speed or a higher
speed
2 LIM indicator lamp
3 To store the current speed or call up the
last stored speed
4 To store the current speed or a lower
speed Controls
* optional
251_AKB; 5; 7, en-GB
wobuchh
,V ersion: 2.10.6
2008-05-11T14:51:51+02:00 - Seite 149 ZDateiname: 6515_1825_02_buchblock.pdf; preflight
Page 154 of 373

Driving sys
tems 151
up
1 for a higher speed or down 4for a
lower speed.
Deactivating variable Speedtronic There are several ways to deactivate variable
Speedtronic:
X
Briefly press the cruise control lever for-
wards 6.
The LIM indicator lamp in the instrument
cluster goes out.
or
X Briefly press the cruise control lever in the
direction of arrow 5.
LIM indicator lamp 2in the cruise control
lever goes out. Variable Speedtronic is
deactivated.
Cruise control or Distronic* is selected.
Variable Speedtronic is deactivated automat-
ically when you depress the accelerator pedal
beyond the pressure point (kickdown), but
only if your current speed does not differ by
more than 20 km/h from the stored speed.
You will hear a warning tone if this is the case. G
Risk of accident
It is not possible to deactivate variable
Speedtronic by braking. i
The last speed stored is cleared when you
switch off the engine.
Permanent Speedtronic i
Permanent Speedtronic is only available
in certain countries.
You can use the on-board computer to limit
the speed permanently to a value between
160 km/h (e.g. for driving with winter tyres)
and the maximum speed.
Just before the stored speed is reached, it
appears in the multi-function display.
Permanent Speedtronic remains active, even
if variable Speedtronic is deactivated.
You cannot exceed the stored limit speed,
even if you depress the accelerator pedal
beyond the pressure point (kickdown).
Setting permanent Speedtronic
X Press the èor· button to select the
Settings menu (Ypage 129).
X Press the jbutton to call up the selec-
tion of submenus.
X Press the æorç button to select the
Vehicle submenu.
X Press the jbutton to select Speed
limit (winter tyres) . X
Press the æorç button to select the
desired setting.
The following settings can be selected:
R Off
Permanent Speedtronic is deactivated.
R A limit speed between 240 km/hand
160 km/h in increments of 10 km/h. Rear axle level control*
The rear axle level control regulates the vehi-
cle level at the rear axle. The benefit of this is
that the vehicle level at the rear axle is kept
constant regardless of the load.
Observe the notes on driving with a trailer in
the "Operation" (Y page 239) section. Controls
* optional
251_AKB; 5; 7, en-GB
wobuchh
,V ersion: 2.10.6
2008-05-11T14:51:51+02:00 - Seite 151 ZDateiname: 6515_1825_02_buchblock.pdf; preflight
Page 155 of 373

Driving sys
tems 152 AIRMATIC package*
AIRMATIC enables a suspension tuning set-
ting to be selected and regulates the damping
behaviour and level of your vehicle. The sys-
tem comprises two components: ADS*
(Adaptive Damping System) (Y page 152)
and level control* (Y page 152).
Observe the notes on driving with a trailer in
the "Operation" (Y page 239) section.
ADS* (Adaptive Damping System) ADS adapts the damping characteristics to
the current operating and driving situation.
How this is adjusted depends on:
R your driving style
R the road surface conditions
R the ADS setting
R the vehicle level setting
Your selection remains stored even if you
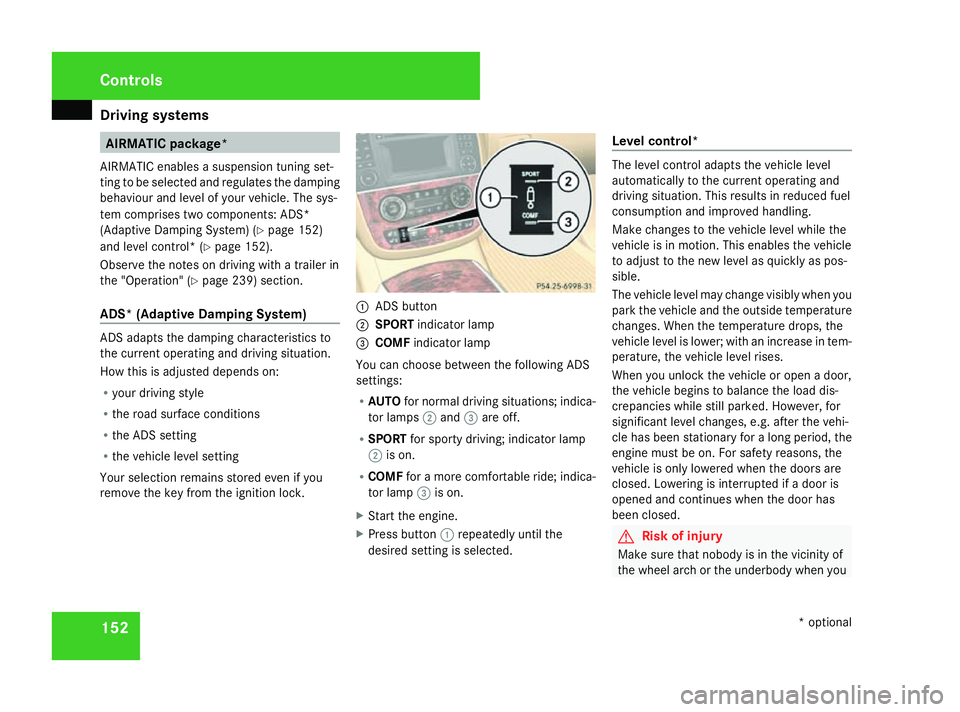
remove the key from the ignition lock. 1
ADS button
2 SPORT indicator lamp
3 COMF indicator lamp
You can choose between the following ADS
settings:
R AUTO for normal driving situations; indica-
tor lamps 2and 3are off.
R SPORT for sporty driving; indicator lamp
2 is on.
R COMF for a more comfortable ride; indica-
tor lamp 3is on.
X Start the engine.
X Press button 1repeatedly until the
desired setting is selected. Level control* The level control adapts the vehicle level
automatically to the current operating and
driving situation. This results in reduced fuel
consumption and improved handling.
Make changes to the vehicle level while the
vehicle is in motion. This enables the vehicle
to adjust to the new level as quickly as pos-
sible.
The vehicle level may change visibly when you
park the vehicle and the outside temperature
changes. When the temperature drops, the
vehicle level is lower; with an increase in tem-
perature, the vehicle level rises.
When you unlock the vehicle or open a door,
the vehicle begins to balance the load dis-
crepancies while still parked. However, for
significant level changes, e.g. after the vehi-
cle has been stationary for a long period, the
engine must be on. For safety reasons, the
vehicle is only lowered when the doors are
closed. Lowering is interrupted if a door is
opened and continues when the door has
been closed. G
Risk of injury
Make sure that nobody is in the vicinity of
the wheel arch or the underbody when you Controls
* optional
251_AKB; 5; 7, en-GB
wobuchh
,V ersion: 2.10.6
2008-05-11T14:51:51+02:00 - Seite 152 Dateiname: 6515_1825_02_buchblock.pdf; preflight
Page 159 of 373

Driving sys
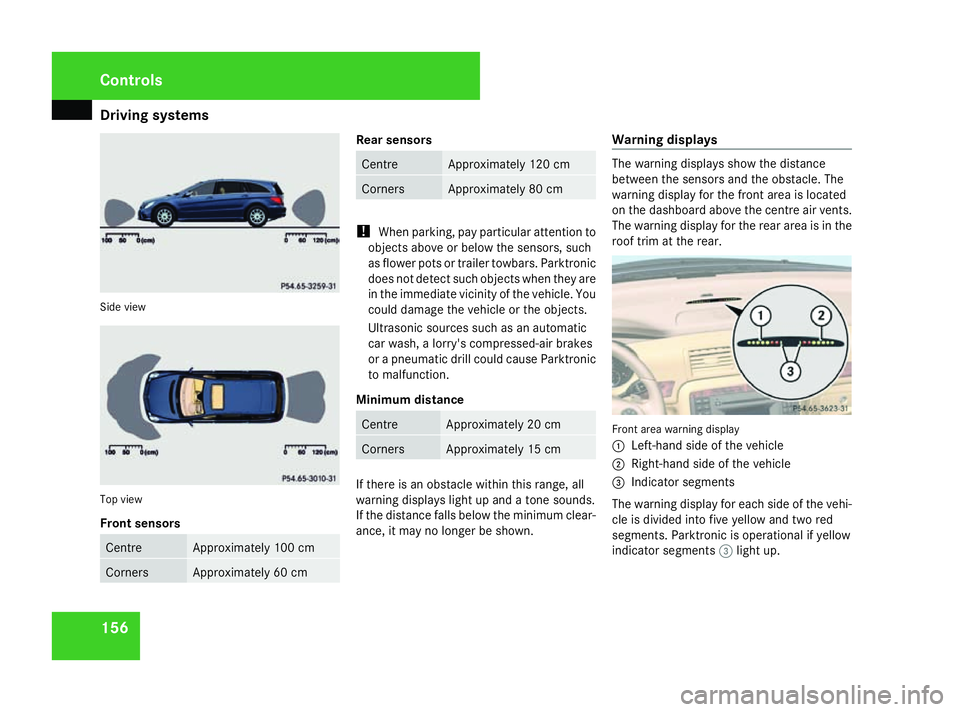
tems 156Side view
Top view
Front sensors
Centre Approximately 100 cm
Corners Approximately 60 cm Rear sensors
Centre Approximately 120 cm
Corners Approximately 80 cm
!
When parking, pay particular attention to
objects above or below the sensors, such
as flower pots or trailer towbars. Parktronic
does not detect such objects when they are
in the immediate vicinity of the vehicle. You
could damage the vehicle or the objects.
Ultrasonic sources such as an automatic
car wash, a lorry's compressed-air brakes
or a pneumatic drill could cause Parktronic
to malfunction.
Minimum distance Centre Approximately 20 cm
Corners Approximately 15 cm
If there is an obstacle within this range, all
warning displays light up and a tone sounds.
If the distance falls below the minimum clear-
ance, it may no longer be shown.Warning displays The warning displays show the distance
between the sensors and the obstacle. The
warning display for the front area is located
on the dashboard above the centre air vents.
The warning display for the rear area is in the
roof trim at the rear.
Front area warning display
1
Left-hand side of the vehicle
2 Right-hand side of the vehicle
3 Indicator segments
The warning display for each side of the vehi-
cle is divided into five yellow and two red
segments. Parktronic is operational if yellow
indicator segments 3light up. Controls
251_AKB; 5; 7, en-GB
wobuchh
, Version: 2.10.6
2008-05-11T14:51:51+02:00 - Seite 156 Dateiname: 6515_1825_02_buchblock.pdf; preflight
Page 160 of 373

Driving sys
tems 157
The automatic transmission position deter-
mines which warning display is active: Automatic trans-
mission position Warning display
D Front area activated
R
or N Rear and front areas
activated
P No areas activated
One or more segments light up as the vehicle
approaches an obstacle, depending on the
vehicle's distance to the obstacle.
From the:
R sixth segment onwards, you will hear an
intermittent warning tone for approxi-
mately two seconds.
R seventh segment onwards, you will hear a
warning tone for approximately two sec-
onds. You have reached the minimum dis-
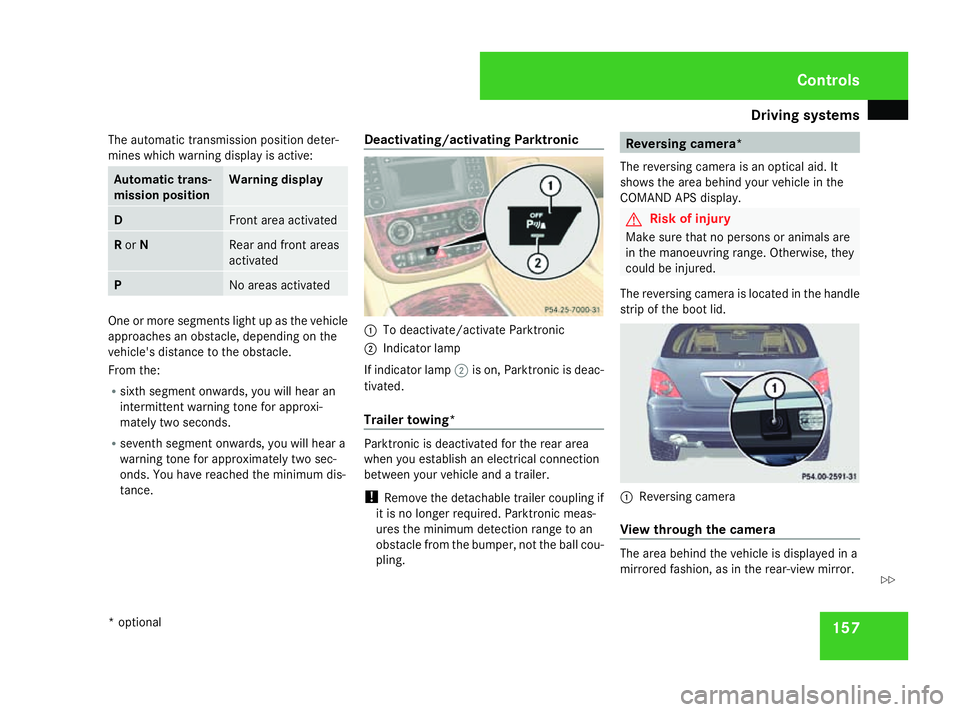
tance. Deactivating/activating Parktronic 1
To deactivate/activate Parktronic
2 Indicator lamp
If indicator lamp 2is on, Parktronic is deac-
tivated.
Trailer towing* Parktronic is deactivated for the rear area
when you establish an electrical connection
between your vehicle and a trailer.
! Remove the detachable trailer coupling if
it is no longer required. Parktronic meas-
ures the minimum detection range to an
obstacle from the bumper, not the ball cou-
pling. Reversing camera*
The reversing camera is an optical aid. It
shows the area behind your vehicle in the
COMAND APS display. G
Risk of injury
Make sure that no persons or animals are
in the manoeuvring range. Otherwise, they
could be injured.
The reversing camera is located in the handle
strip of the boot lid. 1
Reversing camera
View through the camera The area behind the vehicle is displayed in a
mirrored fashion, as in the rear-view mirror. Controls
* optional
251_AKB; 5; 7, en-GB
wobuchh
,V ersion: 2.10.6
2008-05-11T14:51:51+02:00 - Seite 157 ZDateiname: 6515_1825_02_buchblock.pdf; preflight
Page 220 of 373

217
Running-in notes
............................... 218
Refuelling ........................................... 218
Engine compartment ........................220
Tyres and wheels .............................. 224
Winter driving ................................... 231
Driving tips ........................................ 232
Driving abroad ................................... 235
Trailer towing* .................................. 235
Service ............................................... 242
Care .................................................... 243 Operation
251_AKB; 5; 7, en-GB
wobuchh,
Version: 2.10.6
2008-05-11T14:51:51+02:00 - Seite 217 Dateiname: 6515_1825_02_buchblock.pdf; preflight
Page 231 of 373

Tyres and wheels
228
R
you adopt a very sporty driving style (cor-
nering at high speeds or driving with high
rates of acceleration)
R you are towing a very heavy or large trailer
R you are driving with a heavy load (in the
vehicle or on the roof)
Restarting the tyre pressure loss warn-
ing system Restart the tyre pressure loss warning system
if you have:
R changed the tyre pressure
R changed the wheels or tyres
R fitted new wheels or tyres
X Before restarting, consult the table of tyre
pressures on the inside of the fuel filler flap
to ensure that the tyre pressure in all four
tyres is set correctly for the operating con-
ditions concerned.
X Also observe the notes in the section on
tyre pressures (Y page 226). G
Risk of accident
The tyre pressure loss warning system can
only give reliable warnings if you have set
the correct tyre pressure. If an incorrect tyre pressure is set, these
incorrect values will be monitored.
A tyre with insufficient pressure results in
vehicle instability when driving, thus
increasing the risk of an accident.
X Make sure that the key is in position
2(Y page 76) in the ignition lock.
The standard display appears in the multi-
function display (Y page 122).
X Press korj to select the tyre pres-
sure function:
Run Flat Indicator active
Menu: R-Buttonæ
X Press the reset button on the left of the
instrument cluster.
The following message appears in the
multi-function display:
Restart Run Flat Indicator?
Yes Cancel
If you wish to confirm the restart:
X Press the æbutton.
The following message appears in the
multi-function display:
Run Flat Indicator restarted
After a teach-in period, the tyre pressure
loss warning system will monitor the set
tyre pressures of all four tyres. If you wish to cancel the restart:
X
Press the çbutton.
or
X Wait until the message
Restart Run Flat Indicator?
Yes Cancel disappears.
The tyre pressure values stored at the last
restart will continue to be monitored. Checking the tyre pressure electroni-
cally*
The tyre pressure monitor only functions if
the correct wheel electronics are fitted to all
wheels. These monitor the pressure in all four
tyres, which you have set when restarting the
tyre pressure monitor. The monitor warns you
when the pressure drops in one or more of
the tyres. G
Risk of accident
The tyre pressure monitor does not warn
you of an incorrectly set tyre pressure. The
table on the inside of the fuel filler flap will
help you decide whether the tyre pressures
should be corrected.
The tyre pressure monitor is not able to
warn you of a sudden loss of pressure, e.g. Operation
* optional
251_AKB; 5; 7, en-GB
wobuchh
,V ersion: 2.10.6
2008-05-11T14:51:51+02:00 - Seite 228 Dateiname: 6515_1825_02_buchblock.pdf; preflight