2008 MERCEDES-BENZ R-CLASS MPV spare wheel
[x] Cancel search: spare wheelPage 253 of 373
Where will I find...?
250 Where will I find...?
Warning triangle
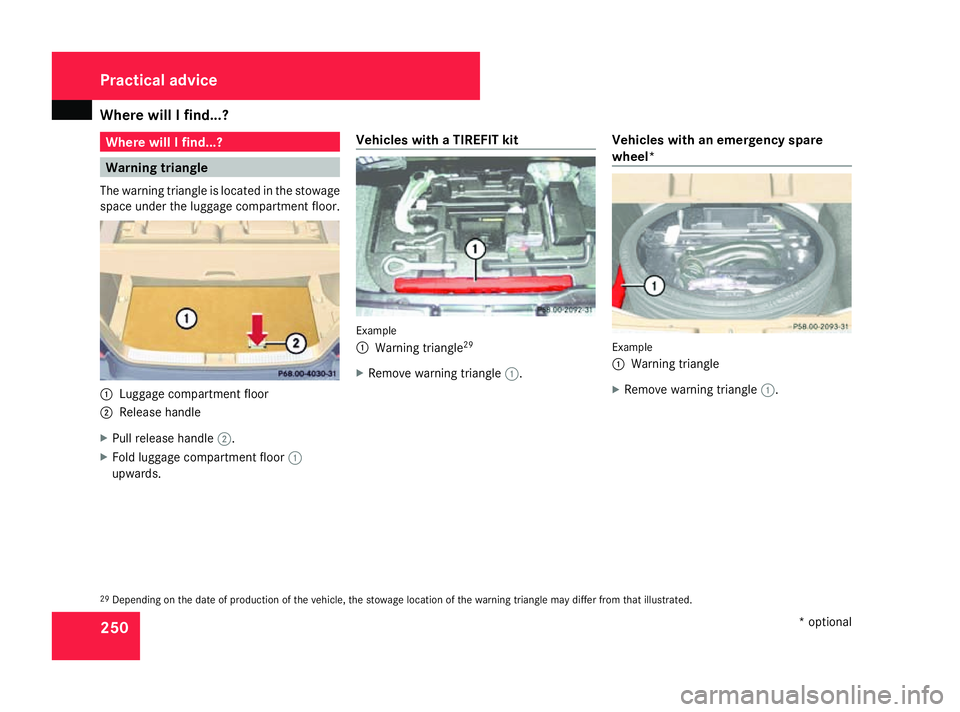
The warning triangle is located in the stowage
space under the luggage compartment floor. 1
Luggage compartment floor
2 Release handle
X Pull release handle 2.
X Fold luggage compartment floor 1
upwards. Vehicles with a TIREFIT kit Example
1
Warning triangle 29
X Remove warning triangle 1.Vehicles with an emergency spare
wheel* Example
1
Warning triangle
X Remove warning triangle 1.
29 Depending on the date of production of the vehicle, the stowage location of the warning triangle may differ from that illustrated. Practical advice
* optional
251_AKB; 5; 7, en-GB
wobuchh
, Version: 2.10.6
2008-05-11T14:51:51+02:00 - Seite 250 Dateiname: 6515_1825_02_buchblock.pdf; preflight
Page 255 of 373

Where will I find...?
252 Vehicle tool kit, jack, TIREFIT kit and
emergency spare wheel*
The vehicle tool kit, jack, TIREFIT kit and
emergency spare wheel* are in the stowage
compartment under the luggage compart-
ment floor. G
Risk of injury
The jack is designed only to raise and hold
the vehicle for a short time while a wheel
is being changed.
You must use stands if you are carrying out
work on the vehicle.
Make sure that the jack is placed on a firm,
non-slip and level surface. Do not use
wooden blocks or similar objects as a jack
underlay. Otherwise, the jack will not be
able to achieve its load-bearing capacity
due to the restricted height.
Do not start the engine at any time while a
wheel is being changed.
Do not lie under the vehicle when it is being
supported by the jack. If you do not raise
the vehicle as described, it could slip off the
jack (e.g. if the engine is started or a door
or the tailgate is opened or closed) and you
could be seriously injured. X
Open the tailgate.
X Open the luggage compartment floor
(Y page 250).
! If the luggage compartment cover* is fit-
ted, roll it open fully.
Only for luggage compartment covers* fit-
ted behind the 3rd row of seats:
Fold forwards the section of the luggage
compartment cover* that is still protrud-
ing. Otherwise the strap of the retaining
hook may damage the luggage compart-
ment cover*.
Vehicles with a TIREFIT kit i
Depending on the date of production of
the vehicle, the appearance and stowage
location of the jack and of the other tools
may differ from those illustrated. Example
1
Ball coupling of the trailer tow hitch*
2 Folding wheel chock
3 Jack, ratchet ring spanner
4 TIREFIT kit 30
5 Electric air pump 30
6 Fuse allocation chart
7 Wheel wrench
8 Towing eye
9 Centring pin
Vehicles with an emergency spare
wheel* i
Depending on the date of production of
the vehicle, the appearance and stowage
30 Not on vehicles with MOExtended run-flat system. Practical advice
* optional
251_AKB; 5; 7, en-GB
wobuchh,
Version: 2.10.6 2008-05-11T14:51:51+02:00 - Seite 252Dateiname: 6515_1825_02_buchblock.pdf; preflight
Page 256 of 373

Where will I find...?
253
location of the jack and of the other tools
may differ from those illustrated.
Example
1
Tool holder
2 Wheel wrench
3 Electric air pump
4 Instructions on the installation position of
the tool holder
5 Fuse allocation chart
6 Jack, ratchet ring spanner
7 Centring pin
8 Folding wheel chock
9 Towing eye
a Wheel bolts
b Ball coupling of the trailer tow hitch*
c Emergency spare wheel* Removing the emergency spare wheel*
X
Remove the jack from the tool holder
(Y page 252). 1
Retaining screw
2 Emergency spare wheel*
3 Tool holder
X Turn retaining screw 1anticlockwise and
out of tool holder 3and remove it.
i If retaining screw 1does not come out
immediately, turn tool holder 3anticlock-
wise a little.
Retaining screw 1should then unscrew
with ease. X
Turn tool holder 3approximately 180°, so
that the electrical air pump points back-
wards (Y page 252).
X Remove tool holder 3from emergency
spare wheel* 2.
X Remove emergency spare wheel* 2from
the emergency spare wheel well.
Stowing the emergency spare wheel*
X Remove the warning triangle from the
emergency spare wheel well (Y page 250). 1
Guides
In the spare wheel well, there are two guides
1 to keep the emergency spare wheel* in
place. Practical advice
* optional
251_AKB; 5; 7, en-GB
wobuchh
, Version: 2.10.6 2008-05-11T14:51:51+02:00 - Seite 253 ZDateiname: 6515_1825_02_buchblock.pdf; preflight
Page 257 of 373

Where will I find...?
2541
Guides
2 Emergency spare wheel*
X Lay emergency spare wheel* 2in the
emergency spare wheel well.
i Make sure that emergency spare wheel*
2 is positioned on guides 1precisely.
X Lay the emergency spare wheel in the
emergency spare wheel well (Y page 250).
X Lay the tool holder in emergency spare
wheel* 2so that the electric air pump is
pointing towards the tailgate
(Y page 252). X
Turn the tool holder approximately 180°,
so that the electrical air pump points for-
wards.
The tool holder should now be positioned
in accordance with the instructions on the
installation position.
X Turn the tool holder screw clockwise into
the tool holder as far as it will go.
Setting up the foldable wheel chock The folding wheel chock serves as an addi-
tional measure for securing the vehicle
against rolling away, e.g. when a wheel is
being changed.
1
To fold the plates upwards
2 To fold out the lower plate
3 To insert the plate X
Fold both plates 1upwards.
X Fold out lower plate 2.
X Guide the lugs on the lower plate fully into
the openings in base plate 3.Practical advice
* optional
251_AKB; 5; 7, en-GB
wobuchh , Version: 2.10.6
2008-05-11T14:51:51+02:00 - Seite 254 Dateiname: 6515_1825_02_buchblock.pdf; preflight
Page 265 of 373
Display
messages 262 Display messages Possible cause/consequence Possible solution
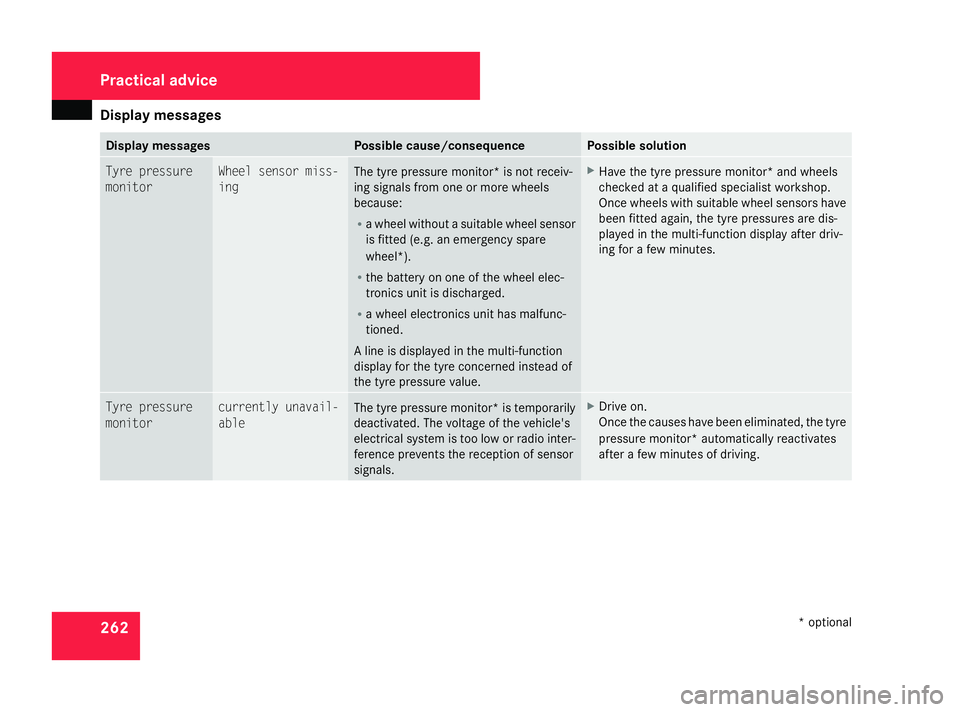
Tyre pressure
monitor Wheel sensor miss-
ing
The tyre pressure monitor* is not receiv-
ing signals from one or more wheels
because:
R
a wheel without a suitable wheel sensor
is fitted (e.g. an emergency spare
wheel*).
R the battery on one of the wheel elec-
tronics unit is discharged.
R a wheel electronics unit has malfunc-
tioned.
A line is displayed in the multi-function
display for the tyre concerned instead of
the tyre pressure value. X
Have the tyre pressure monitor* and wheels
checked at a qualified specialist workshop.
Once wheels with suitable wheel sensors have
been fitted again, the tyre pressures are dis-
played in the multi-function display after driv-
ing for a few minutes. Tyre pressure
monitor currently unavail-
able
The tyre pressure monitor* is temporarily
deactivated. The voltage of the vehicle's
electrical system is too low or radio inter-
ference prevents the reception of sensor
signals. X
Drive on.
Once the causes have been eliminated, the tyre
pressure monitor* automatically reactivates
after a few minutes of driving. Practical advi
ce
* optional
251_AKB; 5; 7, en-GB
wobuchh,
Version: 2.10.6 2008-05-11T14:51:51+02:00 - Seite 262Dateiname: 6515_1825_02_buchblock.pdf; preflight
Page 316 of 373

Flat tyre
313Flat tyre
Flat tyre equipment variants
Your vehicle may be equipped with:
R a TIREFIT kit (Y page 252)
R an emergency spare wheel* ( Ypage 252)
R the MOExtended run-flat sys-
tem* (Y page 322) Preparing the vehicle
i Vehicle preparation is not necessary on
vehicles with MOE tyres*.
X Vehicles with the AIRMATIC package*:
Make sure that highway level* is selected
(Y page 154).
X Stop your vehicle as far away from traffic
as possible on solid, non-slippery, level
ground.
X Switch on the hazard warning lamps.
X Firmly depress the parking brake.
X Move the selector lever to P.X
All occupants must get out of the vehicle.
Make sure that they are not endangered as
they do so.
X Make sure that no one is near the danger
area whilst a wheel is being changed. Any-
one who is not directly assisting in the
wheel change should, for example, stand
behind the barrier.
X Switch off the engine.
Vehicles without KEYLESS GO* X
Remove the key from the ignition lock.
Vehicles with KEYLESS GO* X
Open the driver's door.
The on-board electronics have status 0,
which is the same as the key having been
removed.
X Vehicles with the AIRMATIC package* and
the Off-Road Pro engineering package*:
Remove the KEYLESS GO button from the
ignition lock. For all vehicles X
Get out of the vehicle.
X Close the driver's door.
X Place the warning triangle ( Ypage 250) at
a suitable distance. Observe legal require-
ments.
i To operate the electric air-pump, you can
use the power socket in the luggage com-
partment (Y page 207) or 2nd row of seats
(Y page 207), even when the ignition is
switched off. For example, to use TIREFIT
or to inflate the collapsible emergency
spare wheel*.
An emergency cut-off ensures that the on-
board voltage does not drop too low. If the
on-board voltage is too low, power to the
sockets is automatically cut-off. This
ensures that there is sufficient power to
start the engine. Practical advice
* optional
251_AKB; 5; 7, en-GB
wobuchh,
Version: 2.10.6 2008-05-11T14:51:51+02:00 - Seite 313 ZDateiname: 6515_1825_02_buchblock.pdf; preflight
Page 320 of 373
Flat tyre
317Changing a wheel/fitting the emer-
gency spare wheel*
G
Risk of accident
The wheel dimensions and tyre size of the
emergency spare wheel* may differ from
those of the standard wheels.
The handling characteristics of your vehicle
will change if you fit an emergency spare
wheel*. Adapt your style of driving accord-
ingly.
You may only use the emergency spare
wheel* for a short while. Do not exceed the
maximum speed of 80 km/h and do not
deactivate ESP ®
.
Never drive the vehicle with more than one
emergency spare wheel* fitted. G
Risk of accident
Have the emergency spare wheel*
replaced as soon as possible at a qualified
specialist workshop which has the neces-
sary specialist knowledge and tools to carry
out the work required. Mercedes-Benz rec-
ommends that you use a Mercedes-Benz
Service Centre for this purpose. In particu-
lar, work relevant to safety or on safety- related systems must be carried out at a
qualified specialist workshop.
Preparing the vehicle X
Prepare the vehicle as described
(Y page 313).
X If a trailer is coupled, uncouple it.
X Position the wheels in the straight-ahead
position.
X Take the following from the stowage well
beneath the luggage compartment floor:
R
the emergency spare wheel
R the electric air pump
R the vehicle tool kit
R the wheel chock
R the jack
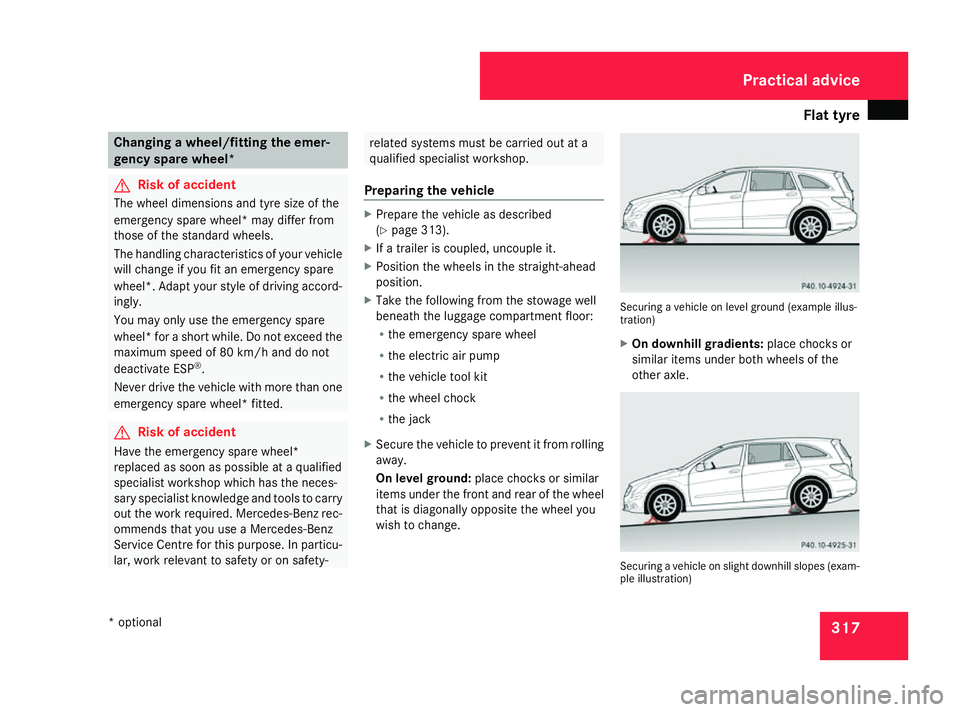
X Secure the vehicle to prevent it from rolling
away.
On level ground: place chocks or similar
items under the front and rear of the wheel
that is diagonally opposite the wheel you
wish to change. Securing a vehicle on level ground (example illus-
tration)
X
On downhill gradients: place chocks or
similar items under both wheels of the
other axle. Securing a vehicle on slight downhill slopes (exam-
ple illustration) Practical advice
* optional
251_AKB; 5; 7, en-GB
wobuchh,
Version: 2.10.6 2008-05-11T14:51:51+02:00 - Seite 317 ZDateiname: 6515_1825_02_buchblock.pdf; preflight
Page 323 of 373

Flat tyre
3201
Wheel bolts for 18", 19" and 21" wheels
and for the R 500 4MATIC emergency
spare wheel
2 Wheel bolts for 17" wheels and the emer-
gency spare wheel of all models except
the R 500 4MATIC
! All models except the R 500 4MATIC:
always use wheel bolts 2to fit 17" wheels
or the emergency spare wheel. Using other
wheel bolts when fitting 17" wheels or the
emergency spare wheel could damage the
brake system.
i All models except the R 500 4MATIC: the
wheel bolts can be found together with the
emergency spare wheel (not with 17"
tyres). X
Clean the wheel and wheel hub contact
surfaces. X
Slide the emergency spare wheel onto the
centring pin and push it on. X
Tighten the wheel bolts until they are fin-
ger-tight. X
Unscrew the centring pin.
X Tighten the last wheel bolt until it is finger-
tight.
Inflating the "Minispare" emergency
spare wheel* G
Risk of accident
Pump up the collapsible emergency spare
wheel before lowering the vehicle, as you
could otherwise damage the wheel rim.
X Take the electric air pump out of the stow-
age well under the luggage compartment
floor (Y page 252). G
Risk of injury
Comply with the manufacturer’s safety
instructions on the sticker on the electric
air pump.
Your vehicle is equipped with one of the fol-
lowing two electric air pumps:
R Version 1: electric air pump with a pres-
sure gauge on the air hose.
R Version 2: electric air pump with an inte-
grated pressure gauge.
The following description applies for both
types. Differences in the way they are used
will be explained explicitly. Practical advice
* optional
251_AKB; 5; 7, en-GB
wobuchh,
Version: 2.10.6
2008-05-11T14:51:51+02:00 - Seite 320 Dateiname: 6515_1825_02_buchblock.pdf; preflight