Page 344 of 561
.
The hood will lock audibly.
�Check to make sure the hood is fully
closed.
If you can raise th")
343 Operation
Engine compartment
Closing
�Let the hood drop from a height of
approximately 1 ft (30 cm).
The hood will lock audibly.
�Check to make sure the hood is fully
closed.
If you can raise the hood at a point
above the headlamps, then it is not
properly closed. Open it again and let it
drop with somewhat greater force.
Engine oil
The amount of oil your engine needs will
depend on a number of factors, including
driving style. Increased oil consumption
can occur when
�the vehicle is new
�the vehicle is driven frequently at
higher engine speeds
Engine oil consumption checks should only
be made after the vehicle break-in period.Checking engine oil level
When checking the oil level
�the vehicle must be parked on level
ground
�the vehicle must have been stationary
for at least 5 minutes with the engine
turned off
Example illustration ML 350 (ML 320 CDI,
ML 550, ML 63 AMG similar)
1Oil dipstick
2Upper mark
3Lower mark
Warning!G
When closing the hood, use extreme caution
not to catch hands or fingers. Be careful that
you do not close the hood on anyone.
Make sure that the hood is securely en-
gaged before driving off. Do not continue
driving if the hood can no longer engage af-
ter an accident, for example. The hood could
otherwise come loose while the vehicle is in
motion and injure you and/or others.
!Do not use any special lubricant additives,
as these may damage the drive assemblies.
Using special additives not approved by
Mercedes-Benz may cause damage not covered
by the Mercedes-Benz Limited Warranty.
More information on this subject is available at
any Mercedes-Benz Light Truck Center.
��
Page 417 of 561
416 Practical hints
What to do if …
Display messagePossible cause/consequencePossible solution
ABSUnavailable
See Operator’s ManualThe self-diagnosis has not yet been
completed yet.The display will clear after driving a
short distance at a vehicle speed of
above 12 mph (20 km/h).
Cruise Control And
SPEEDTRONICInoperativeThe cruise control is malfunctioning.�Have cruise control checked by an
authorized Mercedes-Benz Light
Truck Center.
Cruise Control––– MPHYou have attempted to set a speed
while driving below 20 mph
(30 km/h).�Accelerate to a speed exceeding
20 mph (30 km/h) and set the
speed (
�page 244).
The ESP® is switched off.�Switch on the ESP® (�page 100).
The automatic transmission is set to
positionP, R, orN.�Set the automatic transmission to
positionD (
�page 185).
The vehicle is secured with the
parking brake.�Release the parking brake
(
�page 57).
Page 422 of 561

421 Practical hints
What to do if …
Display messagePossible
cause/consequencePossible solution
Front Passenger Airbag
Enabled
See Operator’s ManualFront passenger front air bag
is activated while driving even
though a child, small
individual, or object below the
system’s weight threshold is
on the front passenger seat,
or the front passenger seat is
empty. Objects on the seat or
forces acting on the seat may
make the system sense sup-
plemental weight.Stop the vehicle in a safe location as soon as possible and check the front
passenger seat for the following:
�Apply the parking brake (�page 65).
�Switch off the ignition (�page 40).
�Remove child and child restraint from front passenger seat and properly
secure the child in rear seat employing the child restraint if necessary.
�Remove any other items from on and around the front passenger seat
and make sure the storage bag on the back of the front passenger seat
is empty.
�Make sure that no objects which apply forces to the seat are present
(e.g. objects such as books, briefcases etc. lodged behind or around the
seat, head restraints pushing against roof etc.). The system may recog-
nize such forces as supplemental weight and sense that an occupant on
the front passenger seat is of a greater weight than actually present.
�Keep the seat unoccupied, close the front passenger door and switch
on the ignition (
�page 40).
(Continued on next page)
Page 450 of 561
449 Practical hints
Where will I find ...?
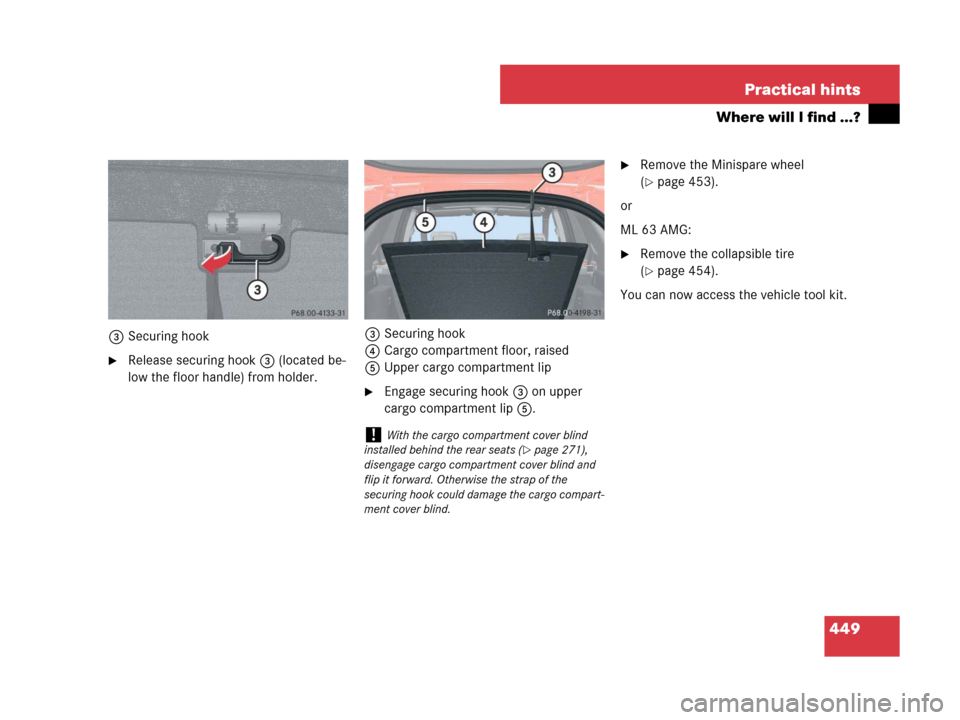
3Securing hook
�Release securing hook3 (located be-
low the floor handle) from holder.3Securing hook
4Cargo compartment floor, raised
5Upper cargo compartment lip
�Engage securing hook3 on upper
cargo compartment lip5.
�Remove the Minispare wheel
(
�page 453).
or
ML 63 AMG:
�Remove the collapsible tire
(
�page 454).
You can now access the vehicle tool kit.
!With the cargo compartment cover blind
installed behind the rear seats (
�page 271),
disengage cargo compartment cover blind and
flip it forward. Otherwise the strap of the
securing hook could damage the cargo compart-
ment cover blind.
Page 451 of 561

450 Practical hints
Where will I find ...?
Example illustration1
6Wheel wrench
7Vehicle jack2
8Collapsible wheel chock
9Fuse chart
aTowing eye bolt
bAlignment bolt
cSpare wheel boltsVehicle jack
The vehicle jack is located underneath the
cargo compartment floor.
�Remove vehicle jack (�page 450).
1Depending on production date, your vehicle may
be equipped with a scissors-type vehicle jack.
Thus, appearance and alignment of the items may
vary.
2If your vehicle is equipped with a scissors-type
vehicle jack, a reversible ratchet is also included.
!Depending on vehicle production date your
vehicle may be equipped with a scissors-type
jack (located under the cargo compartment
floor). If so equipped, only use this jack when
jacking up the vehicle as otherwise the vehicle’s
underbody can be damaged. See separate
instructions for scissors-type jack.
!To prevent damage, always disengage the
strap of the securing hook and lower the cargo
compartment floor (
�page 448) before closing
the tailgate.
Warning!G
Only use the jack supplied with your vehicle
to lift the vehicle briefly for wheel changes.
If you use the jack for any other purpose,
you or others could be inj ure d, as the ja ck is
designed only for the purpose of changing a
wheel.
When using the jack, observe the safety
notes in the “Mounting the spare wheel”
section (
�page 479) and the notes on the
jack.
Page 453 of 561

452 Practical hints
Where will I find ...?
Setting up the collapsible wheel chock
The collapsible wheel chock serves to ad-
ditionally secure the vehicle, e.g. while
changing the wheel.
1Tilt the plate upward
2Fold the lower plate outward
3Insert the plate�Tilt both plates upward1.
�Fold the lower plate outward2.
�Guide the tabs of the lower plate all the
way into the openings of base plate3.
For information on where to place wheel
chocks when changing a wheel, see “Lift-
ing the vehicle” (
�page 479).
Minispare wheel (except ML 63 AMG)
Warning!G
The dimensions of the Minispare wheel are
different from those of the road wheels. As
a result, the vehicle handling characteristics
change when driving with a Minispare wheel
mounted. Adapt your driving style accord-
ingly.
The Minispare wheel is for temporary use
only. When driving with a Minispare wheel
mounted, ensure proper tire inflation
pressure and do not exceed a vehicle speed
of 50 mph (80 km/h).
Drive to the nearest Mercedes-Benz Light
Truck Center as soon as possible to have the
Minispare wheel replaced with a regular
road wheel.
Never operate the vehicle with more than
one spare wheel mounted.
Do not switch off the ESP
® when a
Minispare wheel is mounted.
Page 477 of 561

476 Practical hints
Replacing wiper blades
Installing
1Installing
2Tab
3Attachment
4Guide tab
5Cover
�Slide the wiper blade into
attachment3 in direction of
arrow1.
�Make sure guide tab4 will be placed
under cover5 when fully inserting the
wiper blade into attachment.
�Let tab2 latch into both recesses of
attachment3.
�Check if the wiper blade is securely
fastened.
�Fold the wiper arm backward to rest on
the windshield.
Make sure you hold on to the wiper arm
when folding it back.
Rear wiper blade
Warning!G
For safety reasons, switch off wipers and
remove SmartKey from starter switch
(vehicles with KEYLESS-GO*: Make sure the
vehicle’s on-board electronics have
status
0) before replacing a wiper blade.
Otherwise the motor could suddenly turn on
and cause injury.
!Hold on to the wiper when folding the wiper
arm back. If released, the force of the impact
from the tensioning spring could crack the rear
window.
Do not allow the wiper arm to contact the rear
window glass without a wiper blade inserted.
Make sure the wiper blade is properly installed.
Improperly installed wiper blades may cause
rear window damage.
For your convenience, we recommend that you
have this work carried out by an authorized
Mercedes-Benz Light Truck Center.
Page 478 of 561
477 Practical hints
Replacing wiper blades
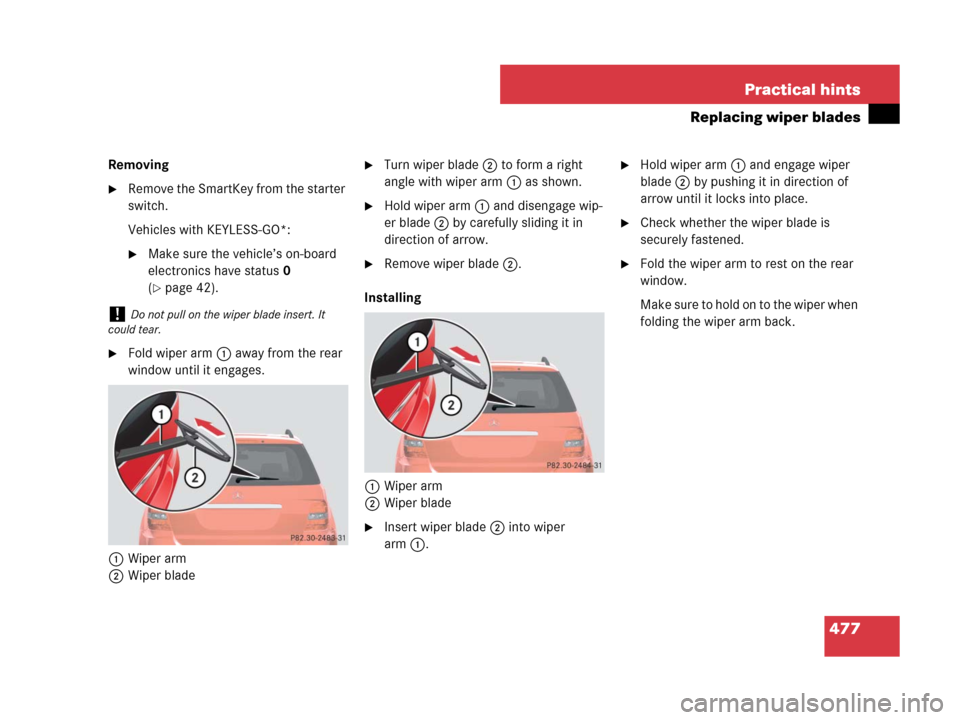
Removing
�Remove the SmartKey from the starter
switch.
Vehicles with KEYLESS-GO*:
�Make sure the vehicle’s on-board
electronics have status0
(
�page 42).
�Fold wiper arm1 away from the rear
window until it engages.
1Wiper arm
2Wiper blade
�Turn wiper blade2 to form a right
angle with wiper arm1 as shown.
�Hold wiper arm1 and disengage wip-
er blade2 by carefully sliding it in
direction of arrow.
�Remove wiper blade2.
Installing
1Wiper arm
2Wiper blade
�Insert wiper blade2 into wiper
arm1.
�Hold wiper arm1 and engage wiper
blade2 by pushing it in direction of
arrow until it locks into place.
�Check whether the wiper blade is
securely fastened.
�Fold the wiper arm to rest on the rear
window.
Make sure to hold on to the wiper when
folding the wiper arm back.
!Do not pull on the wiper blade insert. It
could tear.