Page 491 of 561
 battery, also referred to as “fleece” bat-
tery. Such batteries do not require topping-up of
the electrolyte level.")
490 Practical hints
Battery
!The battery is a valve-regulated lead acid
(VRLA) battery, also referred to as “fleece” bat-
tery. Such batteries do not require topping-up of
the electrolyte level. VRLA batteries therefore do
not have cell caps and the battery cover is
non-removable. Do not attempt to open the bat-
tery as otherwise the battery will be damaged.
Even though VRLA batteries do not require top-
ping-up of the electrolyte level and cannot be
opened to check the electrolyte level, the bat-
tery condition must be checked periodically by
performing a battery conductance test. Refer to
Maintenance Booklet for battery condition test-
ing intervals.
As with any other battery, the battery may dis-
charge if the vehicle is not operated for an ex-
tended period of time. You can connect a battery
maintenance charge unit tested and approved
for use on your vehicle model or disconnect the
battery to prevent battery discharge. Contact an
authorized Mercedes-Benz Light Truck Center
for more information.!The factory-equipped VRLA battery is
leak-proofed. Only use a battery as replacement
that has the same security features and is of
identical size, voltage, and capacity as the
factory-equipped battery.
The battery, the battery ventilation hose
(
�page 495) and the lateral plug (�page 495)
must always be securely installed when the
vehicle is in operation.
Warning!G
Jump starting must only be done using the
jump-start contacts located in the engine
compartment (
�page 497).
Warning!G
Failure to follow these instructions can re-
sult in severe injury or death.
Observe all safety instructions and precau-
tions when handling automotive batteries
(
�page 489).
Never lean over batteries while connecting,
you might get injured.
Battery fluid contains sulfuric acid. Do not
allow this fluid to come in contact with eyes,
skin or clothing. In case it does, immediately
flush affected area with water and seek
medical help if necessary.
A battery will also produce hydrogen gas,
which is flammable and explosive. Keep
flames or sparks away from battery, avoid
improper connection of jumper cables,
smoking etc.
Page 496 of 561

cBattery
�Tilt the batteryc with the negative
terminal side upwards.
�Take out the battery maintaining its
tilted position in the direction of the
arro")
495 Practical hints
Battery
Step 8 (Removing)
cBattery
�Tilt the batteryc with the negative
terminal side upwards.
�Take out the battery maintaining its
tilted position in the direction of the
arrow.Step 9 (Reinstalling)
�Carry out step 8 in reverse order
(
�page 495).
Battery, shown removed for illustration
9Battery ventilation hose
dVent plug
�Carry out step 10 to reconnect the
battery (
�page 495).
�Follow steps 5 to 1 in reverse order to
completely reinstall the battery
(
�page 494) to (�page 491).
Step 10 (Reconnecting)
�If the battery has been removed, first
carry out step 8 in reverse order
(
�page 495).
�Open the driver’s door.
�Make sure all electrical consumers are
turned off.
�Make sure the SmartKey is removed
from the starter switch.
Vehicles with KEYLESS-GO*:
�Make sure the vehicle’s on-board
electronics have status0 (Open the
driver’s door. With the driver’s door
open, the vehicle’s on-board elec-
tronics have status0, same as with
the SmartKey removed from the
starter switch (
�page 39)).
!The battery, the battery ventilation hose9
and the lateral plugd (
�page 495) must
always be securely installed when the vehicle is
in operation.
��
Page 503 of 561
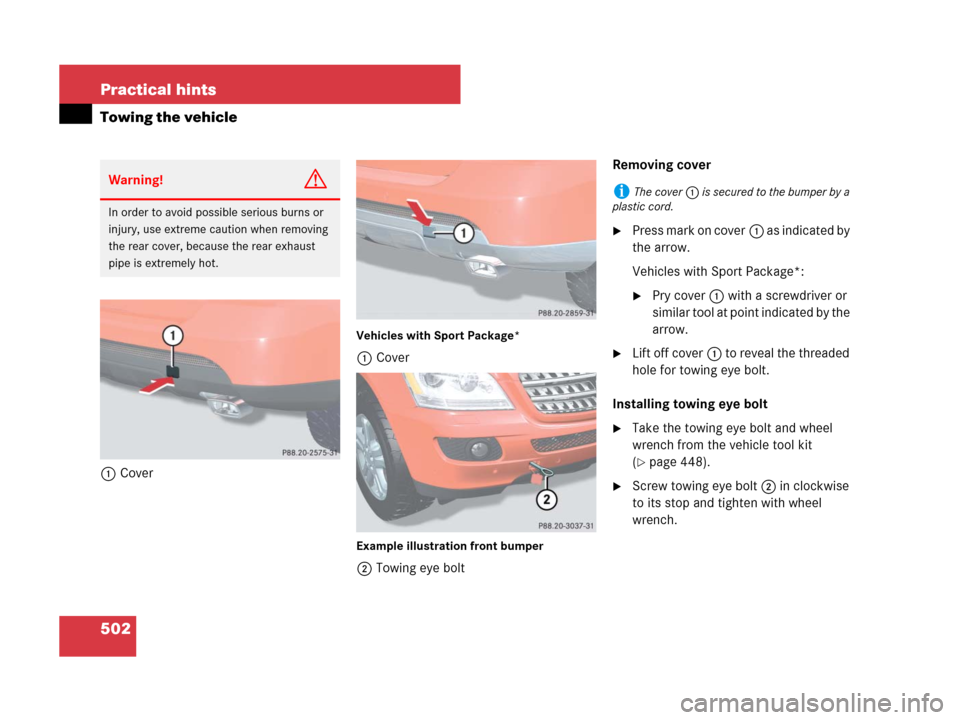
502 Practical hints
Towing the vehicle
1Cover
Vehicles with Sport Package*
1Cover
Example illustration front bumper
2Towing eye boltRemoving cover
�Press mark on cover1 as indicated by
the arrow.
Vehicles with Sport Package*:
�Pry cover1 with a screwdriver or
similar tool at point indicated by the
arrow.
�Lift off cover1 to reveal the threaded
hole for towing eye bolt.
Installing towing eye bolt
�Take the towing eye bolt and wheel
wrench from the vehicle tool kit
(
�page 448).
�Screw towing eye bolt2 in clockwise
to its stop and tighten with wheel
wrench.
Warning!G
In order to avoid possible serious burns or
injury, use extreme caution when removing
the rear cover, because the rear exhaust
pipe is extremely hot.
iThe cover1 is secured to the bumper by a
plastic cord.
Page 505 of 561

504 Practical hints
Fuses
The electrical fuses in your vehicle serve to
switch off malfunctioning power circuits.
If a fuse is blown, the components and sys-
tems secured by that fuse will stop operat-
ing.If a newly inserted fuse blows again, have
the cause determined and rectified by an
authorized Mercedes-Benz Light Truck
Center.
A fuse chart explains the fuse allocation
and fuse amperages. It is located in the
cargo compartment with the vehicle tool
kit (
�page 448).
The electrical fuses are located in different
fuse boxes:
�Fuse box in engine compartment
(
�page 505)
�Fuse box in cargo compartment
(
�page 505)
�Fuse box in passenger compartment
(
�page 506)Before replacing fuses:
�Apply parking brake (�page 65).
�Make sure the automatic transmission
is set toP (
�page 185).
The gear position indicator in the multi-
function display should be on
P.
�Turn off all electrical consumers.
�Turn off the engine (�page 40).
�Remove the SmartKey from the starter
switch.
Vehicles with KEYLESS-GO*:
�Open the driver’s door (this puts
the starter switch in position0,
same as with the SmartKey re-
moved from the starter switch). The
driver’s door then can be closed
again.
Warning!G
Only use fuses approved by Mercedes-Benz
with the specified amperage for the system
in question and do not attempt to repair or
bridge a blown fuse. Using other than ap-
proved fuses or using repaired or bridged
fuses may cause an overload leading to a
fire, and/or cause damage to electrical
components and/or systems. Have the
cause determined and remedied by an au-
thorized Mercedes-Benz Light Truck Center.
iA blown fuse must be replaced by an appro-
priate spare fuse (recognizable by its color or the
fuse rating given on the fuse) of the amperage
recommended in the fuse chart. Any
Mercedes-Benz Light Truck Center will be glad to
advise you on this subject.
Page 545 of 561

544 Index
Fog lamps, Front 439
Fog lamps, Rear 441
Front passenger front air bag 421,
422, 423, 424
Fuel cap 435
Headlamps 438, 439, 441, 443
Hood 435
Key, SmartKey 437
Key, SmartKey with
KEYLESS-GO* 436, 437
Lamps 438, 439, 440, 441, 443
Low tire pressure 425, 445, 446
Parking brake 429
Parking lamps 441
Tele Aid 444
Telephone* 444
Turn signals 443
Vehicle battery 427
Windshield washer fluid 444
Multifunction steering wheel 30, 148
Button operation 148N
Navigation system* 161
See separate COMAND system
operating instructions
Net, Cargo* 272
Net, Parcel 283
Neutral gear position, Automatic
transmission 183, 187
New vehicle, Break-in period 310
Night security illumination 138, 171
Normal occupant weight 381
Number, Vehicle Identification (VIN) 510
O
Occupant distribution 381
Occupant safety 72
Active head restraint 88
Air bags 74
Children and air bags 75, 89, 91
Children in the vehicle 89
Fastening the seat belt 51
Front passenger front air bag off
indicator lamp 79, 83, 84
Infant and child restraint systems 90
LATCH-type child seat anchors 93
OCS 79OCS, Messages in the multifunction
display 421, 422, 423, 424
Seat belts 51, 76
OCS 79
Self-test 84
Odometer 146, 147, 154
Off-road - 4-ETS 105
Off-road - ABS 99
Off-road - ESP
®103
Off-road driving
Checklist 322, 327
Crossing obstacles 325
Driving instructions for off-road
driving 319
Driving through water 324
Returning 327
Rules 321
Special driving features 320
Steep terrain 322
Off-road driving program 253
Oil level see Engine oil, Checking level
One-touch gearshifting 193
Operating safety 17
Operator’s Manual 10
Page 549 of 561

548 Index
Seat heating* see Seats
Seat ventilation* see Seats
Seating capacity 353
Seats 43, 127
Adjusting 43
Cushion depth, Multicontour
seat* 129
Folding the backrest forward 269
Heating* 130
Lumbar support 129
Memory function* 133
Multicontour seat* 129
Returning seat backrest to original
position 271
Ventilation* 131
Securing cargo 268
Cargo tie-down rings 268
Hooks 269
Selector lever see Gear selector lever
Self-test
Lamps in the instrument cluster 400
OCS 84
Tele Aid 295
Vehicle battery 489
Service and warranty information 10Service intervals see Maintenance, Service
indicator
Service life
Tires 349
Service see Maintenance
Service system see Maintenance System
Service, Parts 508
Settings
Adaptive Damping System
(ADS)* 255
Air suspension* 254
Clock 169
Comfort functions* 176
Control system menus 150, 152
Control system submenus 151, 153,
166
Date 153, 166, 169
Daytime running lamp mode 170
Factory, SmartKey 112
Factory, SmartKey with
KEYLESS-GO* 116
Individual, Vehicle 163
Instrument cluster 167
Language, multifunction display 167,
168
Lighting 170Memory function* 133
Resetting all, Control system 164
Selective, SmartKey 112
Selective, SmartKey with
KEYLESS-GO* 117
Time 169
Vehicle configuration 177
Vehicle level control* 255
Shift program (ML 63 AMG only) 194
Shifting
Automatic transmission 54
Shifting, Automatic transmission 183
Side impact air bags 78
Side marker lamps
Cleaning lenses 393
Messages in the multifunction
display 441
Replacing bulbs 464, 469, 472
Side windows see Power windows
Sidewall 381
SmartKey see Key, SmartKey
SmartKey see Key, SmartKey with
KEYLESS-GO*
Snow chains 385
Snow tires see Winter tires