Page 275 of 561
274 Controls in detail
Loading
Pulling the cargo net tight
Belt hook attached behind the front seats
1Belt hook
2Cargo tie-down ring
3Tightening belt
�Hook belt hook1 into cargo tie-down
ring2 in direction of arrow.
�Pull tightening belt3 by the loose end
in direction of arrow until the cargo net
is pulled tight.
�After driving a short distance, make
sure the cargo net is still tight and, if
necessary, pull it tight again.Loosening the cargo net
Belt hook attached behind the front seats
1Buckle
2Belt hook
3Cargo tie-down ring
�Loosen the tightening belt by pulling
buckle1 upward in direction of arrow.
�Remove belt hook2 from cargo
tie-down ring3.Removing and storing the cargo net
�Take cargo net bar2 out of holder1,
see “Installing the cargo net”
(
�page 273).
�Press the red button on the upper and
lower cargo net bar.
�Fold the cargo net.
�Roll up the cargo net.
�Close the hook and loop fasteners on
the cargo net package.
Page 276 of 561

275 Controls in detail
Loading
Cargo management system*
Your vehicle may be equipped with a cargo
management system and accompanying
accessories which enables you to utilize
your cargo compartment in a variety of
ways. You can store the cargo manage-
ment system in the pouch that comes with
the vehicle.
1Cargo railsInserting the mounting elements into
the cargo rails
1Cargo rail
2Mounting element
You can move the mounting element2 to
various engaging points on the
cargo rail1 and fix it in place.
These engaging points are located
2 inches apart from one another on the
cargo rail and are indicated by markings.
�Turn mounting element2 toL.
�Insert mounting element2 in cargo
rail1.
�Turn mounting element2 until it en-
gages in the ‹position.
You should be able to feel the mounting
element engage in the cargo rail.
iThe pouch and the telescoping rod are locat-
ed under the cargo compartment floor.
iYou can turn the mounting element in the
cargo rail to four positions:
‹To lock the mounting element.
NTo insert or remove the cargo tie-down
ring, the belt reel or the telescoping rod.
LTo insert or remove the mounting ele-
ment.
STo move the mounting element to the
next engaging point.
Page 277 of 561

276 Controls in detail
Loading
Inserting the cargo tie-down ring in the
mounting element
1Cargo tie-down ring
2Mounting element
�Turn mounting element2 in the cargo
rail toN.
�Insert cargo tie-down ring1 into
mounting element2.
�Turn mounting element2 until it en-
gages in the ‹position.
You should be able to feel the mounting
element engage in the cargo rail.
Belt reel
1Belt reel
2Mounting element
3Locking button
�Insert two mounting elements2 into a
cargo rail.
�Turn mounting element2 in the cargo
rail toN.
�Insert belt reel1 into mounting
element2.
�Turn mounting element2 in the cargo
rail until it engages in the‹ posi-
tion.
You should be able to feel the mounting
element engage in the cargo rail.
�Press locking button3 on the belt
reel1 and pull cargo net out in direc-
tion of arrow.
Warning!G
The cargo tie-down rings should be subject
to equal loads. Make sure to comply with the
information provided in the loading instruc-
tions (
�page 266).
iThe belt reel can be used to tighten
light-weight loads against the side wall of the
cargo compartment, thus securing them from
slipping.
Page 278 of 561

277 Controls in detail
Loading
�Place load between the cargo net and
the side wall of the cargo compart-
ment.
�Press locking button3 on belt
reel1. With the other hand, slowly
pull net over load until it is taut.
Telescoping rod
1Telescoping rod
2Mounting element�Insert one mounting element2 into
each cargo rail.
�Turn mounting element2 in cargo rail
toN.
�Insert telescoping rod1 into mount-
ing element2.
�Turn mounting element2 in cargo rail
until it engages in the‹ position.
You should be able to feel the mounting
element engage in the cargo rail.Removing rear seat cushions
If your vehicle is equipped with the cargo
management system* you can remove the
rear seat cushions.
Removing the rear seat cushions will pro-
vide you with a larger cargo compartment.
�Fold the seat cushions forward
(
�page 269).
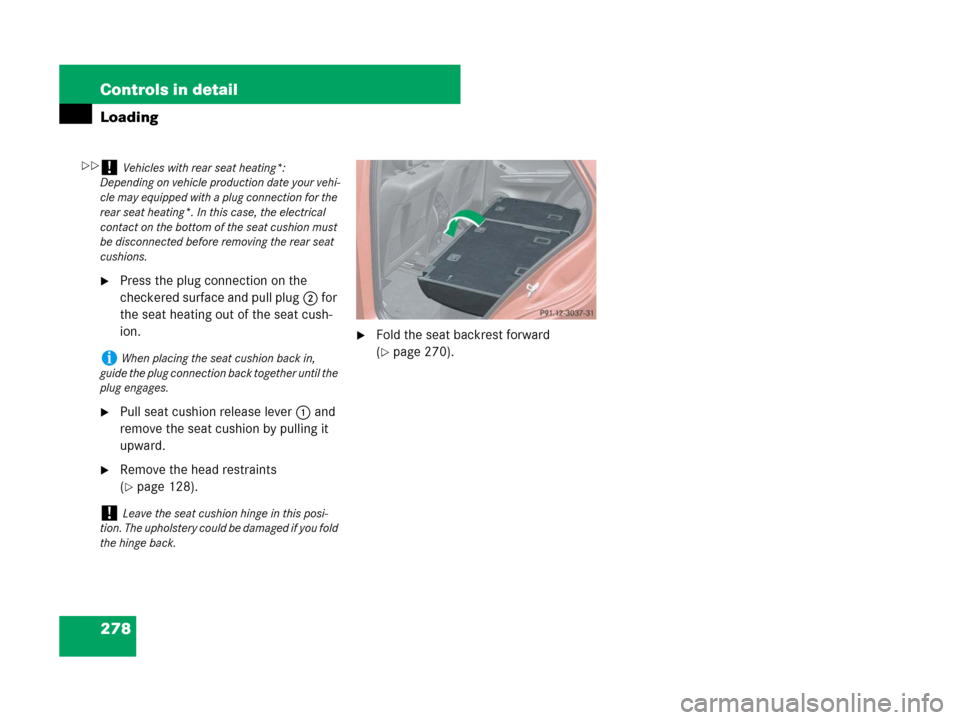
Example illustration passenger-side
1Release lever
2Plug for seat heating*
iThe telescoping rod can be used to tighten
the load against the rear seats so as to secure it
from slipping.
��
Page 279 of 561
278 Controls in detail
Loading
�Press the plug connection on the
checkered surface and pull plug2 for
the seat heating out of the seat cush-
ion.
�Pull seat cushion release lever1 and
remove the seat cushion by pulling it
upward.
�Remove the head restraints
(
�page 128).
�Fold the seat backrest forward
(
�page 270).
!Vehicles with rear seat heating*:
Depending on vehicle production date your vehi-
cle may equipped with a plug connection for the
rear seat heating*. In this case, the electrical
contact on the bottom of the seat cushion must
be disconnected before removing the rear seat
cushions.
iWhen placing the seat cushion back in,
guide the plug connection back together until the
plug engages.
!Leave the seat cushion hinge in this posi-
tion. The upholstery could be damaged if you fold
the hinge back.
��
Page 280 of 561

279 Controls in detail
Useful features
�Useful features
Storage compartments Glove box/CD changer*
1Glove box lid release
2Glove box lid
Opening the glove box
�Pull lid release1 in direction of arrow.
Glove box lid2 opens downward.
Closing the glove box
�Push glove box lid2 up to close.Releasing CD changer*
1Release button
2AUX-socket (Vehicles without Rear
Seat Entertainment System*)
3CD changer
�Open the glove box (�page 279).
�Press release button1.
CD changer3 is released and swings
down automatically.
For information on CD changer operation,
see separate COMAND system operating
instructions.
Warning!G
To help avoid personal injury during a colli-
sion or sudden maneuver, exercise care
when storing objects in the vehicle. Put lug-
gage or cargo in the cargo compartment if
possible. Do not pile luggage or cargo higher
than the seat backs.
If so equipped, always use the cargo net*
when transporting cargo. The cargo net*
cannot secure hard or heavy objects.
Parcel nets cannot secure hard or heavy ob-
jects.
Keep compartment lids closed. This will help
to prevent stored objects from being thrown
about and injuring vehicle occupants during
�braking
�vehicle maneuvers
�an accident
iDepending on vehicle equipment, a
CD changer* and an AUX-socket are located in
the glove box.
Page 281 of 561
280 Controls in detail
Useful features
Closing CD changer*
1CD changer
�Gently push CD changer1 up in direc-
tion of arrow until it engages.
For information on CD changer operation,
see separate COMAND system operating
instructions.Locking and unlocking the glove box
separately
You can lock the glove box separately, e.g.
when the vehicle is in the shop for service.
�Take the mechanical key out of the
SmartKey or SmartKey with
KEYLESS-GO* (
�page 455).
1Unlocking glove box
2Locking glove box
�Insert mechanical key into glove box
lock.
�Turn mechanical key to position3 to
lock the glove box.
�Turn mechanical key to position2 to
unlock the glove box.
iThe glove box can only be locked or
unlocked with the mechanical key (
�page 455).
Page 282 of 561
281 Controls in detail
Useful features
Storage compartment in front center
console
�Briefly press the front of the cover.
The cover opens automatically.
�Briefly press the front of the cover.
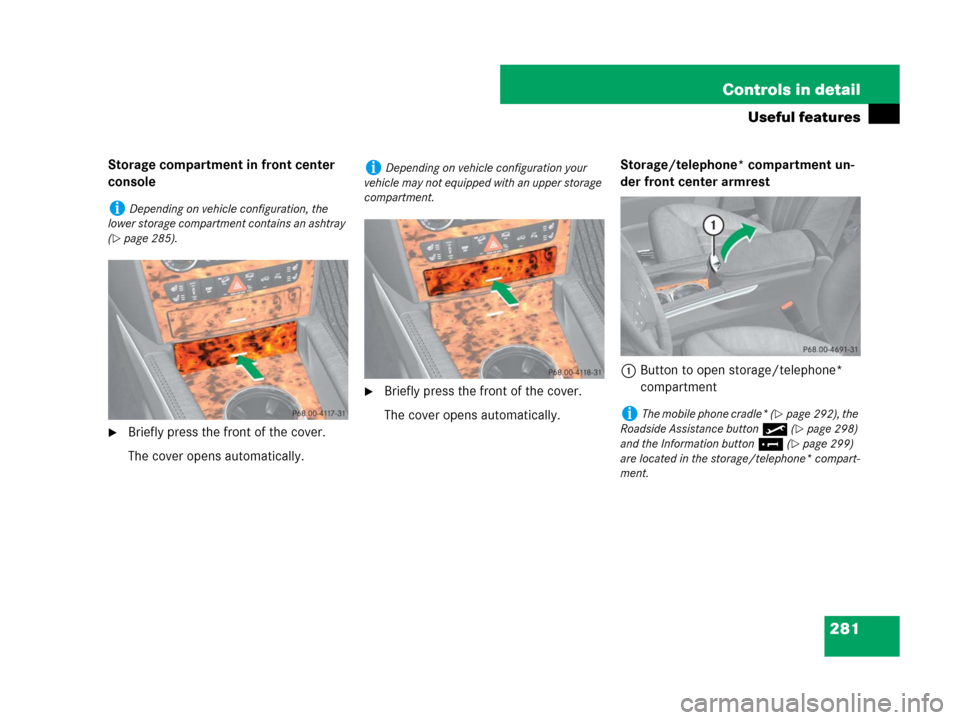
The cover opens automatically.Storage/telephone* compartment un-
der front center armrest
1Button to open storage/telephone*
compartment
iDepending on vehicle configuration, the
lower storage compartment contains an ashtray
(
�page 285).
iDepending on vehicle configuration your
vehicle may not equipped with an upper storage
compartment.
iThe mobile phone cradle* (�page 292), the
Roadside Assistance button• (
�page 298)
and the Information button¡ (
�page 299)
are located in the storage/telephone* compart-
ment.