Page 63 of 561

62 Getting started
Driving
Wiping with windshield washer fluid
�Press the combination switch in direc-
tion of arrow1 past the resistance
point.
The windshield wipers operate with
washer fluid.
For information on cleaning the headlamps
with washer fluid, see “Headlamp cleaning
system*” (
�page 199).
For information on filling up the washer
reservoir, see “Windshield/rear window
washer system and headlamp cleaning
system*” (
�page 346).
Rear window wiper/washer
The combination switch is located on the
left of the steering column.
Combination switch
1Rear window wiper switch
2Wiping rear window with washer fluid
3Intermittent wiping
4Rear window wiper off
5Wiping rear window with washer fluid6Rear window wiper indicator
�Switch on the ignition (�page 40).
Activating intermittent wipe
�Turn rear window wiper switch1 to
position3 (
�page 62).
In the lower multifunction display you
will see indicator6, indicating that
the rear window wiper is activated.
iTo prevent smears on the windshield or
noisy/chattering wiper blades, wipe with
windshield washer fluid every now and then even
when it is raining.
iThe rear window wiper engages automatical-
ly when the automatic transmission is shifted to
positionR with the windshield wipers switched
on.
Page 64 of 561
.
Indicator6 (
�page 62) for the rear
window wiper is cleared from the lower
multif")
63 Getting started
Driving
Deactivating intermittent wipe
�Turn rear window wiper switch1 to
position4 (
�page 62).
Indicator6 (
�page 62) for the rear
window wiper is cleared from the lower
multifunction display, indicating that
the rear window wiper is deactivated.
Wiping with windshield washer fluid
�Turn and hold rear window wiper
switch1 in position2 or5
(
�page 62) until the rear window is
clean.
The rear window wiper operates with
washer fluid.
For information on filling up the washer
reservoir, see “Windshield/rear window
washer system and headlamp cleaning
system*” (
�page 346).
Problems while driving
The engine runs erratically and misfires
�An ignition cable may be damaged
(gasoline engine only).
�The engine electronics may not be
operating properly.
�Unburned gasoline may have entered
the catalytic converter and damaged it
(gasoline engine only).
�Give very little gas.
�Have the problem repaired by an
authorized Mercedes-Benz Light Truck
Center as soon as possible.The coolant temperature is above
248°F (120°C)
The coolant is too hot and is no longer
cooling the engine.
�Stop the vehicle in a safe location as
soon as possible and turn off the en-
gine. Allow engine and coolant to cool
off.
�Check the coolant level and add cool-
ant if necessary (
�page 345).
Page 175 of 561

174 Controls in detail
Control system
�Press buttonj ork repeatedly
until the message
Compass Setting
Zone
appears in the multifunction
display.
The selection marker is on the current
setting.
�Press buttonæ orç to set the
respective compass zone.
For information on how to call up the
compass, see “Compass” (
�page 307).Compass calibration
This function is not available if your vehicle
is equipped with the COMAND system and
navigation module*.
In order to calibrate the compass properly,
mind the following:
�Calibrate the compass in open terrain.
Nearby buildings, bridges, power lines
and large antenna masts, for example,
could impair compass calibration.
�Switch off electrical consumers (e.g.
climate control, windshield wipers, or
rear window defroster).
�Close all doors and the tailgate.
�Start the engine (�page 54).
�Press buttonæ orç to move
the selection marker to the
Vehicle
submenu.
�Press buttonj ork repeatedly
until the message
Compass Calibration appears in the
multifunction display.
The selection marker is on setting
switched Off.
�Press buttonæ to set the selection
marker to
Start.
The following message appears in the
multifunction display:
Compass Calibration Active
Please drive in a full circle.
iMake sure you are in area where you can
drive a full circle with your vehicle without dis-
turbing traffic in order to calibrate the compass.
��
Page 200 of 561
.
Headlamp cleaning system*
The headlamps will automatically be
c")
199 Controls in detail
Good visibility
�Good visibility
For information on windshield wipers, see
“Windshield wipers” (
�page 60).
Headlamp cleaning system*
The headlamps will automatically be
cleaned with a high-pressure water jet
when you have
�switched on the headlamps
and
�operated the windshield wipers with
windshield washer fluid five times
When you switch off the headlamps, the
counter resets.
For information on filling up the washer
reservoir, see “Windshield/rear window
washer system and headlamp cleaning
system*” (
�page 346).
Rear view mirrors
For more information on setting the rear
view mirrors, see “Mirrors” (
�page 49).
Interior rear view mirror, antiglare
position
1Lever
�Tilt the mirror to the antiglare position
by moving lever1 towards the wind-
shield.
The interior rear view mirror is dimmed.Auto-dimming rear view mirrors*
The reflection brightness of the exterior
rear view mirror on the driver’s side and
the interior rear view mirror will respond
automatically to glare when
�the ignition is switched on
and
�incoming light from headlamps falls on
the sensor in the interior rear view
mirror
The rear view mirror will not react if
�the automatic transmission is set to
positionR
�the interior lighting is turned on
Page 203 of 561
202 Controls in detail
Good visibility
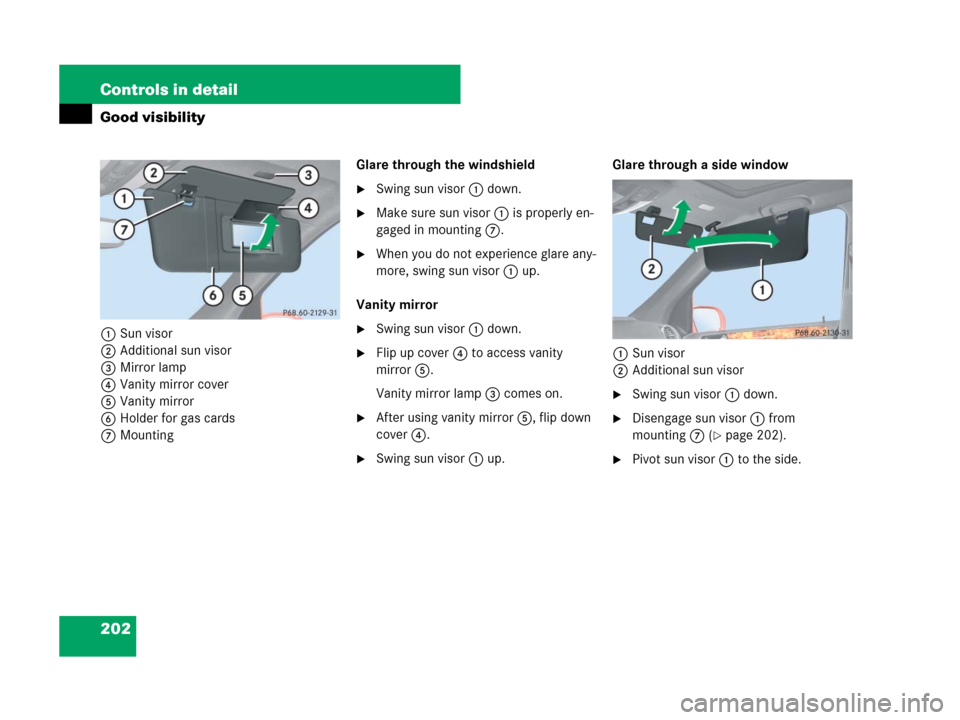
1Sun visor
2Additional sun visor
3Mirror lamp
4Vanity mirror cover
5Vanity mirror
6Holder for gas cards
7MountingGlare through the windshield
�Swing sun visor1 down.
�Make sure sun visor1 is properly en-
gaged in mounting7.
�When you do not experience glare any-
more, swing sun visor1 up.
Vanity mirror
�Swing sun visor1 down.
�Flip up cover4 to access vanity
mirror5.
Vanity mirror lamp3 comes on.
�After using vanity mirror5, flip down
cover4.
�Swing sun visor1 up.Glare through a side window
1Sun visor
2Additional sun visor
�Swing sun visor1 down.
�Disengage sun visor1 from
mounting7 (
�page 202).
�Pivot sun visor1 to the side.
Page 204 of 561

203 Controls in detail
Good visibility
�Adjust sun visor1 by pushing or pull-
ing in the direction of arrows.
�Swing down additional sun visor2
when you experience additional glare
through the windshield.
Rear window defroster
The rear window defroster uses a large
amount of power. To keep battery drain to
a minimum, switch off the defroster as
soon as the rear window is clear. The de-
froster is automatically deactivated after
approximately 6 to 17 minutes of
operation depending on the outside tem-
perature.
�Switch on the ignition (�page 40).Activating
�Press button1 on the climate con-
trol panel (
�page 206) or the automat-
ic climate control* panel (
�page 220).
The indicator lamp on the button
comes on.
Deactivating
�Press button1 once more.
The indicator lamp on the button goes
out.
!To avoid damage to vanity mirror cover4
(
�page 202), make sure it is closed before
pivoting sun visor1 to the side.
Warning!G
Any accumulation of snow and ice should be
removed from the rear window before driv-
ing. Visibility could otherwise be impaired,
endangering you and others.!If the rear window defroster switches off too
soon and the indicator lamp starts flashing, too
many electrical consumers are operating simul-
taneously and there is insufficient voltage in the
battery. The system responds automatically by
switching the rear window defroster off.
As soon as the battery has sufficient voltage, the
rear window defroster switches back on auto-
matically.
Page 206 of 561
205 Controls in detail
Climate control
1Driver’s door air vent, fixed
2Left side air vent, adjustable
3Thumbwheel for air volume control
for left side and door air vent
4Windshield air vents
5Thumbwheel for air volume control
for left center air vent
6Left center air vent, adjustable
7Right center air vent, adjustable
8Thumbwheel for air volume control
for right center air vent
9Thumbwheel for air volume control
for right side and door air vent
aRight side air vent, adjustable
bFront passenger door air vent, fixed
cClimate control panel
dFootwell air vents
iFor draft-free ventilation, move the sliders
for center air vents and side air vents to the
middle position.
Page 207 of 561
206 Controls in detail
Climate control
1Temperature control, left
2Air distribution and air volume
(automatic, manual)
3Front defroster
4Increasing air volume
5Air distribution (directs air through
the windshield and side air vents)
6Rear climate control* on/off
Air supply for rear passenger
compartment on/off
:USA only
7Temperature control, right
8AC cooling on/off
Residual heat/ventilation
9Air distribution (directs air through
center and side air vents)
aAir distribution (directs air through
the footwells and side air vents)
bAir volume display
cDecreasing air volume
dRear window defroster
eAir recirculation
fInterior temperature sensor
gClimate control on/off


3Front defroster
4Increasing air volume
5Air distribution (directs air through")