Page 45 of 561
*
2Seat cushion t")
44 Getting started
Adjusting
Seat adjustment
The seat adjustment switch is located on
the entry side of each front seat base.
1 Head restraint height (vehicles with
memory function)*
2Seat cushion tilt
3Seat height
4Backrest tilt
5Seat fore and aft adjustment
Warning!G
According to accident statistics, children
are safer when properly restrained in the
rear seating positions than in the front seat-
ing position. Thus, we strongly recommend
that children be placed in the rear seats
whenever possible. Regardless of seating
position, children 12 years old and under
must be seated and properly secured in an
appropriately sized infant restraint, toddler
restraint, or booster seat recommended for
the size and weight of the child. For addi-
tional information, see “Children in the vehi-
cle” (
�page 89).
A child’s risk of serious or fatal injuries is
significantly increased if the child restraints
are not properly secured in the vehicle
and/or the child is not properly secured in
the child restraint.
!When moving the seats, make sure there are
no items in the footwell or behind the seats;
otherwise you could damage the seats.
!When the rear seats are folded forward, e.g.
for cargo compartment expansion (
�page 269),
the front seats may not be moved to the rear-
most position. Otherwise you could damage the
front and rear seats.
!When adjusting the seat backrest tilt and
head restraint height, make sure the sun visor is
folded up (
�page 201). If the head restraint is in
the uppermost position, it could hit and damage
the sun visor.
iVehicles without memory function*:
The seats can be adjusted within 5 minutes after
either front door has been opened. The counter
resets each time
�you open or close a front door
�you insert the SmartKey into the starter
switch
�you remove the SmartKey from the starter
switch
�you switch the ignition on or off
Page 46 of 561

45 Getting started
Adjusting
Seat fore and aft adjustment
�Press the switch forward or backward
in direction of arrow5.
Seat height
�Press the switch up or down in
direction of arrow3.
Seat cushion tilt
�Press the switch up or down in
direction of arrow2 until your upper
legs are lightly supported.
Seat backrest tilt
�Press the switch forward or backward
in direction of arrow4.Head restraint height
Vehicles with memory function*:
�Press switch1 (�page 44) up or
down in direction of arrow.
Vehicles without memory function*:
1Head restraint
2Release button
iThe memory function* (�page 133) lets
you store the settings for the seat positions
together with the settings for the steering wheel
and the exterior rear view mirrors.
Warning!G
Do not drive the vehicle without the seat
head restraints. Head restraints are intend-
ed to help reduce injuries during an
accident.
With a rear seat occupied, make sure to
move the respective head restraint up from
the lowest non-use position and have the
occupant adjust the head restraint properly.
For your protection, drive only with properly
positioned and engaged head restraints.
Adjust the head restraint so that it is as
close to the head as possible and the center
of the head restraint supports the back of
the head at eye level. This will reduce the po-
tential for injury to the head and neck in the
event of an accident or similar situation.
!Do not attempt to remove front seat head
restraints. They can only be removed by qualified
technicians. We recommend that you have this
work carried out by an authorized
Mercedes-Benz Light Truck Center.
Page 47 of 561

46 Getting started
Adjusting
Raising:
�Manually adjust the height of head
restraint1 by pulling it upward.
If head restraint1 is fully retracted,
push release button2 in direction of
arrow and pull head restraint1 up-
ward.
Lowering:
�To lower head restraint1, push
release button2 in direction of arrow
and press down on head restraint1.Head restraint fore and aft adjustment
Manually adjust the angle of the head
restraint.
�While seated, reach behind you with
both hands and find lower edge of the
head restraint.
�Adjust the head restraint to the desired
position by pushing or pulling on the
lower edge of the head restraint cush-
ion.
For more information, see “Seats”
(
�page 127).
Steering wheel
Easy-entry/exit feature*
This feature allows for easier entry into and
exit from the vehicle. When entering and
exiting the vehicle, the steering wheel is in
its uppermost position.
The easy-entry/exit feature can be
activated or deactivated in the
Comfort
submenu of the control system
(
�page 176).
Warning!G
You must make sure no one can become
trapped or injured by the moving steering
wheel when the easy-entry/exit feature is
activated.
To stop steering wheel movement, do one of
the following:
�Move steering wheel adjustment stalk*
(
�page 49).
Page 54 of 561

53 Getting started
Driving
�With a smooth motion, pull the belt out
of seat belt outlet1.
�Place the shoulder portion of the belt
across the top of your shoulder and the
lap portion across your hips.
�Push latch plate2 into buckle3
(
�page 52) until it clicks.
�If necessary, tighten the lap portion to
a snug fit by pulling shoulder portion
up.
Seat belt height adjustment
1Release button
�Press release button1 and move the
seat belt height adjuster upward or
downward.
Proper use of seat belts
�Do not twist the belt when fastening.
�Adjust seat belt so that the shoulder
portion is located as close as possible
to the middle of the shoulder (it should
not touch the neck). Never pass the
shoulder portion of the belt under your
arm. For this purpose, you can adjust
the height of the belt outlet
(
�page 53).
�Position the lap belt as low as possible
on your hips (over hip joint) and not
across the abdomen.
�Place the seat backrest in a position
that is as upright as possible.
�Never use a seat belt for more than one
person at a time.
�Do not fasten a seat belt around a
person and another object at the same
time. When using a seat belt to secure
infant or toddler restraints or children
in booster seats, always follow the
child seat manufacturer’s instructions.
�Check your seat belt periodically
during travel to make sure that it is
properly positioned.
�Make sure the seat belt is always fitted
snugly. Take special care of this when
wearing loose clothing.
Page 129 of 561
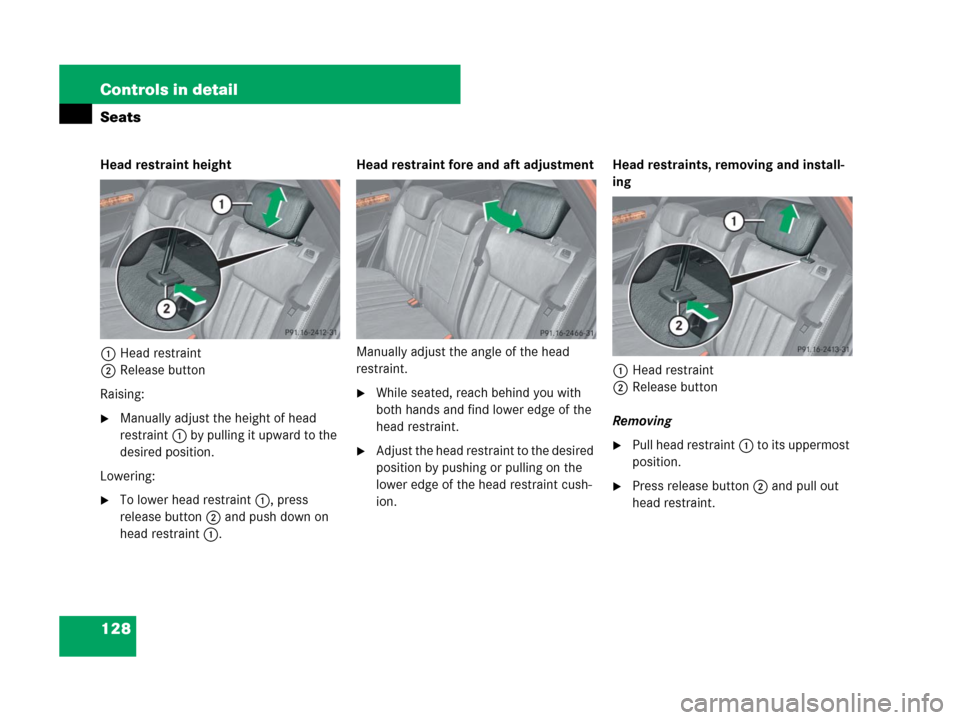
128 Controls in detail
Seats
Head restraint height
1Head restraint
2Release button
Raising:
�Manually adjust the height of head
restraint1 by pulling it upward to the
desired position.
Lowering:
�To lower head restraint1, press
release button2 and push down on
head restraint1.Head restraint fore and aft adjustment
Manually adjust the angle of the head
restraint.
�While seated, reach behind you with
both hands and find lower edge of the
head restraint.
�Adjust the head restraint to the desired
position by pushing or pulling on the
lower edge of the head restraint cush-
ion.Head restraints, removing and install-
ing
1Head restraint
2Release button
Removing�Pull head restraint1 to its uppermost
position.
�Press release button2 and pull out
head restraint.
Page 130 of 561

129 Controls in detail
Seats
Installing
�Insert head restraint1 into openings
on the seat backrest.
�Push head restraint1 down until it au-
dibly engages.
�Press release button2 and adjust
head restraint1 to the desired posi-
tion (
�page 128).
For more information on seats, see the
“Getting started” section (
�page 43).
Lumbar support
The curvature of the driver’s seat can be
adjusted to help enhance lower back sup-
port and seating comfort.
The lever for lumbar support adjustment is
located on the right hand side of the
driver’s seat backrest.
1Adjustment lever
�Move adjustment lever1 in direction
of arrows until you have reached a
comfortable seating position.
Multicontour seat*
The multicontour seat has an extendable
seat cushion and inflatable air chambers
built into the backrest to provide additional
lumbar and side support.
The seat cushion depth, seat backrest
cushion-height and curvature can be con-
tinuously varied with switches on the in-
side of each front seat base after the
ignition is switched on (
�page 39).
1Seat cushion depth
2Backrest side bolsters
3Backrest center
4Backrest bottom
Page 167 of 561
166 Controls in detail
Control system
The table below shows what settings can
be changed within the various menus.
Detailed instructions on making individual
settings can be found on the following
pages.
Instrument clusterTime/DateLightingVehicleComfort*
(�page 167)(�page 169)(�page 170)(�page 173)(�page 176)
Selecting speedometer
display modeSetting the timeSetting daytime running
lamp mode (USA only)Compass adjustmentActivating
easy-entry/exit
feature*
Selecting languageSetting the dateSetting locator lightingCompass calibrationSetting fold-in func-
tion* for exterior rear
view mirrors
Selecting display (digital
speedometer or outside
temperature) for status in-
dicatorSetting night security
illuminationAudio search function
Setting interior lighting
delayed shut-offSetting automatic cen-
tral locking
Limiting opening
height of tailgate*
Page 174 of 561
173 Controls in detail
Control system
Vehicle submenu
Access the
Vehicle submenu via the
Settings menu. Use the Vehicle submenu
to make general vehicle settings.
The following functions are available:Compass adjustment
This function is not available if your vehicle
is equipped with the COMAND system and
navigation module*.
Determine your location on the basis of the
following zone maps.
Zone map North AmericaZone map South America
�Press buttonæ orç to move
the selection marker to the
Vehicle
submenu.
FunctionPage
Compass adjustment173
Compass calibration174
Audio search function175
Setting automatic central
locking175
Limiting opening height of
tailgate*176
��