Page 437 of 561

436 Practical hints
What to do if …
Display symbolDisplay messagePossible cause/consequencePossible solution
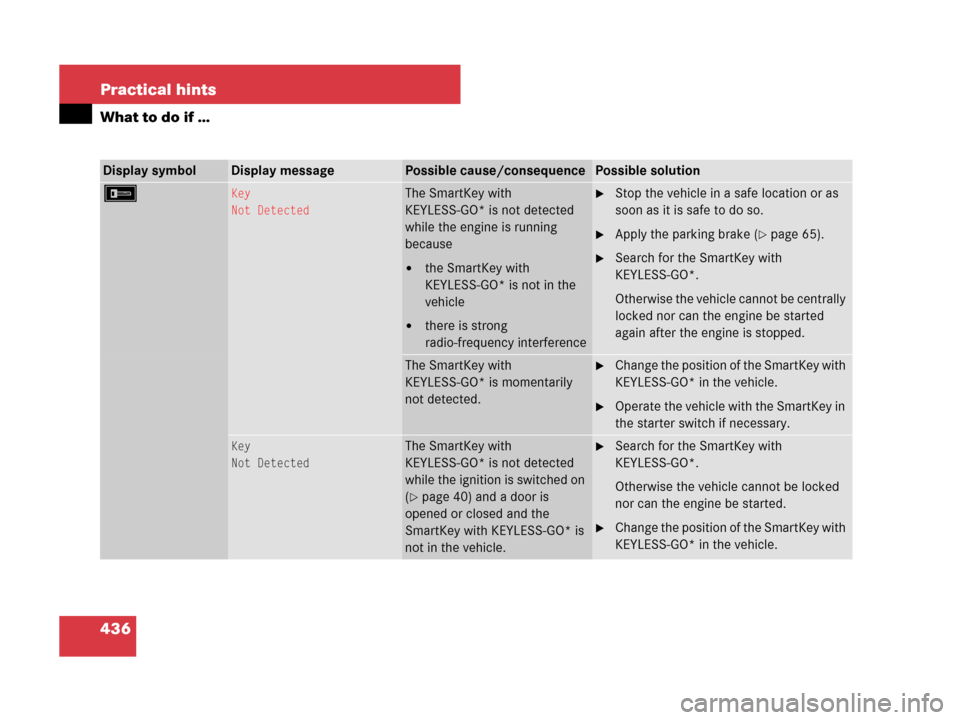
FKey
Not DetectedThe SmartKey with
KEYLESS-GO* is not detected
while the engine is running
because
�the SmartKey with
KEYLESS-GO* is not in the
vehicle
�there is strong
radio-frequency interference
�Stop the vehicle in a safe location or as
soon as it is safe to do so.
�Apply the parking brake (�page 65).
�Search for the SmartKey with
KEYLESS-GO*.
Otherwise the vehicle cannot be centrally
locked nor can the engine be started
again after the engine is stopped.
The SmartKey with
KEYLESS-GO* is momentarily
not detected.�Change the position of the SmartKey with
KEYLESS-GO* in the vehicle.
�Operate the vehicle with the SmartKey in
the starter switch if necessary.
Key
Not DetectedThe SmartKey with
KEYLESS-GO* is not detected
while the ignition is switched on
(
�page 40) and a door is
opened or closed and the
SmartKey with KEYLESS-GO* is
not in the vehicle.
�Search for the SmartKey with
KEYLESS-GO*.
Otherwise the vehicle cannot be locked
nor can the engine be started.
�Change the position of the SmartKey with
KEYLESS-GO* in the vehicle.
Page 438 of 561

437 Practical hints
What to do if …
Display symbolDisplay messagePossible cause/consequencePossible solution
FKey Detected
In VehicleA SmartKey with KEYLESS-GO*
left in the vehicle was detected
while trying to lock the vehicle
from the outside.�Take the SmartKey with KEYLESS-GO*
out of the vehicle.
Remove KeyYou have forgotten to remove
the SmartKey.�Remove the SmartKey from the starter
switch.
You need a new key.There is no additional code avail-
able for SmartKey or SmartKey
with KEYLESS-GO*.�Contact an authorized Mercedes-Benz
Light Truck Center as soon as possible.
Key
Does Not Belong to VehicleThe SmartKey or SmartKey with
KEYLESS-GO* in the starter
switch does not belong to the
vehicle.�Find the SmartKey or SmartKey with
KEYLESS-GO* that belongs to the
vehicle to operate the vehicle.
Change
Key BatteriesThe batteries in the SmartKey
with KEYLESS-GO* are dis-
charged.�Replace the batteries (�page 461).
Don’t Forget
Your KeyThis message appears for a
maximum of 60 seconds if the
driver’s door is opened with the
engine shut off and no SmartKey
in the starter switch.
This message is only a reminder.�Insert the SmartKey in the starter
switch (
�page 40).
or
�Take the SmartKey with KEYLESS-GO*
with you when leaving the vehicle.
Page 446 of 561
445 Practical hints
What to do if …
Display symbolDisplay messagePossible cause/consequencePossible solution
HTire Pressure(s)
Please CorrectVehicles with Advanced TPMS*:
The pressure is too low in one or
more tires.�Check and correct tire inflation pressure as
required.
Tire Pressure
Caution - Tire DefectOne or more tires are deflating.�Carefully bring the vehicle to a halt, avoiding
abrupt steering and braking maneuvers.
�If necessary, change the wheel.
Caution: Tire DefectOne or more tires are deflating.
Vehicles with Advanced TPMS*:
The respective tire is indicated in
the multifunction display.�Carefully bring the vehicle to a halt, avoiding
abrupt steering and braking maneuvers.
�If necessary, change the wheel.
Warning!G
Do not drive with a flat tire. A flat tire affects
the ability to steer or brake the vehicle. You
may lose control of the vehicle. Continued
driving with a flat tire will cause excessive
heat build-up and possibly a fire.
Page 447 of 561

446 Practical hints
What to do if …
Display symbolDisplay messagePossible cause/consequencePossible solution
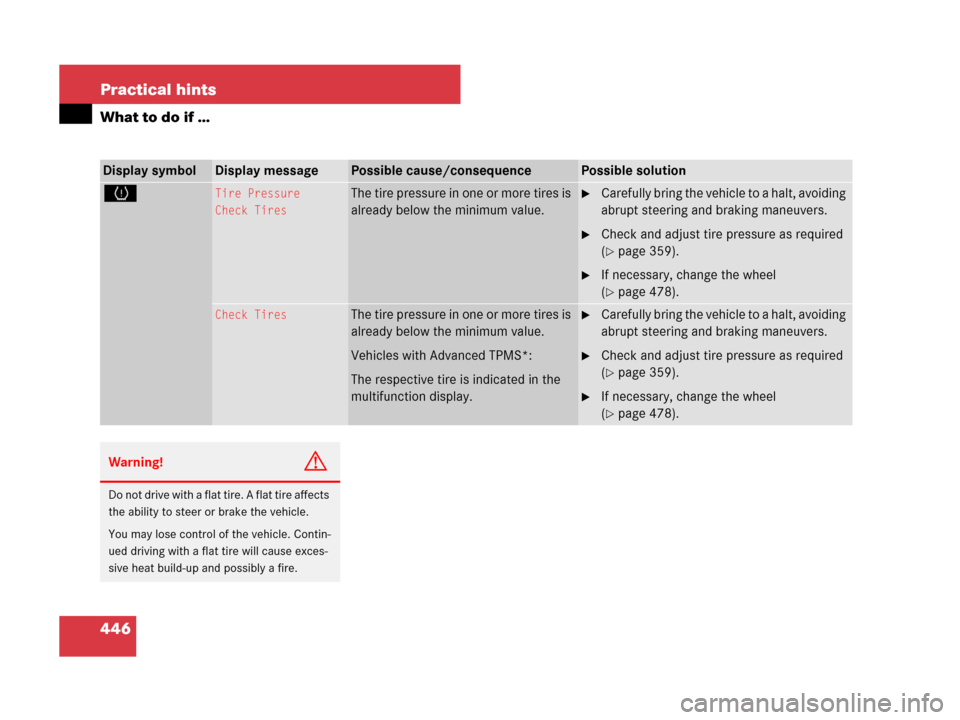
HTire Pressure
Check TiresThe tire pressure in one or more tires is
already below the minimum value.�Carefully bring the vehicle to a halt, avoiding
abrupt steering and braking maneuvers.
�Check and adjust tire pressure as required
(
�page 359).
�If necessary, change the wheel
(
�page 478).
Check TiresThe tire pressure in one or more tires is
already below the minimum value.
Vehicles with Advanced TPMS*:
The respective tire is indicated in the
multifunction display.�Carefully bring the vehicle to a halt, avoiding
abrupt steering and braking maneuvers.
�Check and adjust tire pressure as required
(
�page 359).
�If necessary, change the wheel
(
�page 478).
Warning!G
Do not drive with a flat tire. A flat tire affects
the ability to steer or brake the vehicle.
You may lose control of the vehicle. Contin-
ued driving with a flat tire will cause exces-
sive heat build-up and possibly a fire.
Page 448 of 561

447 Practical hints
What to do if …
Display symbolDisplay messagePossible cause/consequencePossible solution
nLevel Selection
Not PermittedThe selected vehicle level cannot ad-
justed, because
�you are driving too fast for the de-
sired vehicle level
�you are towing a trailer
�you are using accessories that are
connected to the trailer power
socket, e.g. a bicycle rack
�Reduce vehicle speed.
�Set the desired vehicle level again
(
�page 257).
MalfunctionThe air suspension* is malfunctioning.�Do not drive faster than 50 mph
(80 km/h) depending on the set
vehicle level.
�Have the vehicle checked at an au-
thorized Mercedes-Benz Light
Truck Center.
Compressor
Cooling DownYou have selected a higher vehicle
level*. Due to frequent level changes
within a short period, the compressor
must first cool down.�Let the compressor cool until the
message disappears.
The selected level will be set once
the compressor has cooled down.
!When the message Compressor Cooling
Down
appears in the multifunction display,
driving is still possible. Keep in mind that theride height of the vehicle is not yet reached, so
you can damage the underbody of the vehicle.The selected level will be set once the compres-
sor has cooled.
Page 451 of 561

450 Practical hints
Where will I find ...?
Example illustration1
6Wheel wrench
7Vehicle jack2
8Collapsible wheel chock
9Fuse chart
aTowing eye bolt
bAlignment bolt
cSpare wheel boltsVehicle jack
The vehicle jack is located underneath the
cargo compartment floor.
�Remove vehicle jack (�page 450).
1Depending on production date, your vehicle may
be equipped with a scissors-type vehicle jack.
Thus, appearance and alignment of the items may
vary.
2If your vehicle is equipped with a scissors-type
vehicle jack, a reversible ratchet is also included.
!Depending on vehicle production date your
vehicle may be equipped with a scissors-type
jack (located under the cargo compartment
floor). If so equipped, only use this jack when
jacking up the vehicle as otherwise the vehicle’s
underbody can be damaged. See separate
instructions for scissors-type jack.
!To prevent damage, always disengage the
strap of the securing hook and lower the cargo
compartment floor (
�page 448) before closing
the tailgate.
Warning!G
Only use the jack supplied with your vehicle
to lift the vehicle briefly for wheel changes.
If you use the jack for any other purpose,
you or others could be inj ure d, as the ja ck is
designed only for the purpose of changing a
wheel.
When using the jack, observe the safety
notes in the “Mounting the spare wheel”
section (
�page 479) and the notes on the
jack.
Page 453 of 561

452 Practical hints
Where will I find ...?
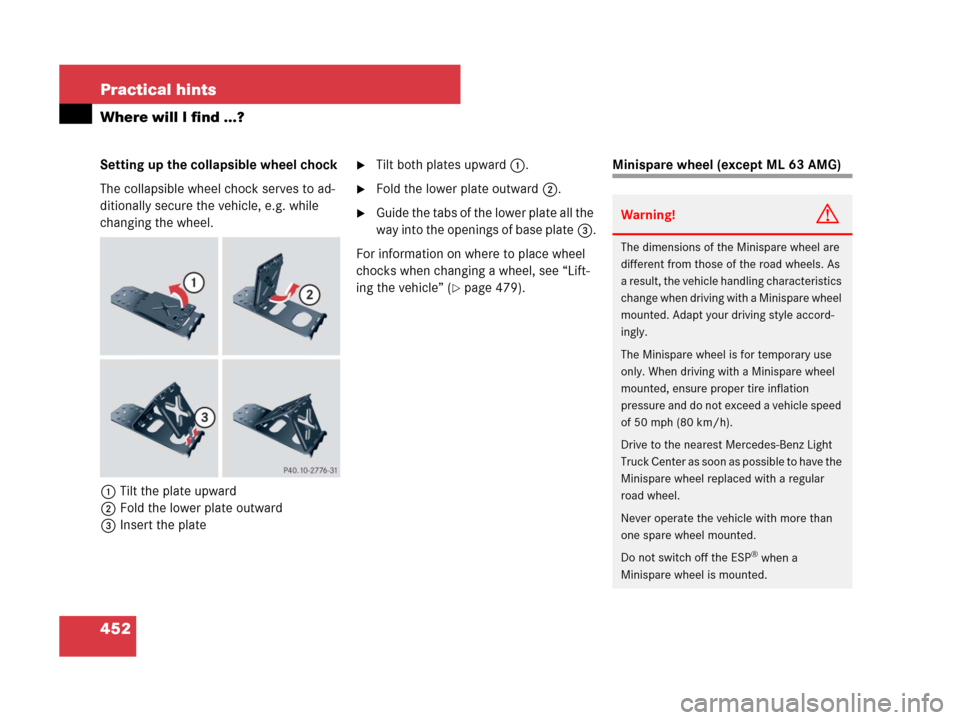
Setting up the collapsible wheel chock
The collapsible wheel chock serves to ad-
ditionally secure the vehicle, e.g. while
changing the wheel.
1Tilt the plate upward
2Fold the lower plate outward
3Insert the plate�Tilt both plates upward1.
�Fold the lower plate outward2.
�Guide the tabs of the lower plate all the
way into the openings of base plate3.
For information on where to place wheel
chocks when changing a wheel, see “Lift-
ing the vehicle” (
�page 479).
Minispare wheel (except ML 63 AMG)
Warning!G
The dimensions of the Minispare wheel are
different from those of the road wheels. As
a result, the vehicle handling characteristics
change when driving with a Minispare wheel
mounted. Adapt your driving style accord-
ingly.
The Minispare wheel is for temporary use
only. When driving with a Minispare wheel
mounted, ensure proper tire inflation
pressure and do not exceed a vehicle speed
of 50 mph (80 km/h).
Drive to the nearest Mercedes-Benz Light
Truck Center as soon as possible to have the
Minispare wheel replaced with a regular
road wheel.
Never operate the vehicle with more than
one spare wheel mounted.
Do not switch off the ESP
® when a
Minispare wheel is mounted.
Page 454 of 561

453 Practical hints
Where will I find ...?
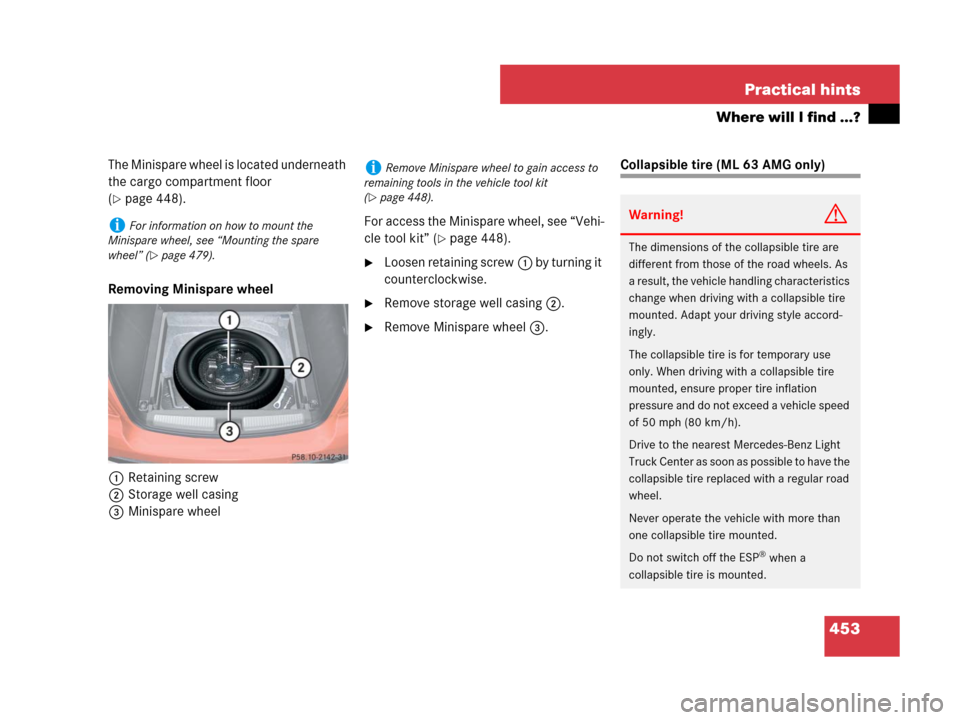
The Minispare wheel is located underneath
the cargo compartment floor
(
�page 448).
Removing Minispare wheel
1Retaining screw
2Storage well casing
3Minispare wheelFor access the Minispare wheel, see “Vehi-
cle tool kit” (
�page 448).
�Loosen retaining screw1 by turning it
counterclockwise.
�Remove storage well casing2.
�Remove Minispare wheel3.
Collapsible tire (ML 63 AMG only)
iFor information on how to mount the
Minispare wheel, see “Mounting the spare
wheel” (
�page 479).
iRemove Minispare wheel to gain access to
remaining tools in the vehicle tool kit
(
�page 448).
Warning!G
The dimensions of the collapsible tire are
different from those of the road wheels. As
a result, the vehicle handling characteristics
change when driving with a collapsible tire
mounted. Adapt your driving style accord-
ingly.
The collapsible tire is for temporary use
only. When driving with a collapsible tire
mounted, ensure proper tire inflation
pressure and do not exceed a vehicle speed
of 50 mph (80 km/h).
Drive to the nearest Mercedes-Benz Light
Truck Center as soon as possible to have the
collapsible tire replaced with a regular road
wheel.
Never operate the vehicle with more than
one collapsible tire mounted.
Do not switch off the ESP
® when a
collapsible tire is mounted.