Page 128 of 561
.
For more information on seats, see “Load-
ing” (
�page 266).
Front seat")
127 Controls in detail
Seats
�Seats
For information on seat adjustment, see
the “Getting started” section (
�page 43).
For more information on seats, see “Load-
ing” (
�page 266).
Front seat active head restraintsYou cannot remove the active head
restraints on the driver’s and front
passenger’s seat.
For removal of the active head restraints
we recommend that you contact an
authorized Mercedes-Benz Light Truck
Center.
For information on head restraint adjust-
ment, see “Seats” (
�page 43).
For information on active head restraints,
see “Active head restraint” (
�page 88).
Rear seat head restraints
Warning!G
For your protection, drive only with properly
positioned head restraints.
Adjust the head restraint so that it is close
to the head as possible and the center of the
head restraint supports the back of the head
at eye level. This will reduce the potential for
injury to the head and neck in the event of
an accident or similar situation.
Warning!G
Do not drive the vehicle without the seat
head restraints installed when the rear seats
are occupied. Head restraints are intended
to help reduce injuries during an accident.
With a rear seat occupied, make sure to
move the respective head restraint up from
the lowest non-use position and have the oc-
cupant adjust the head restraint properly.
For your protection, drive only with properly
positioned head restraints.
Adjust the head restraint in such a way that
it is as close to the head as possible and the
center of the head restraint supports the
back of the head at eye level. This will re-
duce the potential for injury to the head and
neck in the event of an accident or similar
situation.
Page 129 of 561
128 Controls in detail
Seats
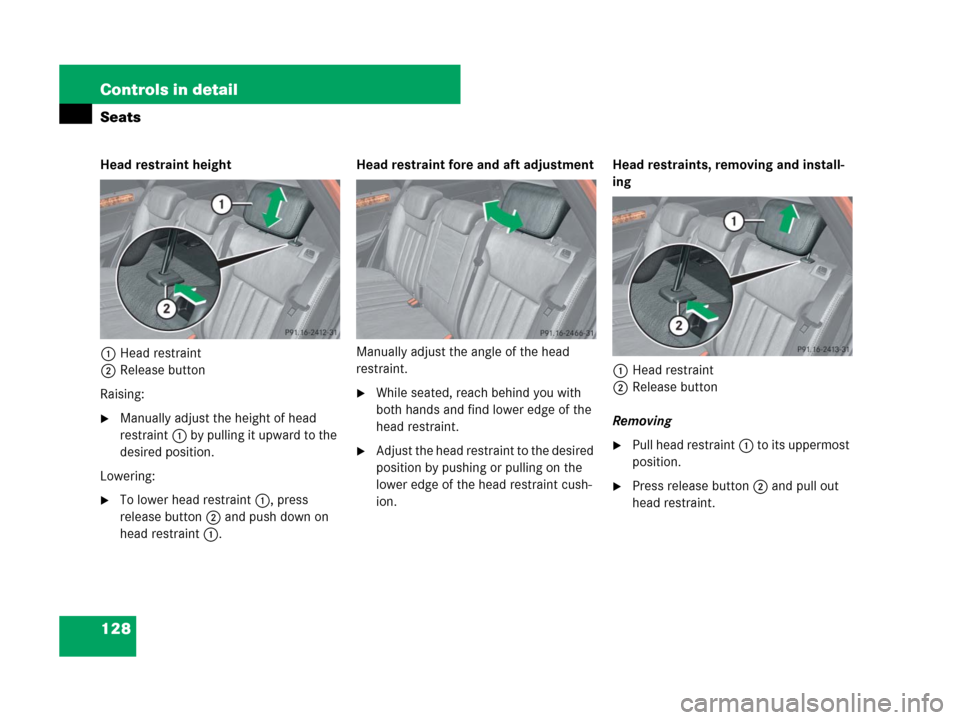
Head restraint height
1Head restraint
2Release button
Raising:
�Manually adjust the height of head
restraint1 by pulling it upward to the
desired position.
Lowering:
�To lower head restraint1, press
release button2 and push down on
head restraint1.Head restraint fore and aft adjustment
Manually adjust the angle of the head
restraint.
�While seated, reach behind you with
both hands and find lower edge of the
head restraint.
�Adjust the head restraint to the desired
position by pushing or pulling on the
lower edge of the head restraint cush-
ion.Head restraints, removing and install-
ing
1Head restraint
2Release button
Removing�Pull head restraint1 to its uppermost
position.
�Press release button2 and pull out
head restraint.
Page 130 of 561

129 Controls in detail
Seats
Installing
�Insert head restraint1 into openings
on the seat backrest.
�Push head restraint1 down until it au-
dibly engages.
�Press release button2 and adjust
head restraint1 to the desired posi-
tion (
�page 128).
For more information on seats, see the
“Getting started” section (
�page 43).
Lumbar support
The curvature of the driver’s seat can be
adjusted to help enhance lower back sup-
port and seating comfort.
The lever for lumbar support adjustment is
located on the right hand side of the
driver’s seat backrest.
1Adjustment lever
�Move adjustment lever1 in direction
of arrows until you have reached a
comfortable seating position.
Multicontour seat*
The multicontour seat has an extendable
seat cushion and inflatable air chambers
built into the backrest to provide additional
lumbar and side support.
The seat cushion depth, seat backrest
cushion-height and curvature can be con-
tinuously varied with switches on the in-
side of each front seat base after the
ignition is switched on (
�page 39).
1Seat cushion depth
2Backrest side bolsters
3Backrest center
4Backrest bottom
Page 131 of 561
130 Controls in detail
Seats
�Switch on the ignition (�page 40).
Seat cushion depth
�Adjust the seat cushion depth to the
length of your upper leg with
switch1.
Backrest contour
�Adjust the contour of the seat backrest
to the desired position with
switchæ orç.
�Move the backrest support to the bot-
tom with button4 or to the center
with button3.
Backrest side bolsters
�Adjust the side bolsters so that they
provide good lateral support using
switch2.
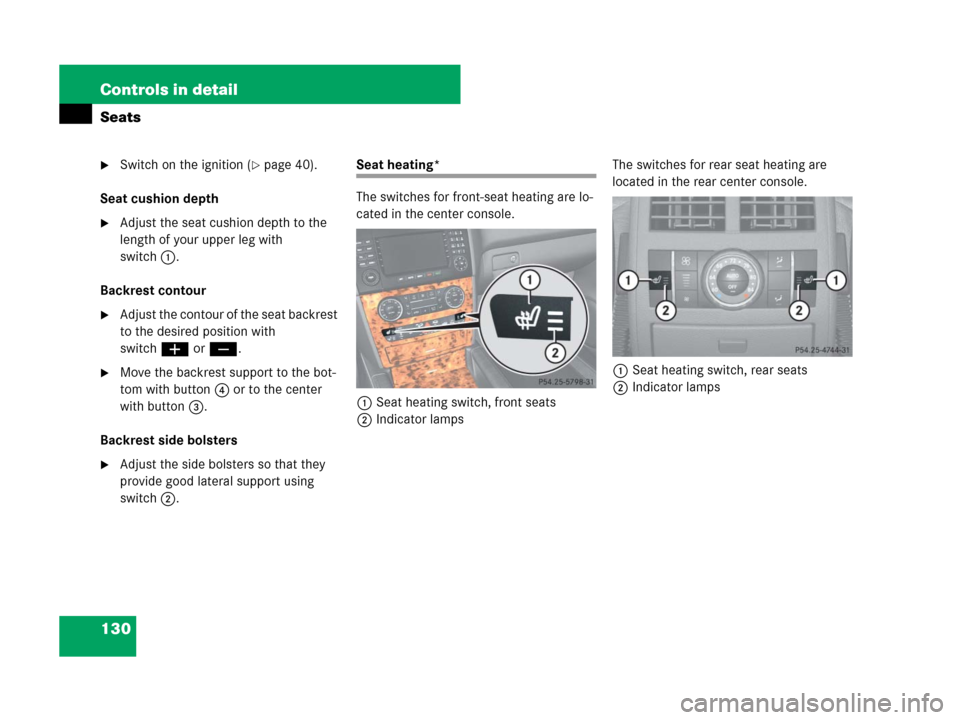
Seat heating*
The switches for front-seat heating are lo-
cated in the center console.
1Seat heating switch, front seats
2Indicator lampsThe switches for rear seat heating are
located in the rear center console.
1Seat heating switch, rear seats
2Indicator lamps
Page 134 of 561

133 Controls in detail
Memory function*
�Memory function*
Prior to operating the vehicle, the driver
should check and adjust the seat height,
seat position fore and aft, and seat back-
rest angle if necessary, to ensure adequate
control, reach and comfort. The head
restraint should also be adjusted for
proper height. See also the section on
air bags (
�page 74) for proper seat posi-
tioning.
In addition, adjust the steering wheel to
ensure adequate control, reach, operation
and comfort. Both the interior and exterior
rear view mirrors should be adjusted for
adequate rear vision.
Fasten seat belts. Infants and small chil-
dren should be seated in a properly se-
cured restraint system that complies with
U.S. Federal Motor Vehicle Safety Stan-
dards 213 and 225 and Canadian Motor
Vehicle Safety Standards 213 and 210.2.With the memory function you can store up
to three different configurations.
Each stored position on the driver’s side
includes the following settings:
�Seat position
�Multicontour seat*: previously saved
setting
�Steering wheel position
�Exterior rear view mirrors’ position
Each stored position on the passenger side
includes the following settings:
�Seat position
�Multicontour seat*: previously saved
settingThe memory button and stored position
buttons are located on the entry side of
each front seat base.
MMemory button
1, 2, 3Stored position buttons
Warning!G
Do not activate the memory function while
driving. Activating the memory function
while driving could cause the driver to lose
control of the vehicle.
Page 135 of 561
134 Controls in detail
Memory function*
Storing positions into memory
�Adjust the seats (�page 43).
�On the driver’s side, additionally adjust
the steering wheel (
�page 48) and ex-
terior rear view mirrors (
�page 49) to
the desired positions.
�Press memory buttonM.
�Release memory buttonM and press
stored position button1,2 or3 within
3 seconds.
All settings are stored to the selected
position.
Recalling positions from memory
�Press and hold stored position
button1,2 or3 until the seat, steering
wheel and exterior rear view mirrors
have fully moved to the stored posi-
tions.
!Do not operate the power seats using
memory buttonM if the seat backrest is in an
excessively reclined position. Doing so could
cause damage to front or rear seats.
Move seat backrest to an upright position first.
iReleasing the stored position button stops
movement to the stored positions immediately.
Page 144 of 561

143 Controls in detail
Lighting
Activating
�Press switch3.
The switch disengages from its
recessed position back to its original
position.
The interior lighting and the locator
lighting (
�page 171) come on when
you
�unlock the vehicle
�open a door
�open the tailgate
�remove the SmartKey from the
starter switch
The interior lamps go out following an
adjustable time delay (
�page 172).Manual control
Switching front/rear interior lighting on
and off
�Press front/rear interior lighting
switch4 or2 to switch on the
respective interior light.
�Press front/rear interior lighting
switch4 or2 again to switch off the
respective interior light.
Switching front reading lamps on and off
�Press front reading lamp switch1
or5 to switch on the respective front
reading lamp.
�Press front reading lamp switch1
or5 again to switch off the respective
front reading lamp.Switching rear interior reading lamps on
and off
The rear interior reading lamps are located
above the side windows.
Passenger side reading lamp
1Rear interior reading lamp
�Press on reading lamp1 where indi-
cated by arrow.
The reading lamp comes on.
�Press on reading lamp1 once more.
The reading lamp goes out.
iIf a door remains open, the interior lamps
switch off automatically after approximately
5 minutes when the SmartKey is removed or in
starter switch position0.
iAn interior lamp switched on manually does
not go out automatically.
Page 146 of 561
.
1To dim instrument cluster illuminatio")
145 Controls in detail
Instrument cluster
�Instrument cluster
For a full view illustration of the instrument
cluster, see “Instrument cluster”
(
�page 26).
1To dim instrument cluster illumination
2Reset button
3To brighten instrument cluster
illumination
The instrument cluster is activated when
you
�open a door
�switch on the ignition (�page 40)
�press reset button2
�switch on the exterior lamps
(
�page 135)For information on changing the instru-
ment cluster settings, e.g. the language,
see “Instrument cluster submenu”
(
�page 167).Adjusting instrument cluster illumina-
tion
Use button1 or3 to adjust the illumina-
tion brightness for the instrument cluster.
To brighten illumination
�Press and hold button3 until the
desired level of illumination is reached.
To dim illumination
�Press and hold button1 until the
desired level of illumination is reached.
iOpening a front door or pressing the reset
button without switching on the ignition or the
exterior lighting activates the multifunction
display illumination only for 30 seconds.
Warning!G
No messages will be displayed if either the
instrument cluster or the multifunction
display is inoperative.
As a result, you will not be able to see infor-
mation about your driving conditions, such
as speed or outside temperature, warn-
ing/indicator lamps, malfunction/warning
messages or the failure of any systems.
Driving characteristics may be impaired.
If you must continue to drive, do so with
added caution. Contact an authorized
Mercedes-Benz Light Truck Center as soon
as possible.
iThe instrument cluster illumination is
dimmed or brightened automatically to suit am-
bient light conditions.
The instrument cluster illumination will also be
adjusted automatically when you switch on the
vehicle’s exterior lamps.
iWith the exterior lighting switched on, the
brightness of the switches in the center console
will also be adjusted when using button
1 or3.