Page 94 of 561

type anchors (at each of the outer rear
se")
93 Safety and Security
Occupant safety
Child seat anchors – LATCH type
This vehicle is equipped with two LATCH
(L
ower Anchors and Tethers for CHildren)
type anchors (at each of the outer rear
seats) for the installation of a LATCH child
seat with matching mounting fittings.
The LATCH anchors are blended with
covers.
1Anchorage ring covers
Children too big for a toddler restraint must
ride in seats using regular seat belts. Posi-
tion shoulder belt across chest and shoul-
der, not face or neck. A booster seat may be
necessary to achieve proper belt positioning
for children from 41 lb until they reach a
height where a lap/shoulder belt fits
properly without a booster.
When the child restraint is not in use,
remove it from the vehicle or secure it with
the seat belt to prevent the child restraint
from becoming a projectile in the event of an
accident.
Do not leave children unattended in the
vehicle, even if the children are secured in a
child restraint system.
A child’s unsupervised access to a vehicle
could result in an accident and/or serious
personal injury.
Warning!G
Children too big for a toddler restraint must
ride in seats using regular seat belts. Posi-
tion shoulder belt across chest and shoul-
der, not face or neck.
A booster seat may be necessary to achieve
proper belt positioning for children over
41 lb until they reach a height where a
lap/shoulder belt fits properly without a
booster.
Install child seat according to manufactu-
rer’s instructions.
The child seat must be firmly attached to the
right and left side anchors2 (
�page 94).
An incorrectly mounted child seat may come
loose during an accident which could result
in serious injury or death to the child.
Damaged or impact damaged child seats or
child seat mounting fittings must be re-
placed.
Do not leave children unattended in the ve-
hicle, even if the children are secured in a
child restraint system.
Page 95 of 561
94 Safety and Security
Occupant safety
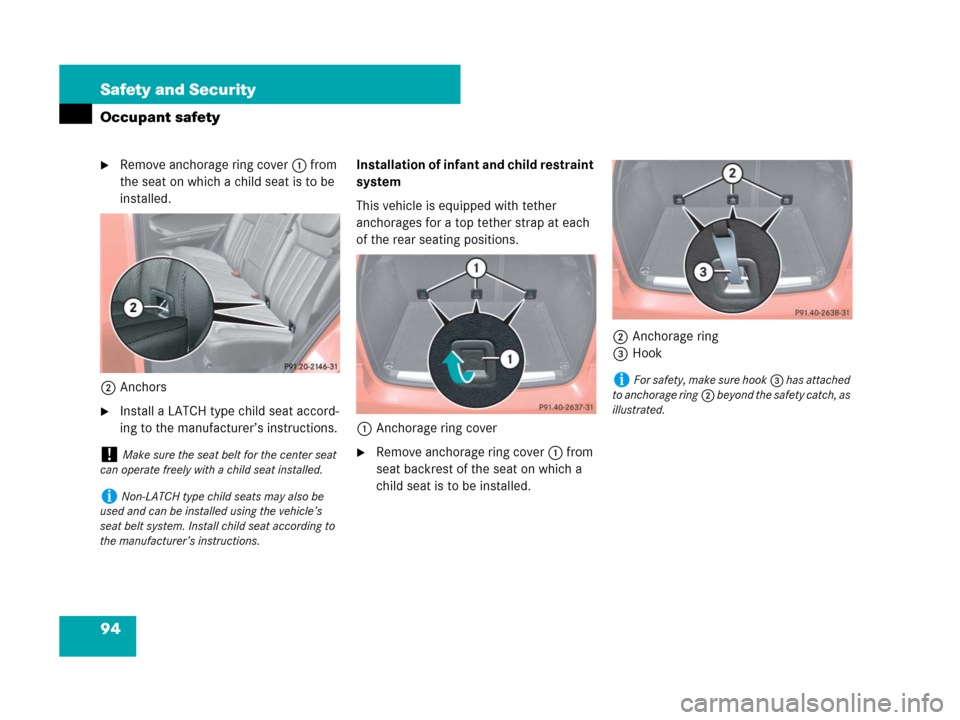
�Remove anchorage ring cover1 from
the seat on which a child seat is to be
installed.
2Anchors
�Install a LATCH type child seat accord-
ing to the manufacturer’s instructions.Installation of infant and child restraint
system
This vehicle is equipped with tether
anchorages for a top tether strap at each
of the rear seating positions.
1Anchorage ring cover
�Remove anchorage ring cover1 from
seat backrest of the seat on which a
child seat is to be installed.2Anchorage ring
3Hook!Make sure the seat belt for the center seat
can operate freely with a child seat installed.
iNon-LATCH type child seats may also be
used and can be installed using the vehicle’s
seat belt system. Install child seat according to
the manufacturer’s instructions.
iFor safety, make sure hook3 has attached
to anchorage ring2 beyond the safety catch, as
illustrated.
Page 97 of 561

96 Safety and Security
Occupant safety
Blocking of rear door window operation
With the override switch you can disable
the rear side window switches in the rear
door panels.The override switch is located on the
driver’s door control panel.
1Override switch
For more information on power windows,
see “Power windows” (
�page 235).Disabling
�Press override switch1 until it engag-
es.
The switch engages in the recessed
position.
The rear door windows can no longer
be operated using the switches located
in the rear doors.
Enabling
�Press override switch1 once more.
The switch disengages from its
recessed position back to its original
position.
The rear door windows can again be
operated using the switches located in
the rear doors.
Warning!G
Activate the override switch when children
are riding in the back seats of the vehicle.
The children could otherwise injure them-
selves, e.g. by becoming trapped in the win-
dow opening.
When leaving the vehicle, always remove the
SmartKey or SmartKey with KEYLESS-GO*
from the starter switch, take it with you, and
lock the vehicle. Do not leave children unat-
tended in the vehicle, or with access to an
unlocked vehicle. A child’s unsupervised
access to a vehicle could result in an
accident and/or serious personal injury.
iOperating the rear door windows using the
switches located on the door control panel of the
driver’s door is still possible.
Page 110 of 561
109 Controls in detail
Locking and unlocking
Seats
Memory function*
Lighting
Instrument cluster
Control system
Automatic transmission
Transfer case
Good visibility
Climate control
3-zone automatic climate control*
Power windows
Power tilt/sliding sunroof
Driving systems
Loading
Useful features
Page 128 of 561
.
For more information on seats, see “Load-
ing” (
�page 266).
Front seat")
127 Controls in detail
Seats
�Seats
For information on seat adjustment, see
the “Getting started” section (
�page 43).
For more information on seats, see “Load-
ing” (
�page 266).
Front seat active head restraintsYou cannot remove the active head
restraints on the driver’s and front
passenger’s seat.
For removal of the active head restraints
we recommend that you contact an
authorized Mercedes-Benz Light Truck
Center.
For information on head restraint adjust-
ment, see “Seats” (
�page 43).
For information on active head restraints,
see “Active head restraint” (
�page 88).
Rear seat head restraints
Warning!G
For your protection, drive only with properly
positioned head restraints.
Adjust the head restraint so that it is close
to the head as possible and the center of the
head restraint supports the back of the head
at eye level. This will reduce the potential for
injury to the head and neck in the event of
an accident or similar situation.
Warning!G
Do not drive the vehicle without the seat
head restraints installed when the rear seats
are occupied. Head restraints are intended
to help reduce injuries during an accident.
With a rear seat occupied, make sure to
move the respective head restraint up from
the lowest non-use position and have the oc-
cupant adjust the head restraint properly.
For your protection, drive only with properly
positioned head restraints.
Adjust the head restraint in such a way that
it is as close to the head as possible and the
center of the head restraint supports the
back of the head at eye level. This will re-
duce the potential for injury to the head and
neck in the event of an accident or similar
situation.
Page 129 of 561
128 Controls in detail
Seats
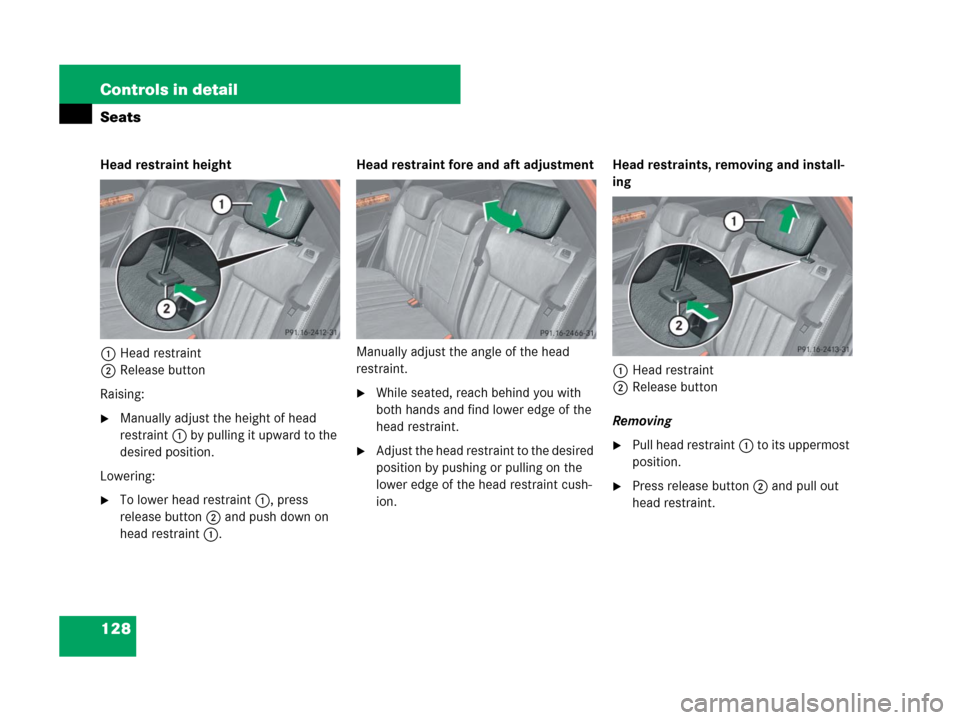
Head restraint height
1Head restraint
2Release button
Raising:
�Manually adjust the height of head
restraint1 by pulling it upward to the
desired position.
Lowering:
�To lower head restraint1, press
release button2 and push down on
head restraint1.Head restraint fore and aft adjustment
Manually adjust the angle of the head
restraint.
�While seated, reach behind you with
both hands and find lower edge of the
head restraint.
�Adjust the head restraint to the desired
position by pushing or pulling on the
lower edge of the head restraint cush-
ion.Head restraints, removing and install-
ing
1Head restraint
2Release button
Removing�Pull head restraint1 to its uppermost
position.
�Press release button2 and pull out
head restraint.
Page 130 of 561

129 Controls in detail
Seats
Installing
�Insert head restraint1 into openings
on the seat backrest.
�Push head restraint1 down until it au-
dibly engages.
�Press release button2 and adjust
head restraint1 to the desired posi-
tion (
�page 128).
For more information on seats, see the
“Getting started” section (
�page 43).
Lumbar support
The curvature of the driver’s seat can be
adjusted to help enhance lower back sup-
port and seating comfort.
The lever for lumbar support adjustment is
located on the right hand side of the
driver’s seat backrest.
1Adjustment lever
�Move adjustment lever1 in direction
of arrows until you have reached a
comfortable seating position.
Multicontour seat*
The multicontour seat has an extendable
seat cushion and inflatable air chambers
built into the backrest to provide additional
lumbar and side support.
The seat cushion depth, seat backrest
cushion-height and curvature can be con-
tinuously varied with switches on the in-
side of each front seat base after the
ignition is switched on (
�page 39).
1Seat cushion depth
2Backrest side bolsters
3Backrest center
4Backrest bottom
Page 131 of 561
130 Controls in detail
Seats
�Switch on the ignition (�page 40).
Seat cushion depth
�Adjust the seat cushion depth to the
length of your upper leg with
switch1.
Backrest contour
�Adjust the contour of the seat backrest
to the desired position with
switchæ orç.
�Move the backrest support to the bot-
tom with button4 or to the center
with button3.
Backrest side bolsters
�Adjust the side bolsters so that they
provide good lateral support using
switch2.
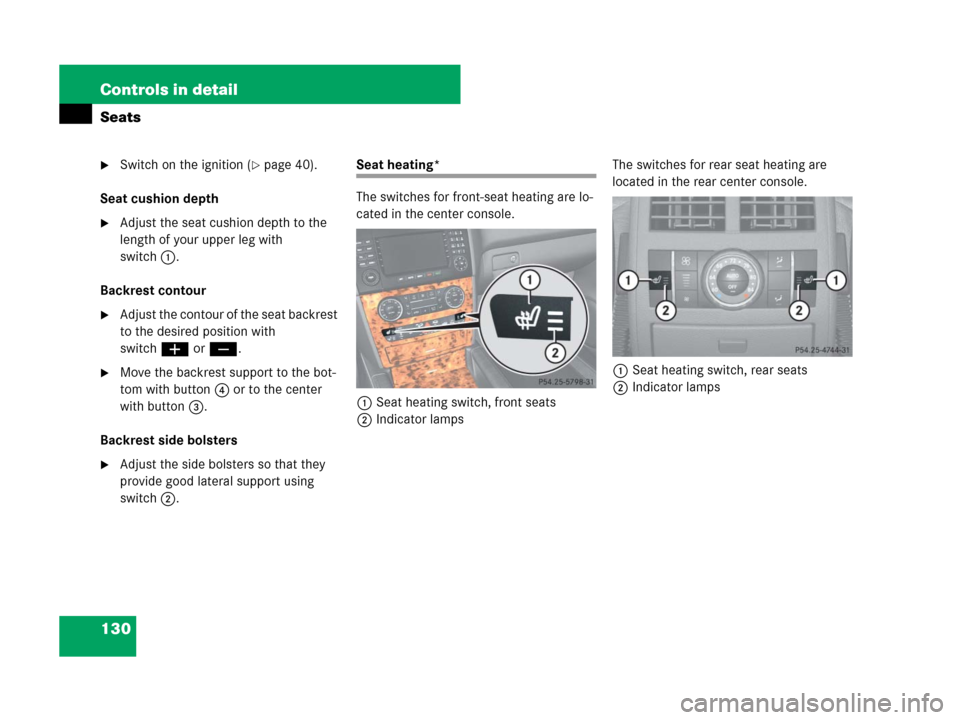
Seat heating*
The switches for front-seat heating are lo-
cated in the center console.
1Seat heating switch, front seats
2Indicator lampsThe switches for rear seat heating are
located in the rear center console.
1Seat heating switch, rear seats
2Indicator lamps