Page 424 of 561

423 Practical hints
What to do if …
Display messagePossible cause/conse-
quencePossible solution
Front Passenger Airbag
Disabled
See Operator’s ManualFront passenger front air bag is
deactivated while driving even
though an adult or someone
larger than a small individual is
occupying the front passenger
seat. Forces acting on the seat
may make the system sense a
decrease in weight.Stop the vehicle in a safe location as soon as possible and check the front
passenger seat for the following:
�Apply the parking brake (�page 65).
�Switch off the ignition (�page 40).
�Have the front passenger vacate the seat and exit the vehicle.
�Adjust the seat in a height position (�page 44).
�Make sure that no objects which apply forces to the seat are present
(e.g. objects such as books, briefcases etc. lodged underneath, behind
or around the seat). Such forces may cause the system to sense that
an occupant of a lesser weight than actually present is on the front
passenger seat.
�Keep the seat unoccupied, close the front passenger door and switch
on the ignition (
�page 40).
(Continued on next page)
Page 425 of 561
 and
the multifunction display in the i")
424 Practical hints
What to do if …
Display messagePossible
cause/conse-
quencePossible solution
Monitor the 59indicator lamp on the center console (�page 83) and
the multifunction display in the instrument cluster (
�page 26) for the following:
With the seat unoccupied and the ignition turned on,
�the 59indicator lamp on the center console should illuminate and
remain illuminated, indicating that the OCS (
�page 79) has deactivated the air
bag.
�the message Front Passenger Airbag Enabled See Operator’s Manual or the
message
Front Passenger Airbag Disabled See Operator’s Manual should not
appear in the multifunction display at any time the seat is unoccupied. Wait at
least 60 seconds for the system to complete the necessary check cycles and to
make sure neither message appears in the multifunction display.
If above conditions are met, you can occupy the front passenger seat again.
Depending on the front passenger classification sensed by the OCS (
�page 79),
the59indicator lamp will remain illuminated or go out.
If above conditions are not met, the system is not working properly. Have the system
checked as soon as possible by an authorized Mercedes-Benz Light Truck Center.
Warning!G
If the 59indicator lamp
remains illuminated with an adult occupant
on the front passenger seat even after per-
forming the above corrective steps, do nothave any passenger use the front passenger
seat until the system has been repaired.
Page 460 of 561
459 Practical hints
Resetting activated head restraints
�Repeat this procedure on the active
head restraint for the second front
seat.
For information on active head restraints,
see “Active head restraint” (
�page 88).
For information on head restraint adjust-
ment, see “Seats” (
�page 43).Vehicles with Rear seat entertainment
system*
�Take the reset tool out of the
Mercedes-Benz vehicle literature
pouch.
1Reset tool
2Active head restraint1Reset tool
2Active head restraint
3Rectangular opening
�Guide reset tool1 into rectangular
opening3 of active head restraint2.
�Press reset tool1 downward in
direction of arrow until you hear the
head restraint release mechanism
audibly disengage.
�Pull out reset tool1.��
Page 461 of 561
460 Practical hints
Resetting activated head restraints
�Firmly press the active head restraint
cushion backward towards the head
restraint cover in direction of arrow
until it engages.
�Repeat this procedure on the active
head restraint for the second front
seat.
�After resetting the active head
restraints store reset tool1 in the
Mercedes-Benz vehicle literature
pouch.
For information on active head restraints,
see “Active head restraint” (
�page 88).
For information on head restraint adjust-
ment, see “Seats” (
�page 43).
��
Page 480 of 561
.
Vehicles with Minispare wheel:
�Take the Minispare wheel out of the
cargo")
479 Practical hints
Flat tire
Mounting the spare wheel
Preparing the vehicle
�Prepare the vehicle as described
(
�page 478).
Vehicles with Minispare wheel:
�Take the Minispare wheel out of the
cargo compartment (
�page 453).
�Take the wheel wrench, the collapsible
wheel chock, and the vehicle jack out
of the cargo compartment
(
�page 448).
Vehicles with collapsible tire
(ML 63 AMG only):
�Take the collapsible tire, wheel wrench,
wheel bolts, jack, and electric air pump
out of the cargo compartment
(
�page 454).Lifting the vehicle
iVehicles with collapsible tire (ML 63 AMG
only):
You can use the power outlets, except for the
power outlet in the front center console, to
operate the electric air pump even when the
ignition is switched off, e.g. in order to inflate the
collapsible emergency spare tire (
�page 485).
An emergency shut-off feature ensures that the
vehicle’s electrical voltage does not fall below a
minimum level. If the voltage drops to this mini-
mum level, the power outlets are automatically
switched off. This ensures that enough power re-
mains to start the engine.
!Depending on vehicle production date your
vehicle may be equipped with a scissors-type
jack (located under the cargo compartment
floor). If so equipped, only use this jack when
jacking up the vehicle as otherwise the vehicle’s
underbody can be damaged. See separate
instructions for scissors-type jack.
Warning!G
When jacking up the vehicle, only use the
jack which has been specifically approved
by Mercedes-Benz for your vehicle.
The jack is designed exclusively for jacking
up the vehicle at the jack take-up brackets
built into both sides of the vehicle. Make
sure the jack arm is fully seated in the jack
take-up bracket.
The jack is intended only for lifting the
vehicle briefly for wheel changes. It is not
suited for performing maintenance work
under the vehicle. To help avoid personal in-
jury, use the jack only to lift the vehicle dur-
ing a wheel change.
Never get beneath the vehicle while it is sup-
ported by the jack. Keep hands and feet
away from the area under the lifted vehicle.
Always lower the vehicle onto sufficient
capacity jackstands before working under
the vehicle.
��
Page 490 of 561

489 Practical hints
Battery
�Battery
The battery is located under the front
passenger seat.
The battery should always be sufficiently
charged in order to achieve its rated ser-
vice life.
If you use your vehicle mostly for
short-distance trips, you will need to have
the battery charge checked more
frequently.
When replacing the battery, always use
batteries approved by Mercedes-Benz.
If you do not intend to operate your vehicle
for an extended period of time, consult an
authorized Mercedes-Benz Light Truck
Center about steps you need to observe.Batteries contain materials that can harm
the environment if disposed of improperly.
Recycling of batteries is the preferred
method of disposal. Many states require
sellers of batteries to accept old batteries
for recycling.
iMercedes-Benz recommends to have the
battery replaced at an authorized
Mercedes-Benz Light Truck Center.
Warning!G
Observe all safety instructions and precau-
tions when handling automotive batteries.
Risk of explosion.
Fire, open flames and smoking
are prohibited when handling
batteries. Avoid creating sparks.
Battery acid is caustic. Do not
allow it to come into contact
with skin, eyes or clothing.
Wear suitable protective cloth-
ing, especially gloves, apron and
faceguard.
Wear eye protection.
Rinse any acid spills immediate-
ly with clear water. Contact a
physician if necessary.
Keep children away.
Follow the instructions in this
Operator’s Manual.
Page 493 of 561
.
�Open the front passenger door.
�Move the front passenger seat to")
492 Practical hints
Battery
�Switch off all electrical consumers.
�Read and observe safety instructions
and precautions (
�page 489).
�Open the front passenger door.
�Move the front passenger seat to the
most forward position (
�page 44).Step 2 (Disconnecting)
1Battery cover
�Enter the rear passenger compartment
and remove main battery cover1.Step 3 (Disconnecting)
2Perforated floor carpet�Cut the floor carpet2 along the
dotted white line (see illustration) until
you reach the perforated part. Start
cutting at the point indicated by the
arrows. Cut carpet using a sharp object
(knife etc.).
�Enter the front passenger compart-
ment.
�Move the front passenger seat to the
most rearward position (
�page 44).
iIf the vehicle battery is discharged and you
had the vehicle jump started:
�Leave the engine running.
�Complete step 1, starting with switching off
all electrical consumers.
�Continue with step 2.
�When the front passenger seat is in the most
forward position, turn off the engine.
iOpen doors only when conditions are safe to
do so.
��
Page 494 of 561
493 Practical hints
Battery
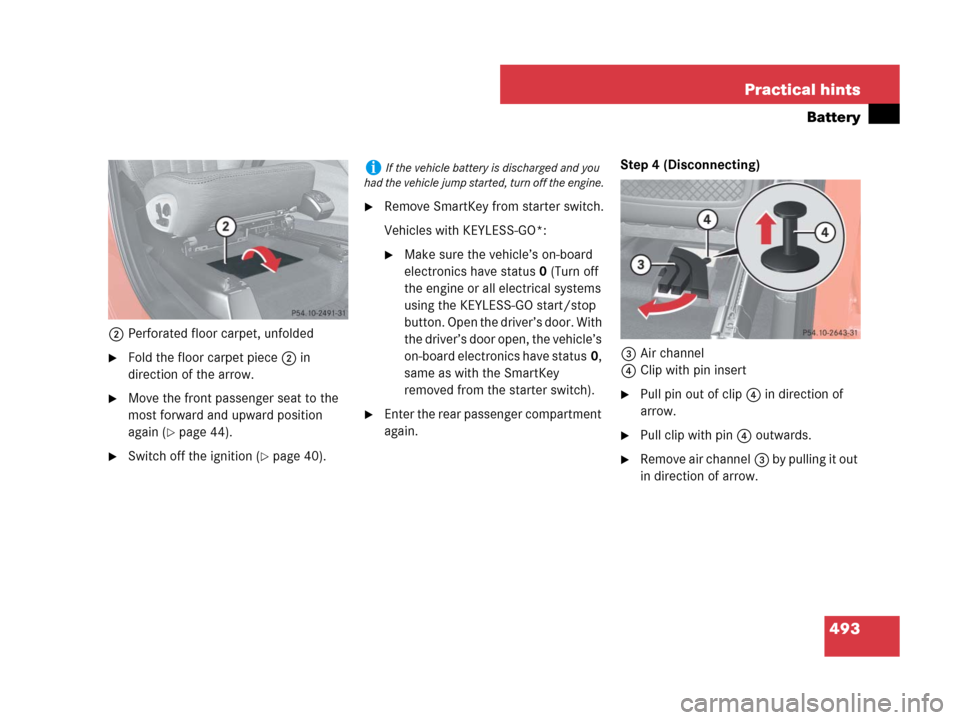
2Perforated floor carpet, unfolded
�Fold the floor carpet piece2 in
direction of the arrow.
�Move the front passenger seat to the
most forward and upward position
again (
�page 44).
�Switch off the ignition (�page 40).
�Remove SmartKey from starter switch.
Vehicles with KEYLESS-GO*:
�Make sure the vehicle’s on-board
electronics have status0 (Turn off
the engine or all electrical systems
using the KEYLESS-GO start/stop
button. Open the driver’s door. With
the driver’s door open, the vehicle’s
on-board electronics have status0,
same as with the SmartKey
removed from the starter switch).
�Enter the rear passenger compartment
again.Step 4 (Disconnecting)
3Air channel
4Clip with pin insert
�Pull pin out of clip4 in direction of
arrow.
�Pull clip with pin4 outwards.
�Remove air channel3 by pulling it out
in direction of arrow.
iIf the vehicle battery is discharged and you
had the vehicle jump started, turn off the engine.