Page 275 of 561
274 Controls in detail
Loading
Pulling the cargo net tight
Belt hook attached behind the front seats
1Belt hook
2Cargo tie-down ring
3Tightening belt
�Hook belt hook1 into cargo tie-down
ring2 in direction of arrow.
�Pull tightening belt3 by the loose end
in direction of arrow until the cargo net
is pulled tight.
�After driving a short distance, make
sure the cargo net is still tight and, if
necessary, pull it tight again.Loosening the cargo net
Belt hook attached behind the front seats
1Buckle
2Belt hook
3Cargo tie-down ring
�Loosen the tightening belt by pulling
buckle1 upward in direction of arrow.
�Remove belt hook2 from cargo
tie-down ring3.Removing and storing the cargo net
�Take cargo net bar2 out of holder1,
see “Installing the cargo net”
(
�page 273).
�Press the red button on the upper and
lower cargo net bar.
�Fold the cargo net.
�Roll up the cargo net.
�Close the hook and loop fasteners on
the cargo net package.
Page 283 of 561
282 Controls in detail
Useful features
2Storage/telephone* compartment
3Coin holder
Opening the storage/telephone* com-
partment
�Pull button1 and lift up armrest.
The coin holders3 are located in front
of storage/telephone*
compartment2.Rear storage compartments
Depending on the vehicle configuration,
your vehicle may be equipped with three
storage compartments in the front of the
rear seats.
1Storage compartment cover
2Release button
�Briefly press release button2 on
storage compartment cover1.
The storage compartment opens
automatically.
iDepending on vehicle equipment, the upper
storage compartment may be replaced by a
control panel, for example in vehicles with rear
climate control* (
�page 216) or rear automatic
climate control* (
�page 231).
iDepending on vehicle configuration, the
middle storage compartment contains an
ashtray (
�page 286).
Page 284 of 561

283 Controls in detail
Useful features
Parcel nets Parcel net in front passenger footwell
A small convenience parcel net is located
in the front passenger footwell. It is intend-
ed for small and light items, such as road
maps, mail, etc.
1Parcel netParcel nets on front seat backrests
A small convenience parcel net is located
on each of the front seat backrests. It is in-
tended for small and light items, such as
road maps, mail, etc.
1Parcel net
Warning!G
Do not place objects with a combined
weight of more than 4.4 lb (2 kg) into the
parcel net on the back of the front passen-
ger seat. Otherwise, the Occupant Classifi-
cation System OCS (
�page 79) may not be
able to properly approximate the occupant
weight category.
Parcel nets are intended for storing
light-weight items only.
Heavy objects, objects with sharp edges or
fragile objects may not be transported in the
parcel nets. In an accident, during hard
braking, or sudden maneuvers, they could
be thrown around inside the vehicle and
cause injury to vehicle occupants.
Parcel nets cannot protect transported
goods in the event of an accident.
Page 286 of 561

285 Controls in detail
Useful features
Removing and reinstalling cup holder
The front cup holder can be removed for
cleaning purposes.
1Cup holder
2Bridge with card, ticket holder
�Hold cup holder at its bridge2 and
pull out bridge in direction of arrow.
�Pull cup holder1 out in direction of ar-
row.
�First, insert the cup holder1 and then
insert bridge2.
Ashtrays
Depending on vehicle configuration, your
vehicle is equipped with an ashtray and a
cigarette lighter (
�page 287) located in
the front center console and an ashtray lo-
cated in front of the rear seats
(
�page 286).
Ashtray in the center console
1Ashtray insert
2Cover plateOpening the ashtray
�Briefly touch cover plate2.
The ashtray opens automatically.
Removing ashtray insert
�Grip the ashtray insert1 on the sides
and pull it out upwards.
Reinstalling ashtray insert
�Install ashtray insert1.
�Close ashtray cover plate2.
iIf your vehicle is not equipped with an ash-
tray, it has a storage compartment (
�page 281)
with a power outlet (
�page 288) instead.
Warning!G
Remove ashtray only with vehicle standing
still. Set the parking brake to secure vehicle
from movement. Set automatic transmis-
sion toP. With the automatic transmission
set toP, turn off the engine.
Page 287 of 561

1Ashtray
2Ashtray coverOpening rear ashtray
�Briefly press ashtray cover2.
The ashtray1 opens automatically.
R")
286 Controls in detail
Useful features
Rear center console ashtray (front of
rear seats)
1Ashtray
2Ashtray coverOpening rear ashtray
�Briefly press ashtray cover2.
The ashtray1 opens automatically.
Removing rear ashtray insert
�Grip the insert on the sides and pull it
out upwards.
Reinstalling rear ashtray insert
�Install ashtray insert.
�Close the ashtray.
Cigarette lighter
�Switch on the ignition (�page 40).
�Push in cigarette lighter.
The cigarette lighter will pop out auto-
matically when hot.
Cigarette lighter
Depending on vehicle configuration your
vehicle is equipped with a cigarette lighter
and an ashtray (
�page 285) located in the
front center console and an ashtray locat-
ed in front of the rear seats (
�page 286).
!Close the ashtray when not in use and be-
fore folding the rear seats
Warning!G
Never touch the heating element or sides of
the cigarette lighter; they are extremely hot.
Hold the knob only.
Make sure that any children traveling with
you do not injure themselves or start a fire
with the hot cigarette lighter.
When leaving the vehicle always remove the
SmartKey or SmartKey with KEYLESS-GO*
from the starter switch, take it with you, and
lock the vehicle. Do not leave children unat-
tended in the vehicle, or with access to an
unlocked vehicle. A child’s unsupervised
access to a vehicle could result in an
accident and/or serious personal injury.
Page 290 of 561
.
�Flip up cover and insert electrical plug
(cigarette lighter type).
Floormats
1Retainer pi")
289 Controls in detail
Useful features
Power outlet in cargo compartment
�Switch on the ignition (�page 40).
�Flip up cover and insert electrical plug
(cigarette lighter type).
Floormats
1Retainer pin
2Eyelet
Removing
�Pull floormat off of retainer pins1.
�Remove the floormat.
Installing
�Lay down the floormat in the respective
footwell.
�Press the floormat eyelets2 onto re-
tainer pins1.
Warning!G
Whenever you are using floormats, make
sure there is enough clearance and that the
floormats are securely fastened.
Floormats should always be securely fas-
tened using eyelets2 and retainer pins1
(
�page 289).
Before driving off, check that the floormats
are securely in place and adjust them if nec-
essary. A loose floormat could slip and
hinder proper functioning of the pedals.
Do not place several floormats on top of
each other as this may impair pedal move-
ment.
iTo install or remove the floormat more easi-
ly, move the driver’s seat or front passenger seat
as far to the rear as possible (
�page 44).
Page 354 of 561

353 Operation
Tires and wheels
Seating capacity
The seating capacity gives you important
information on the number of occupants
that can be in the vehicle. Observe front
and rear seating capacity. The Tire and
Loading Information placard showing the
seating capacity is located on the driver’s
door B-pillar (
�page 352).
1Seating capacity information on the
Tire and Loading Information placard.
Steps for determining correct load limit
The following steps have been developed
as required of all manufacturers under
Title 49, Code of U.S. Federal Regulations,
Part 575 pursuant to the “National Traffic
and Motor Vehicle Safety Act of 1966”.Step 1
�Locate the statement “The combined
weight of occupants and cargo should
never exceed XXX kg or XXX lbs.” on
your vehicle’s Tire and Loading
Information placard.
Step 2
�Determine the combined weight of the
driver and passengers that will be
riding in your vehicle.
Step 3
�Subtract the combined weight of the
driver and passengers from
XXX kilograms or XXX lbs.
iData shown on Tire and Loading Information
placard example are for illustration purposes
only. Seating data are specific to each vehicle
and may vary from data shown in the illustration
below. Refer to Tire and Loading Information
placard on vehicle for actual data specific to your
vehicle.
��
Page 356 of 561
355 Operation
Tires and wheels
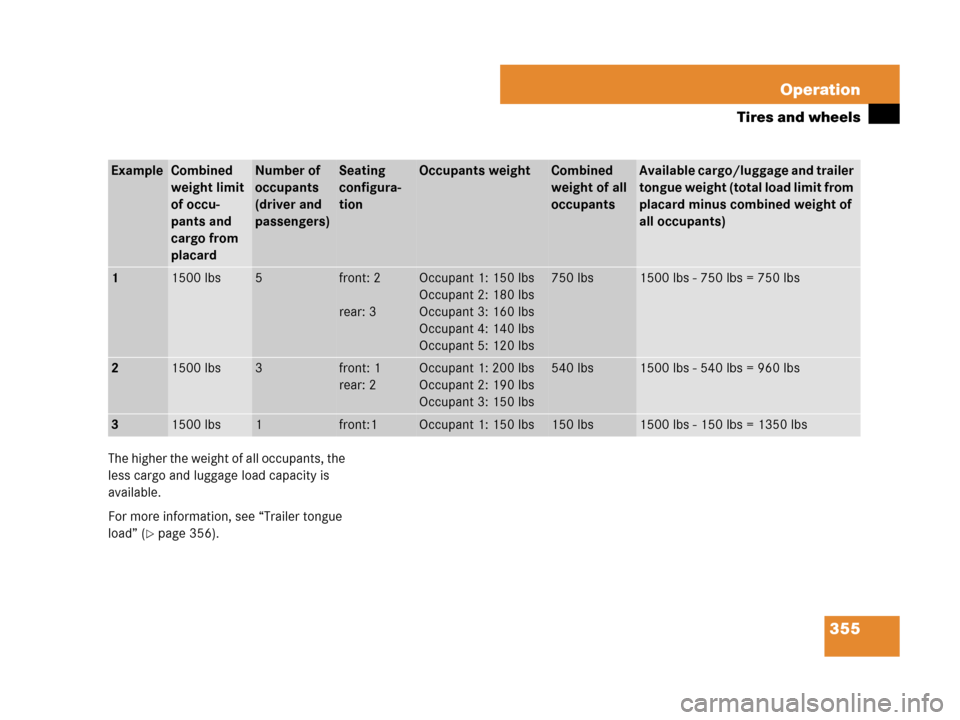
The higher the weight of all occupants, the
less cargo and luggage load capacity is
available.
For more information, see “Trailer tongue
load” (
�page 356).
ExampleCombined
weight limit
of occu-
pants and
cargo from
placardNumber of
occupants
(driver and
passengers)Seating
configura-
tionOccupants weight Combined
weight of all
occupantsAvailable cargo/luggage and trailer
tongue weight (total load limit from
placard minus combined weight of
all occupants)
11500 lbs5front: 2
rear: 3Occupant 1: 150 lbs
Occupant 2: 180 lbs
Occupant 3: 160 lbs
Occupant 4: 140 lbs
Occupant 5: 120 lbs750 lbs1500 lbs - 750 lbs = 750 lbs
21500 lbs3front: 1
rear: 2Occupant 1: 200 lbs
Occupant 2: 190 lbs
Occupant 3: 150 lbs540 lbs1500 lbs - 540 lbs = 960 lbs
31500 lbs1front:1Occupant 1: 150 lbs150 lbs1500 lbs - 150 lbs = 1350 lbs