Page 33 of 561
32 At a glance
Center console
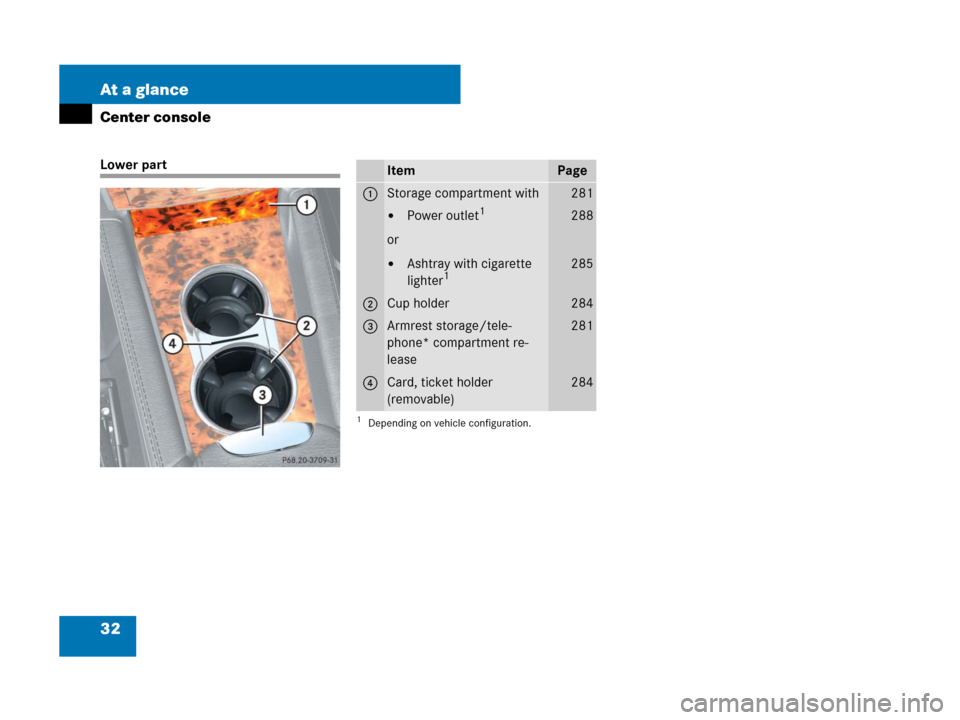
Lower partItemPage
1Storage compartment with281
�Power outlet1
or
�Ashtray with cigarette
lighter1
1Depending on vehicle configuration.
288
285
2Cup holder284
3Armrest storage/tele-
phone* compartment re-
lease281
4Card, ticket holder
(removable)284
Page 34 of 561
33 At a glance
Overhead control panel
�Overhead control panel
ItemPage
1Left reading lamp switch142
2Rear interior lighting switch142
3Automatic interior lighting
switch142
4Front interior lighting switch142
5Right reading lamp switch142
6Front right interior lamp142
7Power tilt/sliding sunroof
switch240
8Tele Aid (emergency call
system) button297
9Interior rear view mirror199
aFront right reading lamp142
ItemPage
bFront left reading lamp142
cGarage door opener302
dVehicles without
telephone* installed:
Hands-free microphone for
Tele Aid (emergency call
system)294
eVehicles with telephone*
installed:
Hands-free microphone for
Tele Aid (emergency call
system) and telephone*294
fFront left interior lamp142
Page 39 of 561

38 Getting started
The “Getting started” section provides an
overview of the vehicle’s most basic func-
tions. First-time Mercedes-Benz owners
should pay special attention to the infor-
mation given here.
If you are already familiar with the basic
functions described here, the “Controls in
detail” section will provide you with further
information. The corresponding page
references are located at the end of each
segment.
Unlocking
Unlocking with the SmartKey
SmartKey
1‹Lock button
2ŠUnlock button* for tailgate
3ŒUnlock button
4ÂPanic button (
�page 97)
�Press unlock buttonŒ on the
SmartKey.
All turn signal lamps flash once. The
vehicle unlocks. The locking knobs in
the doors move up. The anti-theft alarm
system is disarmed. The locator light-
ing comes on if the feature is enabled
in the control system (
�page 171).
�Enter the vehicle and insert the
SmartKey in the starter switch.
For more information, see “Locking and
unlocking” (
�page 110).
Warning!G
When leaving the vehicle, always remove the
SmartKey from the starter switch, take it
with you, and lock the vehicle. Do not leave
children unattended in the vehicle, or with
access to an unlocked vehicle. A child’s
unsupervised access to a vehicle could
result in an accident and/or serious
personal injury.
Page 40 of 561

39 Getting started
Unlocking
Unlocking with KEYLESS-GO*
With the KEYLESS-GO function, you can
lock or unlock the vehicle without using
the remote control buttons on the
SmartKey and start the engine without in-
serting the SmartKey into the starter
switch.�Grasp an outside door handle.
All turn signal lamps flash once. The ve-
hicle unlocks. The locking knobs in the
doors move up. The anti-theft alarm
system is disarmed. The locator light-
ing comes on if the feature is enabled
in the control system (
�page 171).
�Enter the vehicle.
For more information, see “SmartKey with
KEYLESS-GO*” (
�page 113).
Starter switch positions
iTo unlock the vehicle, the SmartKey with
KEYLESS-GO must be outside the vehicle, no
further than approximately 3 feet (1 meter) away
from the respective door.
Warning!G
When leaving the vehicle, always take the
SmartKey with KEYLESS-GO* with you, and
lock the vehicle. Do not leave children
unattended in the vehicle, or with access to
an unlocked vehicle. A child’s unsupervised
access to a vehicle could result in an
accident and/or serious personal injury.
i If the vehicle has been parked for more than
72 hours, you must pull an outside door handle
in order to activate the KEYLESS-GO function.
Warning!G
When leaving the vehicle, always remove the
SmartKey or SmartKey with KEYLESS-GO*
from the starter switch, take it with you and
lock the vehicle. Do not leave children unat-
tended in the vehicle, or with access to an
unlocked vehicle. A child’s unsupervised
access to a vehicle could result in an
accident and/or serious personal injury.
Page 44 of 561

43 Getting started
Adjusting
�Adjusting
Seats
Warning!G
All seat, head restraint, steering wheel, and
rear view mirror adjustments, as well as fas-
tening of seat belts, must be done before
the vehicle is put into motion.
Warning!G
Do not adjust the driver’s seat while driving.
Adjusting the seat while driving could cause
the driver to lose control of the vehicle.
Never ride in a moving vehicle with the seat
backrest in an excessively reclined position
as this can be dangerous. You could slide
under the seat belt in a collision. If you slide
under it, the belt would apply force at the ab-
domen or neck. That could cause serious or
fatal injuries. The seat backrest and seat
belts provide the best restraint when the
wearer is in a position that is as upright as
possible and belts are properly positioned
on the body.
Warning!G
Your seat must be adjusted so that you can
correctly fasten your seat belt (
�page 51).
Observe the following points:
�Adjust the backrest until your arms are
slightly angled when holding the steer-
ing wheel
�Adjust the seat to a comfortable seating
position that still allows you to reach the
accelerator/brake pedal safely. The po-
sition should be as far back as possible
with the driver still able to operate the
controls properly.
�Adjust the head restraint so that it is as
close to the head as possible and the
center of the head restraint supports the
back of the head at eye level.
�Never place hands under the seat or
near any moving parts while a seat is be-
ing adjusted.
Failure to do so could result in an accident
and/or serious personal injury.
Warning!G
When leaving the vehicle, always remove the
SmartKey or SmartKey with KEYLESS-GO*
from the starter switch, take it with you, and
lock the vehicle.
Even with the SmartKey or the SmartKey
with KEYLESS-GO* removed from the
starter switch or the SmartKey with
KEYLESS-GO* removed from the vehicle,
the power seats can be operated.
Therefore, do not leave children unattended
in the vehicle, or with access to an unlocked
vehicle. A child’s unsupervised access to a
vehicle could result in an accident and/or
serious personal injury.
Page 46 of 561

45 Getting started
Adjusting
Seat fore and aft adjustment
�Press the switch forward or backward
in direction of arrow5.
Seat height
�Press the switch up or down in
direction of arrow3.
Seat cushion tilt
�Press the switch up or down in
direction of arrow2 until your upper
legs are lightly supported.
Seat backrest tilt
�Press the switch forward or backward
in direction of arrow4.Head restraint height
Vehicles with memory function*:
�Press switch1 (�page 44) up or
down in direction of arrow.
Vehicles without memory function*:
1Head restraint
2Release button
iThe memory function* (�page 133) lets
you store the settings for the seat positions
together with the settings for the steering wheel
and the exterior rear view mirrors.
Warning!G
Do not drive the vehicle without the seat
head restraints. Head restraints are intend-
ed to help reduce injuries during an
accident.
With a rear seat occupied, make sure to
move the respective head restraint up from
the lowest non-use position and have the
occupant adjust the head restraint properly.
For your protection, drive only with properly
positioned and engaged head restraints.
Adjust the head restraint so that it is as
close to the head as possible and the center
of the head restraint supports the back of
the head at eye level. This will reduce the po-
tential for injury to the head and neck in the
event of an accident or similar situation.
!Do not attempt to remove front seat head
restraints. They can only be removed by qualified
technicians. We recommend that you have this
work carried out by an authorized
Mercedes-Benz Light Truck Center.
Page 49 of 561

48 Getting started
Adjusting
Make sure that
�you can reach the steering wheel with
your arms slightly bent at the elbows
�you can move your legs freely
�all displays (including malfunction and
indicator lamps) on the instrument
cluster are clearly visible
The steering wheel adjustment release
handle is located on the lower left of the
steering column.1Release handle
�To unlock the steering column, pull
release handle1 out to its stop limit.
�Move steering wheel to the desired
position.
�Push release handle1 back to its
original position to relock the steering
column.
The steering column is locked into po-
sition again.
�Make sure the steering column is
securely locked by trying to move the
steering wheel up and down as well as
in and out before driving off.Steering wheel adjustment, electrical*
Driving without the steering wheel adjust-
ment locked may cause an unexpected
steering wheel movement which could
cause the driver to lose control of the vehi-
cle. Make sure the steering wheel is secure-
ly locked by trying to move it up and down,
and in and out before driving off.
Warning!G
Do not adjust the steering wheel while driv-
ing. Adjusting the steering wheel while driv-
ing could cause the driver to lose control of
the vehicle.
When leaving the vehicle, always remove the
SmartKey or SmartKey with KEYLESS-GO*
from the starter switch, take it with you, and
lock the vehicle.
Even with the SmartKey or SmartKey with
KEYLESS-GO* removed from the starter
switch or the SmartKey with KEYLESS-GO*
removed from the vehicle, the steering
wheel adjustment feature can be operated.
Therefore, do not leave children unattended
in the vehicle, or with access to an unlocked
vehicle. A child’s unsupervised access to a
vehicle could result in an accident and/or
serious personal injury.
��
Page 50 of 561

49 Getting started
Adjusting
Make sure that
�you can reach the steering wheel with
your arms slightly bent at the elbows
�you can move your legs freely
�all displays (including malfunction and
indicator lamps) on the instrument
cluster are clearly visible
The steering wheel adjustment stalk is
located on the lower left of the steering
column.1Adjusting steering wheel, in or out
2Adjusting steering wheel, up or down
Adjusting steering column in or out
�Move stalk forward or back in direction
of arrow1.
Adjusting steering column up or down
�Move stalk up or down in direction of
arrow2.
Mirrors
Adjust the interior and exterior rear view
mirrors before driving so that you have a
good view of the road and traffic condi-
tions.
Interior rear view mirror
�Manually adjust the interior rear view
mirror.
For more information, see “Rear view mir-
rors” (
�page 199).
Exterior rear view mirrors
iThe memory function* (�page 133) lets
you store the settings for the steering wheel
together with the settings for seat positions and
the exterior rear view mirrors.
Warning!G
Exercise care when using the
passenger-side exterior rear view mirror.
The mirror surface is convex (outwardly
curved surface for a wider field of view). Ob-
jects in mirror are closer than they appear.
Check your interior rear view mirror or
glance over your shoulder before changing
lanes.