Page 129 of 561
128 Controls in detail
Seats
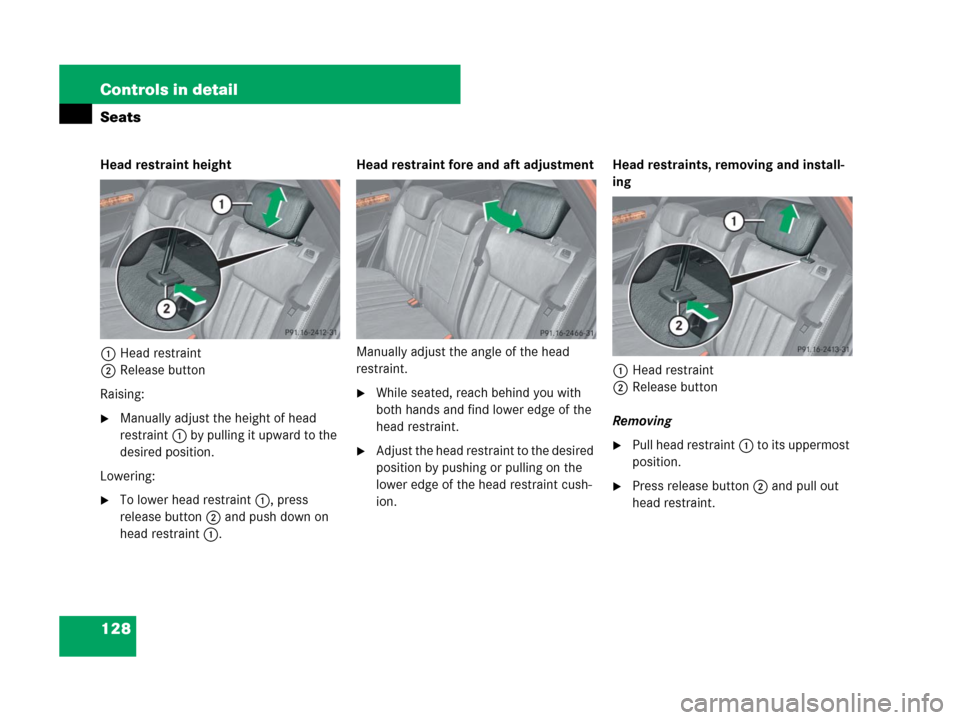
Head restraint height
1Head restraint
2Release button
Raising:
�Manually adjust the height of head
restraint1 by pulling it upward to the
desired position.
Lowering:
�To lower head restraint1, press
release button2 and push down on
head restraint1.Head restraint fore and aft adjustment
Manually adjust the angle of the head
restraint.
�While seated, reach behind you with
both hands and find lower edge of the
head restraint.
�Adjust the head restraint to the desired
position by pushing or pulling on the
lower edge of the head restraint cush-
ion.Head restraints, removing and install-
ing
1Head restraint
2Release button
Removing�Pull head restraint1 to its uppermost
position.
�Press release button2 and pull out
head restraint.
Page 130 of 561

129 Controls in detail
Seats
Installing
�Insert head restraint1 into openings
on the seat backrest.
�Push head restraint1 down until it au-
dibly engages.
�Press release button2 and adjust
head restraint1 to the desired posi-
tion (
�page 128).
For more information on seats, see the
“Getting started” section (
�page 43).
Lumbar support
The curvature of the driver’s seat can be
adjusted to help enhance lower back sup-
port and seating comfort.
The lever for lumbar support adjustment is
located on the right hand side of the
driver’s seat backrest.
1Adjustment lever
�Move adjustment lever1 in direction
of arrows until you have reached a
comfortable seating position.
Multicontour seat*
The multicontour seat has an extendable
seat cushion and inflatable air chambers
built into the backrest to provide additional
lumbar and side support.
The seat cushion depth, seat backrest
cushion-height and curvature can be con-
tinuously varied with switches on the in-
side of each front seat base after the
ignition is switched on (
�page 39).
1Seat cushion depth
2Backrest side bolsters
3Backrest center
4Backrest bottom
Page 131 of 561
130 Controls in detail
Seats
�Switch on the ignition (�page 40).
Seat cushion depth
�Adjust the seat cushion depth to the
length of your upper leg with
switch1.
Backrest contour
�Adjust the contour of the seat backrest
to the desired position with
switchæ orç.
�Move the backrest support to the bot-
tom with button4 or to the center
with button3.
Backrest side bolsters
�Adjust the side bolsters so that they
provide good lateral support using
switch2.
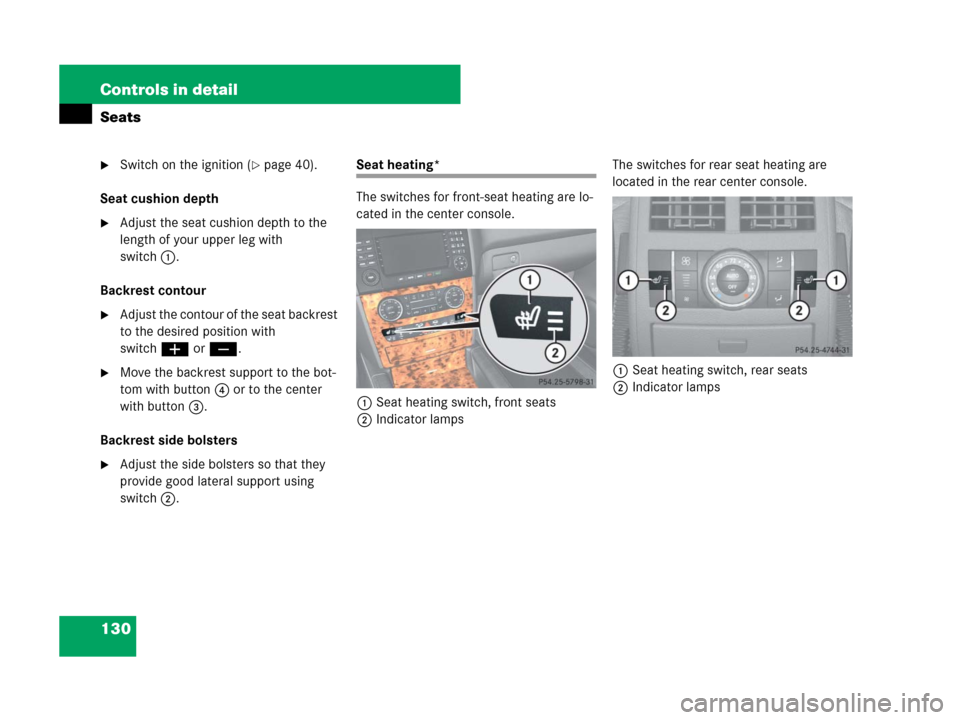
Seat heating*
The switches for front-seat heating are lo-
cated in the center console.
1Seat heating switch, front seats
2Indicator lampsThe switches for rear seat heating are
located in the rear center console.
1Seat heating switch, rear seats
2Indicator lamps
Page 134 of 561

133 Controls in detail
Memory function*
�Memory function*
Prior to operating the vehicle, the driver
should check and adjust the seat height,
seat position fore and aft, and seat back-
rest angle if necessary, to ensure adequate
control, reach and comfort. The head
restraint should also be adjusted for
proper height. See also the section on
air bags (
�page 74) for proper seat posi-
tioning.
In addition, adjust the steering wheel to
ensure adequate control, reach, operation
and comfort. Both the interior and exterior
rear view mirrors should be adjusted for
adequate rear vision.
Fasten seat belts. Infants and small chil-
dren should be seated in a properly se-
cured restraint system that complies with
U.S. Federal Motor Vehicle Safety Stan-
dards 213 and 225 and Canadian Motor
Vehicle Safety Standards 213 and 210.2.With the memory function you can store up
to three different configurations.
Each stored position on the driver’s side
includes the following settings:
�Seat position
�Multicontour seat*: previously saved
setting
�Steering wheel position
�Exterior rear view mirrors’ position
Each stored position on the passenger side
includes the following settings:
�Seat position
�Multicontour seat*: previously saved
settingThe memory button and stored position
buttons are located on the entry side of
each front seat base.
MMemory button
1, 2, 3Stored position buttons
Warning!G
Do not activate the memory function while
driving. Activating the memory function
while driving could cause the driver to lose
control of the vehicle.
Page 135 of 561
134 Controls in detail
Memory function*
Storing positions into memory
�Adjust the seats (�page 43).
�On the driver’s side, additionally adjust
the steering wheel (
�page 48) and ex-
terior rear view mirrors (
�page 49) to
the desired positions.
�Press memory buttonM.
�Release memory buttonM and press
stored position button1,2 or3 within
3 seconds.
All settings are stored to the selected
position.
Recalling positions from memory
�Press and hold stored position
button1,2 or3 until the seat, steering
wheel and exterior rear view mirrors
have fully moved to the stored posi-
tions.
!Do not operate the power seats using
memory buttonM if the seat backrest is in an
excessively reclined position. Doing so could
cause damage to front or rear seats.
Move seat backrest to an upright position first.
iReleasing the stored position button stops
movement to the stored positions immediately.
Page 158 of 561

157 Controls in detail
Control system
RACETIMER
The RACETIMER allows you to time and
save driving stretches in hours, minutes
and seconds.
�Press buttonè orÿ repeatedly
until the AMG menu appears in the
multifunction display.
�Press buttonj repeatedly until the
RACETIMER appears in the multifunc-
tion display.
1Gear indicator
2RACETIMER
3Lap numberStarting the RACETIMER
�Press buttonæ.
The timer starts.
Displaying intermediate time
�Press buttonç while the timer is
running.
The intermediate time is shown for
5 seconds.
Stopping the RACETIMER
�Press buttonæ.
The timer stops.
Warning!G
The RACETIMER feature is only for use on
roads and in conditions where high speed
driving is permitted. Racing on public roads
is prohibited under all circumstances and
the driver is and must always remain re-
sponsible for following posted speed limits.
iYou can start the RACETIMER when the
engine is running or the starter switch is in
position2 (
�page 40).
iWhile the RACETIMER is being displayed,
you cannot adjust the audio volume using
buttonsæ orç.iWhen you stop the vehicle and turn the
SmartKey to position1 (
�page 40) or, in vehi-
cles with KEYLESS-GO*, turn off the engine and
do not open the driver’s door, the RACETIMER
stops timing. Timing is resumed when you
switch the ignition back on (
�page 40) or
restart the engine (
�page 54) and then press
buttonæ.
Page 196 of 561

195 Controls in detail
Automatic transmission
The selected program mode appears in the
multifunction display.
1Current program mode
Automatic shift program
You can choose between automatic shift
program C or S.
�Press program mode selector switch
repeatedly until the letter of the
desired program mode appears in the
multifunction display.
SelectCfor standard driving:
�The vehicle starts out in second
gear (both forward and reverse) for
gentler starts. This does not apply if
full throttle is applied or gear
range1 is selected.
�Traction and driving stability are
improved on icy roads.
�Upshifts occur earlier even when
you give more gas. The engine then
operates at lower rpms and the
wheels are less likely to spin.
SelectSfor sporty driving:
�The vehicle starts out in first gear.
�Upshifts occur later.
Manual shift program
In the manual program mode M,
system-controlled automatic gearshifting
is switched off and you need to change the
the gears by manually upshifting or down-
shifting using the steering wheel gearshift
control buttons to the left and right of the
steering wheel (
�page 193).Activating manual shift program
�Press program mode selector switch
repeatedly until the
M for the manual
program modeM appears in the multi-
function display.
The transmission switches to the
manual program modeM. Automatic
shifting is switched off. The gear range
is not limited.
You can change the gears manually with
drive positionD selected. You can upshift
or downshift through the gears in succes-
sion.
iThe last selected program mode (C or S) is
switched on when the engine is restarted.
iThe manual program modeM will not be
stored. When the engine is turned off with the
manual program modeM selected, the transmis-
sion will go to the automatic program mode
(CorS) when the engine is restarted.
Page 197 of 561
.
The transmission shifts to the next
higher gear.
If you have selected the AMG menu in the
c")
196 Controls in detail
Automatic transmission
Upshifting
�Briefly press right shift button2
(
�page 193).
The transmission shifts to the next
higher gear.
If you have selected the AMG menu in the
control system and you are driving in the
manual program modeM, upshift
indicator2 in the multifunction display
advises you to upshift before the engine
reaches the overspeed range. Thus you
can drive at the maximum engine speed for
each gear without overrevving the engine.1Gear indicator
2Upshift indicator
�Shift to the next higher gear.
The fuel supply will otherwise be inter-
rupted to prevent the engine from over-
revving.
Downshifting
�Briefly press left shift button1
(
�page 193).
The transmission shifts to the next
lower gear.
Kickdown
Using the kickdown when driving in the
manual program modeM is not possible.
Deactivating manual shift program
�Press the program mode selector
switch (
�page 194) repeatedly until
CorS appears in the multifunction
display.
or
�Restart the engine.
The transmission will go to the
automatic program mode (C orS).
The manual program modeM is not
stored.
!In the manual program modeM, the trans-
mission will not upshift, even if the engine has
reached its overrewing range. Shift up to the
next gear before the engine has reached its over-
rewing range. Make absolutely certain that the
engine speed does not reach the red marking on
the tachometer (
�page 28). Otherwise the en-
gine could be damaged which is not covered by
the Mercedes-Benz Limited Warranty.
Warning!G
On slippery road surfaces, never downshift
in order to obtain braking action. This could
result in drive wheel slip and reduced
vehicle control. Your vehicle’s ABS will not
prevent this type of loss of control.
iWhen you brake or stop, the transmission
shifts down to a gear from which you can easily
accelerate or drive off.