Page 369 of 601

368 Operation
Driving instructions
�Always secure items in the trailer to
prevent load shifts while driving.
�When towing a trailer, check occasion-
ally to make sure the load is secure,
and that lighting and trailer brakes (if
so equipped) are functioning properly.
�Take into consideration that when tow-
ing a trailer, the handling characteris-
tics are different and less stable from
those when operating the vehicle with-
out a trailer.
It is important to avoid sudden maneu-
vers.
�The vehicle and trailer combination is
heavier, and therefore is limited in ac-
celeration and climbing ability, and re-
quires longer stopping distances.
It is more prone to reacting to cross
wind gusts, and requires more sensi-
tive steering input.
�If possible, do not brake abruptly, but
rather engage the brake slightly at first
to permit the trailer to activate its
brake. Then increase the braking force.
�If the transmission repeatedly shifts
between gears on inclines, manually
shift to a lower gear (select 4, 3, 2 or 1)
(
�page 197).
A lower gear and reduction of speed re-
duces the chance of engine overload-
ing and/or overheating.
�On very steep inclines, not manageable
with automatic transmission in1,
switch on off-road driving program
(
�page 278) or LOW RANGE mode*
(
�page 201).
�When going down a long hill, shift into
a lower gear and use the engine’s brak-
ing effect.
Avoid riding the brakes, thus overheat-
ing the vehicle and trailer brakes.
�If the engine coolant rises to an ex-
tremely high temperature (coolant tem-
perature needle approaching the red
zone) when the air conditioning is on,
turn off the air conditioning system.
Engine coolant heat can be additionally
vented by opening the windows,
switching the climate control fan speed
to high and setting the temperature
control to the maximum hot position.
�Extreme care must be exercised since
your vehicle with a trailer will require
additional passing distance ahead than
when driving without a trailer.
Because your vehicle and trailer is
longer than your vehicle alone, you will
also need to go much farther ahead of
the passed vehicle before you can re-
turn to your lane.
!If the trailer should begin to sway, reduce
the vehicle’s speed immediately.
In no case attempt to straighten out the tow
vehicle and trailer by increasing the speed.
164.boo Seite 368 Freitag, 30. März 2007 12:54 12
Page 371 of 601

370 Operation
Driving instructions
Passenger compartmentDriving abroad
Abroad, there is an extensive
Mercedes-Benz service network at your
disposal. If you plan to drive into areas
which are not listed in the index of your
Mercedes-Benz Light Truck Center
directory, you should request pertinent
information from an authorized
Mercedes-Benz Light Truck Center.Control and operation of radio
transmitters
COMAND system, radio and telephone*
Warning!G
Always fasten items being carried as secure-
ly as possible.
In an accident, during hard braking or sud-
den maneuvers, loose items will be thrown
around inside the vehicle, and cause injury
to vehicle occupants unless the items are
securely fastened in the vehicle.
The rear cargo compartment is the preferred
place to carry objects. Always use tie down
rings, and if so equipped, always use the
cargo net* when transporting cargo. The
cargo net* cannot secure hard or heavy ob-
jects. Always fasten items being carried as
securely as possible using the cargo
tie-down rings in the cargo floor area and
fastening materials.
Warning!G
Do not forget that your primary responsibili-
ty is to drive the vehicle. Only operate the
COMAND system, radio or telephone
1 if
road, weather and traffic conditions permit.
Bear in mind that at a speed of just 30 mph
(approximately 50 km/h), your vehicle is
covering a distance of 44 feet (approximate-
ly 14 m) every second.
1Observe all legal requirements.
164.boo Seite 370 Freitag, 30. März 2007 12:54 12
Page 380 of 601

379 Operation
Engine compartment
The hood lock release lever is located in
the driver’s footwell.
1Release lever
�Pull release lever1 downwards.
The hood is unlocked. Handle2 pro-
trudes slightly from the radiator grille.
If not, lift the hood slightly.2Handle for opening the hood
�Press and hold handle2.
The hood is unlocked.
�Pull up on the hood in direction of ar-
row and then release it.
The hood will be automatically held
open at shoulder height by gas-filled
struts.Closing�Let the hood drop from a height of
approximately 1 ft (30 cm).
The hood will lock audibly.
�Check to make sure the hood is fully
closed.
If you can raise the hood at a point
above the headlamps, then it is not
properly closed. Open it again and let it
drop with somewhat greater force.
�with the engine running
�while starting the engine
�when the ignition is switched on
!To avoid damage to the windshield wipers or
hood, never open the hood if the wiper arms are
folded forward away from the windshield.
Warning!G
When closing the hood, use extreme caution
not to catch hands or fingers. Be careful that
you do not close the hood on anyone.
Make sure that the hood is securely en-
gaged before driving off. Do not continue
driving if the hood can no longer engage af-
ter an accident, for example. The hood could
otherwise come loose while the vehicle is in
motion and endanger you and others.
164.boo Seite 379 Freitag, 30. März 2007 12:54 12
Page 453 of 601
452 Practical hints
What to do if …
Display messagePossible cause/consequencePossible solution
ABSUnavailable
See Operator’s ManualThe self-diagnosis has not yet been
completed yet.The display will clear after driving a
short distance at a vehicle speed of
above 12 mph (20 km/h).
Cruise Control And
SPEEDTRONICInoperativeThe cruise control is malfunctioning.�Have cruise control checked by an
authorized Mercedes-Benz Light
Truck Center.
Cruise Control––– MPHYou have attempted to set a speed
while driving below 20 mph
(30 km/h).�Accelerate to a speed exceeding
20 mph (30 km/h) and set the
speed (
�page 255).
The ESP® is switched off.�Switch on the ESP® (�page 103).
The automatic transmission is set to
positionP, R, orN.�Set the automatic transmission to
positionD (
�page 191).
The vehicle is secured with the
parking brake.�Release the parking brake
(
�page 59).
164.boo Seite 452 Freitag, 30. März 2007 12:54 12
Page 454 of 601
453 Practical hints
What to do if …
Display messagePossible cause/consequencePossible solution
DISTRONIC––– MPHYou have attempted to set a speed
while driving below 20 mph
(30 km/h).�Accelerate to a speed exceeding 20 mph
(30 km/h) and set the speed (
�page 260).
The ESP® is switched off.�Switch on the ESP® (�page 106).
The automatic transmission is set to
positionP, R, orN.�Set the automatic transmission to
positionD (
�page 191).
The vehicle is secured with the
parking brake.�Release the parking brake (�page 59).
InoperativeThe Distronic* or the Distronic*
display are malfunctioning.�Have the system checked by an authorized
Mercedes-Benz Light Truck Center.
OverrideYou have accelerated. The
Distronic* has switched off.�Stop accelerating.
164.boo Seite 453 Freitag, 30. März 2007 12:54 12
Page 461 of 601

460 Practical hints
What to do if …
Display messagePossible
cause/consequencePossible solution
Front Passenger Airbag
Enabled
See Operator’s ManualFront passenger front air bag
is activated while driving even
though a child, small
individual, or object below the
system’s weight threshold is
on the front passenger seat,
or the front passenger seat is
empty. Objects on the seat or
forces acting on the seat may
make the system sense sup-
plemental weight.Stop the vehicle in a safe location as soon as possible and check the front
passenger seat for the following:
�Apply the parking brake (�page 67).
�Switch off the ignition (�page 42).
�Remove child and child restraint from front passenger seat and properly
secure the child in rear seat employing the child restraint if necessary.
�Remove any other items from on and around the front passenger seat
and make sure the storage bag on the back of the front passenger seat
is empty.
�Make sure that no objects which apply forces to the seat are present
(e.g. objects such as books, briefcases etc. lodged behind or around the
seat, head restraints pushing against roof etc.). The system may recog-
nize such forces as supplemental weight and sense that an occupant on
the front passenger seat is of a greater weight than actually present.
�Keep the seat unoccupied, close the front passenger door and switch
on the ignition (
�page 42).
(Continued on next page)
164.boo Seite 460 Freitag, 30. März 2007 12:54 12
Page 492 of 601
491 Practical hints
Where will I find ...?
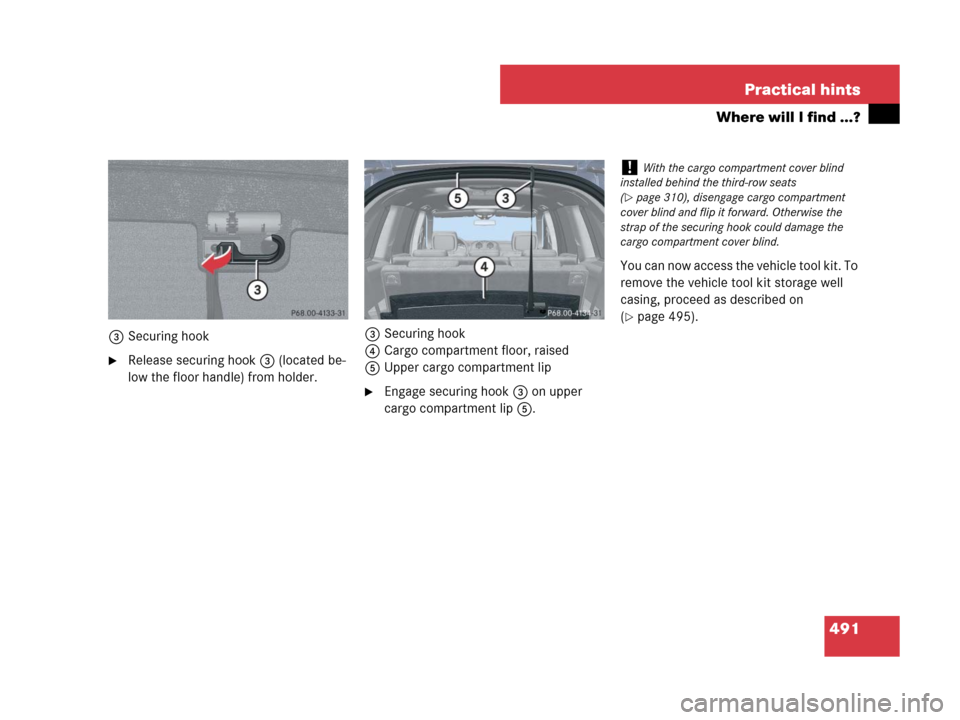
3Securing hook
�Release securing hook3 (located be-
low the floor handle) from holder.3Securing hook
4Cargo compartment floor, raised
5Upper cargo compartment lip
�Engage securing hook3 on upper
cargo compartment lip5.You can now access the vehicle tool kit. To
remove the vehicle tool kit storage well
casing, proceed as described on
(
�page 495).
!With the cargo compartment cover blind
installed behind the third-row seats
(
�page 310), disengage cargo compartment
cover blind and flip it forward. Otherwise the
strap of the securing hook could damage the
cargo compartment cover blind.
164.boo Seite 491 Freitag, 30. März 2007 12:54 12
Page 493 of 601

492 Practical hints
Where will I find ...?
Example illustration1
6Alignment bolt
7Towing eye bolt
8Wheel wrench
9Hook and loop fastener
aVehicle jack
2
bWheel bolts
cCollapsible wheel chock
dFuse chart
eVehicle tool kit storage well casing
�To remove vehicle jacka, loosen
hook and loop fastener9.Vehicle jack
The vehicle jack is located underneath the
cargo compartment floor.
1Depending on production date, your vehicle may
be equipped with a scissors-type vehicle jack.
Thus, appearance and alignment of the items may
vary.
2If your vehicle is equipped with a scissors-type
vehicle jack, a reversible ratchet is also included.
!Depending on vehicle production date your
vehicle may be equipped with a scissors-type
jack (located under the cargo compartment
floor). If so equipped, only use this jack when
jacking up the vehicle as otherwise the vehicle’s
underbody can be damaged. See separate
instructions for scissors-type jack.
!To prevent damage, always disengage the
strap of the securing hook and lower the cargo
compartment floor (
�page 490) before closing
the tailgate.
Warning!G
Only use the jack supplied with your vehicle
to lift the vehicle briefly for wheel changes.
If you use the jack for any other purpose,
you or others could be inj ure d, as the ja ck is
designed only for the purpose of changing a
wheel.
When using the jack, observe the safety
notes in the “Mounting the spare wheel”
section (
�page 520) and the notes on the
jack.
164.boo Seite 492 Freitag, 30. März 2007 12:54 12