Page 308 of 601
307 Controls in detail
Loading
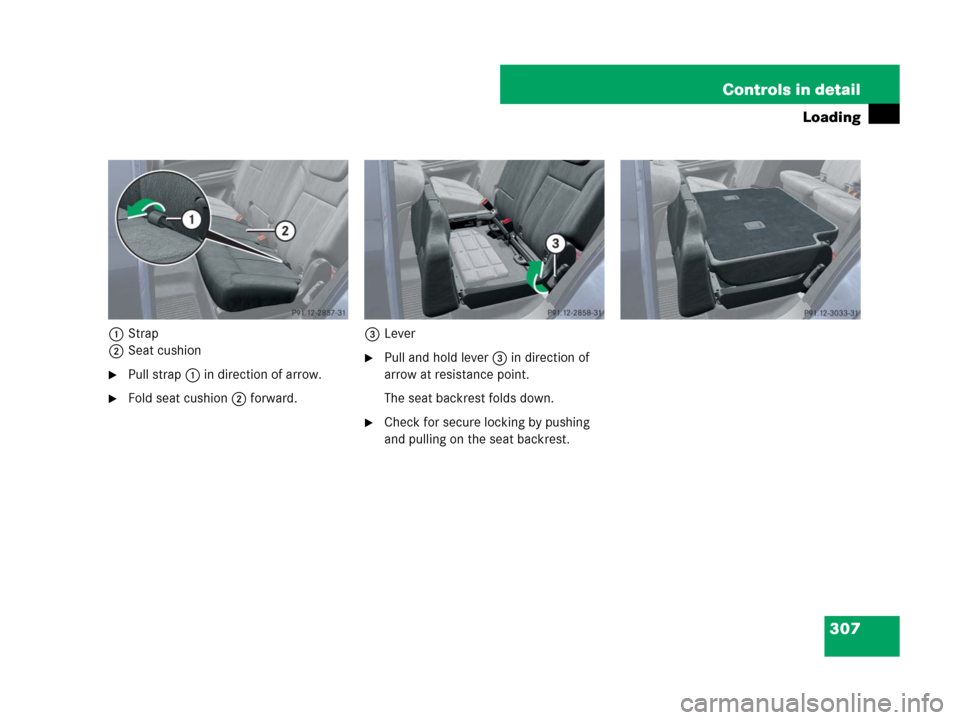
1Strap
2Seat cushion
�Pull strap1 in direction of arrow.
�Fold seat cushion2 forward.3Lever
�Pull and hold lever3 in direction of
arrow at resistance point.
The seat backrest folds down.
�Check for secure locking by pushing
and pulling on the seat backrest.
164.boo Seite 307 Freitag, 30. März 2007 12:54 12
Page 310 of 601
.
Step 2:
1Seat backrest
2Lever
�Pull and hold lever2 in")
309 Controls in detail
Loading
Returning seats to their original positionStep 1:
�Return third-row seats to its original
position (
�page 308).
Step 2:
1Seat backrest
2Lever
�Pull and hold lever2 in direction of
arrow at resistance point.
�Fold seat backrest1 rearward until it
engages.
�Check for secure locking by pushing
and pulling on seat backrest1.3Seat cushion
�Fold seat cushion3 rearward until it
locks into position.
Warning!G
Make sure all seats are properly locked in
position before driving off. Do not drive with
seats not properly locked.
Never ride in a moving vehicle with the seat
not properly locked as this can be danger-
ous. The seat could move forward and the
seat backrest could fold. You could slide un-
der the seat belt during braking, vehicle ma-
neuvers, or in an accident. If you slide under
it, the belt would apply force at the abdomen
or neck. That could cause serious or even fa-
tal injuries.
The seat backrest and seat belt provide the
best restraint when the wearer is in a nearly
upright position and the belt is properly po-
sitioned on the body.
164.boo Seite 309 Freitag, 30. März 2007 12:54 12
Page 312 of 601
311 Controls in detail
Loading
�Remove cover3 by pulling its lower
edge out of the side trim.
�Place left side of blind2 (�page 311)
in left mount.
�Position right side of blind2 over right
mount.
�Press release button1 (�page 311)
and guide cover2 into mount.
�Make sure the cargo compartment
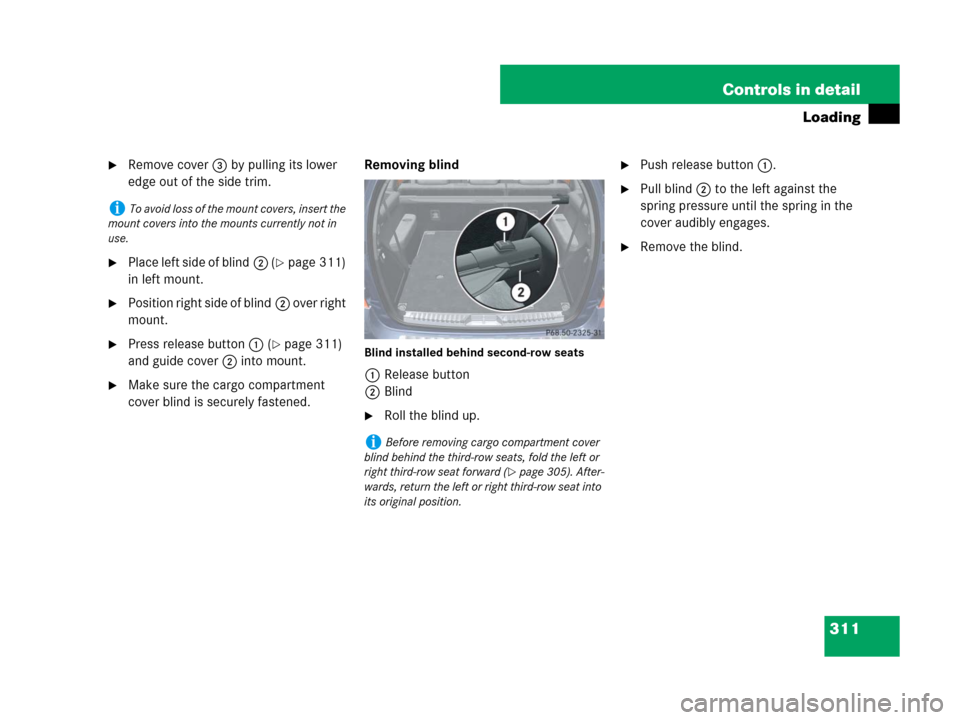
cover blind is securely fastened.Removing blind
Blind installed behind second-row seats
1Release button
2Blind
�Roll the blind up.
�Push release button1.
�Pull blind2 to the left against the
spring pressure until the spring in the
cover audibly engages.
�Remove the blind.
iTo avoid loss of the mount covers, insert the
mount covers into the mounts currently not in
use.
iBefore removing cargo compartment cover
blind behind the third-row seats, fold the left or
right third-row seat forward (
�page 305). After-
wards, return the left or right third-row seat into
its original position.
164.boo Seite 311 Freitag, 30. März 2007 12:54 12
Page 313 of 601

312 Controls in detail
Loading
Cargo net*Use of the cargo net is a particularly impor-
tant safety factor when the vehicle is load-
ed higher than the top of the seat
backrests with smaller objects. For your
safety, always use the cargo net when
transporting cargo.
The cargo net can be installed in two
locations:
1Holder in B-pillar
2Holder in C-pillar�With the cargo compartment expanded
in part (
�page 305), use holders
above C-pillars2 and the cargo
tie-down rings behind the third-row
seat backrest (
�page 303).
�With the cargo compartment fully ex-
panded (
�page 306), use holders
above B-pillars1 and the cargo
tie-down rings in the second-row foot-
well (
�page 303).
�Open the hook and loop fasteners on
the cargo net package.
�Roll out the cargo net.
�Unfold the cargo net.
The cargo net bars must audibly
engage.
Warning!G
Make sure the cargo net is properly engaged
top and bottom position and the tightening
belts are securely fastened.
Never use a damaged cargo net.
To help avoid personal injury from smaller
objects being thrown around in the occu-
pant compartment during a collision or sud-
den maneuver, always use cargo net when
transporting cargo.
The cargo net cannot prevent the movement
of large, heavier objects into the passenger
compartment in an accident. Such items
must be properly secured using the cargo
tie-down rings (
�page 302) in the cargo
compartment floor.
Passenger use of seats behind installed
cargo net is restricted because of the
footwell being taken up by the net.
164.boo Seite 312 Freitag, 30. März 2007 12:54 12
Page 316 of 601

315 Controls in detail
Useful features
�Useful features
Storage compartments Glove box/CD changer
1Glove box lid release
2Glove box lid
Opening the glove box
�Pull lid release1 in direction of arrow.
Glove box lid2 opens downward.
Closing the glove box
�Push glove box lid2 up to close.Releasing CD changer
1Release button
2AUX-socket (Vehicles without Rear
Seat Entertainment System*)
3CD changer
�Open the glove box (�page 315).
�Press release button1.
CD changer3 is released and swings
down automatically.
For information on CD changer operation,
see separate COMAND system operating
instructions.
Warning!G
To help avoid personal injury during a colli-
sion or sudden maneuver, exercise care
when storing objects in the vehicle. Put lug-
gage or cargo in the cargo compartment if
possible. Do not pile luggage or cargo higher
than the seat backs.
If so equipped, always use the cargo net*
when transporting cargo. The cargo net*
cannot secure hard or heavy objects.
Parcel nets cannot secure hard or heavy ob-
jects.
Keep compartment lids closed. This will help
to prevent stored objects from being thrown
about and injuring vehicle occupants during
�braking
�vehicle maneuvers
�an accident
iDepending on vehicle equipment, an
AUX-socket is located in the glove box.
164.boo Seite 315 Freitag, 30. März 2007 12:54 12
Page 323 of 601

322 Controls in detail
Useful features
Opening the ashtray
�Briefly touch cover plate2.
The ashtray opens automatically.
Removing ashtray insert
�Grip the ashtray insert1 on the sides
and pull it out upwards.
Reinstalling ashtray insert
�Install ashtray insert1.
�Close ashtray cover plate2.Rear center console ashtray
(second-row)
1Ashtray
2Ashtray coverOpening rear ashtray
�Briefly press ashtray cover2.
The ashtray1 opens automatically.
Removing rear ashtray insert
�Grip the insert on the sides and pull it
out upwards.
Reinstalling rear ashtray insert
�Install ashtray insert.
�Close the ashtray.
Cigarette lighter
�Switch on the ignition (�page 42).
�Push in cigarette lighter.
The cigarette lighter will pop out auto-
matically when hot.
Warning!G
Remove ashtray only with vehicle standing
still. Set the parking brake to secure vehicle
from movement. Set automatic transmis-
sion toP. With the automatic transmission
set toP, turn off the engine.
!Close the ashtray when not in use and be-
fore folding the second-row seats
164.boo Seite 322 Freitag, 30. März 2007 12:54 12
Page 326 of 601
.
�Flip up cover and insert electrical plug
(cigarette lighter type).Power outlet in cargo")
325 Controls in detail
Useful features
Power outlet in second-row footwell
�Switch on the ignition (�page 42).
�Flip up cover and insert electrical plug
(cigarette lighter type).Power outlet in cargo compartment
�Switch on the ignition (�page 42).
�Flip up cover and insert electrical plug
(cigarette lighter type).
Floormats
Warning!G
Whenever you are using floormats, make
sure there is enough clearance and that the
floormats are securely fastened.
Floormats should always be securely fas-
tened using eyelets2 and retainer pins1
(
�page 326).
Before driving off, check that the floormats
are securely in place and adjust them if nec-
essary. A loose floormat could slip and
hinder proper functioning of the pedals.
Do not place several floormats on top of
each other as this may impair pedal move-
ment.
iTo install or remove the floormat more easi-
ly, move the driver’s seat or front passenger seat
as far to the rear as possible (
�page 46).
164.boo Seite 325 Freitag, 30. März 2007 12:54 12
Page 357 of 601

356 Operation
Driving instructions
Read this chapter carefully before you be-
gin off-road travel.
Familiarize yourself with the vehicle char-
acteristics and gear changing before you
attempt any difficult terrain off-road driv-
ing. We recommend that you start out with
easy off-road travel.Special driving features for off-road
driving
The following driving features are available
for specific kind of operation:
�Off-road – ABS (�page 102)
�Off-road – ESP® (�page 106)
�Off-road – 4-ETS (�page 108)
�Hill start assist system (�page 196)
�LOW RANGE mode* (�page 201)
�Differential locks* (�page 204)
�Downhill Speed Regulation (DSR)
(
�page 273)
�Off-road driving program (Vehicles
without enhanced off-road package*)
(
�page 277)
�Air suspension (�page 278)Off-road driving rules
�Engage the off-road driving program
(
�page 277) or LOW RANGE mode*
(
�page 201) before driving under
off-road conditions.
�If necessary, activate differential
locks* (
�page 204).
� Make sure you select a vehicle level
(
�page 279) appropriate to the topo-
graphical conditions. Always make
sure the vehicle has enough ground
clearance.
�Fasten items being carried as securely
as possible (
�page 295).
�Always navigate gradients with the en-
gine on and with the transmission en-
gaged in a gear. Switch on the DSR
(
�page 274) to help maintain a preset
speed.
164.boo Seite 356 Freitag, 30. März 2007 12:54 12