Page 311 of 601

310 Controls in detail
Loading
Cargo compartment cover blind
The cargo compartment cover blind can be
installed behind the third-row seats or the
second-row seats.
Blind installed behind third-row seats
1Handle
2MountRolling out blind
�Pull blind on handle1 across the car-
go compartment.
�Guide blind into mounts2 and re-
lease.
Rolling up blind
�Disengage blind and guide retraction
by its handle1.Installing blind
Cover from the mounts behind second-row
seats
3Cover
�Press on cover3 at its upper edge as
indicated by arrow.
!With the cargo compartment cover blind in-
stalled, do not pile luggage higher than the lower
edges of the rear side windows.
iBefore installing cargo compartment cover
blind behind the second-row seats, fold the
third-row seats forward (
�page 305).
iBefore installing cargo compartment cover
blind behind the third-row seats, fold the left or
right third-row seat forward (
�page 305). After-
wards, return the left or right third-row seat into
its original position.
164.boo Seite 310 Freitag, 30. März 2007 12:54 12
Page 312 of 601
311 Controls in detail
Loading
�Remove cover3 by pulling its lower
edge out of the side trim.
�Place left side of blind2 (�page 311)
in left mount.
�Position right side of blind2 over right
mount.
�Press release button1 (�page 311)
and guide cover2 into mount.
�Make sure the cargo compartment
cover blind is securely fastened.Removing blind
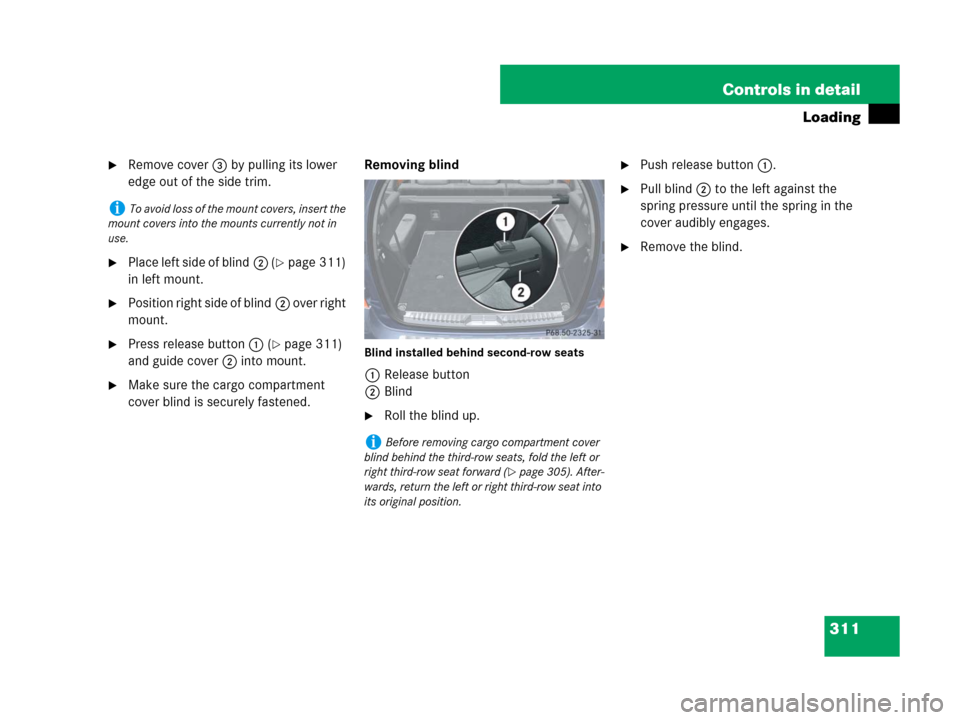
Blind installed behind second-row seats
1Release button
2Blind
�Roll the blind up.
�Push release button1.
�Pull blind2 to the left against the
spring pressure until the spring in the
cover audibly engages.
�Remove the blind.
iTo avoid loss of the mount covers, insert the
mount covers into the mounts currently not in
use.
iBefore removing cargo compartment cover
blind behind the third-row seats, fold the left or
right third-row seat forward (
�page 305). After-
wards, return the left or right third-row seat into
its original position.
164.boo Seite 311 Freitag, 30. März 2007 12:54 12
Page 313 of 601

312 Controls in detail
Loading
Cargo net*Use of the cargo net is a particularly impor-
tant safety factor when the vehicle is load-
ed higher than the top of the seat
backrests with smaller objects. For your
safety, always use the cargo net when
transporting cargo.
The cargo net can be installed in two
locations:
1Holder in B-pillar
2Holder in C-pillar�With the cargo compartment expanded
in part (
�page 305), use holders
above C-pillars2 and the cargo
tie-down rings behind the third-row
seat backrest (
�page 303).
�With the cargo compartment fully ex-
panded (
�page 306), use holders
above B-pillars1 and the cargo
tie-down rings in the second-row foot-
well (
�page 303).
�Open the hook and loop fasteners on
the cargo net package.
�Roll out the cargo net.
�Unfold the cargo net.
The cargo net bars must audibly
engage.
Warning!G
Make sure the cargo net is properly engaged
top and bottom position and the tightening
belts are securely fastened.
Never use a damaged cargo net.
To help avoid personal injury from smaller
objects being thrown around in the occu-
pant compartment during a collision or sud-
den maneuver, always use cargo net when
transporting cargo.
The cargo net cannot prevent the movement
of large, heavier objects into the passenger
compartment in an accident. Such items
must be properly secured using the cargo
tie-down rings (
�page 302) in the cargo
compartment floor.
Passenger use of seats behind installed
cargo net is restricted because of the
footwell being taken up by the net.
164.boo Seite 312 Freitag, 30. März 2007 12:54 12
Page 321 of 601

320 Controls in detail
Useful features
Cup holders
Cup holder in front of armrest
A cup holder and a card/ticket holder are
located in the front center console.
1Cup holderCup holder in rear armrest (second-row
seats)
1Cup holder
�Pull the armrest down by its top.
Warning!G
In order to help prevent spilling liquids on
vehicle occupants and/or vehicle equip-
ment, only use containers that fit into the
cup holder. Use lids on open containers and
do not fill containers to a height where the
contents, especially hot liquids, could spill
during braking, vehicle maneuvers, or an
accident. Liquids spilled on vehicle occu-
pants may cause serious personal injury.
Liquids spilled on vehicle equipment may
cause damage not covered by the
Mercedes-Benz Limited Warranty.
When not in use, keep rear cup holder
closed. An open cup holder may cause injury
to you or others when contacted during
braking, vehicle maneuvers, or in an acci-
dent.
Keep in mind that objects placed in a cup
holder may come loose during braking,
vehicle maneuvers, or an accident and be
thrown around in the vehicle interior.
Objects thrown around in the vehicle interi-
or may cause an accident and/or serious
personal injury.
iThe front cup holder can be removed for
cleaning purposes (
�page 321).
!Close the cup holder before folding the arm-
rest upwards.
164.boo Seite 320 Freitag, 30. März 2007 12:54 12
Page 323 of 601

322 Controls in detail
Useful features
Opening the ashtray
�Briefly touch cover plate2.
The ashtray opens automatically.
Removing ashtray insert
�Grip the ashtray insert1 on the sides
and pull it out upwards.
Reinstalling ashtray insert
�Install ashtray insert1.
�Close ashtray cover plate2.Rear center console ashtray
(second-row)
1Ashtray
2Ashtray coverOpening rear ashtray
�Briefly press ashtray cover2.
The ashtray1 opens automatically.
Removing rear ashtray insert
�Grip the insert on the sides and pull it
out upwards.
Reinstalling rear ashtray insert
�Install ashtray insert.
�Close the ashtray.
Cigarette lighter
�Switch on the ignition (�page 42).
�Push in cigarette lighter.
The cigarette lighter will pop out auto-
matically when hot.
Warning!G
Remove ashtray only with vehicle standing
still. Set the parking brake to secure vehicle
from movement. Set automatic transmis-
sion toP. With the automatic transmission
set toP, turn off the engine.
!Close the ashtray when not in use and be-
fore folding the second-row seats
164.boo Seite 322 Freitag, 30. März 2007 12:54 12
Page 327 of 601
326 Controls in detail
Useful features
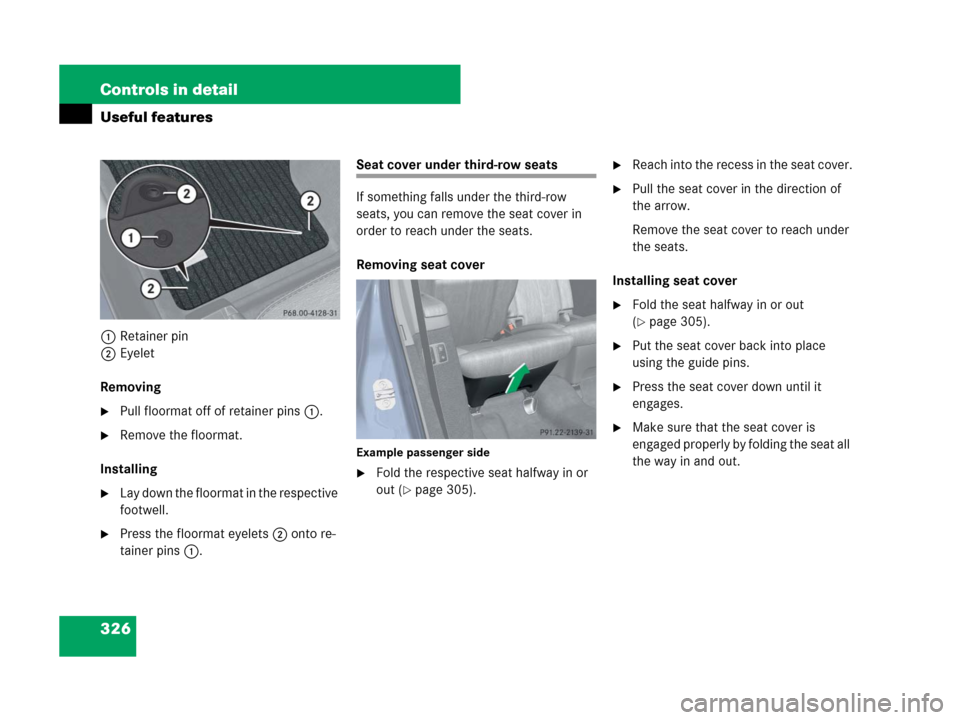
1Retainer pin
2Eyelet
Removing
�Pull floormat off of retainer pins1.
�Remove the floormat.
Installing
�Lay down the floormat in the respective
footwell.
�Press the floormat eyelets2 onto re-
tainer pins1.
Seat cover under third-row seats
If something falls under the third-row
seats, you can remove the seat cover in
order to reach under the seats.
Removing seat cover
Example passenger side
�Fold the respective seat halfway in or
out (
�page 305).
�Reach into the recess in the seat cover.
�Pull the seat cover in the direction of
the arrow.
Remove the seat cover to reach under
the seats.
Installing seat cover
�Fold the seat halfway in or out
(
�page 305).
�Put the seat cover back into place
using the guide pins.
�Press the seat cover down until it
engages.
�Make sure that the seat cover is
engaged properly by folding the seat all
the way in and out.
164.boo Seite 326 Freitag, 30. März 2007 12:54 12
Page 589 of 601

588 Index
Seat belts 86
Children in the vehicle 91
Cleaning 433
Fastening 53
Height adjustment 55
Messages in the multifunction
display 443
Proper use of 55, 88
Safety guidelines 78
Telltale 29, 86, 442
Warning lamp 442, 443
Seat cushion depth see Seats
Seat heating* see Seats
Seat ventilation* see Seats
Seating capacity 389
Seats 45, 130
Adjusting 45
Cushion depth, Multicontour
seat* 138
Easy entry/exit feature for
third-row seats 130
Emergency exit for
third-row seats 132
Heating* 138
Lumbar support 137Memory function* 141
Multicontour seat* 138
Second-row, Folding 306
Third-row, Folding electrically 305,
308
Ventilation* 140
Securing cargo 302
Cargo tie-down rings 302
Hooks 304
Selector lever see Gear selector lever
Self-test
Lamps in the instrument cluster 436
OCS* 86
Tele Aid 332
Vehicle battery 528
Service and warranty information 10
Service intervals see Maintenance, Service
indicator
Service life
Tires 385
Service see Maintenance
Service system see Maintenance System
Service, Parts 548Settings
Adaptive Damping System
(ADS)* 278
Air suspension 278
Clock 174
Comfort functions* 181
Control system menus 158, 160
Control system submenus 159, 161,
171
Date 161, 171, 174
Daytime running lamp mode 175
Factory, SmartKey 114
Factory, SmartKey with
KEYLESS-GO* 118
Individual, Vehicle 168
Instrument cluster 172
Language, multifunction display 172,
173
Lighting 175
Memory function* 141
Resetting all, Control system 169
Selective, SmartKey 114
Selective, SmartKey with
KEYLESS-GO* 119
Time 174
Vehicle configuration 182
164.boo Seite 588 Freitag, 30. März 2007 12:54 12
Page:
< prev 1-8 9-16 17-24